2003 Hyundai H-1 (Grand Starex) key
[x] Cancel search: keyPage 38 of 173

1-31
BEFORE DRIVING YOUR VEHICLE
BEFORE DRIVING YOUR VEHICLE BEFORE DRIVING YOUR VEHICLE
BEFORE DRIVING YOUR VEHICLE
BEFORE DRIVING YOUR VEHICLE
FUA1115A
Driver's and Passenger's side Airbag Inflated
WARNING:
WARNING: WARNING:
WARNING:
WARNING:
oo
oo
o When the SRS is activated, there may be
When the SRS is activated, there may be When the SRS is activated, there may be
When the SRS is activated, there may be
When the SRS is activated, there may be
a loud noise and fine dust will be re-
a loud noise and fine dust will be re- a loud noise and fine dust will be re-
a loud noise and fine dust will be re-
a loud noise and fine dust will be re-
leased through the vehicle. These condi-
leased through the vehicle. These condi- leased through the vehicle. These condi-
leased through the vehicle. These condi-
leased through the vehicle. These condi-
tions are normal and are not hazardous.
tions are normal and are not hazardous. tions are normal and are not hazardous.
tions are normal and are not hazardous.
tions are normal and are not hazardous.
However, the fine dust generated during
However, the fine dust generated during However, the fine dust generated during
However, the fine dust generated during
However, the fine dust generated during
airbag deployment may cause skin irrita-
airbag deployment may cause skin irrita- airbag deployment may cause skin irrita-
airbag deployment may cause skin irrita-
airbag deployment may cause skin irrita-
tion. Be sure to wash your hands and
tion. Be sure to wash your hands and tion. Be sure to wash your hands and
tion. Be sure to wash your hands and
tion. Be sure to wash your hands and
face thoroughly with lukewarm water and
face thoroughly with lukewarm water and face thoroughly with lukewarm water and
face thoroughly with lukewarm water and
face thoroughly with lukewarm water and
a mild soap after an accident in which the
a mild soap after an accident in which the a mild soap after an accident in which the
a mild soap after an accident in which the
a mild soap after an accident in which the
airbags were deployed.
airbags were deployed. airbags were deployed.
airbags were deployed.
airbags were deployed.
oo
oo
o The SRS can function only when the
The SRS can function only when the The SRS can function only when the
The SRS can function only when the
The SRS can function only when the
ignition key is in the "ON" position. If the
ignition key is in the "ON" position. If the ignition key is in the "ON" position. If the
ignition key is in the "ON" position. If the
ignition key is in the "ON" position. If the
SRS SRI does not come on, or continu-
SRS SRI does not come on, or continu- SRS SRI does not come on, or continu-
SRS SRI does not come on, or continu-
SRS SRI does not come on, or continu-
ously remains on, after flashing for about
ously remains on, after flashing for about ously remains on, after flashing for about
ously remains on, after flashing for about
ously remains on, after flashing for about
6 seconds when the ignition key is turned
6 seconds when the ignition key is turned 6 seconds when the ignition key is turned
6 seconds when the ignition key is turned
6 seconds when the ignition key is turned
to the "ON" position, or after the engine
to the "ON" position, or after the engine to the "ON" position, or after the engine
to the "ON" position, or after the engine
to the "ON" position, or after the engine
is started, or comes on while driving, the
is started, or comes on while driving, the is started, or comes on while driving, the
is started, or comes on while driving, the
is started, or comes on while driving, the
SRS is not working properly. If this oc-
SRS is not working properly. If this oc- SRS is not working properly. If this oc-
SRS is not working properly. If this oc-
SRS is not working properly. If this oc-
curs, have your vehicle immediately in-
curs, have your vehicle immediately in- curs, have your vehicle immediately in-
curs, have your vehicle immediately in-
curs, have your vehicle immediately in-
spected by your Hyundai dealer.
spected by your Hyundai dealer. spected by your Hyundai dealer.
spected by your Hyundai dealer.
spected by your Hyundai dealer.Passenger's side Airbag
B240B04A-AAG
CAUTION:
CAUTION: CAUTION:
CAUTION:
CAUTION:
When installing the container of liquid air
When installing the container of liquid air When installing the container of liquid air
When installing the container of liquid air
When installing the container of liquid air
refresher inside a vehicle, do not place it
refresher inside a vehicle, do not place it refresher inside a vehicle, do not place it
refresher inside a vehicle, do not place it
refresher inside a vehicle, do not place it
near the instrument cluster nor on the crash
near the instrument cluster nor on the crash near the instrument cluster nor on the crash
near the instrument cluster nor on the crash
near the instrument cluster nor on the crash
pad surface. If there is any leakage from the
pad surface. If there is any leakage from the pad surface. If there is any leakage from the
pad surface. If there is any leakage from the
pad surface. If there is any leakage from the
air refresher onto these areas (Instrument
air refresher onto these areas (Instrument air refresher onto these areas (Instrument
air refresher onto these areas (Instrument
air refresher onto these areas (Instrument
cluster, crash pad or air ventilator), it may
cluster, crash pad or air ventilator), it may cluster, crash pad or air ventilator), it may
cluster, crash pad or air ventilator), it may
cluster, crash pad or air ventilator), it may
damage these parts. If the liquid from air
damage these parts. If the liquid from air damage these parts. If the liquid from air
damage these parts. If the liquid from air
damage these parts. If the liquid from air
refresher does leak onto these areas, wash
refresher does leak onto these areas, wash refresher does leak onto these areas, wash
refresher does leak onto these areas, wash
refresher does leak onto these areas, wash
them with water immediately.
them with water immediately. them with water immediately.
them with water immediately.
them with water immediately.FUA1113A
Upon deployment, tear seams molded directly
into the pad covers will separate under pres- sure from the expansion of the airbags. Further
opening of the covers then allows full inflation ofthe airbags.
A fully inflated airbag in combination with a
properly worn seat belt slows the driver’s or thepassenger’s forward motion, thus reducing the
risk of head or chest injury. After complete inflation, the airbag immediately
starts deflating, enabling the driver to maintain forward visibility.
Page 39 of 173

BEFORE DRIVING YOUR VEHICLE
BEFORE DRIVING YOUR VEHICLE BEFORE DRIVING YOUR VEHICLE
BEFORE DRIVING YOUR VEHICLE
BEFORE DRIVING YOUR VEHICLE
1-32 oo
oo
o If the airbags inflate, they must be re-
If the airbags inflate, they must be re- If the airbags inflate, they must be re-
If the airbags inflate, they must be re-
If the airbags inflate, they must be re-
placed by an authorized
placed by an authorized placed by an authorized
placed by an authorized
placed by an authorized Hyundai dealer.
Hyundai dealer. Hyundai dealer.
Hyundai dealer.
Hyundai dealer.
oo
oo
o
Do not tamper with or disconnect SRS
Do not tamper with or disconnect SRS Do not tamper with or disconnect SRS
Do not tamper with or disconnect SRS
Do not tamper with or disconnect SRS
wiring, or other components
wiring, or other components wiring, or other components
wiring, or other components
wiring, or other components
of the SRS
of the SRS of the SRS
of the SRS
of the SRS
system. Doing so could result in injury,
system. Doing so could result in injury, system. Doing so could result in injury,
system. Doing so could result in injury,
system. Doing so could result in injury,
due to accidental firing
due to accidental firing due to accidental firing
due to accidental firing
due to accidental firing
of the airbags or
of the airbags or of the airbags or
of the airbags or
of the airbags or
by rendering the SRS inoperative.
by rendering the SRS inoperative. by rendering the SRS inoperative.
by rendering the SRS inoperative.
by rendering the SRS inoperative.
oo
oo
o Do not install a child restraint system in
Do not install a child restraint system in Do not install a child restraint system in
Do not install a child restraint system in
Do not install a child restraint system in
the front passenger
the front passenger the front passenger
the front passenger
the front passenger seat position.
seat position. seat position.
seat position.
seat position.
A child restraint system must never be
A child restraint system must never be A child restraint system must never be
A child restraint system must never be
A child restraint system must never be
placed in the front seat. The
placed in the front seat. The placed in the front seat. The
placed in the front seat. The
placed in the front seat. The infant or
infant or infant or
infant or
infant or
child could be severely injured by an
child could be severely injured by an child could be severely injured by an
child could be severely injured by an
child could be severely injured by an
airbag deployment
airbag deployment airbag deployment
airbag deployment
airbag deployment in case of an acci-
in case of an acci- in case of an acci-
in case of an acci-
in case of an acci-
dent.
dent. dent.
dent.
dent.
oo
oo
o If components of the airbag system must
If components of the airbag system must If components of the airbag system must
If components of the airbag system must
If components of the airbag system must
be discarded, or if the
be discarded, or if the be discarded, or if the
be discarded, or if the
be discarded, or if the vehicle must be
vehicle must be vehicle must be
vehicle must be
vehicle must be
scrapped, certain safety precautions must
scrapped, certain safety precautions must scrapped, certain safety precautions must
scrapped, certain safety precautions must
scrapped, certain safety precautions must
be observed. Your
be observed. Your be observed. Your
be observed. Your
be observed. Your Hyundai dealer knows
Hyundai dealer knows Hyundai dealer knows
Hyundai dealer knows
Hyundai dealer knows
these precautions and can give you the
these precautions and can give you the these precautions and can give you the
these precautions and can give you the
these precautions and can give you the
necessary information.
necessary information. necessary information.
necessary information.
necessary information.
Failure to follow
Failure to follow Failure to follow
Failure to follow
Failure to follow
these precautions and procedures could
these precautions and procedures could these precautions and procedures could
these precautions and procedures could
these precautions and procedures could
increase the risk
increase the risk increase the risk
increase the risk
increase the risk of personal injury.
of personal injury. of personal injury.
of personal injury.
of personal injury.
oo
oo
o If you sell your vehicle, be sure to inform
If you sell your vehicle, be sure to inform If you sell your vehicle, be sure to inform
If you sell your vehicle, be sure to inform
If you sell your vehicle, be sure to inform
the new owner of these
the new owner of these the new owner of these
the new owner of these
the new owner of these important points
important points important points
important points
important points
and make certain that this manual is
and make certain that this manual is and make certain that this manual is
and make certain that this manual is
and make certain that this manual is
transferred to the new
transferred to the new transferred to the new
transferred to the new
transferred to the new owner.
owner. owner.
owner.
owner.
oo
oo
o
If your car was flooded and has soaked
If your car was flooded and has soaked If your car was flooded and has soaked
If your car was flooded and has soaked
If your car was flooded and has soaked
carpeting or water on flooring,
carpeting or water on flooring, carpeting or water on flooring,
carpeting or water on flooring,
carpeting or water on flooring,
youyou
youyou
you
shouldn’t try to start engine; have the car
shouldn’t try to start engine; have the car shouldn’t try to start engine; have the car
shouldn’t try to start engine; have the car
shouldn’t try to start engine; have the car
towed to authorized Hyundai dealer.
towed to authorized Hyundai dealer. towed to authorized Hyundai dealer.
towed to authorized Hyundai dealer.
towed to authorized Hyundai dealer.
oo
oo
o Do not replace the bumper or the bumper
Do not replace the bumper or the bumper Do not replace the bumper or the bumper
Do not replace the bumper or the bumper
Do not replace the bumper or the bumper
guard with the one other than the Hyundai
guard with the one other than the Hyundai guard with the one other than the Hyundai
guard with the one other than the Hyundai
guard with the one other than the Hyundai
genuine parts. Otherwise, it can adversely
genuine parts. Otherwise, it can adversely genuine parts. Otherwise, it can adversely
genuine parts. Otherwise, it can adversely
genuine parts. Otherwise, it can adversely
affect SRS performance and lead to un-
affect SRS performance and lead to un- affect SRS performance and lead to un-
affect SRS performance and lead to un-
affect SRS performance and lead to un-
expected injury.
expected injury. expected injury.
expected injury.
expected injury.
WARNING:
WARNING: WARNING:
WARNING:
WARNING:
oo
oo
o
Extreme Hazard! Do not use a rearward
Extreme Hazard! Do not use a rearward Extreme Hazard! Do not use a rearward
Extreme Hazard! Do not use a rearward
Extreme Hazard! Do not use a rearward
facing child restraint
facing child restraint facing child restraint
facing child restraint
facing child restraint on a seat protected
on a seat protected on a seat protected
on a seat protected
on a seat protected
by an airbag in front of it!
by an airbag in front of it! by an airbag in front of it!
by an airbag in front of it!
by an airbag in front of it!
oo
oo
o Modification to SRS components or wir-
Modification to SRS components or wir- Modification to SRS components or wir-
Modification to SRS components or wir-
Modification to SRS components or wir-
ing, including the addition
ing, including the addition ing, including the addition
ing, including the addition
ing, including the addition of any kind of
of any kind of of any kind of
of any kind of
of any kind of
badges to the pad covers or modifica-
badges to the pad covers or modifica- badges to the pad covers or modifica-
badges to the pad covers or modifica-
badges to the pad covers or modifica-
tions to the body structure,
tions to the body structure, tions to the body structure,
tions to the body structure,
tions to the body structure, can adverse-
can adverse- can adverse-
can adverse-
can adverse-
ly affect SRS performance and lead to
ly affect SRS performance and lead to ly affect SRS performance and lead to
ly affect SRS performance and lead to
ly affect SRS performance and lead to
possible injury.
possible injury. possible injury.
possible injury.
possible injury.
oo
oo
o For cleaning the airbag pad covers, use
For cleaning the airbag pad covers, use For cleaning the airbag pad covers, use
For cleaning the airbag pad covers, use
For cleaning the airbag pad covers, use
only a soft, dry cloth
only a soft, dry cloth only a soft, dry cloth
only a soft, dry cloth
only a soft, dry cloth or one which has
or one which has or one which has
or one which has
or one which has
been moistened with plain water. Sol-
been moistened with plain water. Sol- been moistened with plain water. Sol-
been moistened with plain water. Sol-
been moistened with plain water. Sol-
vents or cleaners could
vents or cleaners could vents or cleaners could
vents or cleaners could
vents or cleaners could adversely affect
adversely affect adversely affect
adversely affect
adversely affect
the airbag covers and proper deploy-
the airbag covers and proper deploy- the airbag covers and proper deploy-
the airbag covers and proper deploy-
the airbag covers and proper deploy-
ment of the system.
ment of the system. ment of the system.
ment of the system.
ment of the system.
oo
oo
o
No objects should be placed over or near
No objects should be placed over or near No objects should be placed over or near
No objects should be placed over or near
No objects should be placed over or near
the airbag modules on
the airbag modules on the airbag modules on
the airbag modules on
the airbag modules on
the steering wheel,
the steering wheel, the steering wheel,
the steering wheel,
the steering wheel,
instrument panel, and the front passen-
instrument panel, and the front passen- instrument panel, and the front passen-
instrument panel, and the front passen-
instrument panel, and the front passen-
ger’s panel above
ger’s panel above ger’s panel above
ger’s panel above
ger’s panel above
the glove box, because
the glove box, because the glove box, because
the glove box, because
the glove box, because
any such object could cause harm if the
any such object could cause harm if the any such object could cause harm if the
any such object could cause harm if the
any such object could cause harm if the
vehicle is
vehicle is vehicle is
vehicle is
vehicle is
in a crash severe enough to
in a crash severe enough to in a crash severe enough to
in a crash severe enough to
in a crash severe enough to
cause the airbags to inflate.
cause the airbags to inflate. cause the airbags to inflate.
cause the airbags to inflate.
cause the airbags to inflate.
YT10355A
oo
oo
o Before you replace a fuse or disconnect
Before you replace a fuse or disconnect Before you replace a fuse or disconnect
Before you replace a fuse or disconnect
Before you replace a fuse or disconnect
a battery terminal, turn the ignition key to
a battery terminal, turn the ignition key to a battery terminal, turn the ignition key to
a battery terminal, turn the ignition key to
a battery terminal, turn the ignition key to
the "LOCK" position or remove the igni-
the "LOCK" position or remove the igni- the "LOCK" position or remove the igni-
the "LOCK" position or remove the igni-
the "LOCK" position or remove the igni-
tion key. Never remove or replace the air
tion key. Never remove or replace the air tion key. Never remove or replace the air
tion key. Never remove or replace the air
tion key. Never remove or replace the air
bag related fuse(s) when the ignition key
bag related fuse(s) when the ignition key bag related fuse(s) when the ignition key
bag related fuse(s) when the ignition key
bag related fuse(s) when the ignition key
is in the "ON" position. Failure to heed
is in the "ON" position. Failure to heed is in the "ON" position. Failure to heed
is in the "ON" position. Failure to heed
is in the "ON" position. Failure to heed
this warning will cause the SRS SRI to
this warning will cause the SRS SRI to this warning will cause the SRS SRI to
this warning will cause the SRS SRI to
this warning will cause the SRS SRI to
illuminate.
illuminate. illuminate.
illuminate.
illuminate.
B240C01HP-GAT SRS Care
SRS Care SRS Care
SRS Care
SRS Care The SRS is virtually maintenance-free and so
there are no parts you can safely service by yourself. The entire SRS system must be in-
spected by an authorized Hyundai dealer 10years after the date that the vehicle was man-ufactured.
Any work on the SRS system, such as remov-
ing, installing, repairing, or any work on thesteering wheel must be performed by a quali-
fied Hyundai technician. Improper handling ofthe SRS system may result in serious personal
injury.
Page 49 of 173

INSTRUMENTS & CONTROLS
INSTRUMENTS & CONTROLS INSTRUMENTS & CONTROLS
INSTRUMENTS & CONTROLS
INSTRUMENTS & CONTROLS
2-10 C130P01P-GAT
A/T (AUTOMATIC TRANSMIS-
A/T (AUTOMATIC TRANSMIS- A/T (AUTOMATIC TRANSMIS-
A/T (AUTOMATIC TRANSMIS-
A/T (AUTOMATIC TRANSMIS-
SION) OIL TEMPERATURE
SION) OIL TEMPERATURE SION) OIL TEMPERATURE
SION) OIL TEMPERATURE
SION) OIL TEMPERATURE
WARNING LIGHT
WARNING LIGHT WARNING LIGHT
WARNING LIGHT
WARNING LIGHT
(If installed)
(If installed) (If installed)
(If installed)
(If installed)
The A/T oil temperature warning light comes on when the automatic transmission oil tempera-ture goes up to the temperature that may resultin serious damage of automatic transmission. If the A/T oil temperature warning light comes on while driving, park your vehicle in at a safeplace as soon as possible and with the selectorlever is shifted into "P" position, and allow theengine to idle until the warning light goes off.And when the warning light goes off, the vehiclecan be driven normally. If the warning light doesn't go off or it lights up frequently, have the vehicle checked by yourHyundai dealer.
A/TA/T
A/TA/T
A/T
TEMPTEMP
TEMPTEMP
TEMP
NOTE:
NOTE: NOTE:
NOTE:
NOTE:
If the engine were not started within 10
If the engine were not started within 10 If the engine were not started within 10
If the engine were not started within 10
If the engine were not started within 10 seconds after the preheating is completed,
seconds after the preheating is completed, seconds after the preheating is completed,
seconds after the preheating is completed,
seconds after the preheating is completed,
turn the ignition key once more to the
turn the ignition key once more to the turn the ignition key once more to the
turn the ignition key once more to the
turn the ignition key once more to the
"LOCK" position, and then to the "ON" po-
"LOCK" position, and then to the "ON" po- "LOCK" position, and then to the "ON" po-
"LOCK" position, and then to the "ON" po-
"LOCK" position, and then to the "ON" po-
sition, in order to preheat again.
sition, in order to preheat again. sition, in order to preheat again.
sition, in order to preheat again.
sition, in order to preheat again. B260E02A-GAT
SEAT BELT REMINDER LIGHT
SEAT BELT REMINDER LIGHT SEAT BELT REMINDER LIGHT
SEAT BELT REMINDER LIGHT
SEAT BELT REMINDER LIGHT
(If installed)
(If installed) (If installed)
(If installed)
(If installed)
The seat belt reminder light comes on until your seat belt is fastened when the ignition key isturned from the "OFF" position to "ON" or"START". C130O01P-GAT
ENGINE WARNING LIGHT
ENGINE WARNING LIGHT ENGINE WARNING LIGHT
ENGINE WARNING LIGHT
ENGINE WARNING LIGHT
(If installed)
(If installed) (If installed)
(If installed)
(If installed)
This light illuminates when there is a malfunc-
tion of an exhaust gas related component, andthe system is not functioning properly so thatthe exhaust gas regulation values are not satis-fied. This light will also illuminate when theignition key is turned to the "ON" position, andthen it will go out in a few seconds. If it illumi-nates while driving, or does not illuminate whenthe ignition key is turned to the "ON" position,take your car to your nearest authorized Hyundaidealer and have the system checked.
B260B01S-GAT SRS (AIRBAG) SERVICE
SRS (AIRBAG) SERVICE SRS (AIRBAG) SERVICE
SRS (AIRBAG) SERVICE
SRS (AIRBAG) SERVICE
REMINDER INDICATOR
REMINDER INDICATOR REMINDER INDICATOR
REMINDER INDICATOR
REMINDER INDICATOR (SRI)
(SRI) (SRI)
(SRI)
(SRI)
(If installed)
(If installed) (If installed)
(If installed)
(If installed)
The SRS service reminder indicator (SRI)
comes on and flashes for about 6 secondsafter the ignition key is turned to the "ON"
position or after the engine is started, afterwhich it will go out.
This light also comes on when the SRS is not
working properly. If the SRI does not come on,or continuously remains on after flashing forabout 6 seconds when you turned the ignition
key to the "ON" position or started the engine,or if it comes on while driving, have the SRSinspected by an authorized Hyundai Dealer.
C130N01P-GAT
ANTI-LOCK BRAKE WARNING
ANTI-LOCK BRAKE WARNING ANTI-LOCK BRAKE WARNING
ANTI-LOCK BRAKE WARNING
ANTI-LOCK BRAKE WARNING
LIGHT (If installed)
LIGHT (If installed) LIGHT (If installed)
LIGHT (If installed)
LIGHT (If installed)
When the key is turned to the "ON" position, the
ABS light will come on and then go off in a fewseconds. If the ABS light remains on, comes on while
driving, or does not come on when the key isturned to the "ON" position, this indicates thatthere may be a problem with the ABS.
If this occurs, have your vehicle checked by
your Hyundai dealer as soon as possible. Thenormal braking system will still be operational,but without the assistance of the anti-lock brakesystem.
AIRAIR
AIRAIR
AIR
BAGBAG
BAGBAG
BAG
B270B02O-GATPARKING START WARNING SOUND
PARKING START WARNING SOUND PARKING START WARNING SOUND
PARKING START WARNING SOUND
PARKING START WARNING SOUND
(If installed)
(If installed) (If installed)
(If installed)
(If installed)
If the vehicle driven at over 10km/h(6mph) more 2~3 seconds, the warning chime will soundcontinuously when the parking brake engaged.
Page 50 of 173

2-11
INSTRUMENTS & CONTROLS
INSTRUMENTS & CONTROLS INSTRUMENTS & CONTROLS
INSTRUMENTS & CONTROLS
INSTRUMENTS & CONTROLS
C150A01P-GATTURN SIGNAL SWITCH
TURN SIGNAL SWITCH TURN SIGNAL SWITCH
TURN SIGNAL SWITCH
TURN SIGNAL SWITCH
C140A01P-GAT
MULTI-FUNCTION LIGHT SWITCH
MULTI-FUNCTION LIGHT SWITCH MULTI-FUNCTION LIGHT SWITCH
MULTI-FUNCTION LIGHT SWITCH
MULTI-FUNCTION LIGHT SWITCH
Pulling down on the lever causes the turn
signals on the left side of the car to blink. Pushing upward on the lever causes the turnsignals on the right side of the car to blink. Asthe turn is completed, the lever will automati-cally return to the center position and turn offthe turn signals at the same time. If either turnsignal indicator light blinks more rapidly thanusual, goes on but does not blink, or does notgo on at all, there is a malfunction in thesystem. Check for a burned-out fuse or bulb orsee your Hyundai dealer.
Rotate the switch to turn on the lights.
1. Lights off
2. Position, tail, licence-plate, and instrument panel lamps on
3. Headlights on To operate the headlights, turn the barrel onthe end of the multifunction switch.
Parking light auto cut (If installed)
Parking light auto cut (If installed) Parking light auto cut (If installed)
Parking light auto cut (If installed)
Parking light auto cut (If installed)
If you do not turn the parking lights "OFF" after
driving, the parking light will automatically shut"OFF" when the driver's door is opened.
To turn them "ON" again you must simply turn
the ignition key to the "ON" position. C160A01P-GAT
HIGH-BEAM SWITCH
HIGH-BEAM SWITCH HIGH-BEAM SWITCH
HIGH-BEAM SWITCH
HIGH-BEAM SWITCH
To turn on the headlight high beams, push the
lever forward (away from you). The High BeamIndicator Light will come on at the same time.For low beams, pull the lever back toward you.
C170A01P-GATPASSING SWITCH
PASSING SWITCH PASSING SWITCH
PASSING SWITCH
PASSING SWITCH
HSR2114HSR2113HSR2112
1 2
3
HSR2115
Page 55 of 173
INSTRUMENTS & CONTROLS
INSTRUMENTS & CONTROLS INSTRUMENTS & CONTROLS
INSTRUMENTS & CONTROLS
INSTRUMENTS & CONTROLS
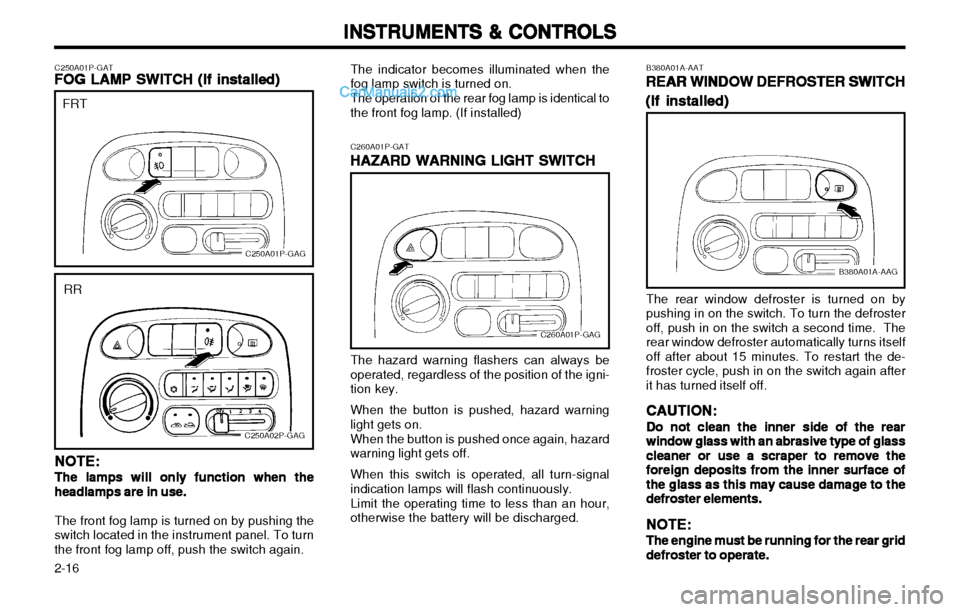
2-16 B380A01A-AAT
REAR WINDOW DEFROSTER SWITCH
REAR WINDOW DEFROSTER SWITCH REAR WINDOW DEFROSTER SWITCH
REAR WINDOW DEFROSTER SWITCH
REAR WINDOW DEFROSTER SWITCH
(If installed)
(If installed) (If installed)
(If installed)
(If installed)
B380A01A-AAG
The rear window defroster is turned on by
pushing in on the switch. To turn the defrosteroff, push in on the switch a second time. The
rear window defroster automatically turns itselfoff after about 15 minutes. To restart the de-froster cycle, push in on the switch again after
it has turned itself off. CAUTION:
CAUTION: CAUTION:
CAUTION:
CAUTION:
Do not clean the inner side of the rear
Do not clean the inner side of the rear Do not clean the inner side of the rear
Do not clean the inner side of the rear
Do not clean the inner side of the rear
window glass with an
window glass with an window glass with an
window glass with an
window glass with an abrasive type of glass
abrasive type of glass abrasive type of glass
abrasive type of glass
abrasive type of glass
cleaner or use a scraper to remove the
cleaner or use a scraper to remove the cleaner or use a scraper to remove the
cleaner or use a scraper to remove the
cleaner or use a scraper to remove the
foreign deposits
foreign deposits foreign deposits
foreign deposits
foreign deposits from the inner surface of
from the inner surface of from the inner surface of
from the inner surface of
from the inner surface of
the glass as this may cause damage to the
the glass as this may cause damage to the the glass as this may cause damage to the
the glass as this may cause damage to the
the glass as this may cause damage to the
defroster
defroster defroster
defroster
defroster
elements.
elements. elements.
elements.
elements.
NOTE:
NOTE: NOTE:
NOTE:
NOTE:
The engine must be running for the rear grid
The engine must be running for the rear grid The engine must be running for the rear grid
The engine must be running for the rear grid
The engine must be running for the rear grid
defroster to operate.
defroster to operate. defroster to operate.
defroster to operate.
defroster to operate.
C260A01P-GAT
HAZARD WARNING LIGHT SWITCH
HAZARD WARNING LIGHT SWITCH HAZARD WARNING LIGHT SWITCH
HAZARD WARNING LIGHT SWITCH
HAZARD WARNING LIGHT SWITCHThe indicator becomes illuminated when thefog lamp switch is turned on. The operation of the rear fog lamp is identical to the front fog lamp. (If installed)
C260A01P-GAG
The hazard warning flashers can always be operated, regardless of the position of the igni-tion key. When the button is pushed, hazard warning light gets on. When the button is pushed once again, hazard warning light gets off. When this switch is operated, all turn-signal indication lamps will flash continuously. Limit the operating time to less than an hour, otherwise the battery will be discharged.
C250A01P-GAT
FOG LAMP SWITCH
FOG LAMP SWITCH FOG LAMP SWITCH
FOG LAMP SWITCH
FOG LAMP SWITCH
(If installed)
(If installed) (If installed)
(If installed)
(If installed)
C250A01P-GAG
FRT
C250A02P-GAG
RR
NOTE:
NOTE: NOTE:
NOTE:
NOTE:
The lamps will only function when the
The lamps will only function when the The lamps will only function when the
The lamps will only function when the
The lamps will only function when the headlamps are in use.
headlamps are in use. headlamps are in use.
headlamps are in use.
headlamps are in use.
The front fog lamp is turned on by pushing the
switch located in the instrument panel. To turn the front fog lamp off, push the switch again.
Page 56 of 173

2-17
INSTRUMENTS & CONTROLS
INSTRUMENTS & CONTROLS INSTRUMENTS & CONTROLS
INSTRUMENTS & CONTROLS
INSTRUMENTS & CONTROLS
C280A01P-GAT HORN SWITCH
HORN SWITCH HORN SWITCH
HORN SWITCH
HORN SWITCH
C280A01P-GAG
The horn button is located in the steering wheel. The horn sounds when the horn button is pressed. B480A01P-AAT
FRONT INTERIOR LIGHT (Minibus)
FRONT INTERIOR LIGHT (Minibus) FRONT INTERIOR LIGHT (Minibus)
FRONT INTERIOR LIGHT (Minibus)
FRONT INTERIOR LIGHT (Minibus)
(If installed)
(If installed) (If installed)
(If installed)
(If installed)
Map Light (With Sunroof)
Map Light (With Sunroof) Map Light (With Sunroof)
Map Light (With Sunroof)
Map Light (With Sunroof)
SSA1340A
The two map light switches are located on both
side of the front overhead console. Push in the map light switch to turn the light on or off.
B490A01S-AATINTERIOR LIGHT
INTERIOR LIGHT INTERIOR LIGHT
INTERIOR LIGHT
INTERIOR LIGHT
SSA1340BWith Sunroof
The interior courtesy light has a button of three
positions. The three positions are:
oo
oo
o DR (
DR ( DR (
DR (
DR (
))
))
)
In the middle position ( ), the interior courtesy
light comes on when any door is opened re- gardless of the ignition key position. The lightgoes out when the door is closed.
oo
oo
o ONON
ONON
ON
In the "ON" position, the light stays on at all
times.
oo
oo
o OFFOFF
OFFOFF
OFF
In the "OFF" position, the light stays off at all
times even though a door is open. C300A01P-GAT
FRONT INTERIOR LIGHT (Minibus)
FRONT INTERIOR LIGHT (Minibus) FRONT INTERIOR LIGHT (Minibus)
FRONT INTERIOR LIGHT (Minibus)
FRONT INTERIOR LIGHT (Minibus)
Map Light (Without Sunroof)
Map Light (Without Sunroof) Map Light (Without Sunroof)
Map Light (Without Sunroof)
Map Light (Without Sunroof)
C300A01P-GAG
Interior light
Map light
The two map light switches are located on both
sides of the front overhead console. Push in the map light switch to turn the light on or off.
Page 58 of 173
2-19
INSTRUMENTS & CONTROLS
INSTRUMENTS & CONTROLS INSTRUMENTS & CONTROLS
INSTRUMENTS & CONTROLS
INSTRUMENTS & CONTROLS
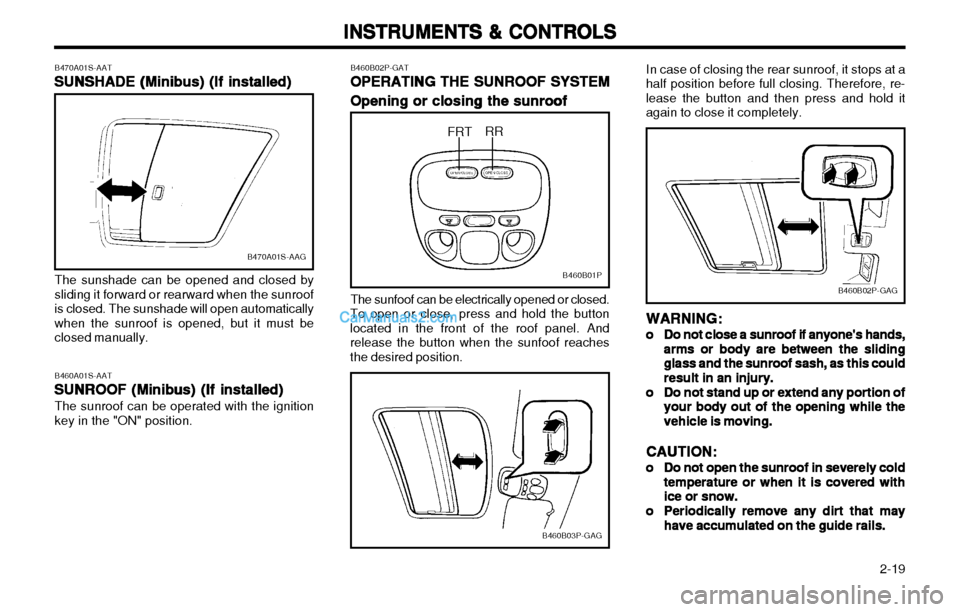
B470A01S-AAT SUNSHADE (Minibus) (If installed)
SUNSHADE (Minibus) (If installed) SUNSHADE (Minibus) (If installed)
SUNSHADE (Minibus) (If installed)
SUNSHADE (Minibus) (If installed)
B470A01S-AAG
The sunshade can be opened and closed by
sliding it forward or rearward when the sunroof
is closed. The sunshade will open automaticallywhen the sunroof is opened, but it must beclosed manually. B460A01S-AAT
SUNROOF (Minibus) (If installed)
SUNROOF (Minibus) (If installed) SUNROOF (Minibus) (If installed)
SUNROOF (Minibus) (If installed)
SUNROOF (Minibus) (If installed)
The sunroof can be operated with the ignition
key in the "ON" position. B460B02P-GAT
OPERATING THE SUNROOF SYSTEM
OPERATING THE SUNROOF SYSTEM OPERATING THE SUNROOF SYSTEM
OPERATING THE SUNROOF SYSTEM
OPERATING THE SUNROOF SYSTEM
Opening or closing the sunroof
Opening or closing the sunroof Opening or closing the sunroof
Opening or closing the sunroof
Opening or closing the sunroofB460B01P
FRT RR
The sunfoof can be electrically opened or closed.
To open or close, press and hold the button located in the front of the roof panel. Andrelease the button when the sunfoof reachesthe desired position.
B460B03P-GAG
B460B02P-GAG
In case of closing the rear sunroof, it stops at a
half position before full closing. Therefore, re- lease the button and then press and hold itagain to close it completely.
WARNING:
WARNING: WARNING:
WARNING:
WARNING:
oo
oo
o Do not close a sunroof if anyone's hands,
Do not close a sunroof if anyone's hands, Do not close a sunroof if anyone's hands,
Do not close a sunroof if anyone's hands,
Do not close a sunroof if anyone's hands,
arms or body are between the sliding
arms or body are between the sliding arms or body are between the sliding
arms or body are between the sliding
arms or body are between the sliding
glass and the sunroof sash, as this could
glass and the sunroof sash, as this could glass and the sunroof sash, as this could
glass and the sunroof sash, as this could
glass and the sunroof sash, as this could
result in an injury.
result in an injury. result in an injury.
result in an injury.
result in an injury.
oo
oo
o Do not stand up or extend any portion of
Do not stand up or extend any portion of Do not stand up or extend any portion of
Do not stand up or extend any portion of
Do not stand up or extend any portion of
your body out of the opening while the
your body out of the opening while the your body out of the opening while the
your body out of the opening while the
your body out of the opening while the
vehicle is moving.
vehicle is moving. vehicle is moving.
vehicle is moving.
vehicle is moving.
CAUTION:
CAUTION: CAUTION:
CAUTION:
CAUTION:
oo
oo
o Do not open the sunroof in severely cold
Do not open the sunroof in severely cold Do not open the sunroof in severely cold
Do not open the sunroof in severely cold
Do not open the sunroof in severely cold
temperature or when it is covered with
temperature or when it is covered with temperature or when it is covered with
temperature or when it is covered with
temperature or when it is covered with
ice or snow.
ice or snow. ice or snow.
ice or snow.
ice or snow.
oo
oo
o Periodically remove any dirt that may
Periodically remove any dirt that may Periodically remove any dirt that may
Periodically remove any dirt that may
Periodically remove any dirt that may
have accumulated on the guide rails.
have accumulated on the guide rails. have accumulated on the guide rails.
have accumulated on the guide rails.
have accumulated on the guide rails.
Page 68 of 173

2-29
INSTRUMENTS & CONTROLS
INSTRUMENTS & CONTROLS INSTRUMENTS & CONTROLS
INSTRUMENTS & CONTROLS
INSTRUMENTS & CONTROLS
C750A03P-GATOVERHEAD AIR CONDITIONING
OVERHEAD AIR CONDITIONING OVERHEAD AIR CONDITIONING
OVERHEAD AIR CONDITIONING
OVERHEAD AIR CONDITIONING
(If installed)
(If installed) (If installed)
(If installed)
(If installed)
C750A01P-1
1
The overhead air conditioner can be operated
with the ignition switch at the "ON" position by depressing the main switch in the instrumentpanel.
1. Blower knob
The blower can be operated at three speeds to regulate the amount of air forced throughthe vehicle. The overhead air conditionerwill not operate if the knob is set to the "O". The blower speed will increase as the knob is moved to the right.
2.2.
2.2.
2. Temperature controller
Temperature controller Temperature controller
Temperature controller
Temperature controller
Lever type - Select the desired tempera-
ture by sliding the lever left or right.
Rotary type - Select the desired tempera- ture by turn the knob left orright.
Red - High temperaute (heating)
Blue - Ambient temperature(ventilating)
3.3.
3.3.
3. Blower controller
Blower controller Blower controller
Blower controller
Blower controllerThe blower can be operated (when the ignition key and main switch for the rearheater is at the "ON" position) at threespeeds to regulate the amount of air forcedthrough the vehicle. The blower speed will increase as the switch is moved to the right.
C740A01P-GAT REAR AIR CONDITIONING (If installed)
REAR AIR CONDITIONING (If installed) REAR AIR CONDITIONING (If installed)
REAR AIR CONDITIONING (If installed)
REAR AIR CONDITIONING (If installed)
The rear air conditioner can be operated with
the ignition switch at the "ON" position by de-pressing the main switch in the instrument panel.
1. Air conditioning switch
The air conditioning is turned on or off by pushing the button.
2. The operations of the rear air conditioner is identical to AIR CONDITIONER OPERRA-TION of page 2-27.
C760A01P-GAG
B760A02P-GAT
AIR FILTER (FOR EVAPORATOR AND
AIR FILTER (FOR EVAPORATOR AND AIR FILTER (FOR EVAPORATOR AND
AIR FILTER (FOR EVAPORATOR AND
AIR FILTER (FOR EVAPORATOR AND
BLOWER UNIT) (If installed)
BLOWER UNIT) (If installed) BLOWER UNIT) (If installed)
BLOWER UNIT) (If installed)
BLOWER UNIT) (If installed)
The air filter is located in the air intake duct
behind the windshield washer reservoir. It oper- ates to prevent the pollutant entering the car.
C760B01PClamp
Air intake duct
Air intake duct
Air Filter
Air intake duct
Engine room
Evaporator unit
Blower unit
Air Filter Inside ofvehicle