Page 61 of 392
These labels are in the locations
shown. They warn you of potential
hazards that could cause serious
injury. Read these labels caref ully.
If a label comes of f or becomes hard
to read, contact your Honda dealer
f or a replacement.U.S. models onlyU.S. models
Canadian models
Saf ety L abels
Driver and Passenger Saf ety57
RADIATOR CAP SUN VISOR
HOOD DASHBOARD
BATTERY LABEL
Page 66 of 392
. If it
comes on at any other time, it
indicates that the passenger’s side
airbag has automatically shut off.
For complete inf ormation")
This indicator lights when you turn
the ignition switch ON (II). If it
comes on at any other time, it
indicates that the passenger’s side
airbag has automatically shut off.
For complete inf ormation, see page.
The instrument panel has many
indicators to give you important
inf ormation about your vehicle.
This indicator lights when you turn
the ignition switch ON (II). If it
comes on at any other time, it
indicates a potential problem with
your f ront airbags. This light will
also alert you to a potential problem
with your side airbags, passenger’s
side airbag automatic cutoff system
or automatic seat belt tensioners.
For complete inf ormation, see page .
See page .
The engine can be severely damaged
if this light f lashes or stays on when
the engine is running. For complete
inf ormation, see page .
If this light comes on when the
engine is running, the battery is not
being charged. For complete
inf ormation, see page .
This indicator lights when you turn
the ignition switch ON (II). It is a
reminder to you and your passengers
to protect yourselves by f astening
the seat belts. A beeper also sounds
if you have not fastened your seat
belt.
If you do not f asten your seat belt,
the beeper will stop af ter a f ew
seconds but the light stays on until
you do. Both the light and the beeper
stay of f if you f asten your seat belt
bef ore turning on the ignition.
53
54
349
347
348
Indicator L ights
Inst rument s and Cont rols
Supplemental Restraint
System Indicator
Malf unction Indicator
Lamp
L ow Oil Pressure
Indicator
Charging System
Indicator
Seat Belt Reminder L ight
Side A irbag Cutof f
Indicator
62
Page 72 of 392
 or kilometers (Canada)
driven since you last reset it.This shows how much f uel you have.
It is most accurate when the vehicle
is on level ground. It may sh")
This meter shows the number of
miles (U.S.) or kilometers (Canada)
driven since you last reset it.This shows how much f uel you have.
It is most accurate when the vehicle
is on level ground. It may show
slightly more or less than the actual
amount when you are driving on
curvy or hilly roads.
The needle returns to the bottom
after you turn off the ignition. The
gauge shows the f uel level reading
immediately af ter you turn the
ignition switch back ON (II).
There are two trip meters: Trip A
and Trip B. Switch between these
displays and the outside temperature
display (EX model only) by pressing
the Select/Reset button repeatedly.
Each trip meter works independently,
so you can keep track of two
dif f erent distances. To reset a trip meter, display it and
then press and hold the Select/Reset
button until the number resets to
‘‘0.0’’. Both trip meters will reset if
the vehicle’s battery goes dead or is
disconnected.
This shows the temperature of the
engine’s coolant. During normal
operation, the pointer should rise
from the bottom white mark to about
the middle white mark. In severe
driving conditions, such as very hot
weather or a long period of uphill
driving, the pointer may rise to the
upper white mark. If it reaches the
red (Hot) mark, pull saf ely to the
side of the road. Turn to page f or
instructions and precautions on
checking the engine’s cooling
system.
345
Trip Meter
Fuel Gauge
Temperature Gauge
Inst rument s and Cont rols
Gauges
68
TRIP METER SELECT/
RESET BUTTON
Avoid driving with an extremely low
f uel level. Running out of f uel could
cause the engine to misf ire, damaging
the catalytic converter.
Page 89 of 392

Panic mode allows you to remotely
activate your vehicle’s horn and
lights to attract attention. When
activated, the horn will sound, and
the headlights, parking lights, side
marker lights, taillights and
instrument panel lights will f lash f or
about 30 seconds. To activate panic
mode,pressandholdthePANIC
button f or about one second.When the remote transmitter’s
battery begins to get weak, it may
take several pushes on the button to
lock or unlock the doors and the
tailgate, and the LED will get dim.
Replace the battery as soon as
possible.
Battery type: CR2025
To cancel Panic mode bef ore 30
seconds, press any button on the
remote transmitter. You can also
turn the ignition switch to ON (II).
Panic mode will not activate if the
key is in the ON (II) position.
To replace the battery, remove the
round cover on the back of the trans-
mitter by turning it counterclockwise
with a coin.
CONT INUED
Panic Mode
Replacing t he Bat t ery
Keys and Locks
Inst rument s and Cont rols85
ROUND
COVERBATTERY
Page 90 of 392
 This devicemay not cause harmf ul interf erence, and(2)")
�´
�Õ �Ü
As required by the FCC:
This device complies with Part 15 of theFCC rules. Operation is subject to thef ollowing two conditions: (1) This devicemay not cause harmf ul interf erence, and(2) this device must accept anyinterf erence received, includinginterf erence that may cause undesiredoperation.
Changes or modif ications not expresslyapproved by the party responsible f orcompliance could void the user’sauthority to operate the equipment.
This device complies with IndustryCanada Standard RSS-210.Operation is subject to the f ollowing twoconditions: (1) this device may not causeinterf erence, and (2) this device mustaccept any interf erence that may causeundesired operation of the device.
Avoid severe shock to the trans-
mitter, such as dropping or throwing
it. Also, protect it f rom extreme hot
or cold temperatures.
Clean the transmitter case with a
sof t cloth. Do not use strong
cleaners or solvents that could harm
the case. Immersing the transmitter
in any liquid will harm the trans-
mitter and cause it to not f unction
properly.
Remove the old battery and note the
polarity. Make sure the polarity of
the new battery is the same ( side
f acing up), then insert it in the
transmitter.
Align the mark on the cover
with the mark on the
transmitter, then set the cover in
place and turn it clockwise.
If you lose a transmitter, you will
need to have the replacement
programmed to your vehicle’s
system by your Honda dealer. Any
other transmitters you have will also
need to be reprogrammed.
Transmitter Care
Keys and Locks
Inst rument s and Cont rols86
Page 102 of 392

Follow these precautions whenever
you use the seat heaters:Use the HI setting only to heat the
seats quickly. Select the LO
setting when the seats f eel warm.
The HI setting draws large
amounts of current f rom the
battery.
Do not use the seat heaters, even
on the LO setting, if the engine is
lef t idling f or an extended period.
They can weaken the battery,
causing hard starting.
The HI or LO indicator lights and
remains lit until you turn it of f by
pushing the opposite side of the
switch lightly. The indicator will turn
off.
In HI, the heater turns of f when the
seat gets warm, and turns back on
after the seat’s temperature drops. It
continues to cycle as long as you
leave it set on HI. The HI indicator
remains lit as a reminder that you
have the heater on.
In LO, the heater runs continuously.
It does not cycle with temperature
changes.
Because of the sensors f or the side
airbag system, there is no heater in
the passenger’s seat-back.
Both f ront seats are equipped with
seat heaters. The ignition switch
must be ON (II) to use them. Push
the front of the switch, HI, to rapidly
heat up the seat. After the seat
reaches a comf ortable temperature,
select LO by pushing the back of the
switch. This will keep the seat warm.On Canadian EX model with leather
seats
Seat Heaters
Inst rument s and Cont rols98
SEAT HEATERS
Page 105 of 392

The power window system has a key-
of f delay f unction. The windows will
stilloperateforuptotenminutes
after you turn off the ignition.
Opening either f ront door cancels
the delay function. You must turn
the ignition switch ON (II) again
bef ore you can operate the windows.
If the driver’s window runs into any
obstacle while it is closing
automatically, it will reverse
direction, and then stop. To close the
window, remove the obstacle, then
use the window switch again.
Auto reverse stops sensing when the
window is almost closed. You should
always check that all passengers and
objects are away from the window
bef ore closing it. If your vehicle’s battery is
disconnected or goes dead, or the
driver’s window f use is removed, the
AUTO f unction will be disabled. The
power window system needs to be
reset af ter reconnecting the battery
or installing the f use. You should do
the f ollowing.
Start the engine. Push down on
the driver’s window switch until
the window is f ully open.
Pull back on the driver’s window
switch to close the window
completely, then hold the switch
f or a second or two more.
If the power windows do not operate
properly af ter resetting, have your
vehicle checked by a Honda dealer. 1.
2.
Power Windows
Inst rument s and Cont rols
Auto Reverse
101
Page 143 of 392
�µ
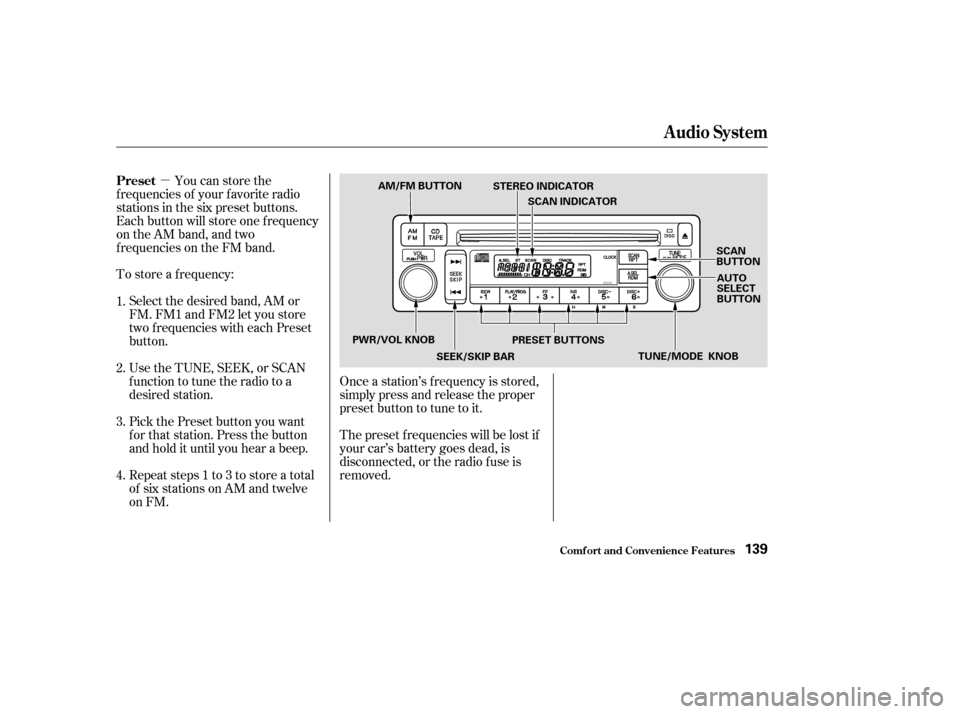
Repeat steps 1 to 3 to store a total
of six stations on AM and twelve
on FM. Pick the Preset button you want
for that station. Press the button
and hold it until you hear a beep. Select the desired band, AM or
FM. FM1 and FM2 let you store
two f requencies with each Preset
button.
To store a f requency:
Once a station’s f requency is stored,
simply press and release the proper
preset button to tune to it.
The preset f requencies will be lost if
your car’s battery goes dead, is
disconnected, or the radio f use is
removed.
You can store the
f requencies of your f avorite radio
stations in the six preset buttons.
Each button will store one f requency
on the AM band, and two
f requencies on the FM band.
UsetheTUNE,SEEK,orSCAN
function to tune the radio to a
desired station.
1.
2.
3.
4. Preset
Audio System
Comf ort and Convenience Feat ures139
AM/FM BUTTON
STEREO INDICATOR
SCAN INDICATOR
SCAN
BUTTONAUTO
SELECT
BUTTON
PWR/VOL KNOB SEEK/SKIP BARPRESET BUTTONS
TUNE/MODE KNOB