Page 146 of 392
 or ON
(II). It shows the operation mode of
the radio, CD player, or optional
cassette player or CD changer")
The audio system display usually
shows the time when the ignition
switch is in ACCESSORY (I) or ON
(II). It shows the operation mode of
the radio, CD player, or optional
cassette player or CD changer when
you operate them, then goes back to
the time display af ter f ive seconds.You can quickly set the time to the
nearest hour. If the displayed time is
bef ore the half hour, pressing and
holding the clock button, then
pressing the RESET button (preset
6) sets the clock back to the previous
hour. If the displayed time is af ter
the half hour, the clock is set
f orward to the beginning of the next
hour.If your vehicle’s battery is
disconnected or goes dead, the time
setting will be lost. To set the time
again, follow the setting procedure. For example:
1:06 will reset to 1:00
1:52 will reset to 2:00
To set the clock, press and hold the
CLOCK (SCAN/RPT) button.
Change the hours by pressing the H
(preset 4) button until the numbers
advance to the desired time. Change
the minutes by pressing the M
(preset 5) button until the numbers
advance to the desired time.
Audio System
Comf ort and Convenience Feat ures
Digital Clock
142
RESET
MH
CLOCK BUTTON
Page 157 of 392
�Î
�Î
CONT INUED
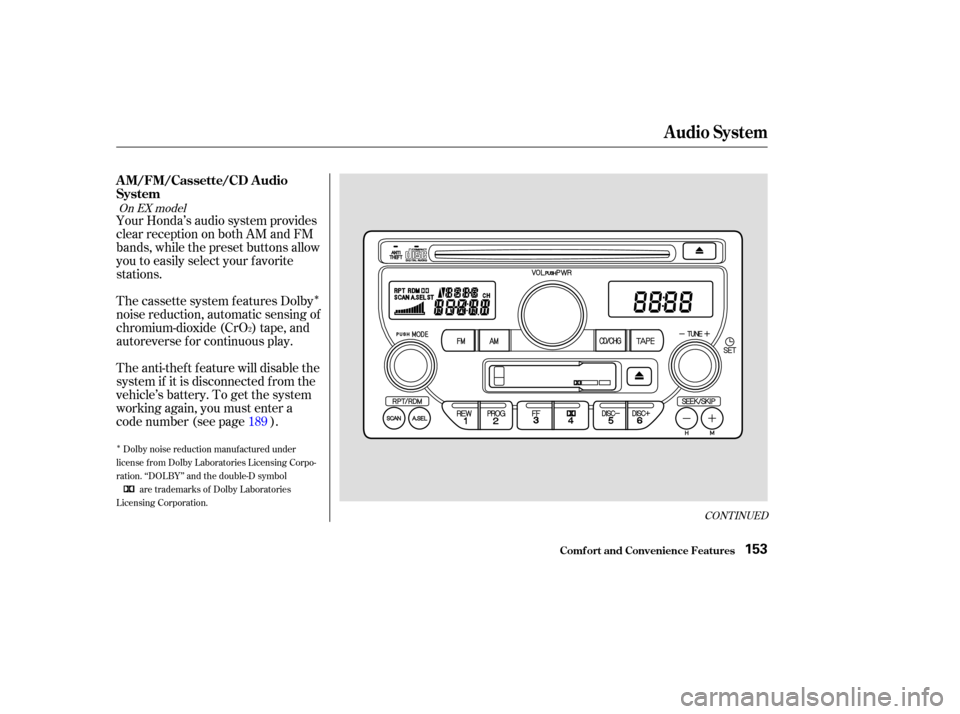
Your Honda’s audio system provides
clear reception on both AM and FM
bands, while the preset buttons allow
you to easily select your f avorite
stations.
The cassette system f eatures Dolby
noise reduction, automatic sensing of
chromium-dioxide (CrO ) tape, and
autoreverse f or continuous play.
The anti-thef t f eature will disable the
system if it is disconnected f rom the
vehicle’s battery. To get the system
working again, you must enter a
code number (see page ).189
2
Dolby noise reduction manuf actured under
license from Dolby Laboratories Licensing Corpo-
ration. ‘‘DOLBY’’ and the double-D symbol are trademarks of Dolby Laboratories
Licensing Corporation.
On EX model
Audio System
Comf ort and Convenience Feat ures
A M/FM/Cassette/CD A udio
System
153
Page 159 of 392

�µ�µ
�µ �µ
�µ�´
You can use any of f our methods to
f ind radio stations on the selected
band: TUNE, SEEK, SCAN or the
Preset buttons.
Use the TUNE knob to
tune the radio to a desired f requency.
Turn the TUNE knob to the right to
tune to a higher f requency, or to the
lef t to tune to a lower f requency.
Turn the knob right or lef t until the
display reaches the desired
f requency.
You can store the
f requencies of your f avorite radio
stations in the six preset buttons.
Each button will store one f requency
on the AM band, and two
f requencies on the FM band. To store a f requency:
Select the desired band, AM or
FM. FM1 and FM2 let you store
two f requencies with each Preset
button.
Use the TUNE or SEEK f unction
to tune the radio to a desired
station.
Pick the Preset button you want
for that station. Press the button
and hold it until you hear a beep.
Repeat steps 1 to 3 to store a total
of six stations on AM and twelve
on FM.
Once a station’s frequency is stored,
simply press and release the proper
Preset button to tune to it. The
preset f requencies will be lost if your
vehicle’s battery goes dead, is
disconnected, or the radio f use is
removed.
The SEEK f unction
searches the band for a station with
a strong signal. To activate it, press
either the or SEEK button,
then release it. Depending on which
button you press, the system scans
upward or downward f rom the
current f requency. It stops when it
finds a station with a strong signal. The SCAN f unction
samples all the stations with strong
signals on the selected band. To
activate it, press the SCAN button,
then release it. When the system is
in the SCAN mode, SCAN shows in
the display. The system will scan up
the band for a station with a strong
signal. When it f inds one, it will stop
and play that station for
approximately f ive seconds. If you do
nothing, the system will then scan
f or the next strong station and play
that f or f ive seconds. When it plays a
station that you want to continue
listening to, press the SCAN button
again. 1.
2.
3.
4.
CONT INUED
TUNE
Preset
SEEK SCAN
Audio System
Comf ort and Convenience Feat ures155
Page 172 of 392
�Î
�Î
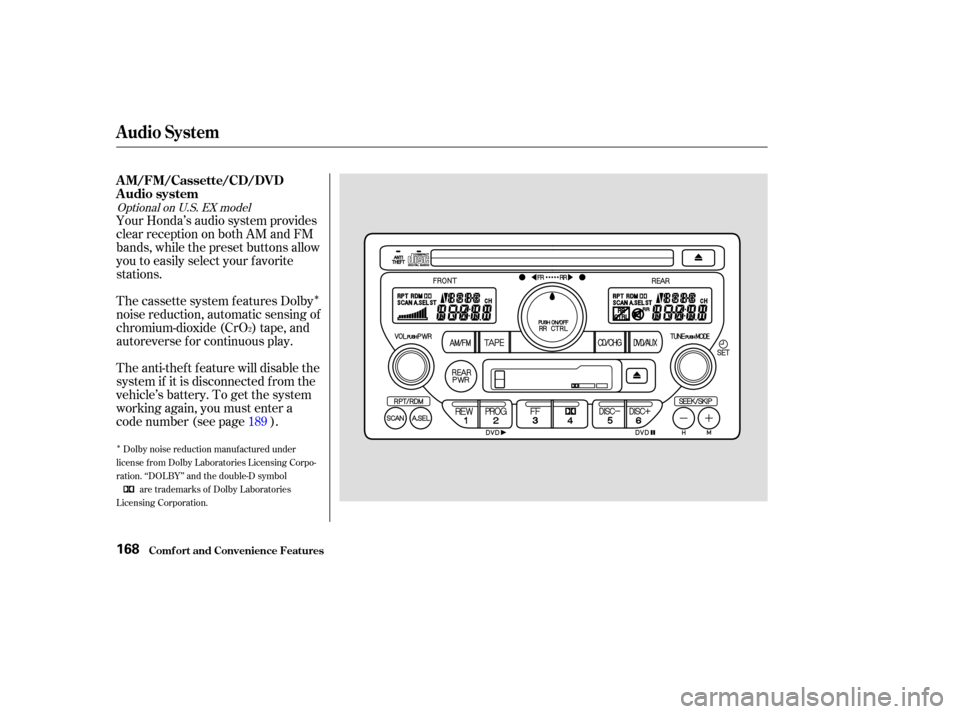
Your Honda’s audio system provides
clear reception on both AM and FM
bands, while the preset buttons allow
you to easily select your f avorite
stations.
The cassette system f eatures Dolby
noise reduction, automatic sensing of
chromium-dioxide (CrO ) tape, and
autoreverse f or continuous play.
The anti-thef t f eature will disable the
system if it is disconnected f rom the
vehicle’s battery. To get the system
working again, you must enter a
code number (see page ).189
2
Dolby noise reduction manuf actured under
license from Dolby Laboratories Licensing Corpo-
ration. ‘‘DOLBY’’ and the double-D symbol are trademarks of Dolby Laboratories
Licensing Corporation.
Optional on U.S. EX model
Audio System
Comf ort and Convenience Feat ures
AM/FM/Cassette/CD/DVD
Audio system
168
Page 175 of 392

�µ�µ
�µ �µ
�µ�´
You can use any of f our methods to
f ind radio stations on the selected
band: TUNE, SEEK, SCAN or the
Preset buttons.
Use the TUNE knob to
tune the radio to a desired f requency.
Turn the TUNE knob to the right to
tune to a higher f requency, or to the
lef t to tune to a lower f requency.
Turn the knob right or lef t until the
display reaches the desired
f requency.
You can store the
f requencies of your f avorite radio
stations in the six preset buttons.
Each button will store one f requency
on the AM band, and two
f requencies on the FM band. To store a f requency:
Select the desired band, AM or
FM. FM1 and FM2 let you store
two f requencies with each Preset
button.
Use the TUNE or SEEK f unction
to tune the radio to a desired
station.
Pick the Preset button you want
for that station. Press the button
and hold it until you hear a beep.
Repeat steps 1 to 3 to store a total
of six stations on AM and twelve
on FM.
Once a station’s frequency is stored,
simply press and release the proper
Preset button to tune to it. The
preset f requencies will be lost if your
vehicle’s battery goes dead, is
disconnected, or the radio f use is
removed.
The SEEK f unction
searches the band for a station with
a strong signal. To activate it, press
either the or SEEK button,
then release it. Depending on which
button you press, the system scans
upward or downward f rom the
current f requency. It stops when it
finds a station with a strong signal. The SCAN f unction
samples all the stations with strong
signals on the selected band. To
activate it, press the SCAN button,
then release it. When the system is
in the SCAN mode, SCAN shows in
the display. The system will scan up
the band for a station with a strong
signal. When it f inds one, it will stop
and play that station for
approximately f ive seconds. If you do
nothing, the system will then scan
f or the next strong station and play
that f or f ive seconds. When it plays a
station that you want to continue
listening to, press the SCAN button
again. 1.
2.
3.
4.
CONT INUED
TUNE
Preset
SEEK SCAN
Audio System
Comf ort and Convenience Feat ures171
Page 193 of 392

You will have to store your favorite
stations in the Preset buttons after
the system begins working. Your
original settings were lost when
power was disconnected.
If your vehicle’s battery is discon-
nected or goes dead, the audio
system will disable itself . If this
happens, you will see ‘‘Code’’ in the
frequencydisplaythenexttimeyou
turn on the system. Use the Preset
buttons to enter the five-digit code. If
it is entered correctly, the radio will
start playing.
If you make a mistake entering the
code, do not start over or try to
correct your mistake. Complete the
f ive-digit sequence, then enter the
correct code. You have ten tries to
enter the correct code. If you are
unsuccessful in ten attempts, you
must then leave the system on for
one hour bef ore trying again.
Your vehicle’s audio system will
disable itself if it is disconnected
f rom electrical power f or any reason.
To make it work again, the user
must enter a specif ic f ive-digit code
in the Preset buttons. Because there
are hundreds of number
combinations possible f rom f ive
digits, making the system work
without knowing the exact code is
nearly impossible.
Youshouldhavereceivedacardthat
lists your audio system’s code
number and serial number. It is best
tostorethiscardinasafeplaceat
home. In addition, you should write
the audio system’s serial number in
this Owner’s Manual. If you should
happen to lose the card, you must
obtain the code number f rom your
Honda dealer. To do this, you will
need the system’s serial number.
On EX model
Thef t Protection
Audio System
Comf ort and Convenience Feat ures189
Page 204 of 392
IndicationSolution
If you see an error indication in the
display while operating the DVD
player,findthecauseinthechartto
the right. If you cannot clear the
error indication, take the vehicle to
your Honda dealer. Cause
Press the EJECT button and pull out the disc.
Check if the disc is inserted correctly in the
DVD Player.
Make sure the disc is not scratched or damaged.
Press the EJECT button and pull out the disc.
Check the disc for damage or deformation.
If the DVD cannot be pulled out or the error
indication does not disappear after the disc is
ejected, see your Honda dealer.
Do not try to force the disc out of the player.
Will disappear when the temperature returns to
normal.
Run the engine to recharge the battery.
FOCUS Error
Mechanical Error
High Temperature
Low Vehicle Battery
Voltage
DVDPlayerErrorIndications
Rear Entertainment System
Comf ort and Convenience Feat ures200
Page 208 of 392
, then lif t
it up. Remove the ba")
The batteries are under the domed
covers on the back of each earpiece.
To remove a cover, press down on it
with your thumb, slide it backward
(away f rom the headband), then lif t
it up. Remove the battery and note
its polarity. Install the new battery in
theearpiecewiththepolaritythe
same. Set the cover in place, then
slide it up until it locks. Each
headphone uses two AAA batteries.
The audio f or the rear entertainment
system is sent to the wireless
headphones that come with the
system. To turn on the headphones,
presstheredbuttonontheearpiece.
Adjust the volume level with the dial
at the bottom of the same earpiece.
To adjust the comf ort of the
headphones, slide the earpieces up
or down the headband.
For greater battery lif e, turn of f the
headphones when they are not in use
by pressing the red button again.
They will turn of f automatically if
they do not receive an audio signal
f rom the system f or several minutes.
When not in use, store the
headphones in the pocket on the
back of either f ront seat.
Some state and local goverment
agencies prohibit the use of
headphones by the driver of a motor
vehicle. Always obey applicable laws
and regulations. Wireless Headphones
Replacing Bat t eries
Rear Entertainment System
Comf ort and Convenience Feat ures204
ON/OFF BUTTON
VOLUME
DIAL
BATTERY
COVER