Page 179 of 392

�µ
�´
Select BAL or FAD by pressing the
TUNE knob. Adjust the Balance or
Fader to your liking by turning the
TUNE knob.
The displayed number shows you
the current setting.
When the adjustment level reaches
the center, you will see ‘‘ ’’.
The system will automatically return
the display to the selected audio
mode about f ive seconds af ter you
stop adjusting a mode with the
TUNE knob.
You can use the instrument panel
brightness control knob to adjust the
illumination of the audio system (see
page ). The audio system
illuminates when the parking lights
are on, even if the radio is turned of f .
The right display usually shows the
time when the ignition is in
ACCESSORY (I) or ON (II). It
shows the operation mode of the
radio, cassette player, CD player, or
rear entertainment system when you
operate them, then goes back to the
time display af ter f ive seconds.
To set the clock, press and hold the
SET (TUNE) button until the
numbers f lash. Change the hours by
pressing the H ( ) button until the
numbers advance to the desired time.
Change the minutes by pressing the
M ( ) button until the numbers
advance to the desired time. When
you are f inished, press the SET
button again.
C
73
Audio System
Comf ort and Convenience Feat ures
A udio System L ighting
Digital Clock
175
Page 182 of 392
�Û
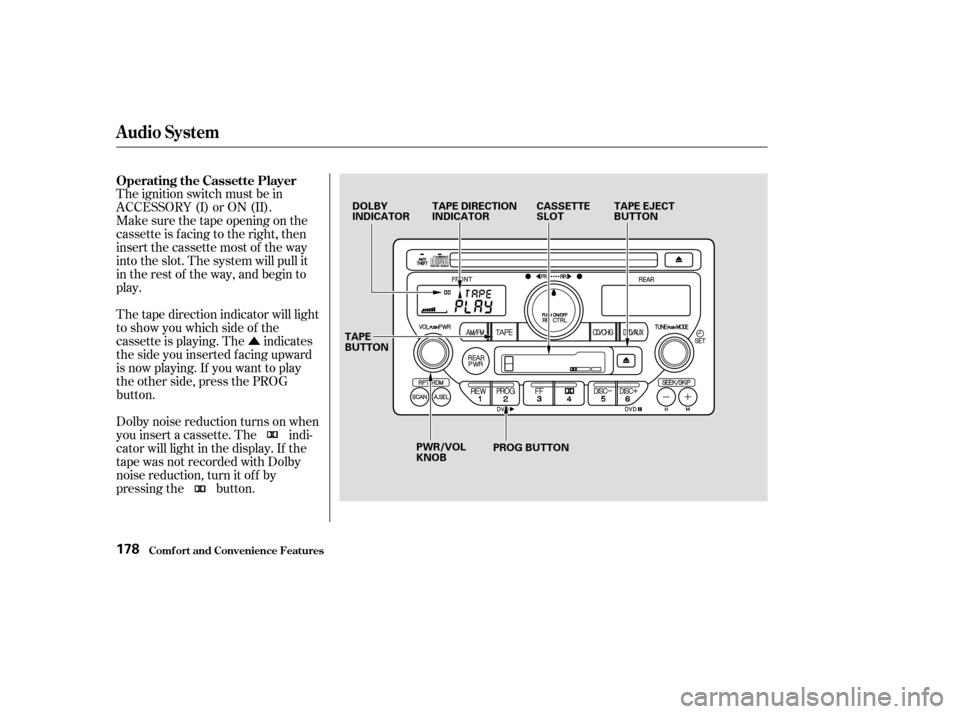
The ignition switch must be in
ACCESSORY (I) or ON (II).
Make sure the tape opening on the
cassette is facing to the right, then
insert the cassette most of the way
into the slot. The system will pull it
in the rest of the way, and begin to
play.
Dolby noise reduction turns on when
you insert a cassette. The indi-
cator will light in the display. If the
tape was not recorded with Dolby
noise reduction, turn it of f by
pressing the button. The tape direction indicator will light
to show you which side of the
cassette is playing. The indicates
thesideyouinsertedfacingupward
is now playing. If you want to play
the other side, press the PROG
button. Operating the Cassette Player
Audio System
Comf ort and Convenience Feat ures178
DOLBY
INDICATOR
TAPE DIRECTION
INDICATOR CASSETTE
SLOTTAPE EJECT
BUTTON
PWR/VOL
KNOB PROG BUTTON
TAPE
BUTTON
Page 185 of 392

The cassette player picks up dirt and
oxides f rom the tape. This contami-
nation builds up over time and
causes the sound quality to degrade.
To prevent this, you should clean the
player af ter every 30 hours of use.
Your dealer has a cleaning kit
available.
If you do not clean the cassette
player regularly, it may eventually
become impossible to remove the
contamination with a normal
cleaning kit.Use 100-minute or shorter cassettes.
Cassettes longer than that use
thinner tape that may break or jam
the drive.
Look at the cassette before you
insert it. If the tape is loose, tighten
it by turning a hub with a pencil or
your f inger.
When they are not in use, store
cassettes in their cases to protect
them f rom dust and moisture. Never
place cassettes where they will be
exposed to direct sunlight, high heat,
or high humidity. If a cassette is
exposed to extreme heat or cold, let
it reach a moderate temperature
bef ore inserting it in the player.
Never try to insert f oreign objects
into the cassette player.
If the label is peeling of f , remove it
from the cassette or it could cause
the cassette to jam in the player.
Never try to insert a warped or
damaged cassette in the player.
Caring f or the Cassette Player
Audio System
Comf ort and Convenience Feat ures181
Page 189 of 392
Never try to insert f oreign objects in
the CD player or the magazine. A new CD may be rough on the
inner and outer edges. The small
plastic pieces causing this roughness
can f lake of f and f all on the re-
cording surf ace of the disc, causing
skipping or other problems. Remove
these pieces by rubbing the inner
and outer edges with the side of a
pencil or pen.
Handle a CD by its edges; never
touch either surf ace. Do not place
stabilizer rings or labels on the CD.
These, along with contamination
f rom f ingerprints, liquids, and f elt-tip
pens, can cause the CD to not play
properly, or possibly jam in the drive.
When a CD is not being played, store
it in its case to protect it f rom dust
and other contamination. To prevent
warpage, keep CDs out of direct
sunlight and extreme heat.
To clean a disc, use a clean sof t cloth.
Wipe across the disc f rom the center
to the outside edge.
Protecting Compact Discs
Audio System
Comf ort and Convenience Feat ures185
Page 210 of 392
, or
the hood, will cause it to alarm. It
also alarms if the radio is removed
f rom the dashboard or")
Once the security system is set,
opening any door (without using the
key or the remote transmitter), or
the hood, will cause it to alarm. It
also alarms if the radio is removed
f rom the dashboard or the wiring is
cut.Do not attempt to alter this system
or add other devices to it. The security system will not set if
the hood, tailgate, or any door is not
f ully closed. If the system will not set,
check the Door and Tailgate Open
Monitor on the instrument panel
(see page ) to see if the doors and
tailgate are f ully closed. Since it is
notpartofthemonitordisplay,
manually check the hood.
The security system helps to protect
your vehicle and valuables f rom thef t.
The horn sounds and a combination
of headlights, parking lights, side
marker lights, and taillights f lash if
someone attempts to break into your
vehicleorremovetheradio.This
alarm continues f or two minutes,
then the system resets. To reset an
alarming system before the two
minutes have elapsed, unlock the
driver’s f ront door with the key or
the remote transmitter.
The security system sets auto-
matically, f if teen seconds af ter you
lock the doors, hood, and tailgate.
For the system to activate, you must
lock the doors f rom the outside with
the key, or remote transmitter. The
security system light next to the low
oil pressure indicator starts blinking
immediately to show you the system
is setting itself . 64
On EX model
Security System
Comf ort and Convenience Feat ures206
SECURITY SYSTEM LIGHT
Page 211 of 392

without keeping")
Push in the Cruise Control Master
Switch to the lef t of the steering
column. The indicator in the
switch will light.
Cruise control allows you to maintain
asetspeedabove25mph(40km/h)
without keeping your f oot on the
accelerator pedal. It should be used
f or cruising on straight, open
highways. It is not recommended f or
conditions such as city driving,
winding roads, slippery roads, heavy
rain, or bad weather. You should
have f ull control of the vehicle under
those conditions.
Accelerate to the desired cruising
speedabove25mph(40km/h).Press and release the SET/
DECELbuttononthesteering
wheel. The CRUISE CONTROL
light on the instrument panel
comes on to show the system is
now activated.
1.
2. 3.
CONT INUED
Cruise ControlUsing t he Cruise Cont rol
Cruise Control
Comf ort and Convenience Feat ures207
CRUISE CONTROL MASTER SWITCH
RESUME/ACCEL
CANCEL
SET/DECEL
Improper use of the cruise
control can lead to a crash.
Use the cruise control only
when traveling on open
highways in good weather.
Page 212 of 392

You can decrease the set cruising
speed in any of these ways:
You can increase the set cruising
speed in any of these ways:
When climbing a steep hill, the
automatic transmission may
downshif t to hold the set speed. Thecruisecontrolmaynotholdthe
set speed when you are going up and
down hills. If your speed increases
going down a hill, use the brakes to
slow down to the desired speed. This
will cancel the cruise control. To
resume the set speed, press the
RESUME/ACCEL button. The
CRUISE CONTROL light on the
instrument panel comes on. Press and hold the RESUME/
ACCEL button. The vehicle will
accelerate. When you reach the
desired cruising speed, release the
button.
Push on the accelerator pedal.
Accelerate to the desired cruising
speed and press the SET/DECEL
button.
To increase your speed in very
small amounts, tap the RESUME/
ACCEL button repeatedly. Each
time you do this, your vehicle will
speed up about 1 mph (1.6 km/h).Press and hold the SET/DECEL
button. The vehicle will decelerate.
Release the button when you
reach the desired speed.
To slow down in very small
amounts, tap the SET/DECEL
button repeatedly. Each time you
do this, your vehicle will slow
down about 1 mph (1.6 km/h).
Tap the brake pedal lightly with
your f oot. The CRUISE
CONTROL light on the instru-
ment panel will go out. When the
vehicle slows to the desired speed,
press the SET/DECEL button.
The vehicle will then maintain the
desired speed.Changing t he Set Speed
Cruise Control
Comf ort and Convenience Feat ures208
Page 213 of 392

Youcancancelthecruisecontrolin
any of these ways:Push the CANCEL button on the
steering wheel.
Press the Cruise Control Master
Switch.
Even with the cruise control turned
on, you can still use the accelerator
pedal to speed up f or passing. Af ter
completing the pass, take your foot
of f the accelerator pedal. The vehicle
will return to the set cruising speed.
Resting your f oot on the brake pedal
will cause the cruise control to
cancel.
Tap the brake pedal.Pressing the Cruise Control Master
Switch turns the system completely
of f and erases the previous cruising
speed f rom memory. To use the
system again, ref er to
.
When you push the CANCEL button,
or tap the brake pedal, the CRUISE
CONTROL light on the instrument
panel will go out and the vehicle will
begin to slow down. You can use the
accelerator pedal in the normal way.
The system remembers the
previously-set cruising speed. To
return to that speed, accelerate to
above25mph(40km/h)andthen
press and release the RESUME/
ACCEL button. The CRUISE
CONTROL light comes on. The
vehicle will accelerate to the same
cruising speed as bef ore.
Cancelling t he Cruise Cont rol
Using t he
Cruise Cont rol
Cruise Control
Comf ort and Convenience Feat ures209
CANCEL
BUTTON