Page 127 of 392

The f low-through ventilation system
draws in outside air, circulates it
through the interior, then exhausts it
through vents near the rear side
panels.Turn the temperature control dial
all the way to the lef t.
Make sure the A/C is of f .
Select and Fresh Air mode.
Set the f an to the desired speed. If the interior is very warm f rom
beingparkedinthesun,youcancool
it down more rapidly by setting up
the controls this way: When the interior has cooled down
to a more comf ortable temperature,
close the windows and set the
controls as described f or normal
cooling.
Air conditioning places an extra load
on the engine. Watch the engine
coolant temperature gauge (see page
) when driving in stop-and-go
traf f ic or climbing a long, steep hill.
If it moves near the red zone, turn
of f the A/C until the gauge reads
normally.
Turn on the A/C by pressing the
button. The light in the button
comesonwhenafanspeedis
selected.
Make sure the temperature
control dial is all the way to the left.
Select .
If the outside air is humid, select
Recirculation mode. If the outside
air is dry, select Fresh Air mode.
Set the f an to the desired speed.
Start the engine.
Turn on the A/C by pressing the
button. Make sure the tempera-
ture control dial is turned all the
way to the left.
Set the f an to maximum speed.
Open the windows partially. Select
and Fresh Air mode.
1.
2.
3.
4. 1.
2.
3.
5. 4.
1.
2.
3. 68
Comf ort and Convenience Feat ures
Heating and Cooling
Vent ilat ion
T o Cool wit h A /C
123
Page 134 of 392

To put the Automatic Climate
Control in f ully-automatic mode,
press the AUTO button and set the
desired temperature by turning the
temperature control dial. You will
see FULL AUTO in the system’s
display. The light above thebutton also show you which
mode, Recirculation or Fresh Air, is
selected.
The system automatically selects the
proper mix of conditioned and/or
heated air that will, as quickly as
possible, raise or lower the interior
temperature f rom its current level to
the set temperature. Pressing the OFF button shuts the
climate control system completely
of f . Keep the system completely of f
only f or short periods. To keep stale
air and mustiness f rom collecting,
you should have the f an running at
all times.
When you set the temperature to its
lower limit (60°F/18°C) or its upper
limit (90°F/32°C), the system runs
at f ull cooling or heating only. It does
not regulate the interior temperature. When the temperature is set
between the lower and upper limits,
the system regulates the interior
temperature to the set value.
Comf ort and Convenience Feat ures
Climat e Cont rol Syst em
Fully-automatic Operation
130
RECIRCULATION
BUTTON
REAR WINDOW
DEFOGGER BUTTON
FAN CONTROL
BUTTONS
OFF BUTTON
AUTO BUTTON TEMPERATURE CONTROL DIAL
MODE BUTTON
AIR CONDITIONING BUTTON
Page 138 of 392
Theclimatecontrolsystemhastwo
sensors. A sunlight sensor is located
in the top of the dashboard and a
temperature sensor is next to the
steering column. Do not cover the
sensors or spill any liquid on them.
Comf ort and Convenience Feat ures
Climat e Cont rol Syst em
Sunlight Sensor/T emperature
Sensor
134
SUNLIGHT SENSORTEMPERATURE SENSOR
Page 140 of 392
When the system is in FULL AUTO,
the rear A/C passenger control dial
cannot be used. The system will
cycle on and of f automatically to
bring the interior to the set
temperature.
To enable the rear A/C passenger
control dial, press the RR A/C
Manual button on the control panel.
The light in the button will come on.When the rear A/C passenger
control dial is enabled, the passenger
in the second row can use the rear
A/C passenger control dial to adjust
the temperature up to 21°F (10°C)
higher or lower than the f ront. This
is limited by the minimum and
maximum system temperatures.With the passenger control dial on
the back of the center console, you
can adjust the rear temperature
independently of the f ront.
On EX model
On EX modelOn LX model
Rear A /C Cont rol But t on Rear A /C Passenger Cont rol Dial
Comf ort and Convenience Feat ures
Climat e Cont rol Syst em
136
AUTO BUTTON
REAR A/C CONTROL BUTTON CONTROL DIAL
Page 147 of 392
 or ON (II), insert
the disc into the CD slot. Push the
disc")
You operate the CD player with the
same controls used f or the radio. For inf ormation, see page .
With the ignition switch in
ACCESSORY (I) or ON (II), insert
the disc into the CD slot. Push the
disc in half way, the drive will pull it
in the rest of the way and begin to
play. The number of the track that is
playing is shown in the display.You can also play 3-inch (8-cm) discs
without using an adapter ring. Play
only standard round discs. Odd-
shaped CDs may jam in the drive or
cause other problems.
For best results when using CD-R
discs, use only high quality discs
labeled f or audio use. When
recording a CD-R, the recording
must be closed in order f or the disc
to be used by CD players. CD-RW
discs will not work in this unit.
You can use the instrument panel
brightness control knob to adjust the
illumination of the audio system (see
page ). The audio system
illuminates when the parking lights
are on, even if the radio is turned of f .
176
73
CONT INUED
Operating the CD Player A udio System L ighting Radio Frequencies and Reception
Audio System
Comf ort and Convenience Feat ures143
CD/TAPE BUTTON
AM/FM BUTTON CD SLOTRPT BUTTON
REPEAT INDICATOR
EJECT
BUTTON
PWR/VOL KNOB SEEK/SKIP BARRANDOM INDICATOR
A.SEL/RDM BUTTON
Page 154 of 392

�Û
The tape direction indicator will light
to show you which side of the
cassette is playing. The indicates
thesideyouinsertedfacingupward
is now playing. If you want to play
the other side, press the PLAY/
PROG button. Dolby noise reduction turns on when
you insert a cassette. The indi-
cator will light in the display. If the
tape was not recorded with Dolby
noise reduction, turn it of f by
pressing the NR button.
When the system reaches the end of
the tape, it will automatically reverse
direction and play the other side. If
you want to remove the cassette
f rom the drive, press the EJECT
button on the cassette player. Noise reduction remains of f until you
turn it on by pressing the button
again.If you turn the system of f while a
tape is playing, either with the PWR/
VOL knob or by turning of f the
ignition, the cassette will remain in
the drive. When you turn the system
back on, the cassette player will be in
pause mode. To begin playing, press
the PLAY/PROG button.
To switch to the radio or CD player
while a tape is playing, press the
AM/FM, or CD/TAPE button. To
change back to the cassette player,
press the CD/TAPE button.
Audio System
Comf ort and Convenience Feat ures150
Page 163 of 392

�µ
�´
The system will automatically return
the display to the selected audio
mode about f ive seconds af ter you
stop adjusting a mode with the
TUNE knob. Select BAL or FAD by pressing the
MODE knob. Adjust the Balance or
Fader to your liking by turning the
MODE knob.
The displayed number shows you
the current setting.
When the adjustment level reaches
the center, you will see ‘‘ ’’.
For inf ormation, see page . You can use the instrument panel
brightness control knob to adjust the
illumination of the audio system (see
page ). The audio system
illuminates when the parking lights
are on, even if the radio is turned of f .
Therightdisplayshowsthetime
when the ignition is in ACCESSORY
(I) or ON (II).
To set the clock, press and hold the
SET (TUNE) button until the
numbers f lash. Change the hours by
pressing the H ( ) button until the
numbers advance to the desired time.
Change the minutes by pressing the
M ( ) button until the numbers
advance to the desired time. When
you are f inished, press the SET
button again.
C
73
176
Audio System
Comf ort and Convenience Feat ures
A udio System L ighting
Radio Frequencies and Reception
Digital Clock
159
Page 164 of 392
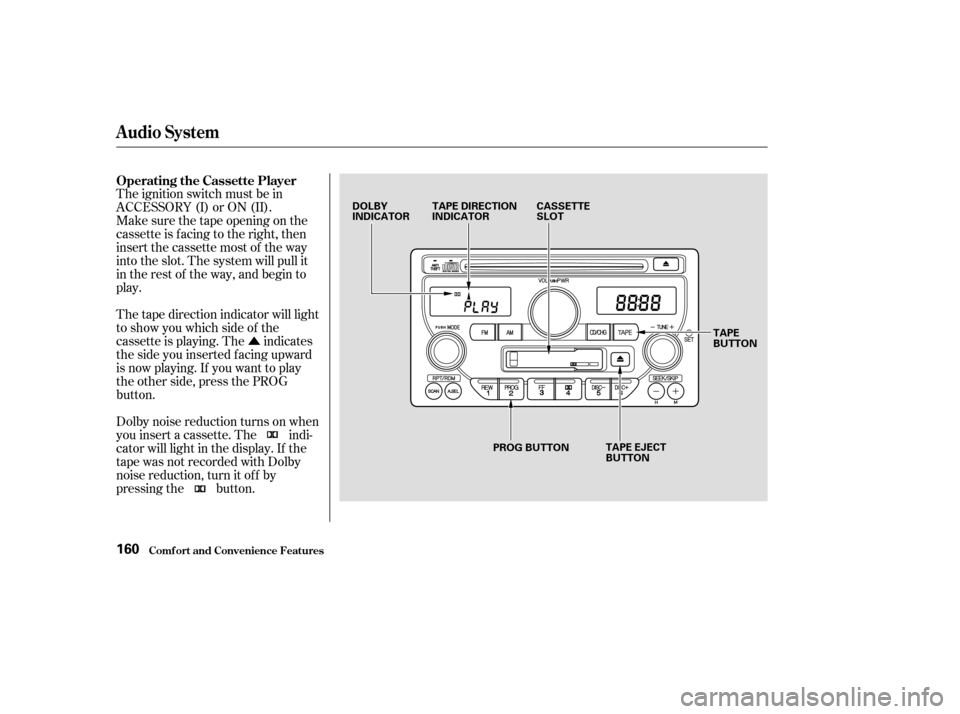
�Û
The ignition switch must be in
ACCESSORY (I) or ON (II).
Make sure the tape opening on the
cassette is facing to the right, then
insert the cassette most of the way
into the slot. The system will pull it
in the rest of the way, and begin to
play.
Dolby noise reduction turns on when
you insert a cassette. The indi-
cator will light in the display. If the
tape was not recorded with Dolby
noise reduction, turn it of f by
pressing the button. The tape direction indicator will light
to show you which side of the
cassette is playing. The indicates
thesideyouinsertedfacingupward
is now playing. If you want to play
the other side, press the PROG
button. Operating the Cassette Player
Audio System
Comf ort and Convenience Feat ures160
DOLBY
INDICATOR
TAPE DIRECTION
INDICATOR CASSETTE
SLOT
TAPE EJECT
BUTTON TAPE
BUTTON
PROG BUTTON