Page 54 of 415

The combination lap belt and
shoulder belt in the center position
of the third seat goes over your
shoulder, across your chest and over
your hips. The shoulder belt has an
emergency locking retractor that
works in combination with the lap
belt.
The seat belts in all positions except
the driver’s and the center position
of the third seat have an additional
locking mechanism that must be
activated to secure a child seat. (See
pages and f or instructions on
how to secure child seats with this
type of seat belt.)
If the shoulder part of the belt is
pulled all the way out, the locking
mechanism will activate. The belt
will retract, but it will not allow the
passenger to move f reely.
To deactivate the locking
mechanism, unlatch the buckle and
let the seat belt f ully retract. To
ref asten the belt, pull it out only as
f ar as needed.
See page f or instructions on how
to wear the lap/shoulder belt
properly.
To f asten the seat belt, unlatch the
metal plate of the shoulder belt from
the anchor on the ceiling and extend
the belt by pulling the metal plate.Attach the metal hook on the edge of
the shoulder belt to the metal loop
on the latch plate of the lap belt
marked CENTER, then tug on the
shoulder belt to make sure it is
securely attached.
Insert the latch plate of the lap belt
into the buckle marked CENTER,
then tug on the lap belt to make sure
the buckle is latched.
To unlock the belt, push the red
PRESS button on the buckle and
detach the shoulder belt f rom the lap
belt.
See page f or how to lengthen the
lap belt, and how to properly position
the lap and shoulder belts.
39
17 18
35
Additional Inf ormation About Your Seat Belts
Driver and Passenger Saf ety51
Page 72 of 415

This section gives inf ormation about
the controls and displays that
contribute to the daily operation of
your Honda. All the essential
controls are within easy reach............................
Control Locations .70
...............................
Indicator Lights .71
.............................................
Gauges .78
Controls Near the Steering .......................................
Wheel .81
...................................
Headlights .82
Automatic Lighting Off .....................................
Feature .83
............
Daytime Running Lights . 83
....
Instrument Panel Brightness . 83
................................
Turn Signals .84 .....................
Windshield Wipers .84
..................
Windshield Washers . 86
Rear Window Wiper and .....................................
Washer .86
..........................
Hazard Warning .87
.............
Rear Window Def ogger . 87
......
Steering Wheel Adjustment . 88
...............................
Keys and Locks .89
..............................................
Keys .89
....................
Immobilizer System . 90
............................
Ignition Switch .91
......................
Power Door Locks .92
...................
Remote Transmitter . 94
..............
Childproof Door Locks . 98
........................................
Tailgate .98
..................................
Glove Box .100
...................
Manual Sliding Doors . 101
.....................
Power Sliding Doors .103
...............................................
Seats .109
....................
Passenger Seating .109
......................
Seat Adjustments .110
Driver’s Seat Manual Height ............................
Adjustment .112
Driver’s Seat Power ..........................
Adjustments .113
.........
Driver’s Lumbar Support . 114....................................
Armrests .115
........................
Head Restraints .115
.....................
Third Seat Access .116
Moving the Second Row ...........................
Bucket Seat .117
Removing the Bucket Seats ................
in the Second Row . 119
Folding the Third Row .........................
‘‘Magic Seat’’ .120
..................................
Seat Heaters .123
............................
Power Windows .124
...........................................
Mirrors .128
...............................
Parking Brake .129
..................................
Digital Clock .130
..................................
Center Table .130
.........................
Beverage Holders .132
........................
Sunglasses Holder .134
........................................
Sun Visor .134
................................
Vanity Mirror .135
.......................
Rear Compartment .135
...............................
Center Pocket .136
...................................
Coin Holder .136
...................................
Storage Box .137
......................................
Coat Hook .137
............
Accessory Power Sockets . 138
...............................
Interior Lights .139
Instruments and Controls
Inst rument s and Cont rols69
Page 73 of 415
Control L ocations
Inst rument s and Cont rols70
MIRROR
CONTROLSDIGITAL CLOCK
HEATING/COOLING CONTROLS
CLIMATE CONTROL SYSTEM
HOOD RELEASE HANDLE
FUEL FILL DOOR RELEASE (P.103)
(P.128)(P.130) (P.144)
(P.152)
(P.166)
(P.169, 181,201,217)
(P.246)
(P.245)
(P.123) (P.124) (P.92) POWER SLIDING
DOOR SWITCHES
REAR A/C
UNITCONTROL
AUDIO SYSTEM/
REAR ENTERTAINMENT
SYSTEM
POWER WINDOW
SWITCHES DOOR LOCKS
WITCHES
SEAT HEATER
SWITCH
Page 74 of 415
�Î
�Î
�Î
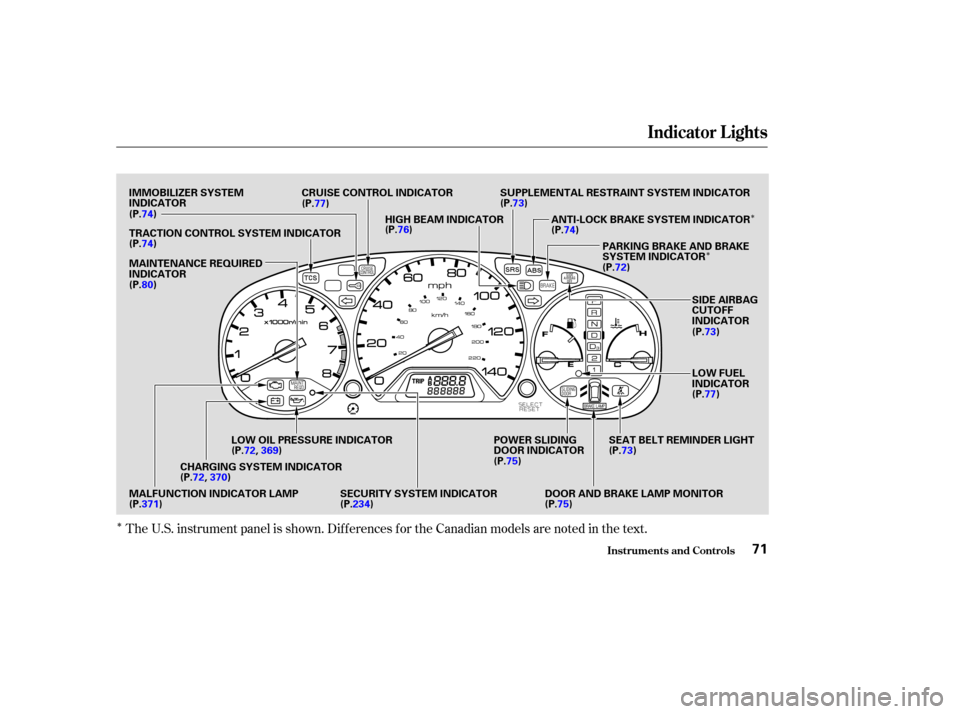
The U.S. instrument panel is shown. Dif f erences f or the Canadian models are noted in the text.
Indicator L ights
Inst rument s and Cont rols71
IMMOBILIZER SYSTEM
INDICATOR CRUISE CONTROL INDICATOR
HIGH BEAM INDICATOR SUPPLEMENTAL RESTRAINT SYSTEM INDICATOR
ANTI-LOCK BRAKE SYSTEM INDICATORPARKING BRAKE AND BRAKE
SYSTEM INDICATOR
SIDE AIRBAG
CUTOFF
INDICATOR
LOW FUEL
INDICATOR
SEAT BELT REMINDER LIGHT
DOOR AND BRAKE LAMP MONITOR
POWER SLIDING
DOOR INDICATOR
SECURITY SYSTEM INDICATOR
LOW OIL PRESSURE INDICATOR
CHARGING SYSTEM INDICATOR
MALFUNCTION INDICATOR LAMP MAINTENANCE REQUIRED
INDICATOR TRACTION CONTROL SYSTEM INDICATOR (P.74)
(P.74)
(P.80) (P.77)
(P.76) (P.73)
(P.74)
(P.72)
(P.73)
(P.77)
(P.73)
(P. 75)
(P.75)
(P.371) (P.72,
369)
(P.72, 370)
(P.234)
Page 77 of 415
, and when
the ignition switch is turned to
START (III). If this light comes on at
any other time, there is a")
This light normally comes on f or a
f ew seconds when you turn the
ignition switch ON (II), and when
the ignition switch is turned to
START (III). If this light comes on at
any other time, there is a problem in
theABS.If thishappens,takethe
vehicle to your dealer to have it
checked. With the light on, your
vehicle still has normal braking
ability but no anti-lock. For complete
inf ormation, see page .This indicator has three f unctions:
This light also comes on when you
turn the ignition ON (II) and goes off
af ter the engine starts. See page
f or more inf ormation on the
TCS. If itcomesonandstaysonwhen
the Traction Control System is on,
it indicates that there is a problem
in the TCS. It f lashes when the TCS is
regulating wheelspin. Itcomesonasareminderthatyou
have turned off the Traction
Control System.
This indicator comes on f or a f ew
seconds when you turn the ignition
switch ON (II). It will then go of f if
you have inserted a properly-coded
ignition key. If it is not a properly-
coded key, the indicator will blink
and the engine will not start (see
page ).
This indicator also blinks several
times when you turn the ignition
switch f rom ON (II) to ACCESSORY
(I) or LOCK (0).
1.
2.
3.
90
268 269
Indicator L ights
Inst rument s and Cont rols
Anti-lock Brake System
(A BS) Indicator Traction Control System
(T CS) Indicator
Immobilizer System
Indicator
74
U.S. Canada
Page 85 of 415
If you leave the lights on with the
ignition switch in ACCESSORY (I)
or LOCK (0), you will hear a
reminder chime when you open the
driver’s door.
To change between low beams and
high beams, pull the turn signal lever
until you hear a click, then let go.
The blue high beam indicator will
light (see page ).To f lash the high beams, pull the
turn signal lever back lightly, then
release it. The high beams will come
on and go of f .
The high beams will stay on f or as
long as you hold the lever back, no
matter what position the headlight
switch is in.
The rotating switch on the lef t lever
controls the lights. Turning this
switch to the ‘‘ ’’ position turns
on the parking lights, taillights,
instrument panel lights, side-marker
lights, and rear license plate light.
Turning the switch to the ‘‘ ’’
position turns on the headlights. 76
Controls Near the Steering Wheel
Inst rument s and Cont rols
Headlights
82
Page 86 of 415

The Automatic Lighting Of f f eature
turns of f the headlights, parking
lights, taillights, side marker lights,
license plate lights and instrument
panel lights within 15 seconds of
removing the key from the ignition
switch and closing the driver’s door.The lights will turn on again when
you unlock or open the driver’s door.
If you unlock the door, but do not
open it within 15 seconds, the lights
will go off. With the driver’s door
open, you will hear a lights-on
reminder chime.
With the headlight switch off, the
high beam headlights come on with
reduced brightness when you turn
the ignition switch to ON (II) and
release the parking brake. They
remain on until you turn the ignition
of f , even if you set the parking brake.
The headlights revert to normal
operation when you turn them on
with the switch.
The knob on the instrument panel
controls the brightness of the instru-
ment panel lights. Turn the knob to
adjust the brightness.
This feature activates if you leave
the headlight switch in the or
position, remove the key, open,
then close the driver’s door.
If you remove the key f rom the
ignition switch with the headlight
switch on, but do not open the door
and get out, the lights will turn of f
af ter 10 minutes.
On EX and EX-L models
Controls Near the Steering Wheel
Inst rument s and Cont rols
Automatic Lighting Of f Feature
Daytime Running L ights
(Canadian Models)Instrument Panel Brightness
83
INSTRUMENT PANEL BRIGHTNESS
CONTROL KNOB
Page 90 of 415
Make sure the rear window is clear
and you have good visibility bef ore
starting to drive.
The rear window def ogger will clear
fog, frost, and thin ice from the
window. Push the def ogger button to
turn it on and of f . The light above
the button lights to show the
def ogger is on. If you do not turn it
of f , the def ogger will shut itself of f
af ter about 15 minutes. It also shuts
of f when you turn of f the ignition.
You have to turn it on again when
you restart the vehicle.
Push the button to the left of the
clocktoturnonthehazardwarning
lights (f our-way f lashers). This
causes all f our outside turn signals
and both indicators in the instrument
panel to f lash. Use the hazard
warning lights if you need to park in
a dangerous area near heavy traffic,
or if your vehicle is disabled.
CONT INUED
Controls Near the Steering Wheel
Inst rument s and Cont rols
Rear Window Def ogger
Hazard Warning
87
EX and EX-L models
Vehicles with Navigaition System

(P.128)(P.130) (P.144)")

or LOCK (0), you will hear a
reminder chime when you open the
driver’s door.
To change between low beams and
high beams, pull the")
