Page 150 of 395
 �Û
The tape direction indicator will light
to show you which side of the
cassette is playing. The indicates
thesideyouinsertedfacingupward
is now playing. If you want to play
the other side, press th")
�Û
The tape direction indicator will light
to show you which side of the
cassette is playing. The indicates
thesideyouinsertedfacingupward
is now playing. If you want to play
the other side, press the Preset 3
(PLAY/PROG) side of the preset
bar. Dolby noise reduction turns on when
you insert a cassette. The indi-
cator will light in the display. If the
tape was not recorded with Dolby
noise reduction, turn it of f by
pressing the Preset 4 (NR) side of
the preset bar.
Noise reduction remains of f until you
turn it on by pressing the button
again.If you turn the system of f while a
tape is playing, either with the PWR/
VOL knob or by turning of f the
ignition, the cassette will remain in
the drive. When you turn the system
back on, the cassette player will be in
pause mode. To begin playing, press
thePreset3(PLAY/PROG)sideof
the preset bar.
To switch to the radio or CD player
while a tape is playing, press the
AM/FM, or CD/AUX button. To
change back to the cassette player,
push the CD/AUX button.
When the system reaches the end of
the tape, it will automatically reverse
direction and play the other side. If
you want to remove the cassette
from the drive, press the eject button
on the cassette player.
Audio System
Comf ort and Convenience Feat ures147
Page 152 of 395
�µThe Repeat f unction
continuously replays the current
song or passage. Press the RPT
button to activate it; you will see RPT
displayed as a reminder. When the
system reaches the end of the song
or passage currently playing, it will
automatically go into rewind. When
it senses the beginning of the same
song or passage, the system returns
to PLAY mode. It will continue to
repeat this same program until you
deactivate REPEAT by pressing the
button again. The SKIP and REPEAT f unctions
use silent periods on the tape to f ind
the end of a song or passage. These
f eatures may not work to your
satisfaction if there is almost no gap
between selections, a high noise
level between selections, or a silent
period in the middle of a selection.
Damaged cassettes can jam inside
the drive or cause other problems.
See page for information on
cassette care and protection.
191
Audio System
Comf ort and Convenience Feat ures
REPEA T
Caring f or the Cassette Player
149
Page 160 of 395
Your Honda’s audio system has an
in-dash CD changer that holds up to
six discs, providing several hours of
continuous entertainment. You
operate this CD changer with the
same controls used f or the radio.
To load CDs or operate the CD
changer, the ignition switch must be
in ACCESSORY (I) or ON (II).
Load and play only standard round
discs. Odd-shaped CDs may jam in
the drive or cause other problems.
You cannot load and play 3-inch
(8-cm)discsinthissystem.
For best results when using CD-R
discs, use only high quality discs
labeled f or audio use. When
recording a CD-R, the recording
must be closed in order f or the disc
to be used by CD players. CD-RW
discs will not work in this unit.
CONT INUED
Operating the CD Changer
Audio System
Comf ort and Convenience Feat ures157
CD BUTTONEJECT
BUTTON
RPT BUTTON
DISC NUMBER
CD SLOT
LOAD BUTTON CD LOAD INDICATOR
Page 168 of 395
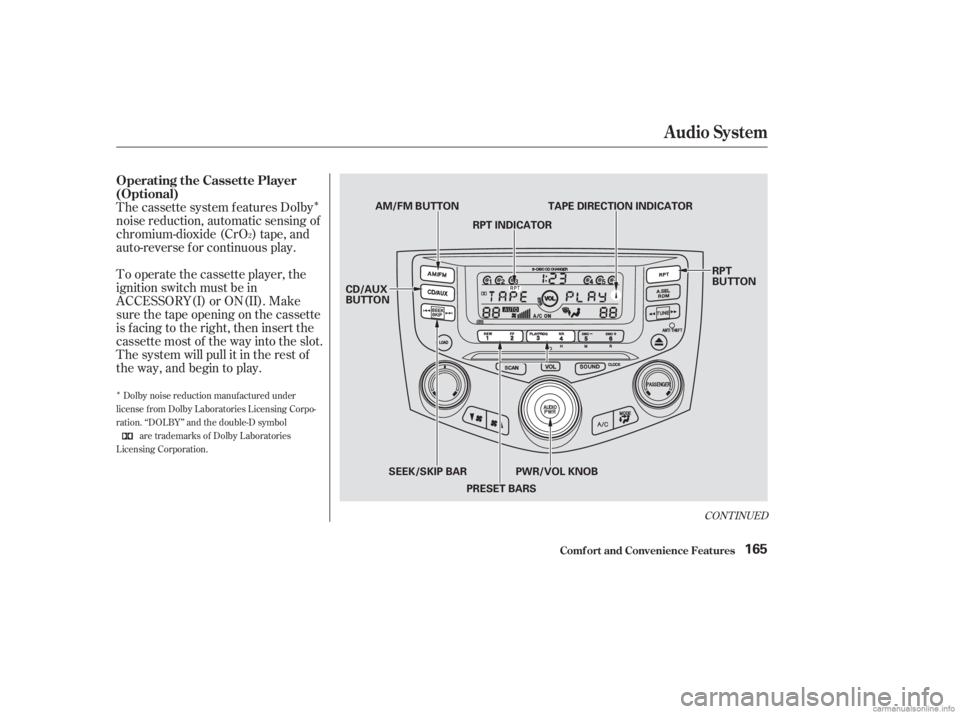
�Î
�Î
The cassette system f eatures Dolby
noise reduction, automatic sensing of
chromium-dioxide (CrO ) tape, and
auto-reverse f or continuous play.
To operate the cassette player, the
ignition switch must be in
ACCESSORY(I) or ON(II). Make
sure the tape opening on the cassette
is f acing to the right, then insert the
cassette most of the way into the slot.
The system will pull it in the rest of
the way, and begin to play.
2
Dolby noise reduction manuf actured under
license from Dolby Laboratories Licensing Corpo-
ration. ‘‘DOLBY’’ and the double-D symbol are trademarks of Dolby Laboratories
Licensing Corporation.
CONT INUED
Operating the Cassette Player
(Optional)
Audio System
Comf ort and Convenience Feat ures165
RPT
BUTTON
CD/AUX
BUTTON AM/FM BUTTON
TAPE DIRECTION INDICATOR
RPT INDICATOR
PWR/VOL KNOB
SEEK/SKIP BAR
PRESET BARS
Page 169 of 395
 �Û
The tape direction indicator will light
to show you which side of the
cassette is playing. The indicates
thesideyouinsertedfacingupward
is now playing. If you want to play
the other side, press th")
�Û
The tape direction indicator will light
to show you which side of the
cassette is playing. The indicates
thesideyouinsertedfacingupward
is now playing. If you want to play
the other side, press the Preset 3
(PLAY/PROG) side of the preset
bar. Dolby noise reduction turns on when
you insert a cassette. The indi-
cator will light in the display. If the
tape was not recorded with Dolby
noise reduction, turn it of f by
pressing the Preset 4 (NR) side of
the preset bar.
Noise reduction remains of f until you
turn it on by pressing the button
again.If you turn the system of f while a
tape is playing, either with the PWR/
VOL knob or by turning of f the
ignition, the cassette will remain in
the drive. When you turn the system
back on, the cassette player will be in
pause mode. To begin playing, press
thePreset3(PLAY/PROG)sideof
the preset bar.
When the system reaches the end of
the tape, it will automatically reverse
direction and play the other side. If
you want to remove the cassette
from the drive, press the eject button
on the cassette player. To switch to the radio or CD player
while a tape is playing, press the
AM/FM, or CD/AUX button. To
change back to the cassette player,
push the CD/AUX button.
Audio System
Comf ort and Convenience Feat ures166
Page 171 of 395
�µThe Repeat f unction
continuously replays the current
song or passage. Press the RPT
button to activate it; you will see RPT
displayed as a reminder. When the
system reaches the end of the song
or passage currently playing, it will
automatically go into rewind. When
it senses the beginning of the same
song or passage, the system returns
to PLAY mode. It will continue to
repeat this same program until you
deactivate REPEAT by pressing the
button again. The SKIP and REPEAT f unctions
use silent periods on the tape to f ind
the end of a song or passage. These
f eatures may not work to your
satisfaction if there is almost no gap
between selections, a high noise
level between selections, or a silent
period in the middle of a selection.
Damaged cassettes can jam inside
the drive or cause other problems.
See page for information on
cassette care and protection.
191
REPEA T
Caring f or the Cassette Player
Audio System
Comf ort and Convenience Feat ures168
Page 180 of 395
Your Honda’s audio system has an
in-dash CD changer that holds up to
six discs, providing several hours of
continuous entertainment. You
operate this CD changer with the
same controls used f or the radio.
To load CDs or operate the CD
changer, the ignition switch must be
in ACCESSORY (I) or ON (II).
Load and play only standard round
discs. Odd-shaped CDs may jam in
the drive or cause other problems.
You cannot load and play 3-inch
(8-cm)discsinthissystem.
For best results when using CD-R
discs, use only high quality discs
labeled f or audio use. When
recording a CD-R, the recording
must be closed in order f or the disc
to be used by CD players. CD-RW
discs will not work in this unit.
CONT INUED
Operating the CD Changer
Audio System
Comf ort and Convenience Feat ures177
LOAD BUTTON CD/AUX
BUTTON
PWR/VOL
KNOBCD LOAD
INDICATOR
UPPER DISPLAY
Page 189 of 395
Never try to insert f oreign objects in
the CD player or the magazine. A new CD may be rough on the
inner and outer edges. The small
plastic pieces causing this roughness
can f lake of f and f all on the re-
cording surf ace of the disc, causing
skipping or other problems. Remove
these pieces by rubbing the inner
and outer edges with the side of a
pencil or pen.
To clean a disc, use a clean sof t cloth.
Wipe across the disc f rom the center
to the outside edge. When a CD is not being played, store
it in its case to protect it f rom dust
and other contamination. To prevent
warpage, keep CDs out of direct
sunlight and extreme heat.
Handle a CD by its edges; never
touch either surf ace. Do not place
stabilizer rings or labels on the CD.
These, along with contamination
f rom f ingerprints, liquids, and f elt-tip
pens, can cause the CD to not play
properly, or possibly jam in the drive. Protecting Compact Discs
Audio System
Comf ort and Convenience Feat ures186
 Your Honda’s audio system has an
in-dash CD changer that holds up to
six discs, providing several hours of
continuous entertainment. You
operate this CD changer with the
same controls used f or the")
 Your Honda’s audio system has an
in-dash CD changer that holds up to
six discs, providing several hours of
continuous entertainment. You
operate this CD changer with the
same controls used f or the")
 Never try to insert f oreign objects in
the CD player or the magazine. A new CD may be rough on the
inner and outer edges. The small
plastic pieces causing this roughness
can f lake of f and f all on")