Page 190 of 395
�Î
�Î
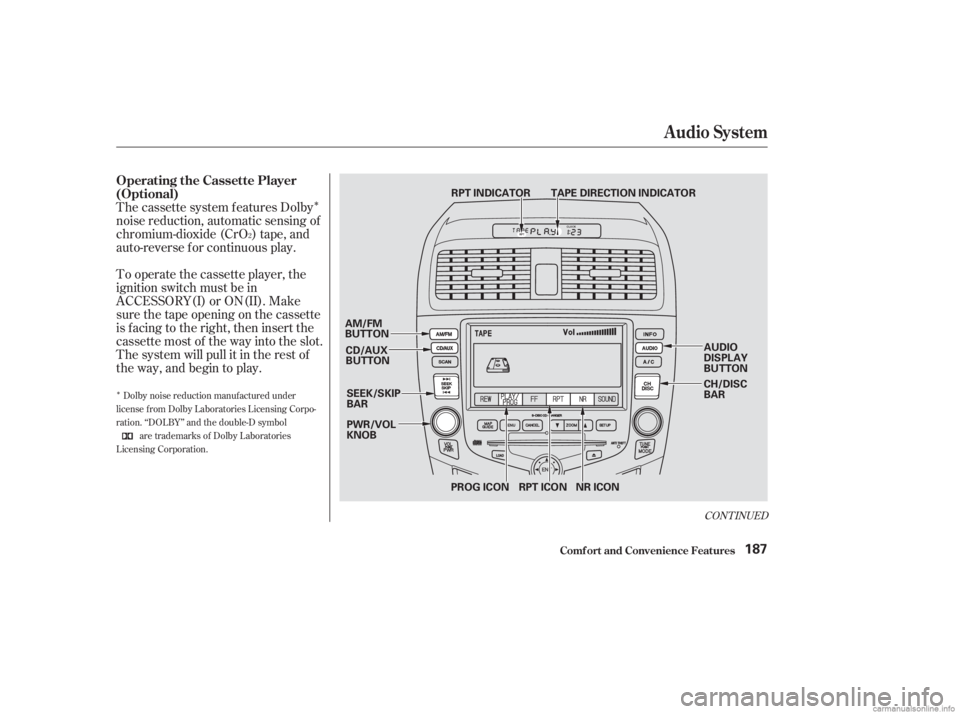
The cassette system f eatures Dolby
noise reduction, automatic sensing of
chromium-dioxide (CrO ) tape, and
auto-reverse f or continuous play.
To operate the cassette player, the
ignition switch must be in
ACCESSORY(I) or ON(II). Make
sure the tape opening on the cassette
is f acing to the right, then insert the
cassette most of the way into the slot.
The system will pull it in the rest of
the way, and begin to play.
2
Dolby noise reduction manuf actured under
license from Dolby Laboratories Licensing Corpo-
ration. ‘‘DOLBY’’ and the double-D symbol are trademarks of Dolby Laboratories
Licensing Corporation.
CONT INUED
Operating the Cassette Player
(Optional)
Audio System
Comf ort and Convenience Feat ures187
PWR/VOL
KNOB
CD/AUX
BUTTON TAPE DIRECTION INDICATOR
RPT INDICATOR
SEEK/SKIP
BAR
AM/FM
BUTTON
CH/DISC
BAR
RPT ICON NR ICON
PROG ICON AUDIO
DISPLAY
BUTTON
Page 191 of 395
 �Û
The tape direction indicator will light
to show you which side of the
cassette is playing. The indicates
thesideyouinsertedfacingupward
is now playing. If you want to play
the other side, push the")
�Û
The tape direction indicator will light
to show you which side of the
cassette is playing. The indicates
thesideyouinsertedfacingupward
is now playing. If you want to play
the other side, push the AUDIO
DISPLAY button to change to the
audio display, and touch the PROG
icon. Dolby noise reduction turns on when
you insert a cassette. If the tape was
not recorded with Dolby noise reduc-
tion, push the AUDIO DISPLAY
button to change to the audio display,
and turn it of f by touching the NR
icon on the display.
Noise reduction remains of f until you
turn it on by pressing the icon again.
When the system reaches the end of
the tape, it will automatically reverse
direction and play the other side. If
you want to remove the cassette
from the drive, press the eject button
on the cassette player.If you turn the system of f while a
tape is playing, either with the PWR/
VOL knob or by turning of f the
ignition, the cassette will remain in
the drive. When you turn the system
back on, the cassette player will be in
pause mode. To begin playing, push
the AUDIO DISPLAY button to
change to the audio display, and
touch the PROG icon.
To switch to the radio or CD player
while a tape is playing, press the
AM/FM, or CD/AUX button. To
change back to the cassette player,
push the CD/AUX button.
Audio System
Comf ort and Convenience Feat ures188
Page 194 of 395
 The cassette player picks up dirt and
oxides f rom the tape. This contami-
nation builds up over time and
causes the sound quality to degrade.
To prevent this, you should clean the
player af ter every")
The cassette player picks up dirt and
oxides f rom the tape. This contami-
nation builds up over time and
causes the sound quality to degrade.
To prevent this, you should clean the
player af ter every 30 hours of use.
Your dealer has a cleaning kit
available.
If you do not clean the cassette
player regularly, it may eventually
become impossible to remove the
contamination with a normal
cleaning kit.
Use 100-minute or shorter cassettes.
Cassettes longer than that use
thinner tape that may break or jam
the drive.Look at the cassette before you
insert it. If the tape is loose, tighten
it by turning a hub with a pencil or
your f inger.
If the label is peeling of f , remove it
from the cassette or it could cause
the cassette to jam in the player.
Never try to insert a warped or
damaged cassette in the player.
When they are not in use, store
cassettes in their cases to protect
them f rom dust and moisture. Never
place cassettes where they will be
exposed to direct sunlight, high heat,
or high humidity. If a cassette is
exposed to extreme heat or cold, let
it reach a moderate temperature
bef ore inserting it in the player.
Never try to insert f oreign objects
into the cassette player.If you see the error indication
‘‘ ’’ f lashing on the display,
press the TAPE eject button to
remove the cassette from the unit.
Make sure the tape is not damaged.
If the cassette will not eject or the
error indication stays on after the
cassette ejects, take the car to your
Honda dealer.
If you see the error indication
‘‘ ’’ on the upper display,
press the TAPE eject button to
remove the cassette from the unit.
Make sure the tape is not damaged.
If the cassette will not eject or the
error indication stays on after the
cassette ejects, take the car to your
Honda dealer.
On Audio system with Navigation
System
On Audio systems without Navigation
System and on DX and LX models
Caring f or the Cassette Player
Audio System
Comf ort and Convenience Feat ures191
Page 387 of 395
 �Î
............................
Capacities Chart .364
.............
Carbon Monoxide Hazard . 52
.............................
Carrying Cargo .214
..............
CAUTION, Explanation of . ii
.........")
�Î
............................
Capacities Chart .364
.............
Carbon Monoxide Hazard . 52
.............................
Carrying Cargo .214
..............
CAUTION, Explanation of . ii
..................
CD Changer . 142,157,177
.......................................
CD Player .140
........................
CD Pocket, Center .105
........................
Certif ication Label .362
............................................
Chains .308
....................
Changing a Flat Tire .335
............
Changing Engine Coolant . 275
Changing Oil ........................................
How to .270
......................................
When to .250
...
Charging System Indicator . 58,348
............
Checklist, Bef ore Driving . 218
..................
Childproof Door Locks . 84
.......................................
Child Seats .26
..........
Tether Anchorage Points . 39
...................................
Cleaner, Air .286
Cleaning ....................
Aluminum Wheels .327
...................................
Carpeting .328
......................................
Exterior .326 .........................................
Fabric .329
.......................................
Interior .328
.......................................
Leather .329
...................................
Seat Belts .329
...........................................
Vinyl .329
......................................
Window .330
...............
Climate Control System . 119
.........
Clock, Setting the . 139,156,174
...................................
Clutch Fluid .285
........................
CO in the Exhaust .372
...................................
Coin Pocket .105
............
Cold Weather, Starting in . 220
..............................
Compact Spare .334
.................
Console Compartment . 103
...............
Consumer Inf ormation . 378
.............
Controls, Instruments and . 55
Coolant ........................................
Adding .272
....................................
Checking .210
.........................
Proper Solution .267
...................
Temperature Gauge . 64
....................
Corrosion Protection .331
Crankcase Emissions Control ........................................
System .371
............
Cruise Control Operation . 195
..........
Customer Relations Of f ice . 378................
DANGER, Explanation of . ii
.......................................
Dashboard .56
................
Daytime Running Lights . 69
............
Def ects, Reporting Saf ety . 380
................
Def ogger, Rear Window . 72
....................................
Dimensions .364
...............
Dimming the Headlights . 68
Dipstick .
Automatic Transmission . 280,281
..................................
Engine Oil .208
..........................
Directional Signals .70
........
Disc Brake Wear Indicators . 229
.....................
Disposal of Used Oil .272
Doors ..............
Locking and Unlocking . 78
..........
DOT Tire Quality Grading . 367
Downshif ting, 5-speed Manual .............................
Transmission .221
.....................................
Drive Belts .302
...........
Driver and Passenger Safety . 5
...........................................
Driving .217
....................................
Economy .211
.........................
In Bad Weather .235
................
In Foreign Countries . 370
Index
C D
II
Page:
< prev 1-8 9-16 17-24