Page 2656 of 4378

SPECIFICATIONS
SECTION 308-
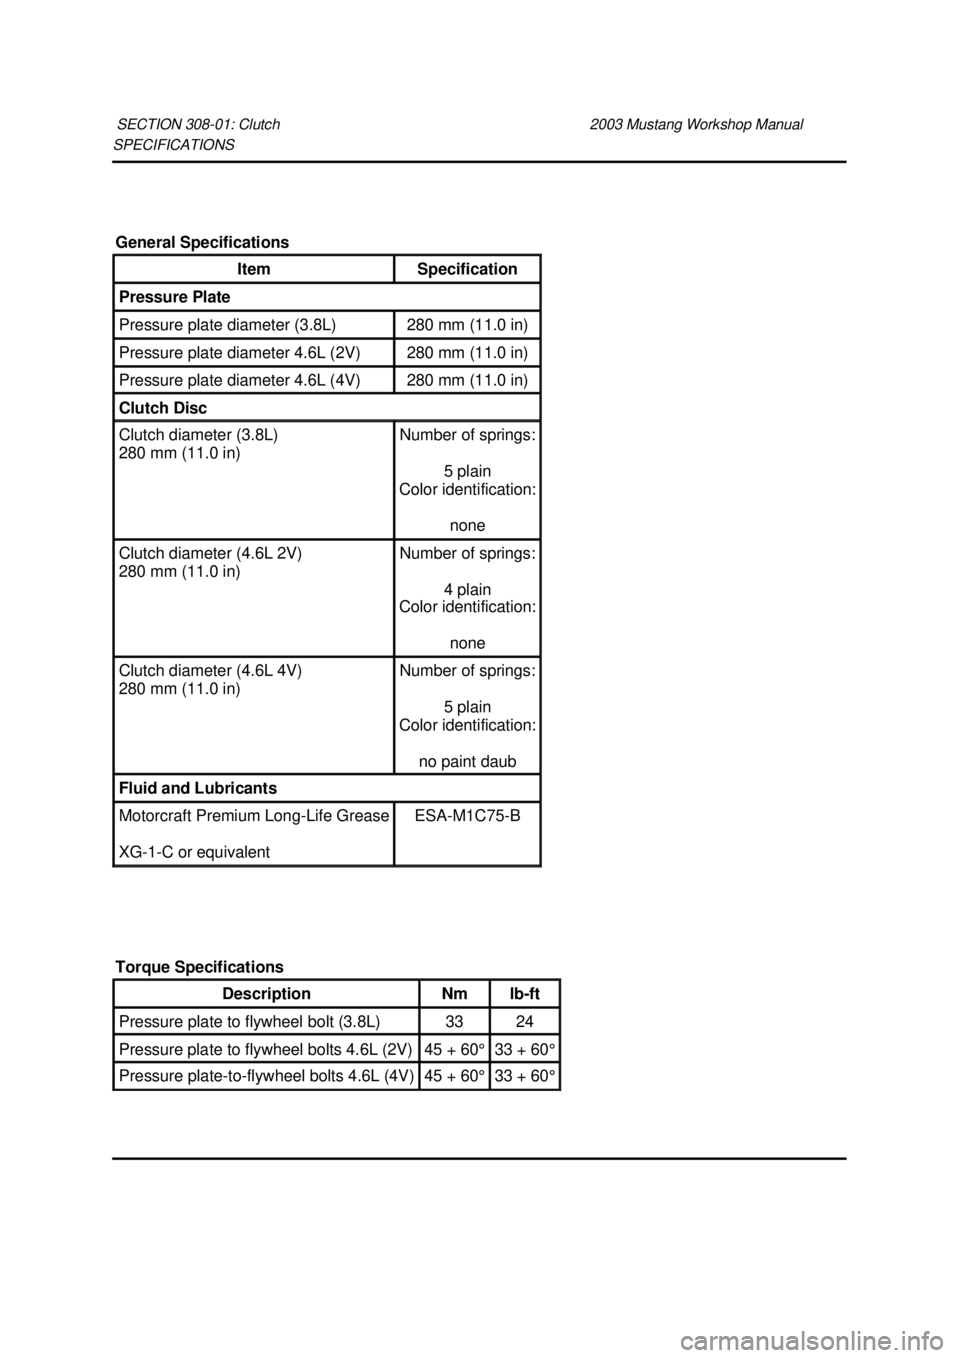
01: Clutch 2003 Mustang Workshop Manual General Specifications
Item Specification
Pressure Plate
Pressure plate diameter (3.8L) 280 mm (11.0 in)
Pressure plate diameter 4.6L (2V) 280 mm (11.0 in)
Pressure plate diameter 4.6L (4V) 280 mm (11.0 in)
Clutch Disc
Clutch diameter (3.8L)
280 mm (11.0 in) Number of springs:
5 plain
Color identification:
none Clutch diameter (4.6L 2V)
280 mm (11.0 in) Number of springs:
4 plain
Color identification:
none Clutch diameter (4.6L 4V)
280 mm (11.0 in) Number of springs:
5 plain
Color identification:
no paint daub Fluid and Lubricants
Motorcraft Premium Long-
Life Grease
XG -1-C or equivalent ESA-
M1C75- B
Torque Specifications Description Nm lb-
ft Pressure plate to flywheel bolt (3.8L) 33 24
Pressure plate to flywheel bolts 4.6L (2V) 45 + 60° 33 + 60°
Pressure plate-
to-flywheel bolts 4.6L (4V) 45 + 60° 33 + 60° �K�l�j . 1 �b�a
22003 Mustang Workshop Manual
18. 11. 2011file:///C:/Ford/2000 - 2004/tsocache/SHEF_2308/S3B~us~en~ ...
Page 2660 of 4378

REMOVAL AND INSTALLATION
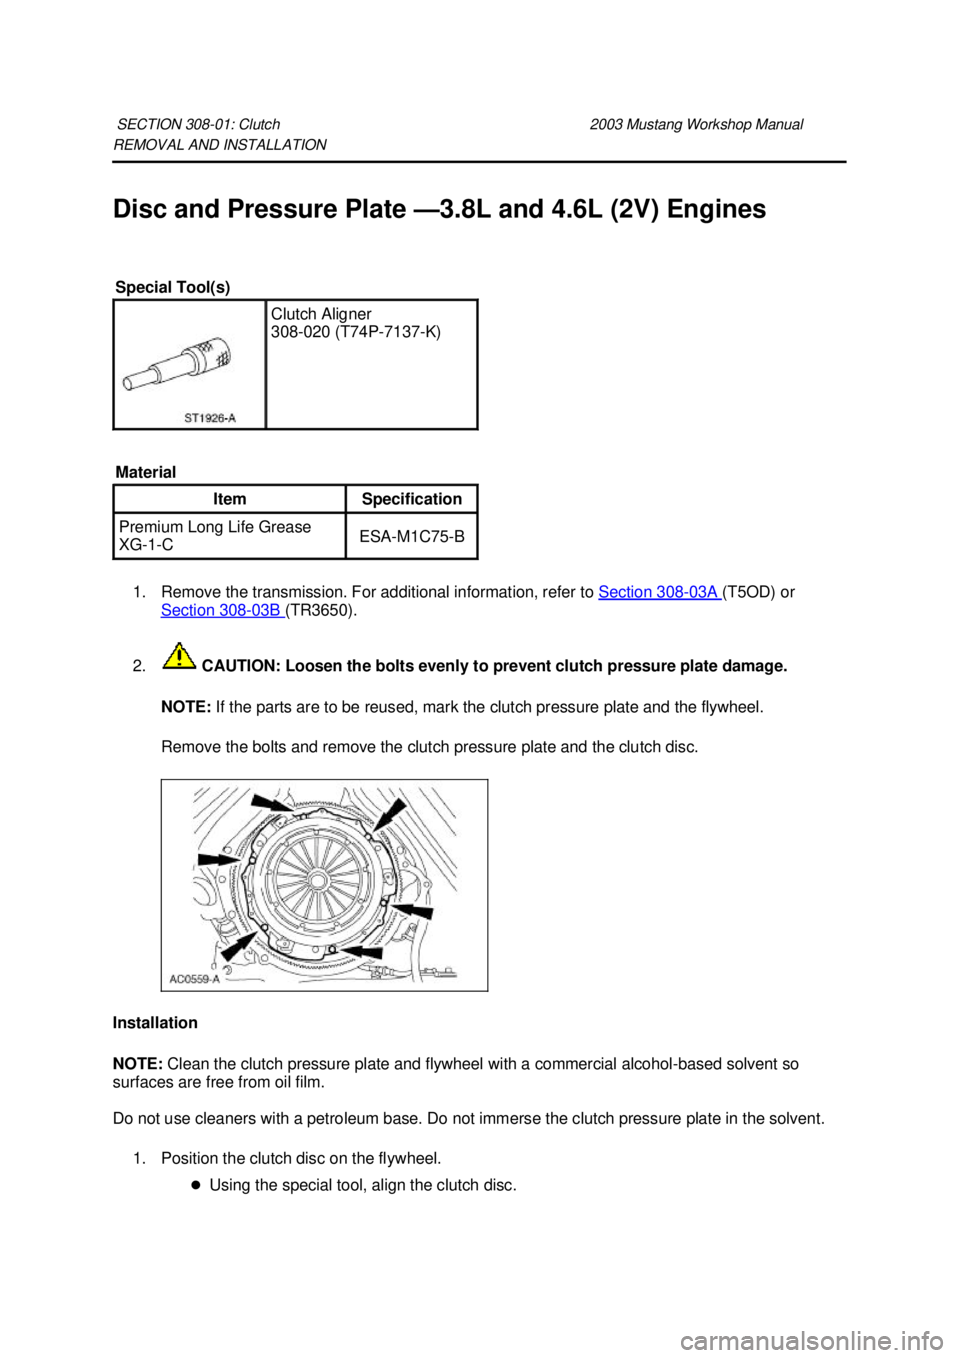
Disc and Pressure Plate —
3.8L and 4.6L (2V) Engines
1. Remove the transmission. For additional information, refer to Section 308 - 03A (T5OD) or
Section 308 - 03B (TR3650).
2. CAUTION: Loosen the bolts evenly to prevent clutch pressure plate damage.
NOTE: If the parts are to be reused, mark the clutch pressure plate and the flywheel.
Remove the bolts and remove the clutch pressure plate and the clutch disc.
Installation
NOTE: Clean the clutch pressure plate and flywheel with a commercial alcohol- based solvent so
surfaces are free from oil film.
Do not use cleaners with a petroleum base. Do not immerse the clutch pressure plate in the solvent.
1. Position the clutch disc on the flywheel. �zUsing the special tool, align the clutch disc.
SECTION 308-
01: Clutch 2003 Mustang Workshop Manual Special Tool(s)
Clutch Aligner
308-
020 (T74P-7137- K)
Material Item Specification
Premium Long Life Grease
XG
-1-C ESA-
M1C75- B �K�l�j . 1 �b�a
32003 Mustang Workshop Manual
18. 11. 2011file:///C:/Ford/2000 - 2004/tsocache/SHEF_2308/S3B~us~en~ ...
Page 2664 of 4378
5. Remove the two bolts and the inspection cover.
6. Remove the seven bolts and the clutch housing.
7.
CAUTION: Loosen the bolts evenly to prevent damage to the pressure plate.
NOTE: If the pressure plate is to be reused, index- mark the pressure plate to the flywheel.
Remove the six bolts and the pressure plate and disc. �K�l�j . 2 �b�a
42003 Mustang Workshop Manual
18. 11. 2011file:///C:/Ford/2000 - 2004/tsocache/SHEF_2308/S3B~us~en~ ...
Page 2665 of 4378
Installation
1. NOTE: Clean the clutch pressure plate and flywheel with a commercial alcohol- based solvent
so surfaces are free from oil film. Do not use cleaners with a petroleum base.
NOTE: Before installing the transmission, the ball stud, the clutch release lever and the input
shaft must be cleaned and lubricated with grease.
To install, reverse the removal procedure.
�zUsing the special tool, align the clutch disc and pressure plate to the flywheel.
2. Tighten the pressure plate bolts in two stages. �zStage 1: Tighten the bolts to 45 Nm (33 lb- ft).
�z Stage 2: Tighten the bolts an additional 60 degrees. �K�l�j . 3 �b�a
42003 Mustang Workshop Manual
18. 11. 2011file:///C:/Ford/2000 - 2004/tsocache/SHEF_2308/S3B~us~en~ ...
Page 2749 of 4378
25. Install the output shaft speed wheel and the snap ring.
26.
CAUTION: Do not under any circumstance apply silicone sealant to the top of the
transmission case. The sealant could fall into the transmission and affect transmission
operation.
Apply a 3.2- mm (1/8-in) bead of silicone rubber to the sealing surface on the case cover.
27. NOTE: Verify that all of the synchronizers are in the NEUTRAL position and the gear shifter
forks in the cover are in the NEUTRAL position.
Install the case cover.
�zPosition the cover toward the filler plug side of the transmission and lower it until the gear
shifter forks engage the synchronizers. Continue to lower the cover and move it into
position to engage the reverse gearshift lever.
28. Install the bolts. �K�l�j . 9 �b�a
142003 Mustang Workshop Manual
18. 11. 2011file:///C:/Ford/2000 - 2004/tsocache/SHEF_2308/S3B~us~en~ ...
Page 2923 of 4378
46. Install a new OSS sensor tone wheel retaining ring.
47. Install the shipping seal.
48. Apply threadlock and sealer to the threads of the plug, then install the plug into the transmission
adapter plate.
49. Clean the mating surfaces of the transmission main case and the extension housing. Apply a bead of silicone rubber to the sealing surface on the transmission case. Install the extension
housing and tighten the bolts. �K�l�j . 16 �b�a
182003 Mustang Workshop Manual
18. 11. 2011file:///C:/Ford/2000 - 2004/tsocache/SHEF_2308/S3B~us~en~ ...
Page 3583 of 4378
5.
NOTE: The steering wheel has been removed for clarity.
Remove the upper and lower steering column shrouds. 1. Remove the screws.
2. Remove the lower steering column shroud.
3. Remove the upper steering column shroud.
6. Remove the instrument panel steering column opening cover reinforcement. 1. Remove the bolts.
2. Remove the instrument panel steering column opening cover reinforcement.
7. NOTE: The steering wheel has been removed for clarity.
Remove the anti- theft transceiver module.
1. Remove the screw from the bottom of the transceiver module.
2. NOTE: Only apply pressure or leverage below the key cylinder lower rib.
Disconnect the electrical connector and remove the module. �K�l�j . 2 �b�a
42003 Mustang Workshop Manual
18. 11. 2011file:///C:/Ford/2000 - 2004/tsocache/SHEF_5108/S3B~us~en~ ...
Page 4103 of 4378

Please refer to the appropriate vehicle shop manual to determine location of the
front air bag sensors.
The side air bag sensors are located at or near the base of the B-
pillar.
To deplete the backup power supply energy, disconnect the battery ground cable
and wait at least one minute. Be sure to disconnect auxiliary batteries and power
supplies (if equipped).
Disconnect the battery ground cable (14301) and wait at least one minute. For additional
information, refer to Section 414 - 01 .
2. WARNING: To reduce the risk of serious personal injury, read and follow all
warnings, cautions, notes, and instructions in the supplemental restraint system
(SRS) deactivation/reactivation procedure.
Deactivate the supplemental restraint system (SRS). For additional information, refer to
Supplemental Restraint System (SRS) Deactivation and Reactivation in the General
Procedures portion of this section.
2. Remove the two steering wheel plugs.
3. Remove the two driver air bag module retaining bolts (one shown).
4. Remove the driver air bag module. 1. Disconnect the driver air bag module electrical connector.
2. Remove the driver air bag module. �K�l�j . 2 �b�a
62003 Mustang Workshop Manual
18. 11. 2011file:///C:/Ford/2000 - 2004/tsocache/SHEF_5108/S3B~us~en~ ...