Page 2426 of 4378

IN-
VEHICLE REPAIR
Main Control Valve Body
Removal 1. Drain transmission fluid and remove the transmission fluid pan and filter. For additional information, refer to Fluid Pan, Gasket and Filter .
2. CAUTION: Do not pull on the molded lead frame. This may cause damage to the
connector ends. Carefully pry up on the locking tabs to disconnect the solenoids.
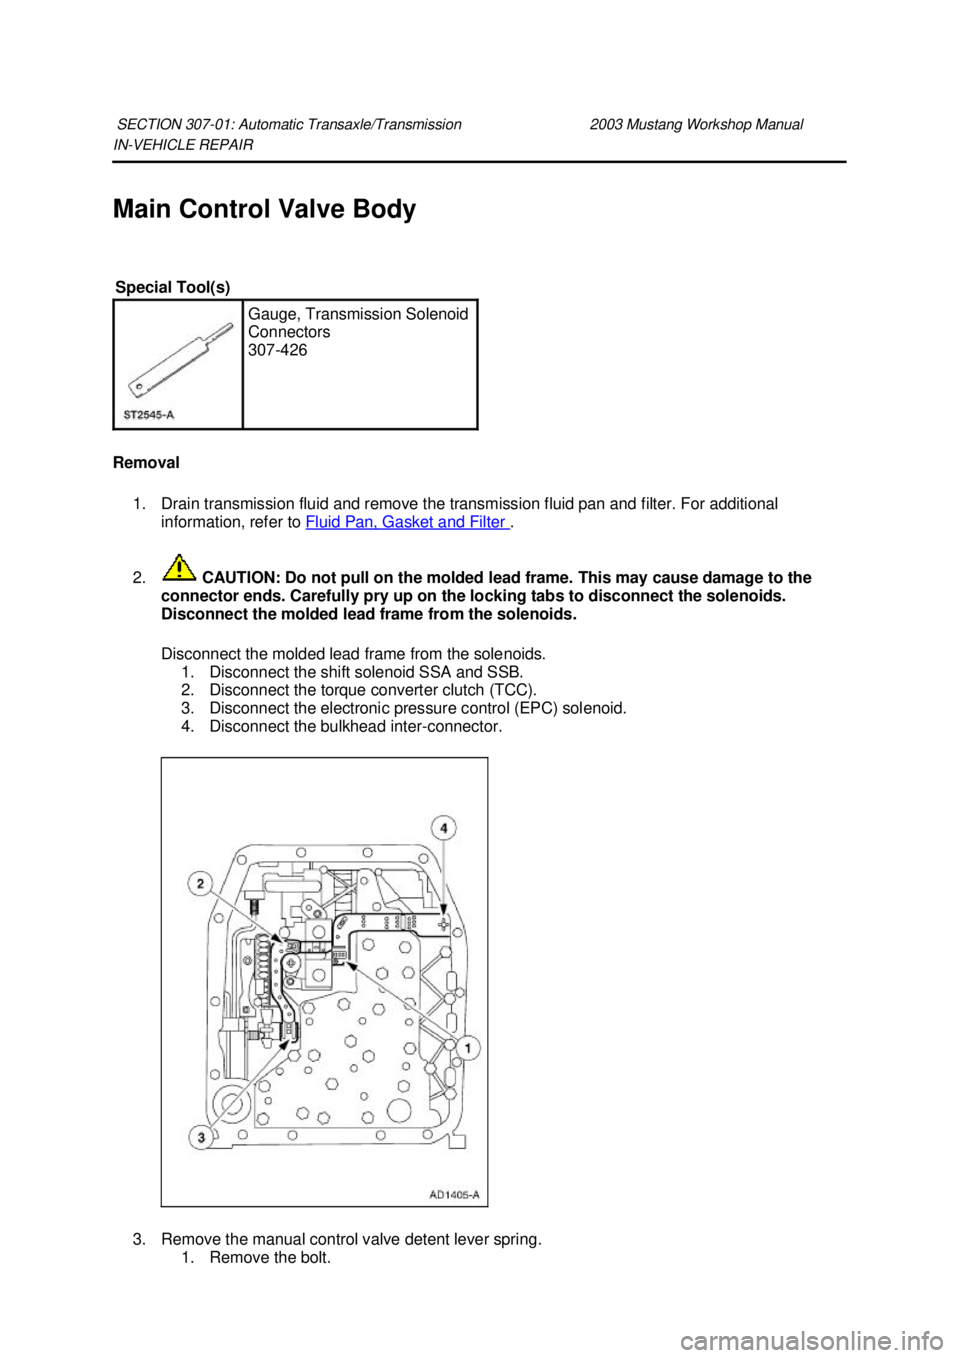
Disconnect the molded lead frame from the solenoids.
Disconnect the molded lead frame from the solenoids. 1. Disconnect the shift solenoid SSA and SSB.
2. Disconnect the torque converter clutch (TCC).
3. Disconnect the electronic pressure control (EPC) solenoid.
4. Disconnect the bulkhead inter- connector.
3. Remove the manual control valve detent lever spring. 1. Remove the bolt.
SECTION 307-
01: Automatic Transaxle/Transmission 2003 Mustang Workshop Manual Special Tool(s)
Gauge, Transmission Solenoid
Connectors
307-426 �K�l�j . 1 �b�a
72003 Mustang Workshop Manual
18. 11. 2011file:///C:/Ford/2000 - 2004/tsocache/SHEF_2748/S3B~us~en~ ...
Page 2438 of 4378

IN-
VEHICLE REPAIR
Electronic Pressure Control (EPC) Solenoid
Removal 1. Remove the manual control lever. For additional information, refer to Manual Control Lever Shaft and Seal in this section.
2. CAUTION: Do not pull on the molded lead frame. This may cause damage to the
connector ends. Carefully pry up on the locking tabs to disconnect the solenoids.
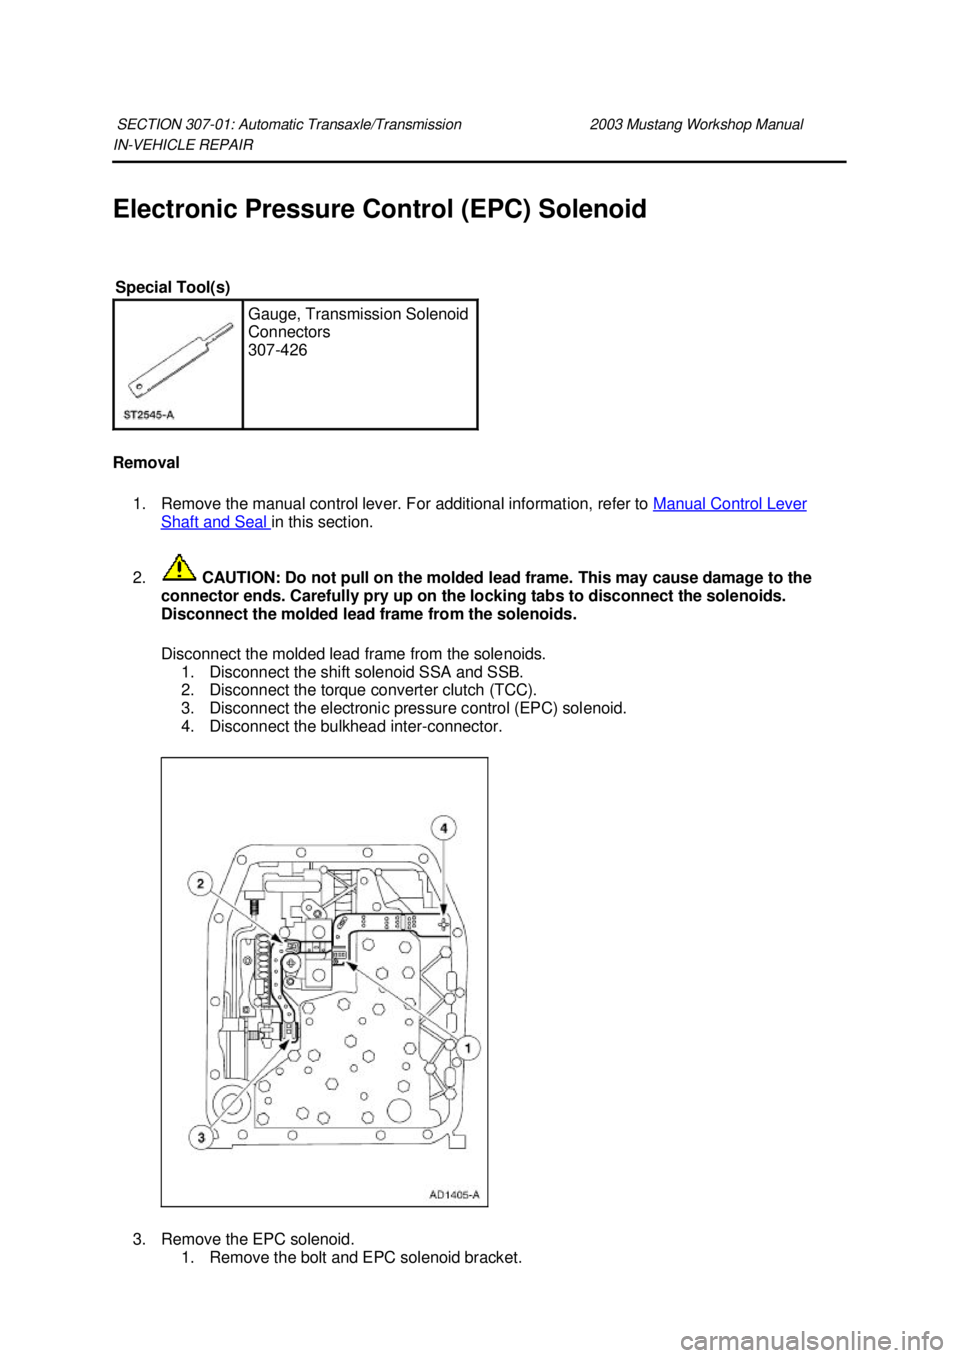
Disconnect the molded lead frame from the solenoids.
Disconnect the molded lead frame from the solenoids. 1. Disconnect the shift solenoid SSA and SSB.
2. Disconnect the torque converter clutch (TCC).
3. Disconnect the electronic pressure control (EPC) solenoid.
4. Disconnect the bulkhead inter- connector.
3. Remove the EPC solenoid. 1. Remove the bolt and EPC solenoid bracket.
SECTION 307-
01: Automatic Transaxle/Transmission 2003 Mustang Workshop Manual Special Tool(s)
Gauge, Transmission Solenoid
Connectors
307-426 �K�l�j . 1 �b�a
32003 Mustang Workshop Manual
18. 11. 2011file:///C:/Ford/2000 - 2004/tsocache/SHEF_2748/S3B~us~en~ ...
Page 2474 of 4378
7.
CAUTION: Do not pull on the molded lead frame. This may cause damage to the
connector ends. Carefully pry up on the locking tabs to disconnect the solenoids.
Disconnect the molded lead frame from the solenoids.
Disconnect the molded lead frame from the solenoids. 1. Disconnect the shift solenoid SSA and SSB.
2. Disconnect the torque converter clutch (TCC).
3. Disconnect the electronic pressure control (EPC) solenoid.
4. Disconnect the bulkhead inter- connector.
8. Remove the output shaft speed (OSS) sensor. 1. Remove the bolt.
2. Remove the OSS sensor. �K�l�j . 4 �b�a
162003 Mustang Workshop Manual
18. 11. 2011file:///C:/Ford/2000 - 2004/tsocache/SHEF_2748/S3B~us~en~ ...
Page 2499 of 4378
4. Using the special tool, install the intermediate clutch piston.
1. Position the intermediate clutch piston and the special tool onto the pump body.
2. Push the intermediate clutch piston to the bottom of the pump body bore, exerting even pressure and remove the special tool.
5. CAUTION: The piston bleed hole must be located at 12 o'clock position (towards
the top of the transmission). Shift problems may occur if installed incorrectly.
NOTE: The piston bleed hole is the only round hole in the pump body.
Locate the piston bleed hole.
6. Install by snapping the spring retainer assembly on pump body. �K�l�j . 5 �b�a
72003 Mustang Workshop Manual
18. 11. 2011file:///C:/Ford/2000 - 2004/tsocache/SHEF_2748/S3B~us~en~ ...
Page 2502 of 4378
DISASSEMBLY AND ASSEMBLY OF SUBASSEMBLIES
Intermediate One-
Way Clutch
Intermediate Clutch Cylinder Disassembled View
Disassembly 1. NOTE: One tab that locks the reverse clutch drum into the reverse sun shell may be removed.
This is done for balancing purposes.
Remove the intermediate one- way clutch.
1. Remove the snap ring.
2. Remove the intermediate one- way clutch.
Assembly 1. NOTE: The intermediate one- way clutch must rotate counterclockwise when installed on the
reverse clutch drum and will make a ratchet sound.
Install the intermediate one- way clutch.
1. Install the intermediate one- way clutch.
2. Install the snap ring.
SECTION 307-
01: Automatic Transaxle/Transmission 2003 Mustang Workshop Manual Item Part Number Description
1 391267-
S Retaining ring
2 7A089 Intermediate one-
way clutch assembly 3 7D044 Reverse clutch drum �K�l�j . 1 �b�a
22003 Mustang Workshop Manual
18. 11. 2011file:///C:/Ford/2000 - 2004/tsocache/SHEF_2748/S3B~us~en~ ...
Page 2507 of 4378
11. Remove the reverse clutch piston spring retaining ring.
12. Remove the reverse clutch piston spring pressure ring.
1. Remove the reverse clutch piston spring.
2. Remove the reverse clutch piston spring pressure ring.
13. NOTE: To ease reverse clutch piston removal, it may be necessary to apply air pressure to the
reverse clutch drum. Block the opposite hole.
Remove the reverse clutch piston. �K�l�j . 4 �b�a
92003 Mustang Workshop Manual
18. 11. 2011file:///C:/Ford/2000 - 2004/tsocache/SHEF_2748/S3B~us~en~ ...
Page 2508 of 4378

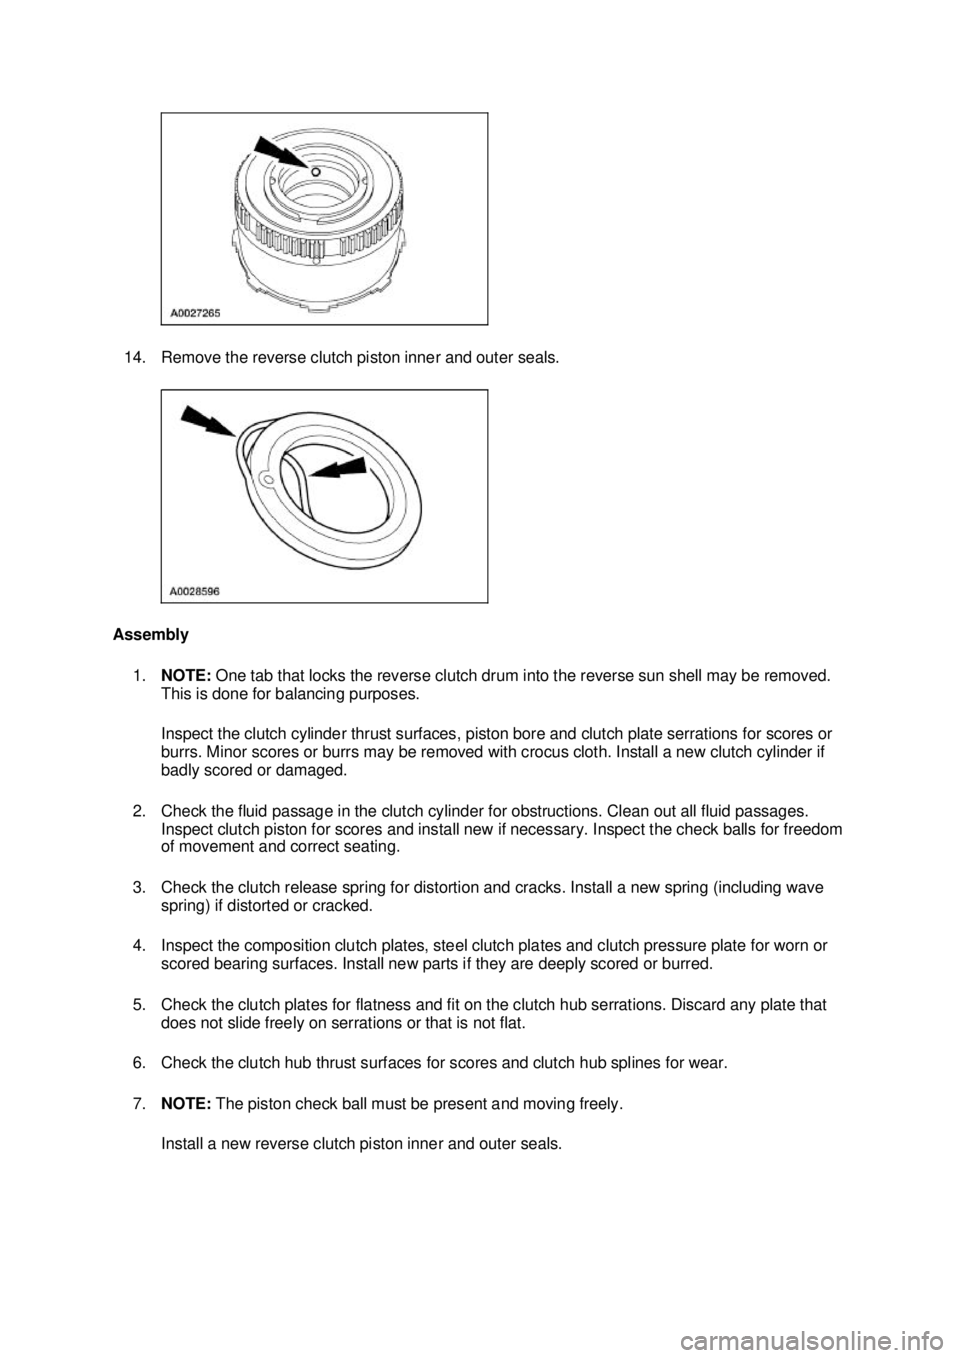
14. Remove the reverse clutch piston inner and outer seals.
Assembly 1. NOTE: One tab that locks the reverse clutch drum into the reverse sun shell may be removed.
This is done for balancing purposes.
Inspect the clutch cylinder thrust surfaces, piston bore and clutch plate serrations for scores or
burrs. Minor scores or burrs may be removed with crocus cloth. Install a new clutch cylinder if
badly scored or damaged.
2. Check the fluid passage in the clutch cylinder for obstructions. Clean out all fluid passages. Inspect clutch piston for scores and install new if necessary. Inspect the check balls for freedom
of movement and correct seating.
3. Check the clutch release spring for distortion and cracks. Install a new spring (including wave spring) if distorted or cracked.
4. Inspect the composition clutch plates, steel clutch plates and clutch pressure plate for worn or scored bearing surfaces. Install new parts if they are deeply scored or burred.
5. Check the clutch plates for flatness and fit on the clutch hub serrations. Discard any plate that does not slide freely on serrations or that is not flat.
6. Check the clutch hub thrust surfaces for scores and clutch hub splines for wear.
7. NOTE: The piston check ball must be present and moving freely.
Install a new reverse clutch piston inner and outer seals. �K�l�j . 5 �b�a
92003 Mustang Workshop Manual
18. 11. 2011file:///C:/Ford/2000 - 2004/tsocache/SHEF_2748/S3B~us~en~ ...
Page 2522 of 4378
DISASSEMBLY AND ASSEMBLY OF SUBASSEMBLIES
Planetary Gear Support Assembly and Planetary One-
Way
Clutch
Disassembly and Assembly
1. NOTE: Inspect the outer and inner races for scores or damaged surface areas where rollers
contact the races. Inspect the rollers and springs for excessive wear or damage. Inspect the
spring and cage for bent or damaged spring retainers.
Rotate the center support counterclockwise and lift to remove the planetary gear support.
2. Remove the planetary one- way clutch.
SECTION 307-
01: Automatic Transaxle/Transmission 2003 Mustang Workshop Manual Item Part Number Description
1 7A130 Planetary gear support
2 7A089 Planetary one-
way clutch 3 7A398 Planetary assembly �K�l�j . 1 �b�a
22003 Mustang Workshop Manual
18. 11. 2011file:///C:/Ford/2000 - 2004/tsocache/SHEF_2748/S3B~us~en~ ...