Page 1133 of 4378
 measured horizontally (oval
pin bore).
g Pin bore and crank bearing bore mu")
e
Specification in 90.200 mm diameter gauge.
f If applicable, measured vertically, +0.030- 0.050 mm (0.001-0.002 inch) measured horizontally (oval
pin bore).
g Pin bore and crank bearing bore must be parallel and in same vertical plane within the specified total
difference when measured at the ends of a 203 mm bar, 101.5 mm on each side of rod centerline.
Torque Specifications Description Nm lb-
ft lb-
in Main bearing cap adjusting bolts
a — — —
EGR sensor bracket 10 — 89
Belt idler pulley 25 18 —
Oil filter 15 11 —
Oil filter adapter insert 58 43 —
Camshaft sprocket bolt
a — — —
Connecting rod bolt
a — — —
Engine mount nuts 150 111 —
Engine mount-
to-cylinder block bolts 70 52 —
Exhaust manifolds
a — — —
Engine front cover bolts
a — — —
Drive belt tensioner bolts 25 18 —
A/C muffler 20 15 —
Battery cable support brackets 20 15 —
Cylinder head bolt
a — — —
Pulley-
to-crankshaft bolt a — — —
EGR valve to intake manifold 25 18 —
EGR valve tube to exhaust manifold fittings 40 30 —
Intake manifold-
to-cylinder head bolt 25 18 —
Main bearing cap bolt
a — — —
Oil filter adapter bolts 25 18 —
Oil level indicator tube bolt 10 — 89
Oil pump screen cover and tube-
to-oil pump bolt 10 — 89
Oil pan-to-
cylinder block bolt a — — —
Flywheel 80 59
Oil pan-to-
engine front cover bolts a — — —
Oil pump-
to-cylinder block bolt 10 — 89
Oil pump screen cover and tube-
to-main bearing cap stud spacer bolt 25 18 —
Water pump pulley bolts 25 18 —
Cam cover bolt
a — — —
Water pump-
to-cylinder block bolt 25 18 —
Water bypass tube 25 18 —
EGR tube nuts (2 req'd) 40 30 —
Power steering pump to engine 25 18 — �K�l�j . 4 �b�a
62003 Mustang Workshop Manual
17. 11. 2011file:///C:/Ford/2000 - 2004/tsocache/SHEF_4464/S3B~us~en~ ...
Page 1142 of 4378

133 6518 Valve spring retainer key (32 reqd)
134 6065 Cylinder head bolt (20 reqd)
135 6C255 Camshaft
136 9J434 EGR transducer
137 N807309 Bolt")
6514 Valve spring retainer (16 req'd)
133 6518 Valve spring retainer key (32 req'd)
134 6065 Cylinder head bolt (20 req'd)
135 6C255 Camshaft
136 9J434 EGR transducer
137 N807309 Bolt (2 req'd)
138 N806139 Bolt
139 8620 Drive belt
140 N806165 Washer
141 6316 Crankshaft pulley
142 8A528 Water pump pulley
143 6700 Crankshaft front seal
144 N808793 Stud bolt (2 req'd)
145 N806177 Bolt (6 req'd)
146 N806176 Bolt (3 req'd)
147 3A674 Power steering pump
148 12A227 Ignition pulse ring
149 6306 Crankshaft sprocket (2 req'd)
150 6268 Timing chain/belt
151 6K297 Timing chain guide
152 N804958 Bolt (4 req'd)
153 6A338 Crankshaft main bearing (4 req'd)
154 6A346 Crankshaft main bearing cap dowel pin (10 req'd)
155 6345 Crankshaft main bearing cap bolt (9 req'd)
156 N806155 Bolt (2 req'd)
157 W701240 Bolt (16 req'd)
158 6675 Oil pan
159 6710 Oil pan gasket
160 N605904 Bolt
161 6622 Oil pump screen cover and tube
162 N806180 Spacer
163 6K258 Crankshaft main bearing cap stud
164 6325 Main bearing cap (5 req'd)
165 6A339 Crankshaft thrust main bearing
166 N602549 Bolt
167 6303 Crankshaft
168 7563 Clutch pressure plate
169 7550 Clutch disc
170 N808139 Bolt (6 req'd)
171 6375 Flywheel (manual transmission)
172 N811363 Bolt (2 req'd)
173 �K�l�j . 7 �b�a
92003 Mustang Workshop Manual
17. 11. 2011file:///C:/Ford/2000 - 2004/tsocache/SHEF_4464/S3B~us~en~ ...
Page 1143 of 4378

�z the cylinder head module (LH)
�z the lower engine module
While not all repairs can take adva")
A modular engine is built around four modules:
�zthe intake module
�z the cylinder head module (RH)
�z the cylinder head module (LH)
�z the lower engine module
While not all repairs can take advantage of the modular concept, most out-of- vehicle repairs benefit
due to the reduction of necessary time and labor.
The basic engine components consist of the following:
�zsingle overhead camshafts
�z two valves per cylinder
�z sequential multiport fuel injection (SFI)
�z aluminum cylinder heads (6049)
�z cast iron, 90- degree V-shaped cylinder block
�z individual ignition coils for each spark plug
�z composite-material intake manifold
�z large- bore throttle body N605919 Bolt
174 18663 Heater water tube
175 N806007 Dowel (2 req'd)
176 N807198 Dowel (2 req'd)
177 N806168 Bolt (6 req'd)
178 6375 Flywheel (automatic transmission)
179 6310 Crankshaft oil slinger
180 6701 Crankshaft rear oil seal
181 N806155 Bolt (6 req'd)
182 6K318 Crankshaft rear oil seal and retainer
183 7120 Transmission input shaft pilot bearing
184 N806435 Pipe plug
185 N87836 Dowel (2 req'd) �K�l�j . 8 �b�a
92003 Mustang Workshop Manual
17. 11. 2011file:///C:/Ford/2000 - 2004/tsocache/SHEF_4464/S3B~us~en~ ...
Page 1187 of 4378
IN-
VEHICLE REPAIR
Timing Drive Components
Removal CAUTION: Since the engine is not free- wheeling, timing procedures must be followed
exactly or piston and valve damage can occur.
1. Remove the engine front cover. For additional information, refer to Engine Front Cover in this
section.
2. Remove the crankshaft sensor ring from the crankshaft. 3. Disconnect the eight ignition coil electrical connectors. SECTION 303-
01B: Engine — 4.6L (2V) 2003 Mustang Workshop Manual Special Tool(s)
Compressor, Valve Spring
303-
567 (T97P-6565- AH) Holding Tool, Crankshaft
303-
448 (T93P-6303- A) Aligner, Camshaft Position
303-
557 (T96T-6256- B) �K�l�j . 1 �b�a
132003 Mustang Workshop Manual
17. 11. 2011file:///C:/Ford/2000 - 2004/tsocache/SHEF_4464/S3B~us~en~ ...
Page 1228 of 4378
IN-
VEHICLE REPAIR
Flywheel
Removal 1. Remove the clutch components. For additional information, refer to Section 308 - 03A or
Section 308 - 03B .
2. Remove the bolts and the flywheel.
Installation 1. To install, reverse the removal procedure. �zTighten the bolts in the sequence shown.
SECTION 303-
01B: Engine — 4.6L (2V) 2003 Mustang Workshop Manual �K�l�j . 1 �b�a
22003 Mustang Workshop Manual
17. 11. 2011file:///C:/Ford/2000 - 2004/tsocache/SHEF_4464/S3B~us~en~ ...
Page 1233 of 4378
1. Remove the flywheel. For additional information, refer to
Flywheel in this section.
2. Using the special tools, remove the crankshaft oil slinger.
3. Using the special tools, remove the crankshaft rear oil seal (6701).
Installation 1. Using the special tools, install the crankshaft rear oil seal. �zLubricate the oil seal using clean engine oil.
2. Using the special tool, install the crankshaft oil slinger. �K�l�j . 2 �b�a
32003 Mustang Workshop Manual
17. 11. 2011file:///C:/Ford/2000 - 2004/tsocache/SHEF_4464/S3B~us~en~ ...
Page 1234 of 4378
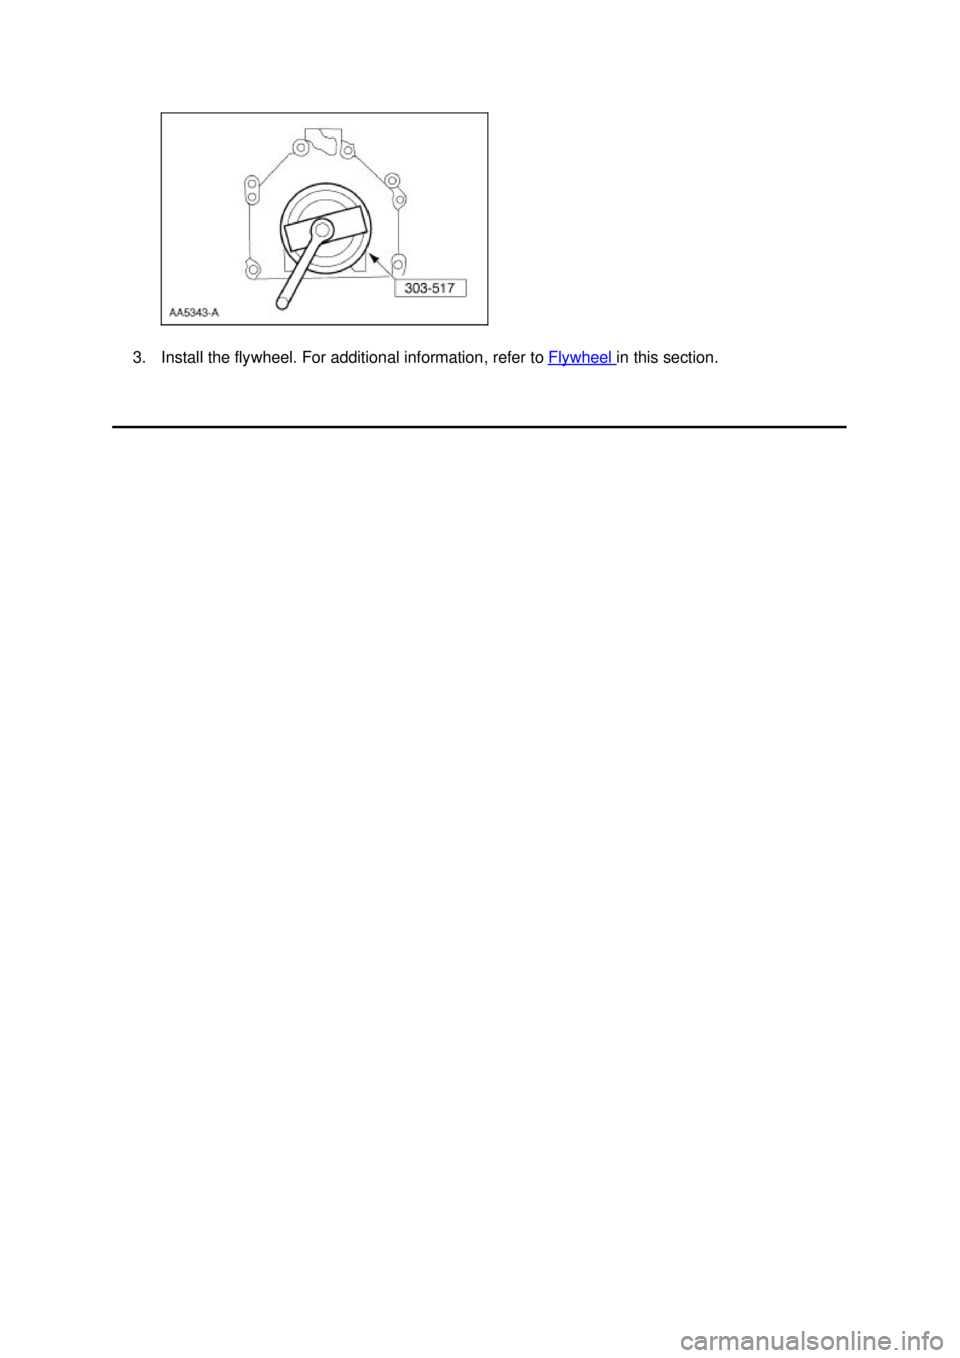
3. Install the flywheel. For additional information, refer to
Flywheel in this section. �K�l�j . 3 �b�a
32003 Mustang Workshop Manual
17. 11. 2011file:///C:/Ford/2000 - 2004/tsocache/SHEF_4464/S3B~us~en~ ...
Page 1242 of 4378
Removal
Both cylinder heads
1. Remove the engine. For additional information, refer to Engine in the Removal portion of this
section.
2. Remove the flywheel.
3. Remove the separator plate.
4. Mount the engine on a suitable engine stand.
5. NOTE: RH shown, LH similar.
Remove the RH and LH lifting eyes. ZC-
31 �K�l�j . 2 �b�a
212003 Mustang Workshop Manual
17. 11. 2011file:///C:/Ford/2000 - 2004/tsocache/SHEF_4464/S3B~us~en~ ...