Page 1105 of 4378
40. Install the crankshaft pulley bolt.
41. Install the camshaft synchronizer. For additional information, refer to
Section 303 - 14 .
42. Install the water pump pulley and the retaining bolts.
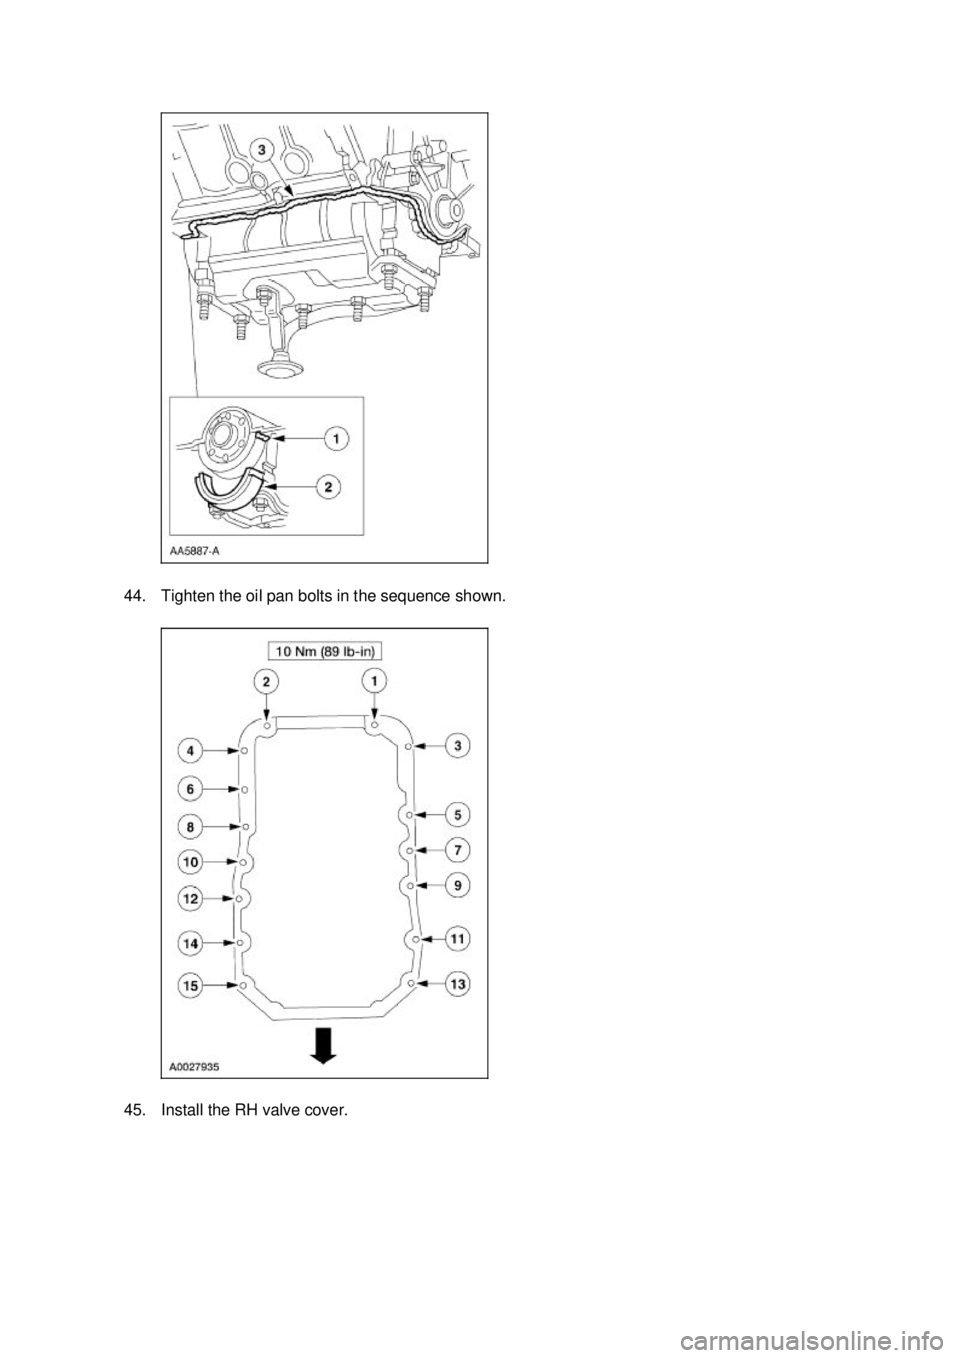
43. NOTE: If the oil pan is not secured within four minutes, the sealant must be removed and the
sealing area cleaned with metal surface cleaner. Allow to dry until there is no sign of wetness,
or four minutes, whichever is longer. Failure to follow this procedure can cause future oil
leakage.
Clean and apply the sealant to the oil pan sealing areas shown and install the oil pan rear seal.
1. Apply silicone gasket and sealant to the rear main bearing cap.
2. Install the oil pan rear seal.
3. Clean the oil pan mating surfaces with metal surface cleaner and apply silicone gasket and sealant to the oil pan mating surface. �K�l�j . 14 �b�a
282003 Mustang Workshop Manual
17. 11. 2011file:///C:/Ford/2000 - 2004/tsocache/SHEF_4464/S3B~us~en~ ...
Page 1106 of 4378
44. Tighten the oil pan bolts in the sequence shown.
45. Install the RH valve cover. �K�l�j . 15 �b�a
282003 Mustang Workshop Manual
17. 11. 2011file:///C:/Ford/2000 - 2004/tsocache/SHEF_4464/S3B~us~en~ ...
Page 1109 of 4378

53.
NOTE: If the lower intake manifold is not secured within four minutes, the sealant must be
removed and the sealing area cleaned with metal surface cleaner. Allow to dry until there is no
sign of wetness, or four minutes, whichever is longer. Failure to follow this procedure can cause
future oil leakage.
Install the lower intake manifold front and rear end seals. 1. Apply a bead of silicone gasket and sealant to the intake manifold front and rear end seal mounting points as indicated.
2. Install the lower intake manifold front and rear end seals.
54. Install the intake manifold gaskets.
55. NOTE: If the lower intake manifold is not secured within four minutes, the sealant must be
removed and the sealing area cleaned with metal surface cleaner. Allow to dry until there is no
sign of wetness, or four minutes, whichever is longer. Failure to follow this procedure can cause
future oil leakage.
Position the lower intake manifold. 1. Apply a bead of silicone gasket and sealant to the lower intake manifold mounting at the
points indicated.
2. Position the lower intake manifold. 4 9A425 Intake manifold front end seal (part of 9439) �K�l�j . 18 �b�a
282003 Mustang Workshop Manual
17. 11. 2011file:///C:/Ford/2000 - 2004/tsocache/SHEF_4464/S3B~us~en~ ...
Page 1112 of 4378
63. Connect the engine oil pressure sender electrical connector.
64. Connect the camshaft position (CMP) sensor electrical connector.
65. Connect the cylinder head temperature (CHT) sensor.
66. Install the fuel injectors and the fuel injection supply manifold as an assembly. For additional
information, refer to Section 303 - 04A .
67. Install a new upper intake manifold gasket. �K�l�j . 21 �b�a
282003 Mustang Workshop Manual
17. 11. 2011file:///C:/Ford/2000 - 2004/tsocache/SHEF_4464/S3B~us~en~ ...
Page 1114 of 4378
70. Connect the differential pressure feedback EGR system electrical and vacuum connections.
71. Connect the vacuum hoses.
72. Install the positive crankcase ventilation (PCV) tube.
73. Connect the ignition coil and the radio interference capacitor electrical connectors.
74. Position and connect the LH spark plug wires. �K�l�j . 23 �b�a
282003 Mustang Workshop Manual
17. 11. 2011file:///C:/Ford/2000 - 2004/tsocache/SHEF_4464/S3B~us~en~ ...
Page 1116 of 4378
78. Install the exhaust gas recirculation (EGR) tube.
79. Connect the EGR valve nut.
80. Using a new gasket, install the LH exhaust manifold. Tighten the nuts in the sequence shown.
81.
NOTE: Install a new O- ring seal.
Install the oil level indicator and tube and retaining bolt. �K�l�j . 25 �b�a
282003 Mustang Workshop Manual
17. 11. 2011file:///C:/Ford/2000 - 2004/tsocache/SHEF_4464/S3B~us~en~ ...
Page 1118 of 4378
87.
NOTE: Lubricate the crankshaft rear seal lips with clean engine oil prior to installation.
Assemble the special tools and the crankshaft rear seal.
88. Install the special tools on the rear of the crankshaft.
89. Install the crankshaft rear seal. Tighten the center jack screw (303- S560) until the spacer (303-
561) contacts the engine block. �K�l�j . 27 �b�a
282003 Mustang Workshop Manual
17. 11. 2011file:///C:/Ford/2000 - 2004/tsocache/SHEF_4464/S3B~us~en~ ...
Page 1120 of 4378
INSTALLATION
Engine
Installation
All vehicles
1. Install the separator plate and the flywheel.
2. Using the special tools, position the engine in the vehicle.
SECTION 303-
01A: Engine — 3.8L 2003 Mustang Workshop Manual Special Tool(s)
Heavy Duty Floor Crane
014-
00071 or equivalent Spreader Bar
303-
D089 (D93P-6001- A3) or
equivalent
Material Item Specification
SAE 5W-
20 Premium Synthetic
Blend Motor Oil
XO- 5W20-QSP or equivalent WSS-
M2C153-
H �K�l�j . 1 �b�a
102003 Mustang Workshop Manual
17. 11. 2011file:///C:/Ford/2000 - 2004/tsocache/SHEF_4464/S3B~us~en~ ...

 sensor electrical connector.
65. Connect the cylinder head temperature (CHT) sensor.
66. Ins")
 tube.
73. Connect the")
 tube.
79. Connect the EGR valve nut.
80. Using a new gasket, install the LH exhaust manifold. Tighten the nuts in the sequence shown.
81.
NOTE: Inst")

