Page 1140 of 4378

55 18198A Engine lifting eye
56 9430 Exhaust manifold
57 9448 E")
6754 Oil level indicator tube
51 N806155 Bolt
52 N806139 Bolt
53 6750 Oil level dipstick
54 N811363 Bolt (2 req'd)
55 18198A Engine lifting eye
56 9430 Exhaust manifold
57 9448 Exhaust manifold gasket
58 6049 Cylinder head, RH
59 12405 Spark plug
60 W701681 Stud (8 req'd)
61 W701706 Nut (8 req'd)
62 6051 Head gasket
63 N807071 Bolt
64 10153 Generator mounting bracket
65 N811011 Bolt (2 req'd)
66 8549 Water outlet connector
67 10884 Water temperature indicator sender unit
68 N808130 Bolt (9 req'd)
69 N806807 O-
ring 70 N807309 Bolt (2 req'd)
71 12A366 Coil on plug (8 req'd)
72 9F593 Fuel injector
73 8575 Water thermostat
74 9424 Intake manifold
75 N806139 Bolt
76 N806164 Washer
77 6256 Camshaft sprocket
78 6265 Camshaft sprocket spacer
79 N807352 Bolt (4 req'd)
80 6A505 Valve cover
81 6758 Crankcase ventilation tube
82 N806070 Bolt (24 req'd)
83 6B280 Camshaft bearing cap
84 N806282 Bolt (4 req'd)
85 N807173 Bolt (2 req'd)
86 N808102 Bolt
87 19A216 Belt idler pulley
88 10300 Generator
89 N804178 Nut (2 req'd)
90 19A439 Bracket
91 �K�l�j . 5 �b�a
92003 Mustang Workshop Manual
17. 11. 2011file:///C:/Ford/2000 - 2004/tsocache/SHEF_4464/S3B~us~en~ ...
Page 1141 of 4378

92 6C315 Crankshaft position sensor
93 N806300 Stud bolt (5 reqd)
94 6C086 Engine front cover
95 N806155 Bolt
96 6B288 Camshaft position sensor
97 N606543 Bo")
N806155 Bolt (2 req'd)
92 6C315 Crankshaft position sensor
93 N806300 Stud bolt (5 req'd)
94 6C086 Engine front cover
95 N806155 Bolt
96 6B288 Camshaft position sensor
97 N606543 Bolt (4 req'd)
98 6L266 Timing chain tensioner
99 6268 Timing chain belt
100 6K297 Timing chain cover
101 6M269 Timing chain tensioner
102 6L253 Timing chain tensioner arm
103 N806184 Bolt (3 req'd)
104 19D629 A/C compressor
105 8501 Water pump
106 N806177 Bolt (4 req'd)
107 N806183 Bolt (4 req'd)
108 6621 Oil pump
109 N806201 Woodruff key
110 6333 Crankshaft main bearing (5 req'd)
111 6A341 Crankshaft thrust washer (3 req'd)
112 6C357 Crankshaft main bearing side bolt (10 req'd)
113 6010 Cylinder block
114 9439 Intake manifold gasket (2 req'd)
115 6083 Head gasket
116 6505 Exhaust valve (8 req'd)
117 6507 Intake valve (8 req'd)
118 87838 Pipe plug (8 req'd)
119 12405 Spark plug (8 req'd)
120 6F087 Dowel
121 9431 Exhaust manifold
122 6C501 Valve tappet (16 req'd)
123 6529 Rocker arm (16 req'd)
124 6049 Cylinder head, RH
125 W701681 Stud (8 req'd)
126 9Y431 Exhaust manifold gasket
127 9F485 EGR valve tube to manifold connector
128 W701706 Nut (8 req'd)
129 181198A Engine lifting eye
130 6A517 Valve stem seal (16 req'd)
131 6513 Valve spring (16 req'd)
132 �K�l�j . 6 �b�a
92003 Mustang Workshop Manual
17. 11. 2011file:///C:/Ford/2000 - 2004/tsocache/SHEF_4464/S3B~us~en~ ...
Page 1142 of 4378

133 6518 Valve spring retainer key (32 reqd)
134 6065 Cylinder head bolt (20 reqd)
135 6C255 Camshaft
136 9J434 EGR transducer
137 N807309 Bolt")
6514 Valve spring retainer (16 req'd)
133 6518 Valve spring retainer key (32 req'd)
134 6065 Cylinder head bolt (20 req'd)
135 6C255 Camshaft
136 9J434 EGR transducer
137 N807309 Bolt (2 req'd)
138 N806139 Bolt
139 8620 Drive belt
140 N806165 Washer
141 6316 Crankshaft pulley
142 8A528 Water pump pulley
143 6700 Crankshaft front seal
144 N808793 Stud bolt (2 req'd)
145 N806177 Bolt (6 req'd)
146 N806176 Bolt (3 req'd)
147 3A674 Power steering pump
148 12A227 Ignition pulse ring
149 6306 Crankshaft sprocket (2 req'd)
150 6268 Timing chain/belt
151 6K297 Timing chain guide
152 N804958 Bolt (4 req'd)
153 6A338 Crankshaft main bearing (4 req'd)
154 6A346 Crankshaft main bearing cap dowel pin (10 req'd)
155 6345 Crankshaft main bearing cap bolt (9 req'd)
156 N806155 Bolt (2 req'd)
157 W701240 Bolt (16 req'd)
158 6675 Oil pan
159 6710 Oil pan gasket
160 N605904 Bolt
161 6622 Oil pump screen cover and tube
162 N806180 Spacer
163 6K258 Crankshaft main bearing cap stud
164 6325 Main bearing cap (5 req'd)
165 6A339 Crankshaft thrust main bearing
166 N602549 Bolt
167 6303 Crankshaft
168 7563 Clutch pressure plate
169 7550 Clutch disc
170 N808139 Bolt (6 req'd)
171 6375 Flywheel (manual transmission)
172 N811363 Bolt (2 req'd)
173 �K�l�j . 7 �b�a
92003 Mustang Workshop Manual
17. 11. 2011file:///C:/Ford/2000 - 2004/tsocache/SHEF_4464/S3B~us~en~ ...
Page 1143 of 4378

�z the cylinder head module (LH)
�z the lower engine module
While not all repairs can take adva")
A modular engine is built around four modules:
�zthe intake module
�z the cylinder head module (RH)
�z the cylinder head module (LH)
�z the lower engine module
While not all repairs can take advantage of the modular concept, most out-of- vehicle repairs benefit
due to the reduction of necessary time and labor.
The basic engine components consist of the following:
�zsingle overhead camshafts
�z two valves per cylinder
�z sequential multiport fuel injection (SFI)
�z aluminum cylinder heads (6049)
�z cast iron, 90- degree V-shaped cylinder block
�z individual ignition coils for each spark plug
�z composite-material intake manifold
�z large- bore throttle body N605919 Bolt
174 18663 Heater water tube
175 N806007 Dowel (2 req'd)
176 N807198 Dowel (2 req'd)
177 N806168 Bolt (6 req'd)
178 6375 Flywheel (automatic transmission)
179 6310 Crankshaft oil slinger
180 6701 Crankshaft rear oil seal
181 N806155 Bolt (6 req'd)
182 6K318 Crankshaft rear oil seal and retainer
183 7120 Transmission input shaft pilot bearing
184 N806435 Pipe plug
185 N87836 Dowel (2 req'd) �K�l�j . 8 �b�a
92003 Mustang Workshop Manual
17. 11. 2011file:///C:/Ford/2000 - 2004/tsocache/SHEF_4464/S3B~us~en~ ...
Page 1151 of 4378
24. Disconnect the fuel pressure sensor electrical connector and the vacuum hose.
25. Disconnect the fuel charging ground wire.
26. Disconnect the ignition coils and the fuel injectors.
27. Disconnect the climate control vacuum supply hoses and remove the vacuum harness. �K�l�j . 6 �b�a
202003 Mustang Workshop Manual
17. 11. 2011file:///C:/Ford/2000 - 2004/tsocache/SHEF_4464/S3B~us~en~ ...
Page 1152 of 4378
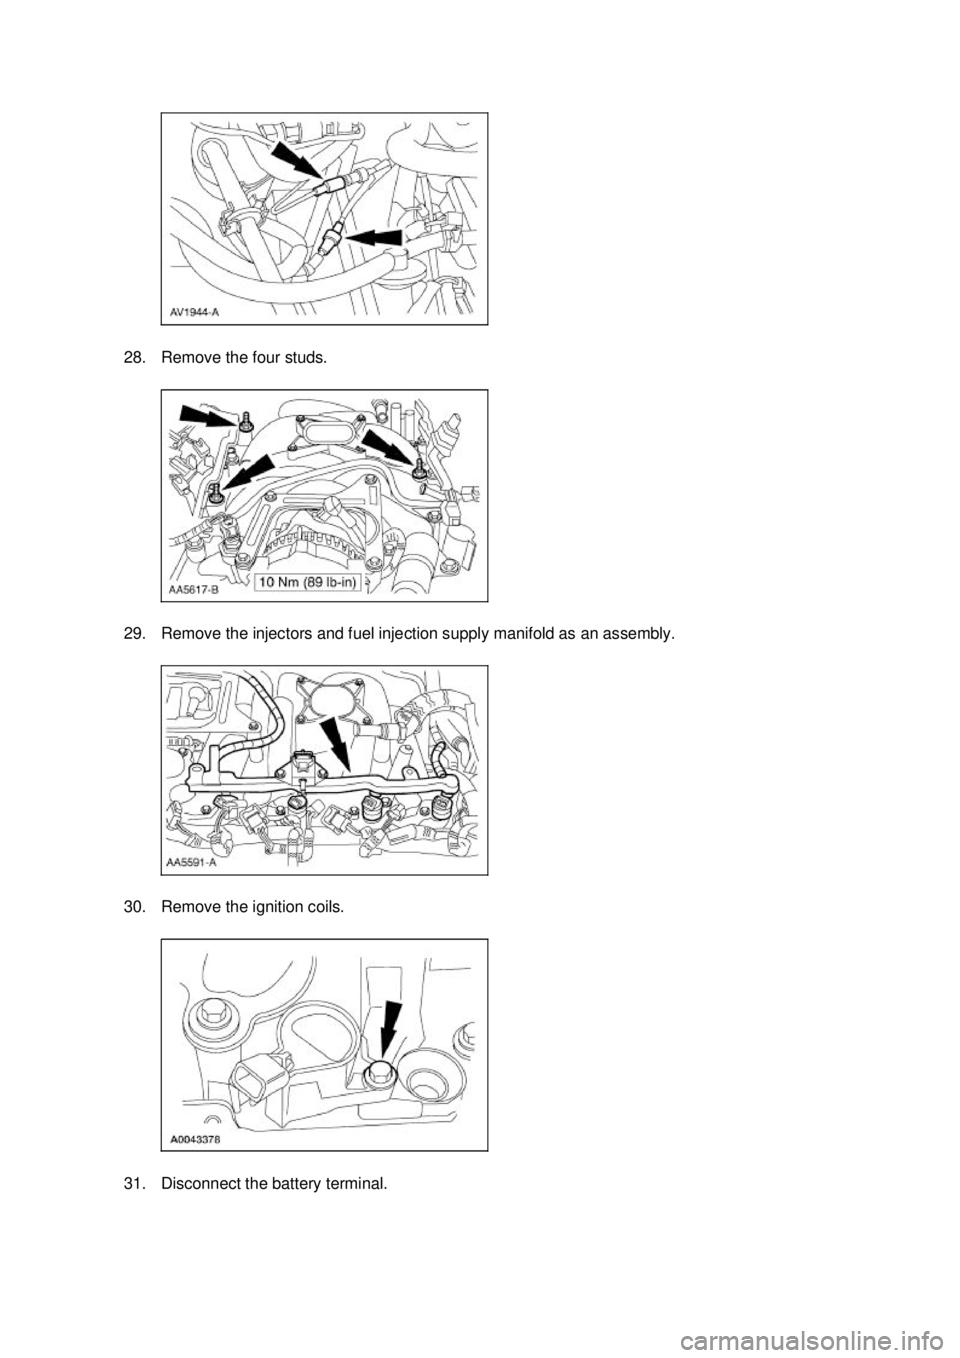
28. Remove the four studs.
29. Remove the injectors and fuel injection supply manifold as an assembly.
30. Remove the ignition coils.
31. Disconnect the battery terminal. �K�l�j . 7 �b�a
202003 Mustang Workshop Manual
17. 11. 2011file:///C:/Ford/2000 - 2004/tsocache/SHEF_4464/S3B~us~en~ ...
Page 1158 of 4378
11. Install the ignition coils.
12. Install the fuel injection supply manifold and fuel injectors as an assembly.
13. Install four studs.
14. Position the vacuum harness and connect to the climate control vacuum supply hoses. �K�l�j . 13 �b�a
202003 Mustang Workshop Manual
17. 11. 2011file:///C:/Ford/2000 - 2004/tsocache/SHEF_4464/S3B~us~en~ ...
Page 1159 of 4378
15. Connect the ignition coils and the fuel injectors.
16. Connect the fuel charging ground wire.
17. Connect the fuel pressure sensor electrical connector and the vacuum hose.
18. Install the throttle body and adapter as an assembly. �K�l�j . 14 �b�a
202003 Mustang Workshop Manual
17. 11. 2011file:///C:/Ford/2000 - 2004/tsocache/SHEF_4464/S3B~us~en~ ...