Page 2687 of 4378

SPECIFICATIONS
SECTION 308-
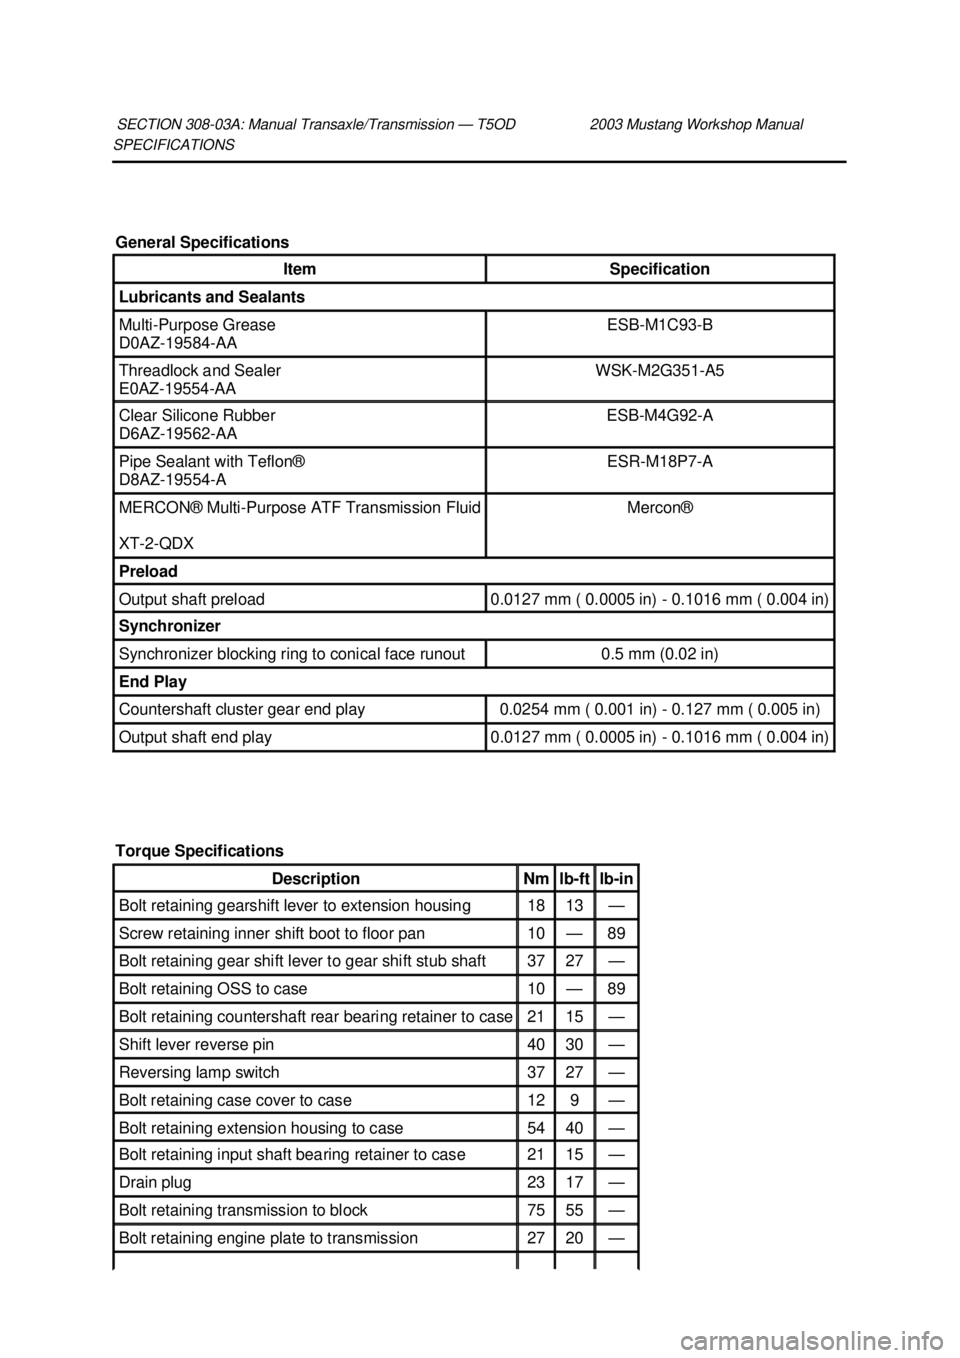
03A: Manual Transaxle/Transmission — T5OD 2003 Mustang Workshop Manual General Specifications
Item Specification
Lubricants and Sealants
Multi-
Purpose Grease
D0AZ- 19584- AA ESB-
M1C93- B Threadlock and Sealer
E0AZ-
19554- AA WSK-
M2G351- A5 Clear Silicone Rubber
D6AZ-
19562- AA ESB-
M4G92- A Pipe Sealant with Teflon®
D8AZ-
19554- A ESR-
M18P7-A MERCON® Multi-
Purpose ATF Transmission Fluid
XT -2-QDX Mercon®
Preload
Output shaft preload 0.0127 mm ( 0.0005 in) - 0.1016 mm ( 0.004 in)
Synchronizer
Synchronizer blocking ring to conical face runout 0.5 mm (0.02 in)
End Play
Countershaft cluster gear end play 0.0254 mm ( 0.001 in) -
0.127 mm ( 0.005 in) Output shaft end play 0.0127 mm ( 0.0005 in) - 0.1016 mm ( 0.004 in)
Torque Specifications Description Nm lb-
ft lb-
in Bolt retaining gearshift lever to extension housing 18 13 —
Screw retaining inner shift boot to floor pan 10 — 89
Bolt retaining gear shift lever to gear shift stub shaft 37 27 —
Bolt retaining OSS to case 10 — 89
Bolt retaining countershaft rear bearing retainer to case 21 15 —
Shift lever reverse pin 40 30 —
Reversing lamp switch 37 27 —
Bolt retaining case cover to case 12 9 —
Bolt retaining extension housing to case 54 40 —
Bolt retaining input shaft bearing retainer to case 21 15 —
Drain plug 23 17 —
Bolt retaining transmission to block 75 55 —
Bolt retaining engine plate to transmission 27 20 — �K�l�j . 1 �b�a
22003 Mustang Workshop Manual
18. 11. 2011file:///C:/Ford/2000 - 2004/tsocache/SHEF_2308/S3B~us~en~ ...
Page 2692 of 4378

Transmission Identification
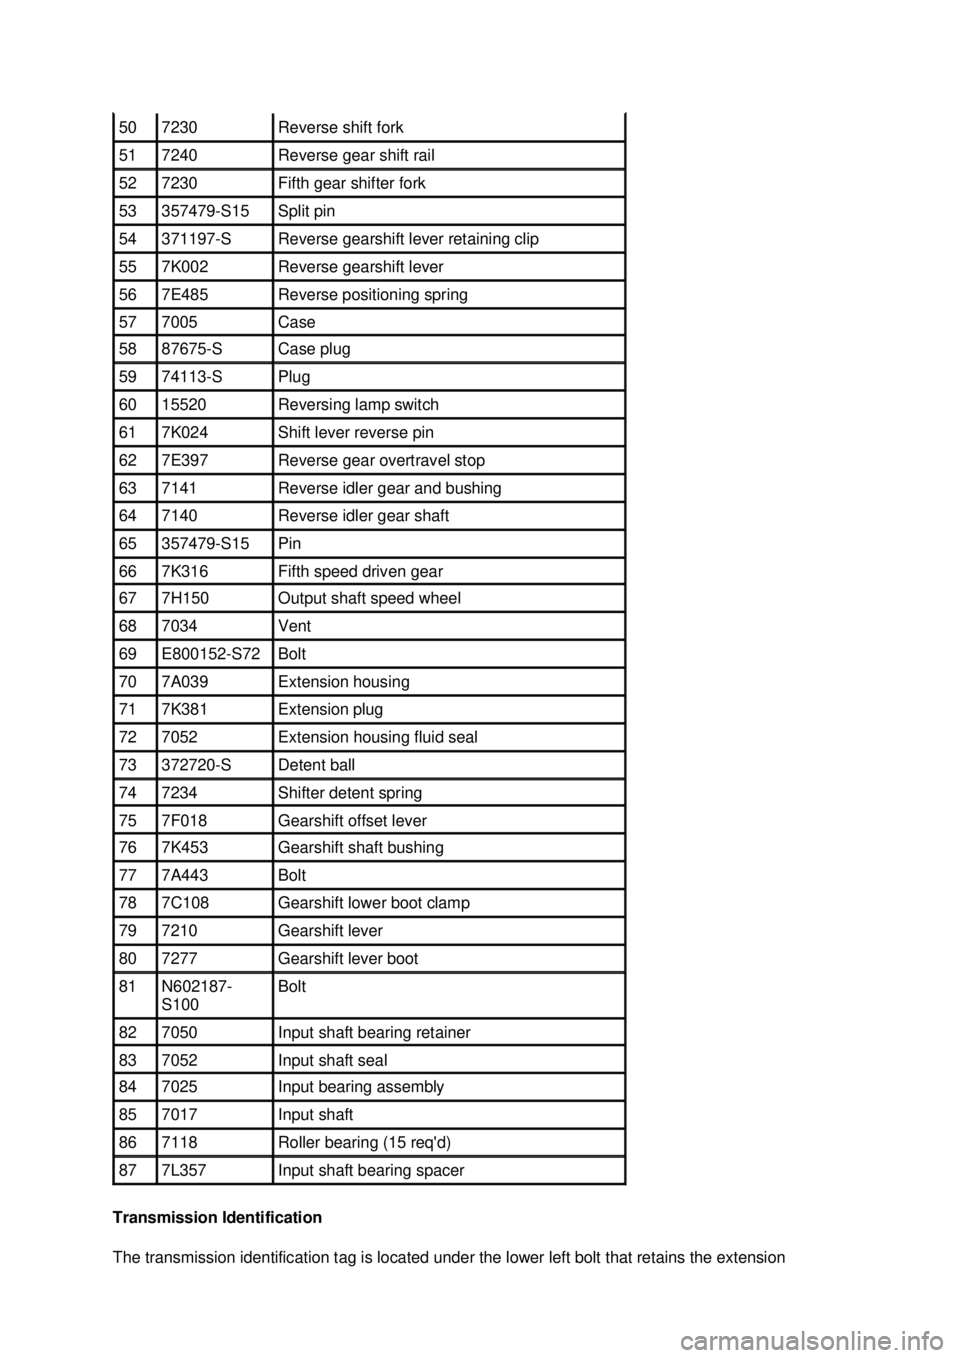
The transmission identification tag is located under the lower left bolt that retains the extension 50 7230 Reverse shift fork
51 7240 Reverse gear shift rail
52 7230 Fifth gear shifter fork
53 357479-S15 Split pin
54 371197-
S Reverse gearshift lever retaining clip
55 7K002 Reverse gearshift lever
56 7E485 Reverse positioning spring
57 7005 Case
58 87675-
S Case plug
59 74113-
S Plug
60 15520 Reversing lamp switch
61 7K024 Shift lever reverse pin
62 7E397 Reverse gear overtravel stop
63 7141 Reverse idler gear and bushing
64 7140 Reverse idler gear shaft
65 357479-S15 Pin
66 7K316 Fifth speed driven gear
67 7H150 Output shaft speed wheel
68 7034 Vent
69 E800152-S72 Bolt
70 7A039 Extension housing
71 7K381 Extension plug
72 7052 Extension housing fluid seal
73 372720-
S Detent ball
74 7234 Shifter detent spring
75 7F018 Gearshift offset lever
76 7K453 Gearshift shaft bushing
77 7A443 Bolt
78 7C108 Gearshift lower boot clamp
79 7210 Gearshift lever
80 7277 Gearshift lever boot
81 N602187-
S100 Bolt
82 7050 Input shaft bearing retainer
83 7052 Input shaft seal
84 7025 Input bearing assembly
85 7017 Input shaft
86 7118 Roller bearing (15 req'd)
87 7L357 Input shaft bearing spacer �K�l�j . 4 �b�a
52003 Mustang Workshop Manual
18. 11. 2011file:///C:/Ford/2000 - 2004/tsocache/SHEF_2308/S3B~us~en~ ...
Page 2695 of 4378
IN-
VEHICLE REPAIR
Seal
Removal 1. With the vehicle in NEUTRAL, raise and support the vehicle. For additional information, refer to Section 100 - 02 .
2. CAUTION: Index- mark the driveshaft flange and pinion flange, and the driveshaft
slip yoke and transmission output shaft.
Remove the driveshaft. For additional information, refer to Section 205 - 01 .
3. Using the special tools, remove the extension housing fluid seal.
Installation 1. Using the special tool, install the extension housing fluid seal.
SECTION 308-
03A: Manual Transaxle/Transmission — T5OD 2003 Mustang Workshop Manual Special Tool(s)
Installer, Transmission
Extension Housing Oil Seal
308-
227 (T94P-7657- A) Slide Hammer
100-
001 (T50T-100- A) Remover, Bushing
307-
001 (TOOL- 1175-AC) or
Equivalent �K�l�j . 1 �b�a
22003 Mustang Workshop Manual
18. 11. 2011file:///C:/Ford/2000 - 2004/tsocache/SHEF_2308/S3B~us~en~ ...
Page 2696 of 4378
2.
CAUTION: Align the index marks.
Install the driveshaft. For additional information, refer to Section 205 - 01 .
3. Check the transmission fluid level, add fluid if necessary.
4. Lower the vehicle. �K�l�j . 2 �b�a
22003 Mustang Workshop Manual
18. 11. 2011file:///C:/Ford/2000 - 2004/tsocache/SHEF_2308/S3B~us~en~ ...
Page 2705 of 4378
17.
CAUTION: To prevent damage, do not depress the clutch pedal with the
transmission removed.
Disengage the clutch release cable from the clutch release fork.
18. Remove the clutch cable retainer and remove the clutch cable from the transmission.
19. If transmission disassembly is necessary, drain the transmission fluid.
20. Position a transmission jack and support the transmission.
21. Remove the bolts and the transmission crossmember. �K�l�j . 4 �b�a
62003 Mustang Workshop Manual
18. 11. 2011file:///C:/Ford/2000 - 2004/tsocache/SHEF_2308/S3B~us~en~ ...
Page 2730 of 4378
Assembly
1. Soak the blocking rings in transmission fluid for ten minutes. �zUse MERCON® Multi- Purpose ATF Transmission Fluid XT -2-QDX or equivalent.
2. Assemble the first and second synchronizer. 1. Install the synchronizer hub insert springs and the synchronizer inserts into the synchronizer hub.
2. Install the sliding sleeve onto the hub.
3. NOTE: If not done so previously, soak the blocking ring in MERCON® Multi- Purpose ATF
Transmission Fluid XT -2-QDX or equivalent for ten minutes.
NOTE: Align the slots in the synchronizer blocking ring with the tabs in the first and second
speed synchronizer.
Install the second speed synchronizer blocking ring and the inner and outer cones as an
assembly.
4. Install the second speed synchronizer thrust washer.
5. Using the special tool, install the output shaft bearing snap ring. �K�l�j . 5 �b�a
102003 Mustang Workshop Manual
18. 11. 2011file:///C:/Ford/2000 - 2004/tsocache/SHEF_2308/S3B~us~en~ ...
Page 2731 of 4378
6. Install the second speed gear bearing spacer and the second speed bearing.
7.
NOTE: Align the slots in the second gear with the tabs on the synchronizer blocking ring.
Install the second gear onto the output shaft.
8. Install the thrust washer and the snap ring.
9. NOTE: If not done so previously, soak the blocking ring in MERCON® Multi- Purpose ATF
Transmission Fluid XT -2-QDX or equivalent for ten minutes. �K�l�j . 6 �b�a
102003 Mustang Workshop Manual
18. 11. 2011file:///C:/Ford/2000 - 2004/tsocache/SHEF_2308/S3B~us~en~ ...
Page 2734 of 4378
17. Install the third speed gear bearing spacer and the third speed bearing.
18.
CAUTION: Before pressing the components together, verify that the synchronizer
hub faces the short end of the output shaft. Hold the third gear against the synchronizer
to maintain the synchronizer blocking ring alignment.
NOTE: If not done so previously, soak the blocking ring in MERCON® Multi- Purpose ATF
Transmission Fluid XT -2-QDX or equivalent for ten minutes.
Using a 1- 1/2 inch deep well socket and a press, install the third gear, the third speed
synchronizer blocking ring, and the third/fourth gear synchronizer assembly. �K�l�j . 9 �b�a
102003 Mustang Workshop Manual
18. 11. 2011file:///C:/Ford/2000 - 2004/tsocache/SHEF_2308/S3B~us~en~ ...