Page 1121 of 4378
3. Remove the special tools.
4. Raise and support the vehicle. For additional information, refer to
Section 100 - 02 .
5. Install the LH engine mount nut.
6. Install the RH engine mount nut.
Vehicles equipped with manual transmission 7. Install the transmission. For additional information, refer to Section 308 - 03A .
8. Install the transmission oil filler tube. �K�l�j . 2 �b�a
102003 Mustang Workshop Manual
17. 11. 2011file:///C:/Ford/2000 - 2004/tsocache/SHEF_4464/S3B~us~en~ ...
Page 1122 of 4378
Vehicles equipped with automatic transmission
9. Install the five bellhousing upper bolts.
10. Install the bolts.
11. Install the four torque converter nuts.
All vehicles �K�l�j . 3 �b�a
102003 Mustang Workshop Manual
17. 11. 2011file:///C:/Ford/2000 - 2004/tsocache/SHEF_4464/S3B~us~en~ ...
Page 1134 of 4378

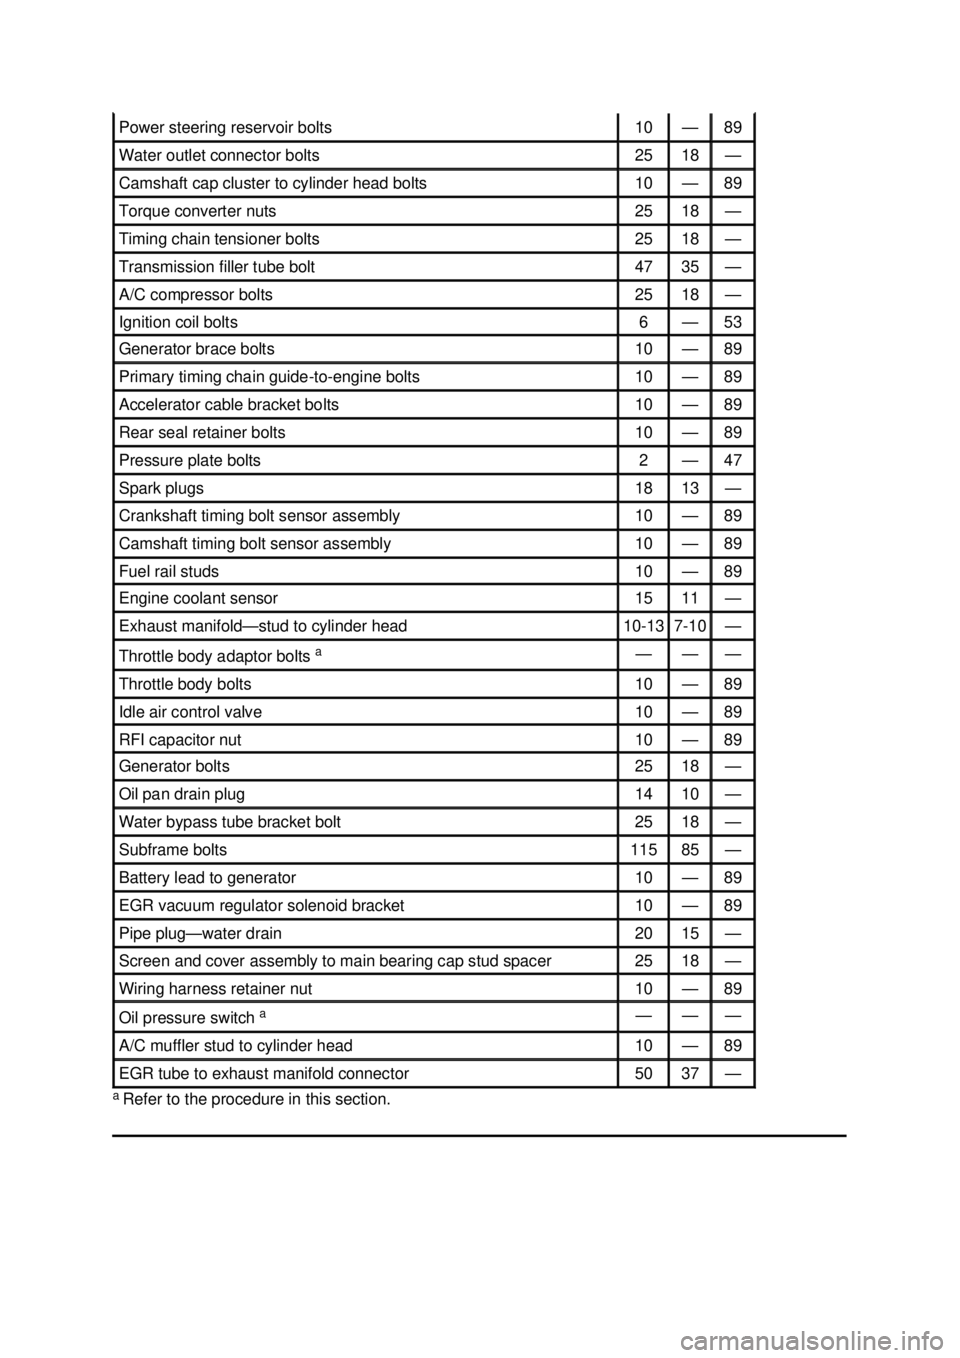
a
Refer to the procedure in this section. Power steering reservoir bolts 10 — 89
Water outlet connector bolts 25 18 —
Camshaft cap cluster to cylinder head bolts 10 — 89
Torque converter nuts 25 18 —
Timing chain tensioner bolts 25 18 —
Transmission filler tube bolt 47 35 —
A/C compressor bolts 25 18 —
Ignition coil bolts 6 — 53
Generator brace bolts 10 — 89
Primary timing chain guide-
to-engine bolts 10 — 89
Accelerator cable bracket bolts 10 — 89
Rear seal retainer bolts 10 — 89
Pressure plate bolts 2 — 47
Spark plugs 18 13 —
Crankshaft timing bolt sensor assembly 10 — 89
Camshaft timing bolt sensor assembly 10 — 89
Fuel rail studs 10 — 89
Engine coolant sensor 15 11 —
Exhaust manifold—
stud to cylinder head 10-
13 7-10 —
Throttle body adaptor bolts
a — — —
Throttle body bolts 10 — 89
Idle air control valve 10 — 89
RFI capacitor nut 10 — 89
Generator bolts 25 18 —
Oil pan drain plug 14 10 —
Water bypass tube bracket bolt 25 18 —
Subframe bolts 115 85 —
Battery lead to generator 10 — 89
EGR vacuum regulator solenoid bracket 10 — 89
Pipe plug—
water drain 20 15 —
Screen and cover assembly to main bearing cap stud spacer 25 18 —
Wiring harness retainer nut 10 — 89
Oil pressure switch
a — — —
A/C muffler stud to cylinder head 10 — 89
EGR tube to exhaust manifold connector 50 37 — �K�l�j . 5 �b�a
62003 Mustang Workshop Manual
17. 11. 2011file:///C:/Ford/2000 - 2004/tsocache/SHEF_4464/S3B~us~en~ ...
Page 1139 of 4378

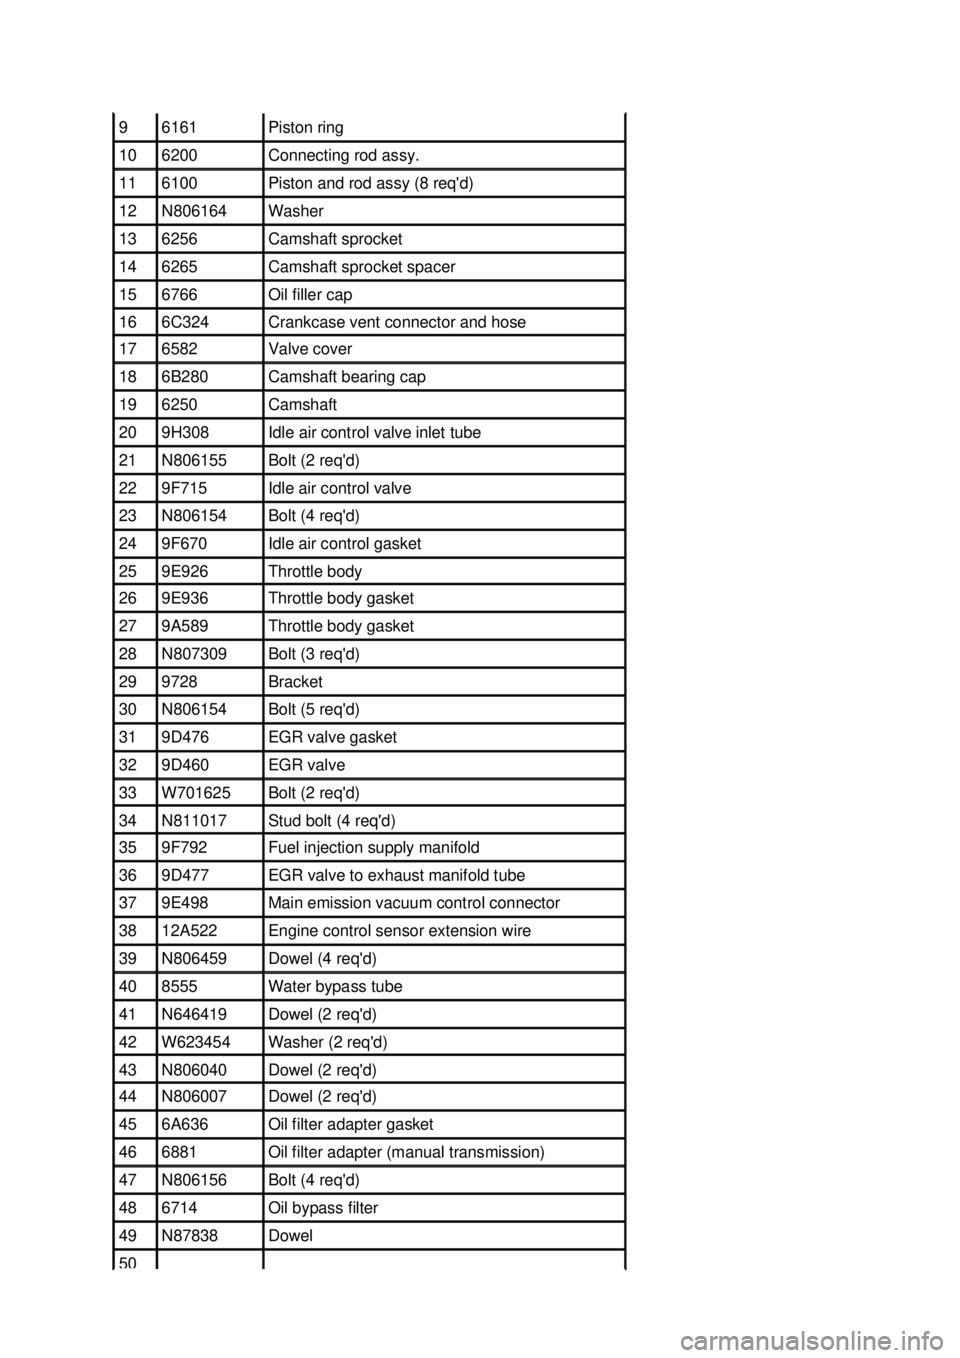
9 6161 Piston ring
10 6200 Connecting rod assy.
11 6100 Piston and rod assy (8 req'd)
12 N806164 Washer
13 6256 Camshaft sprocket
14 6265 Camshaft sprocket spacer
15 6766 Oil filler cap
16 6C324 Crankcase vent connector and hose
17 6582 Valve cover
18 6B280 Camshaft bearing cap
19 6250 Camshaft
20 9H308 Idle air control valve inlet tube
21 N806155 Bolt (2 req'd)
22 9F715 Idle air control valve
23 N806154 Bolt (4 req'd)
24 9F670 Idle air control gasket
25 9E926 Throttle body
26 9E936 Throttle body gasket
27 9A589 Throttle body gasket
28 N807309 Bolt (3 req'd)
29 9728 Bracket
30 N806154 Bolt (5 req'd)
31 9D476 EGR valve gasket
32 9D460 EGR valve
33 W701625 Bolt (2 req'd)
34 N811017 Stud bolt (4 req'd)
35 9F792 Fuel injection supply manifold
36 9D477 EGR valve to exhaust manifold tube
37 9E498 Main emission vacuum control connector
38 12A522 Engine control sensor extension wire
39 N806459 Dowel (4 req'd)
40 8555 Water bypass tube
41 N646419 Dowel (2 req'd)
42 W623454 Washer (2 req'd)
43 N806040 Dowel (2 req'd)
44 N806007 Dowel (2 req'd)
45 6A636 Oil filter adapter gasket
46 6881 Oil filter adapter (manual transmission)
47 N806156 Bolt (4 req'd)
48 6714 Oil bypass filter
49 N87838 Dowel
50 �K�l�j . 4 �b�a
92003 Mustang Workshop Manual
17. 11. 2011file:///C:/Ford/2000 - 2004/tsocache/SHEF_4464/S3B~us~en~ ...
Page 1142 of 4378

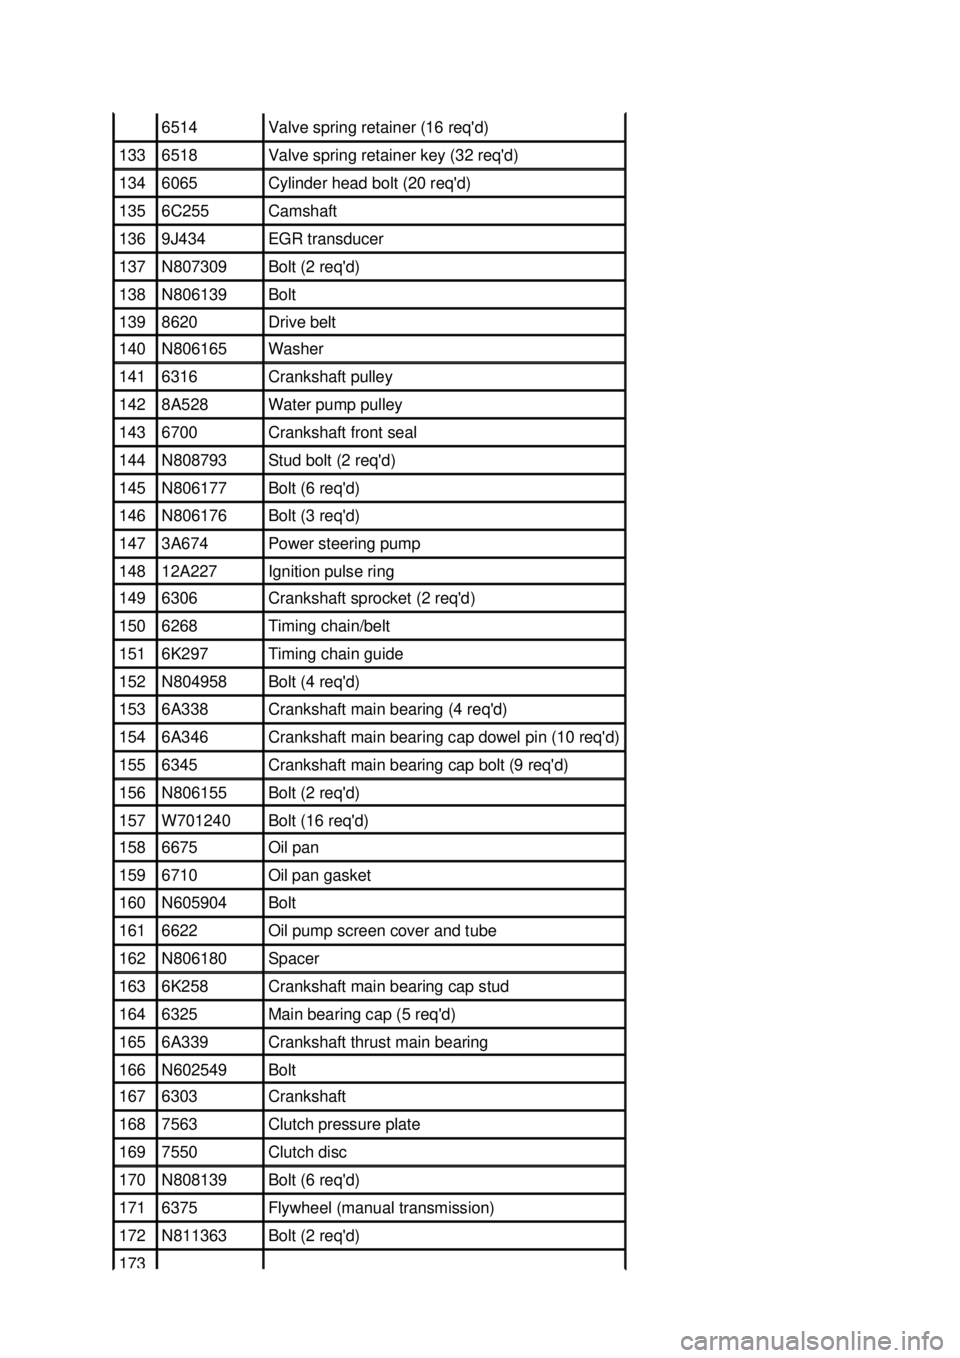
6514 Valve spring retainer (16 req'd)
133 6518 Valve spring retainer key (32 req'd)
134 6065 Cylinder head bolt (20 req'd)
135 6C255 Camshaft
136 9J434 EGR transducer
137 N807309 Bolt (2 req'd)
138 N806139 Bolt
139 8620 Drive belt
140 N806165 Washer
141 6316 Crankshaft pulley
142 8A528 Water pump pulley
143 6700 Crankshaft front seal
144 N808793 Stud bolt (2 req'd)
145 N806177 Bolt (6 req'd)
146 N806176 Bolt (3 req'd)
147 3A674 Power steering pump
148 12A227 Ignition pulse ring
149 6306 Crankshaft sprocket (2 req'd)
150 6268 Timing chain/belt
151 6K297 Timing chain guide
152 N804958 Bolt (4 req'd)
153 6A338 Crankshaft main bearing (4 req'd)
154 6A346 Crankshaft main bearing cap dowel pin (10 req'd)
155 6345 Crankshaft main bearing cap bolt (9 req'd)
156 N806155 Bolt (2 req'd)
157 W701240 Bolt (16 req'd)
158 6675 Oil pan
159 6710 Oil pan gasket
160 N605904 Bolt
161 6622 Oil pump screen cover and tube
162 N806180 Spacer
163 6K258 Crankshaft main bearing cap stud
164 6325 Main bearing cap (5 req'd)
165 6A339 Crankshaft thrust main bearing
166 N602549 Bolt
167 6303 Crankshaft
168 7563 Clutch pressure plate
169 7550 Clutch disc
170 N808139 Bolt (6 req'd)
171 6375 Flywheel (manual transmission)
172 N811363 Bolt (2 req'd)
173 �K�l�j . 7 �b�a
92003 Mustang Workshop Manual
17. 11. 2011file:///C:/Ford/2000 - 2004/tsocache/SHEF_4464/S3B~us~en~ ...
Page 1143 of 4378

A modular engine is built around four modules:
�zthe intake module
�z the cylinder head module (RH)
�z the cylinder head module (LH)
�z the lower engine module
While not all repairs can take advantage of the modular concept, most out-of- vehicle repairs benefit
due to the reduction of necessary time and labor.
The basic engine components consist of the following:
�zsingle overhead camshafts
�z two valves per cylinder
�z sequential multiport fuel injection (SFI)
�z aluminum cylinder heads (6049)
�z cast iron, 90- degree V-shaped cylinder block
�z individual ignition coils for each spark plug
�z composite-material intake manifold
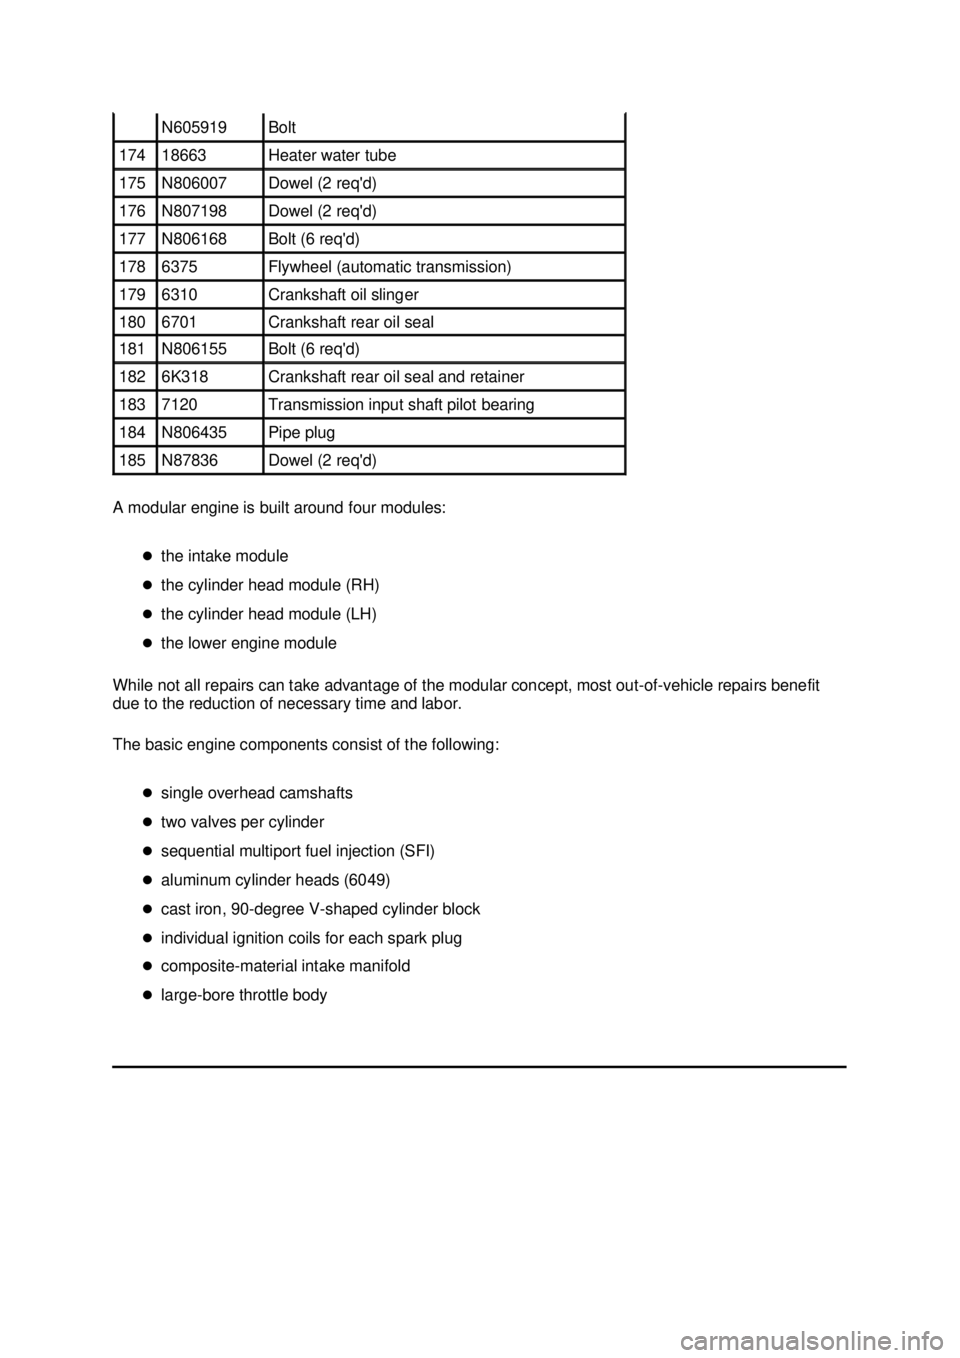
�z large- bore throttle body N605919 Bolt
174 18663 Heater water tube
175 N806007 Dowel (2 req'd)
176 N807198 Dowel (2 req'd)
177 N806168 Bolt (6 req'd)
178 6375 Flywheel (automatic transmission)
179 6310 Crankshaft oil slinger
180 6701 Crankshaft rear oil seal
181 N806155 Bolt (6 req'd)
182 6K318 Crankshaft rear oil seal and retainer
183 7120 Transmission input shaft pilot bearing
184 N806435 Pipe plug
185 N87836 Dowel (2 req'd) �K�l�j . 8 �b�a
92003 Mustang Workshop Manual
17. 11. 2011file:///C:/Ford/2000 - 2004/tsocache/SHEF_4464/S3B~us~en~ ...
Page 1167 of 4378
6. Raise and support the vehicle. For additional information, refer to
Section 100 - 02 .
7. Remove the bolt and position the transmission filler tube aside.
8. Remove the bolts, studs and the valve cover in the sequence shown. �zClean and inspect the sealing surfaces.
9. NOTE: Apply an eight millimeter bead of silicone gasket and sealant at the intersection of the
engine front cover and the cylinder head.
To install, reverse the removal procedure. �K�l�j . 2 �b�a
32003 Mustang Workshop Manual
17. 11. 2011file:///C:/Ford/2000 - 2004/tsocache/SHEF_4464/S3B~us~en~ ...
Page 1230 of 4378
IN-
VEHICLE REPAIR
Flexplate
Removal and Installation 1. Remove the transmission. For additional information, refer to Section 307 - 01 .
2. Remove the six bolts retaining the flexplate to crankshaft, and remove the flexplate.
3. To install, reverse the removal procedure. �zTighten the bolts in the sequence shown
SECTION 303-
01B: Engine — 4.6L (2V) 2003 Mustang Workshop Manual �K�l�j . 1 �b�a
22003 Mustang Workshop Manual
17. 11. 2011file:///C:/Ford/2000 - 2004/tsocache/SHEF_4464/S3B~us~en~ ...