Page 2185 of 4378
REMOVAL AND INSTALLATION
Fuel Vapor Vent Valve
Removal and Installation
1. NOTE: The fuel vapor vent valve is repaired along with the fuel vapor control valve and the in-
line fuel tank pressure sensor as a fuel vapor control valve tube assembly.
For removal and installation of the fuel vapor vent valve, refer to Fuel Vapor Control Tube Assembly Valve in this section.
SECTION 303-
13: Evaporative Emissions 2003 Mustang Workshop Manual �K�l�j . 1 �b�a
12003 Mustang Workshop Manual
18. 11. 2011file:///C:/Ford/2000 - 2004/tsocache/SHEF_4464/S3B~us~en~ ...
Page 2186 of 4378

REMOVAL AND INSTALLATION
Fuel Vapor Control Tube Assembly Valve
Removal and Installation
1. Remove the fuel tank. For additional information, refer to Section 310 - 01 .
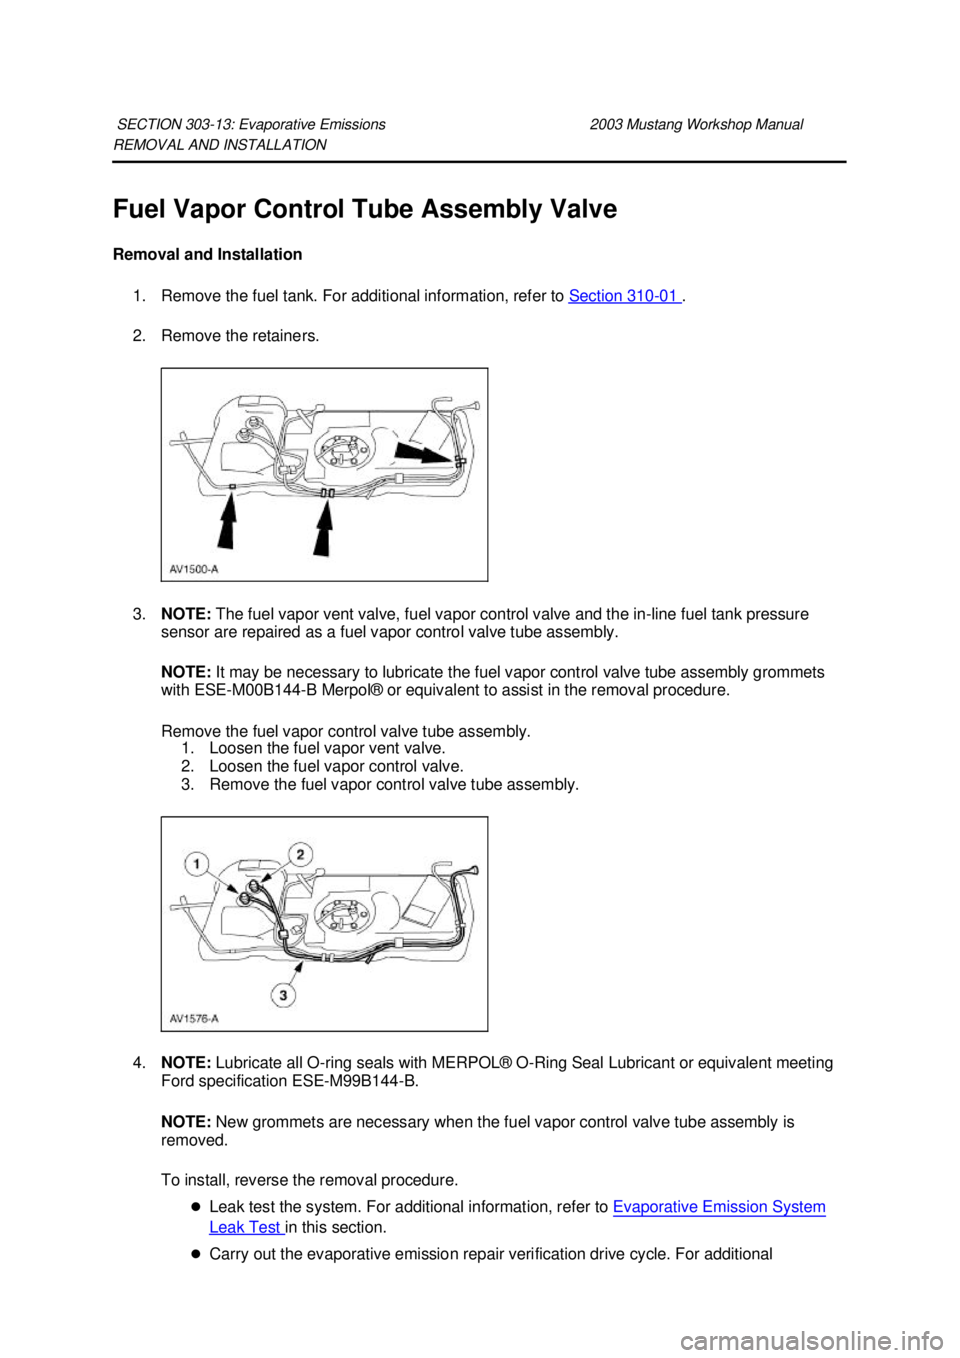
2. Remove the retainers.
3. NOTE: The fuel vapor vent valve, fuel vapor control valve and the in- line fuel tank pressure
sensor are repaired as a fuel vapor control valve tube assembly.
NOTE: It may be necessary to lubricate the fuel vapor control valve tube assembly grommets
with ESE- M00B144- B Merpol® or equivalent to assist in the removal procedure.
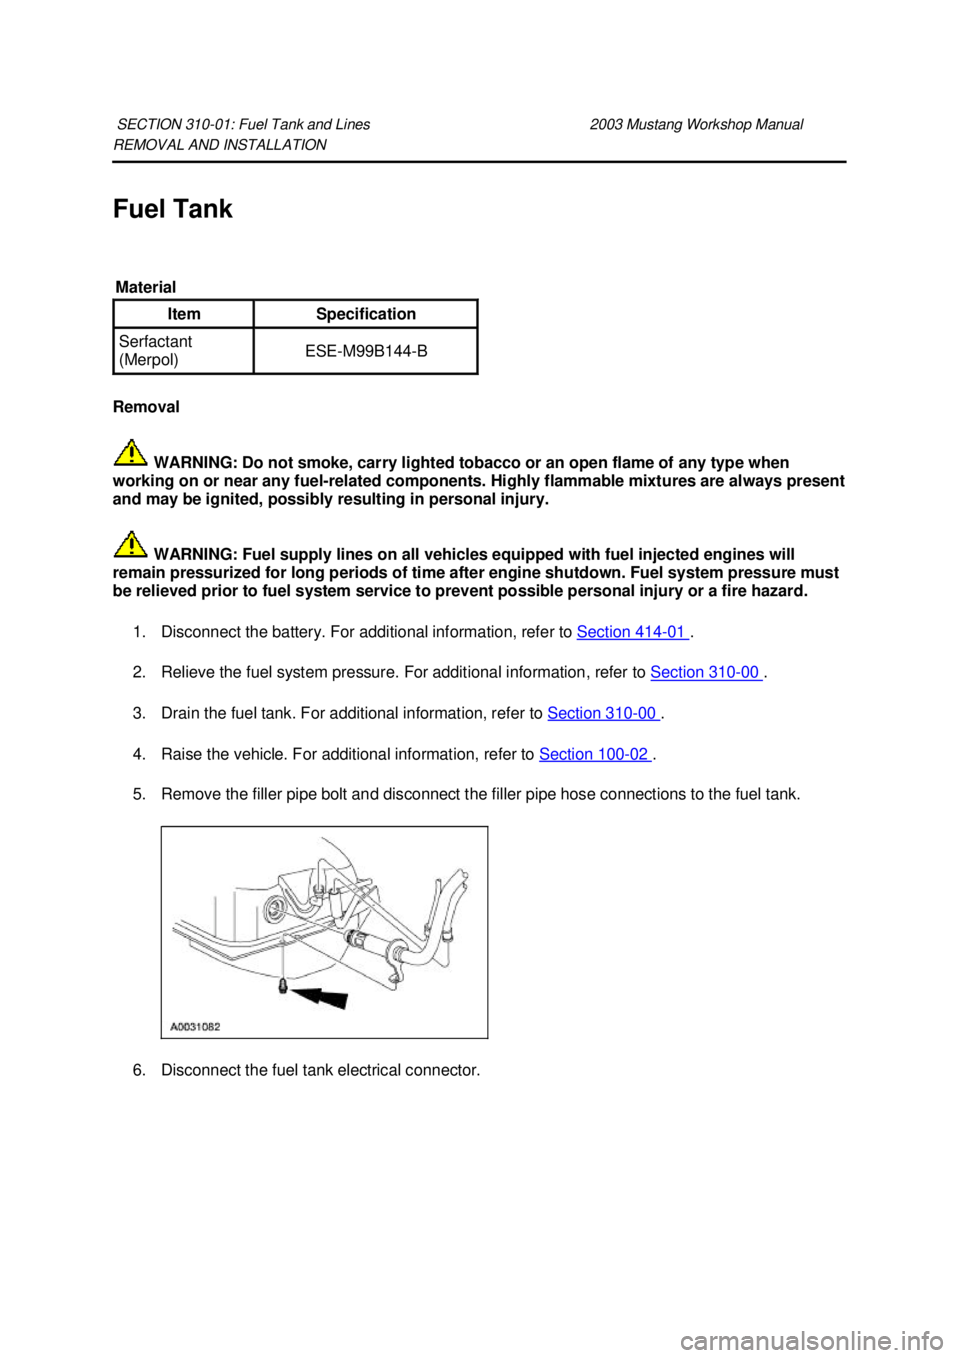
Remove the fuel vapor control valve tube assembly. 1. Loosen the fuel vapor vent valve.
2. Loosen the fuel vapor control valve.
3. Remove the fuel vapor control valve tube assembly.
4. NOTE: Lubricate all O- ring seals with MERPOL® O-Ring Seal Lubricant or equivalent meeting
Ford specification ESE-M99B144- B.
NOTE: New grommets are necessary when the fuel vapor control valve tube assembly is
removed.
To install, reverse the removal procedure.
�zLeak test the system. For additional information, refer to Evaporative Emission System Leak Test in this section.
�z Carry out the evaporative emission repair verification drive cycle. For additional
SECTION 303-
13: Evaporative Emissions 2003 Mustang Workshop Manual �K�l�j . 1 �b�a
22003 Mustang Workshop Manual
18. 11. 2011file:///C:/Ford/2000 - 2004/tsocache/SHEF_4464/S3B~us~en~ ...
Page 2188 of 4378
REMOVAL AND INSTALLATION
Fuel Tank Pressure Sensor
Removal and Installation
1. NOTE: The in-line fuel tank pressure sensor is repaired along with the fuel vapor vent valve and
the fuel vapor control valve as a fuel vapor control valve tube assembly.
For removal and installation of the fuel vapor control valve, refer to Fuel Vapor Control Tube Assembly Valve in this section.
SECTION 303-
13: Evaporative Emissions 2003 Mustang Workshop Manual �K�l�j . 1 �b�a
12003 Mustang Workshop Manual
18. 11. 2011file:///C:/Ford/2000 - 2004/tsocache/SHEF_4464/S3B~us~en~ ...
Page 2977 of 4378

REMOVAL AND INSTALLATION
Fuel Tank
Removal
WARNING: Do not smoke, carry lighted tobacco or an open flame of any type when
working on or near any fuel- related components. Highly flammable mixtures are always present
and may be ignited, possibly resulting in personal injury.
WARNING: Fuel supply lines on all vehicles equipped with fuel injected engines will
remain pressurized for long periods of time after engine shutdown. Fuel system pressure must
be relieved prior to fuel system service to prevent possible personal injury or a fire hazard.
1. Disconnect the battery. For additional information, refer to Section 414 - 01 .
2. Relieve the fuel system pressure. For additional information, refer to Section 310 - 00 .
3. Drain the fuel tank. For additional information, refer to Section 310 - 00 .
4. Raise the vehicle. For additional information, refer to Section 100 - 02 .
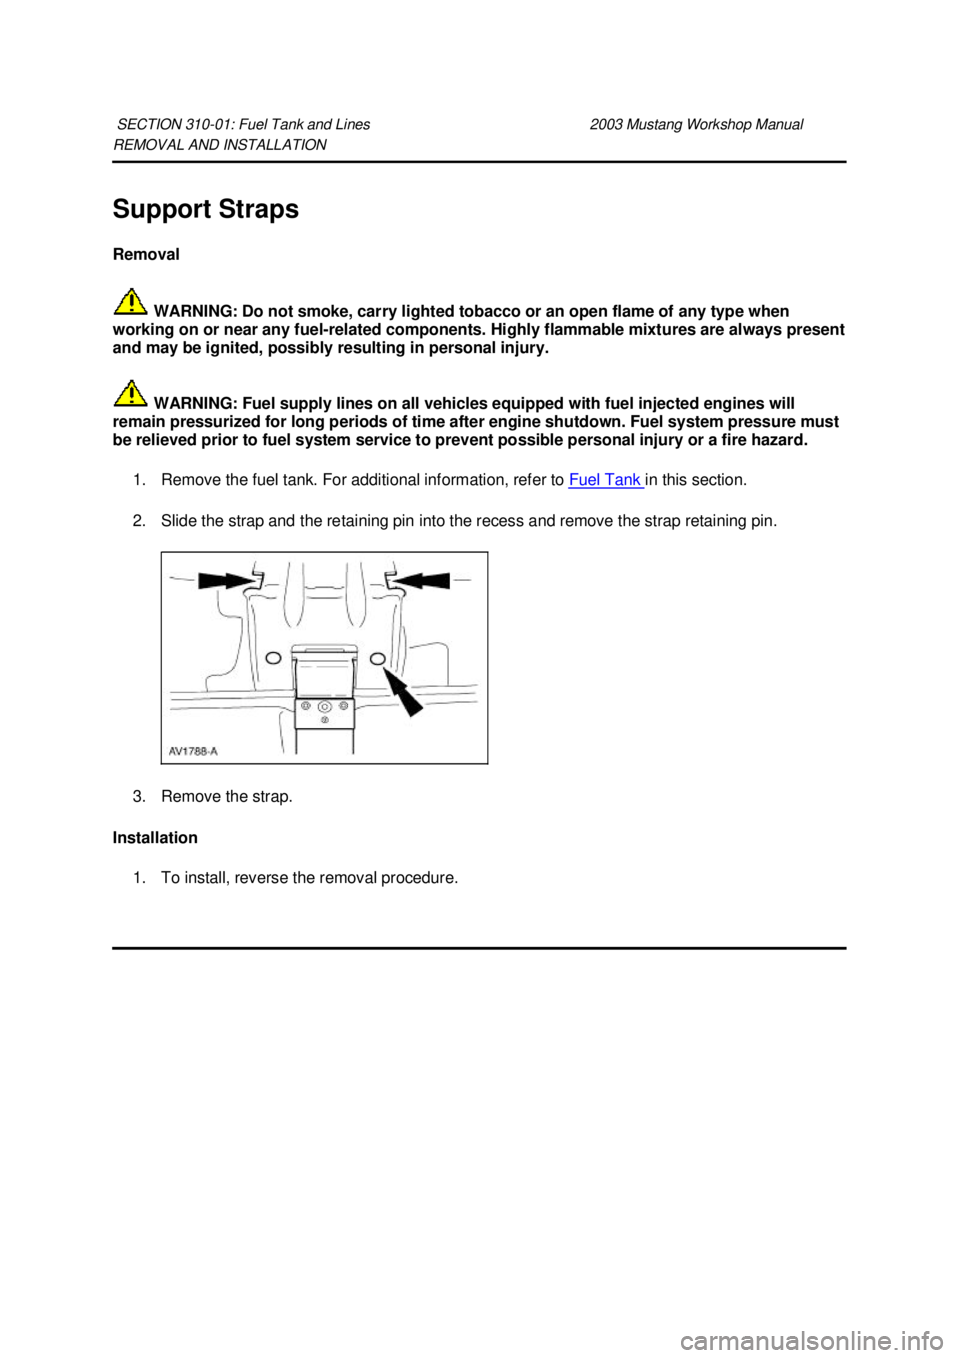
5. Remove the filler pipe bolt and disconnect the filler pipe hose connections to the fuel tank.
6. Disconnect the fuel tank electrical connector.
SECTION 310-
01: Fuel Tank and Lines 2003 Mustang Workshop Manual Material
Item Specification
Serfactant
(Merpol)
ESE-
M99B144- B �K�l�j . 1 �b�a
52003 Mustang Workshop Manual
18. 11. 2011file:///C:/Ford/2000 - 2004/tsocache/SHEF_2308/S3B~us~en~ ...
Page 2979 of 4378
11. Remove the RH fuel tank support strap bolt and remove the strap.
12. Partially lower the fuel tank and disconnect the fuel line. For additional information, refer to
Section 310 - 00 .
13. CAUTION: The filler pipe grommet must be removed prior to removing the fuel tank
from the filler pipe or damage to the fill tube check valve will occur.
Cut outer edge of pipe- to-tank grommet to facilitate pipe removal and carefully remove the
grommet from the fuel tank. Take care to avoid damage to the filler pipe check valve.
14. Lower the fuel tank from the vehicle.
Installation
1. CAUTION: Lubricate the filler pipe check valve area and the tank- to-filler pipe
grommet with Serfactant prior to assembly or damage to the filler pipe check valve will
occur.
NOTE: A new grommet must be used for the installation procedure due to its destruction during
removal. �K�l�j . 3 �b�a
52003 Mustang Workshop Manual
18. 11. 2011file:///C:/Ford/2000 - 2004/tsocache/SHEF_2308/S3B~us~en~ ...
Page 2982 of 4378

REMOVAL AND INSTALLATION
Support Straps
Removal
WARNING: Do not smoke, carry lighted tobacco or an open flame of any type when
working on or near any fuel- related components. Highly flammable mixtures are always present
and may be ignited, possibly resulting in personal injury.
WARNING: Fuel supply lines on all vehicles equipped with fuel injected engines will
remain pressurized for long periods of time after engine shutdown. Fuel system pressure must
be relieved prior to fuel system service to prevent possible personal injury or a fire hazard.
1. Remove the fuel tank. For additional information, refer to Fuel Tank in this section.
2. Slide the strap and the retaining pin into the recess and remove the strap retaining pin.
3. Remove the strap.
Installation 1. To install, reverse the removal procedure.
SECTION 310-
01: Fuel Tank and Lines 2003 Mustang Workshop Manual �K�l�j . 1 �b�a
22003 Mustang Workshop Manual
18. 11. 2011file:///C:/Ford/2000 - 2004/tsocache/SHEF_2308/S3B~us~en~ ...
Page 2984 of 4378
REMOVAL AND INSTALLATION
Fuel Pump Module
Removal and Installation
1. Remove the fuel tank. For additional information, refer to Fuel Tank in this section.
2. NOTE: For installation, tighten the bolts in the sequence shown.
Remove the module assembly flange bolts.
3. Clean the area around the fuel delivery module mounting flange.
4. Lift the fuel pump, carefully detach the fuel float arm and remove the fuel pump from the fuel tank.
5. NOTE: Install a new fuel pump O- ring.
To install, reverse the removal procedure.
SECTION 310-
01: Fuel Tank and Lines 2003 Mustang Workshop Manual �K�l�j . 1 �b�a
22003 Mustang Workshop Manual
18. 11. 2011file:///C:/Ford/2000 - 2004/tsocache/SHEF_2308/S3B~us~en~ ...
Page 2986 of 4378
REMOVAL AND INSTALLATION
Fuel Tank Filler Pipe
Removal
1. Remove the fuel tank. For additional information, refer to Fuel Tank in this section.
2. Remove the bolts from the filler pipe housing.
3. Remove the bolts from the filler pipe rubber boot- to-floor pan.
4. Remove the hose attached to the upper part of the pipe.
5. Rotate the pipe downward to clear the filler pipe pocket and pull it into the trunk area.
Installation
1. To install, reverse the removal procedure.
SECTION 310-
01: Fuel Tank and Lines 2003 Mustang Workshop Manual �K�l�j . 1 �b�a
12003 Mustang Workshop Manual
18. 11. 2011file:///C:/Ford/2000 - 2004/tsocache/SHEF_2308/S3B~us~en~ ...