Page 43 of 256
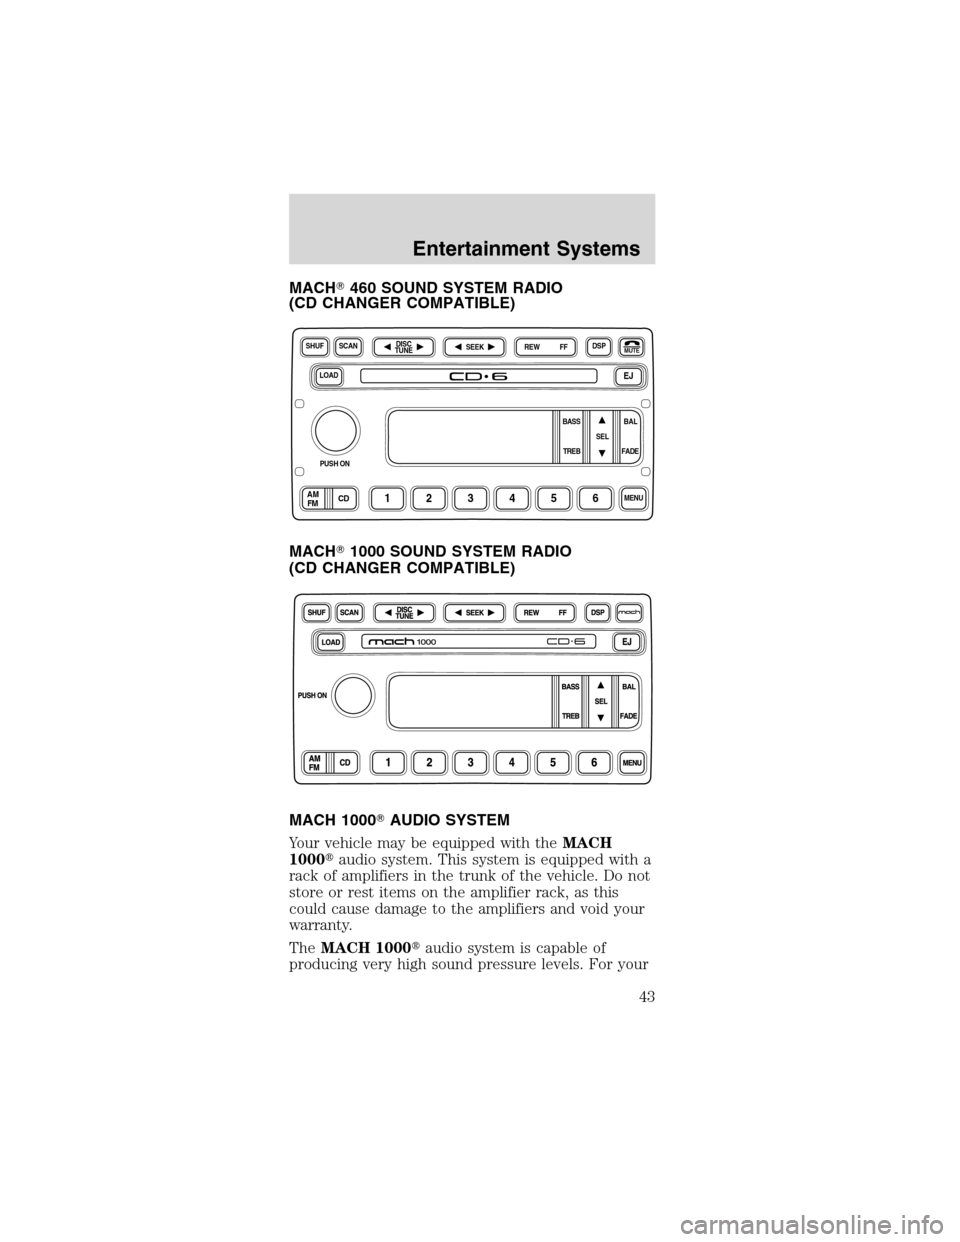
MACH�460 SOUND SYSTEM RADIO
(CD CHANGER COMPATIBLE)
MACH�1000 SOUND SYSTEM RADIO
(CD CHANGER COMPATIBLE)
MACH 1000�AUDIO SYSTEM
Your vehicle may be equipped with theMACH
1000�audio system. This system is equipped with a
rack of amplifiers in the trunk of the vehicle. Do not
store or rest items on the amplifier rack, as this
could cause damage to the amplifiers and void your
warranty.
TheMACH 1000�audio system is capable of
producing very high sound pressure levels. For your
LOADEJ
SHUFDSPMUTE
SELBAL BASS
FADE TREB
SCAN
PUSH ON
CD123456MENUAM
FM
SEEKREW FFDISC
TUNE
Entertainment Systems
43
Page 57 of 256
.
The following can be selected:
•DSP
OFF—disengages
the feature
•STADIUM—outdoor
stadium wi")
Use the SEL control to select the desired signal
mode (the selected mode will appear in the display).
The following can be selected:
•DSP
OFF—disengages
the feature
•STADIUM—outdoor
stadium with a capacity of about 30 000
•CHURCH—church with a high vault
•HALL—rectangular concert hall capacity of about
2 000
•JAZZ CLUB—jazz club with clearly reflected
sounds
•NEWS—”voice-only”type of sound with a limited
audio band
Press the DSP control again to access the occupancy
modes. Use the SEL control to optimize the sound
based upon the occupants in the vehicle.
The following occupancy modes can be selected for
the MACH 460 Sound System:
•ALL SEATS
•DRIVER SEAT
•REAR SEATS
The following occupancy modes can be selected for
the MACH 1000 Sound System:
•ALL SEATS
•DRIVER SEAT
•MACH 1000
MACH 1000 mode raises the bass response of the
trunk mounted subwoofers.
Mute mode
Press the control to
mute the playing
media. Press the
control again to return to the playing media.
SEL
Entertainment Systems
57
Page 74 of 256
3.Atthebackofthe
headlamp, pull two
retainer pins up to
release the headlamp
assembly.
4. Pull headlamp
assembly forward
disengaging the lamp
from the rear snap retainers to expose the back of
the bulb.
5. Rotate the bulb
socket
counterclockwise and
remove from lamp
assembly.
6. Carefully pull the
bulb straight out from the socket and push in the
new bulb.
7. To complete installation, follow the removal
procedure in reverse orer.
Replacing high-mount brakelamp bulbs
1. Open trunk.
2. Inside trunk, locate
access hole under the
rear decklid.
3. Remove the bulb
socket by rotating it 45
degrees and pulling it
out of the lamp
assembly.
4. Carefully pull bulb
straight out of socket and push in new bulb.
5. To complete installation, follow the removal
procedure in reverse order.
Lights
74
Page 75 of 256
Replacing foglamp bulbs
The halogen bulb contains gas under pressure.
The bulb may shatter if the glass envelope is
scratched or if the bulb is dropped. Handle the
bulb carefully. Grasp the bulb only by its base.
Avoid touching the glass envelope.
1. Rotate the foglamp
bulb counterclockwise
and remove from
foglamp (the rear side
of the foglamp is
shown).
2. Disconnect the
electrical connector
from the foglamp bulb.
3. Connect the electrical connector to the new
foglamp bulb.
4. Install the foglamp bulb in foglamp by rotating
clockwise.
Replacing license plate lamp bulbs
1. Open trunk and
remove bulb socket
from the trunk lid by
turning
counterclockwise.
2. Pull the bulb straight
out of the socket.
Install the new bulb in reverse order.
Replacing tail lamp/backup bulbs
For bulb replacement, see a dealer or qualified
technician.
Lights
75
Page 85 of 256

Position the floor mat so
that the eyelet is over the
pointed end of the
ret")
Use only soft cups in the cupholder. Hard
objects can injure you in a collision.
POSITIVE RETENTION FLOOR MAT
(IF EQUIPPED)
Position the floor mat so
that the eyelet is over the
pointed end of the
retention post and rotate
forward to lock in. Make
sure that the mat does not
interfere with the operation
of the accelerator or the
brake pedal. To remove the
floor mat, reverse the installation procedure.
TRUNK REMOTE CONTROL
The remote trunk release control is located in the
glove compartment. Press to open trunk.
CONVERTIBLE (IF EQUIPPED)
Do not store articles behind rear seat. Articles
stored in the convertible top stowage compartment
may break the rear glass window when the top is
lowered.
Lowering the convertible top
The convertible top can be lowered with the side
windows either up or down.
The convertible topwill not operateunless the
parking brake is engaged. Do not lower the top while
the vehicle is moving because the top may be
severely damaged. Also, do not lower the top when
the top material is wet.
To lower the convertible top:
1. Bring vehicle to a complete stop. Engage the
parking brake. Key must be in the ON position.
2. Check the convertible top stowage compartment
behind the rear seat to be sure it is empty and ready
to receive the top.
Driver Controls
85
Page 90 of 256
To open the luggage
compartment door (lid)
from within the
luggage compartment,
pull the illuminated“T”
shaped handle and
push up on the trunk
lid. The handle is
composed of a material
that will glow for hours
in darkness following
brief exposure to
ambient light.
The“T”shaped handle will be located either on the
luggage compartment door (lid) or inside the
luggage compartment near the tail lamps.
Keep vehicle
doors and
luggage compartment
locked and keep keys
and remote
transmitters out of a
child’s reach.
Unsupervised
children could lock
themselves in an
open trunk and risk
injury. Children
should be taught not
to play in vehicles.
Locks and Security
90
Page 91 of 256

On hot days, the temperature in the trunk
or vehicle interior can rise very quickly.
Exposure of people or animals to these high
temperatures for even a short time can cause
death or serious heat-related injuries, including
brain damage. Small children are particularly at
risk.
REMOTE ENTRY SYSTEM
This device complies with part 15 of the FCC rules
and with RS-210 of Industry Canada. Operation is
subject to the following two conditions: (1) This
device may not cause harmful interference, and (2)
This device must accept any interference received,
including interference that may cause undesired
operation.
Changes or modifications not expressly
approved by the party responsible for
compliance could void the user’s authority to
operate the equipment.
The remote entry system allows you to:
•lock or unlock all vehicle doors without a key
•open the trunk
•activate the panic alarm
•confirms that the vehicle is locked with a short
“beep”from the horn.
The remote entry features only operate with the
ignition in the LOCK position.
If there is any potential remote keyless entry
problem with your vehicle, ensureALL remote
entry transmittersare brought to the dealership,
to aid in troubleshooting.
Locks and Security
91
Page 93 of 256

Opening the trunk
Press the control once
to open the trunk.
Ensure that the trunk
is closed and latched
before driving your
vehicle. Failure to latch
the trunk may cause
objects to fall out of
the trunk or block the rear view. This feature will
not work with the transmission out of P (Park) or N
(Neutral) if the ignition is in either the ACC or ON
position.
Replacing the batteries
The transmitter is powered by two coin type
three-volt lithium batteries. Typical operating range
will allow you to be up to 10 meters (33 feet) away
from your vehicle. A decrease in operating range can
be caused by:
•Weather conditions
•Nearby radio towers
•Structures around the vehicle
•Other vehicles parked next to the vehicle
To replace the
batteries:
1. Twist a thin coin
between the two halves
of the transmitter near
the key ring. DO NOT
TAKE THE FRONT
PART OF THE
TRANSMITTER
APART.
2. Place the positive
(+) side of new batteries down. Refer to the diagram
inside the transmitter unit.
3. Snap the two halves back together.
Locks and Security
93


from within the
luggage compartment,
pull the illuminated“T”
shaped handle and
push up on the trunk
lid. The handle is
composed of a material
that will g")