Page 24 of 256
These stations are temporarily stored in the memory
preset controls (until deactivated) and are accessed
in the same manner as your original presets.
To deactivate autoset and return to your audio
system’s manually set memory stations, press the
AUTO control again.
Setting the clock
To set the hour, press
and hold the CLK
control and press
SEEK:
•
to decrease
hours and
•
to increase
hours.
To set the minute,
press and hold the CLK
control and press
TUNE:
•
to decrease
minutes and
•
to increase
minutes.
If your vehicle has a separate clock, (other than the
digital radio display), the CLK control will not
function in the above manner.
The CLK control will
allow you to switch
between media display
mode (radio station,
stereo information,
etc.) and clock display
mode (time). When in
AUTO
CLK
AUTO
CLK
AUTO
CLK
Entertainment Systems
24
Page 25 of 256
, the med")
clock mode, the media information will display for 10
seconds, when the radio is turned on, and then
revert to clock information. Any time that the media
is changed, (new radio station, etc.), the media
information will again display for 10 seconds before
reverting back to the clock. In media mode, the
media information will always be displayed.
Tune adjust
The tune control works in radio mode.
Tune adjust in radio mode
•Press
to move to
the next frequency
down the band
(whether or not a listenable station is located
there). Hold the control to move through the
frequencies quickly.
•Press
to move to the next frequency up the
band (whether or not a listenable station is
located there). Hold for quick movement.
Tape/CD select
•To begin tape play
(with a tape loaded
into the audio
system) while in the radio or CD mode, press the
TAPE control. Press again during rewind or fast
forward to stop the rewind or fast forward
function.
•To begin CD play (if
CD(s) are loaded),
press the CD
control. The first track of the disc will begin
playing. If returning from radio or tape mode, CD
play will begin where it stopped last.
Press the CD control to toggle between single CD
and CD changer (if equipped).
TAPE CD
TAPE CD
Entertainment Systems
25
Page 28 of 256
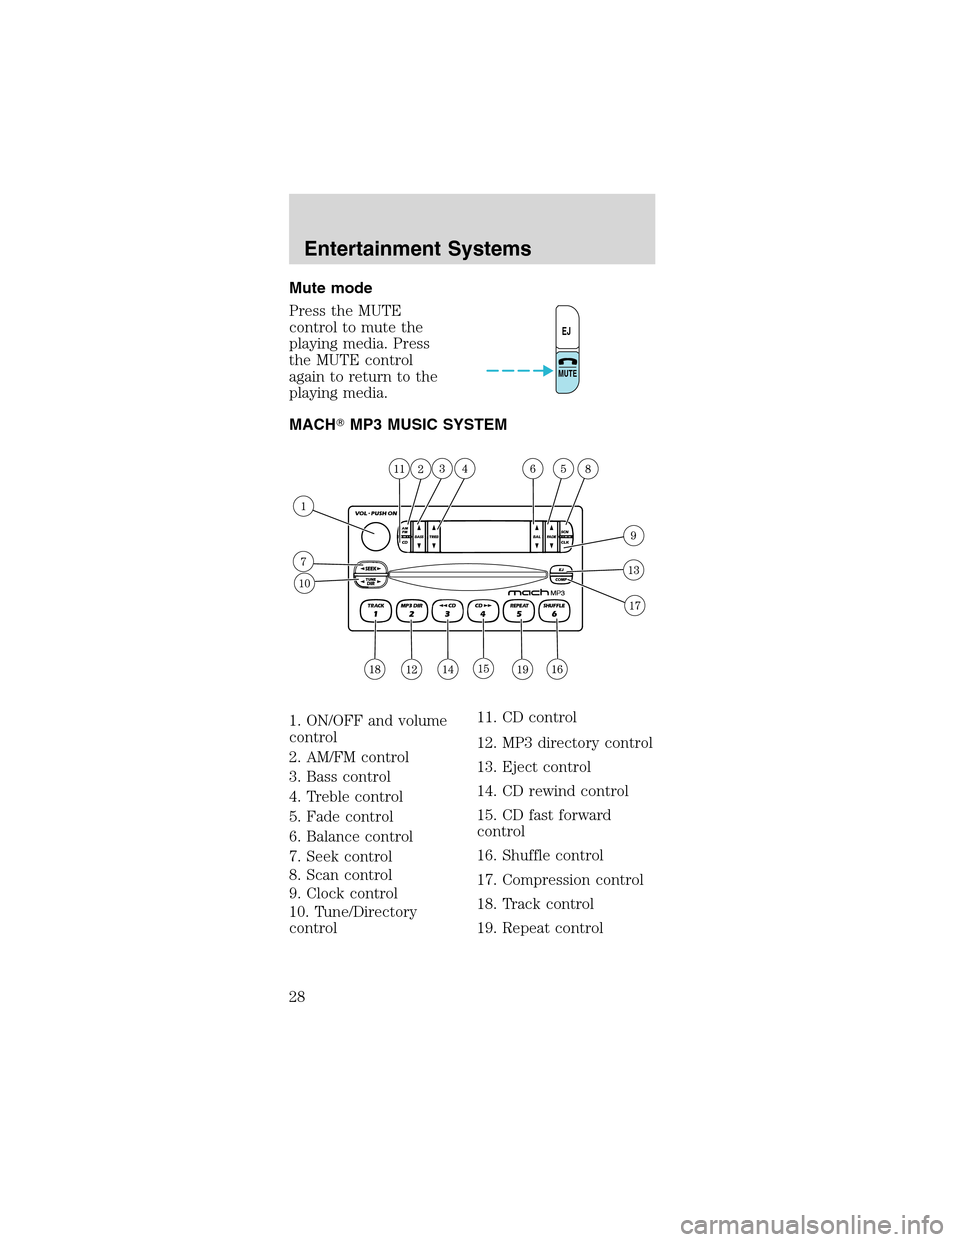
Mute mode
Press the MUTE
control to mute the
playing media. Press
the MUTE control
again to return to the
playing media.
MACH�MP3 MUSIC SYSTEM
1. ON/OFF and volume
control
2. AM/FM control
3. Bass control
4. Treble control
5. Fade control
6. Balance control
7. Seek control
8. Scan control
9. Clock control
10. Tune/Directory
control11. CD control
12. MP3 directory control
13. Eject control
14. CD rewind control
15. CD fast forward
control
16. Shuffle control
17. Compression control
18. Track control
19. Repeat control
EJ
MUTE
Entertainment Systems
28
Page 34 of 256
Setting memory preset stations
1. Select the frequency
band with the AM/FM
select control.
2. Select a station. Refer toTune adjustorSeek
functionfor more information on selecting a station.
3. Press and hold a memory preset control until the
sound returns, indicating the station is held in
memory on the control you selected.
Accessing memory preset stations
1. Select the desired
frequency band with
the AM/FM select
control.
2. Press the preset control which contains the
desired station frequency. The desired station will
begin to play.
Setting the clock
To set the hour, press
and hold the CLK
control while
performing the
following functions:
Entertainment Systems
34
Page 35 of 256

•Presson the
SEEK control to
decrease the hours.
•Press
on the
SEEK control to
increase the hours.
To set the minutes, press and hold the CLK control
while performing the following functions:
•Press
on the
TUNE DIR control to
decrease the
minutes.
•Press
on the TUNE DIR control to increase
the minutes.
Release the CLK control to save the clock settings.
Press the CLK control again to return the display to
radio mode.
Tune adjust
The tune adjust control works in radio mode.
Tune adjust in radio mode
•Press
to move to
the next frequency
down the band. Hold
for quick movement through the frequencies.
•Press
to move to the next frequency up the
band. Hold for quick movement through the
frequencies. When the top of the band is reached,
the tuner will continue to select from the lowest
frequency upward.
When a radio frequency is in tune, the ST icon will
appear in the display for stereo broadcasts.
CD select
The CD select function allows you to play CDs.
Entertainment Systems
35
Page 48 of 256

preset stations. This feature is helpful on trips when
you travel between cities with different radio
stations.
Starting autostore
1. Press and momentarily hold the AM/FM control.
2. AUTOSET will flash
in the display as the
frequency band is
scrolled through.
3. When the six strongest stations are filled, the
station stored in memory preset control 1 will start
playing.
If there are fewer than six strong stations available
on the frequency band, the remaining memory
preset controls will all store the last strong station
available.
To deactivate autoset and return to your audio
system’s manually set memory stations, press the
AM/FM control again.
Setting the clock
Press the MENU
control until SELECT
HOUR or SELECT
MINUTE is displayed. (The menu mode must be
engaged to enable clock mode).
Use the SEL control to
manually set the time.
•Press
to
increase
hours/minutes.
•Press
to decrease hours/minutes.
Press the MENU control again to disengage the
clock mode.
Tune/disc adjust
The tune control works in radio or CD mode.
CD AM
FM
SEL
Entertainment Systems
48
Page 53 of 256

The compression
feature operates in CD
mode and brings soft
and loud CD passages
together for a more
consistent listening level.
On Audiophile audios, press the MENU")
Compression feature (if equipped)
The compression
feature operates in CD
mode and brings soft
and loud CD passages
together for a more
consistent listening level.
On Audiophile audios, press the MENU control until
compression status is displayed. Press the SEL
control to enable the compression feature when
COMP OFF is displayed. Press the SEL control again
to disable the feature when COMP ON is displayed.
On Premium audios,
press the COMP
control until COMP ON
is displayed.
Menu mode
The MENU control
allows you to access
many different features
within your audio system. There are three sets of
menus available depending upon which mode or
feature is activated.
While in FM mode, two menus are available.If RDS
is turned OFF, you can access the following:
•SELECT HOURS—Refer toSetting the clock.
•SELECT MINUTES—Refer toSetting the clock.
•RDS OFF—Refer toRadio data system feature.
If RDS is turned ON, you can access the following:
•TRAFFIC ON/OFF-Refer toTraffic
announcements.
•FIND type-Refer toProgram type.
•SHOW (NAME, TYPE, NONE)- Refer toRadio
data system feature.
•RDS ON—Refer toRadio data system feature.
SEL+MENU
Entertainment Systems
53
Page 54 of 256

•SELECT HOURS—Refer toSetting the clock.
•SELECT MINUTES—Refer toSetting the clock.
When in CD mode, you can access: SELECT HOURS,
SELECT MINUTES or COMP ON/OFF.
SELECT HOURS, SELECT MINUTES—Allows you
to adjust the hours and minutes. Refer toSetting
the clock.
TRAFFIC ON/OFF—Traffic announcements can be
programmed as local or distant. Refer toTraffic
announcements.
RDS ON/OFF—This feature allows your audio
system to receive text information from
RDS-equipped FM radio stations. Refer toRadio
Data System feature.
FIND type—Allows you to select your desired FM
program type and search for that selection.
SHOW—Allows you to select from NAME (displays
the name of the radio station), TYPE (displays the
RDS program type: rock, jazz, etc.), or NONE
(deactivates the RDS display).
Radio data system (RDS) feature
This feature allows
your audio system to
receive text
information from
RDS-equipped FM
radio stations.
To activate RDS:
•When in FM mode, press the MENU control until
RDS OFF displays.
•Press the SEL control to engage this feature
(RDS ON).
SEL+MENU
Entertainment Systems
54
 and are accessed
in the same manner as your original presets.
To deactivate autoset and return to your audio
sys")