Page 170 of 256

3. Install the lug nut by turning the wrench
clockwise.
JUMP STARTING YOUR VEHICLE
The gases around the battery can explode if
exposed to flames, sparks, or lit cigarettes.
An explosion could result in injury or vehicle
damage.
Batteries contain sulfuric acid which can
burn skin, eyes and clothing, if contacted.
Do not attempt to push-start your vehicle.
Automatic transmissions do not have
push-start capability; also, the catalytic
converter may become damaged.
Preparing your vehicle
When the battery is disconnected or a new battery is
installed, the transmission must relearn its shift
strategy. As a result, the transmission may have firm
and/or soft shifts. This operation is considered
normal and will not affect function or durability of
the transmission. Over time, the adaptive learning
process will fully update transmission operation.
1.Use only a 12–volt supply to start your
vehicle.
2. Do not disconnect the battery of the disabled
vehicle as this could damage the vehicle’s electrical
system.
3. Park the booster vehicle close to the hood of the
disabled vehicle making sure the two vehiclesdo
nottouch. Set the parking brake on both vehicles
and stay clear of the engine cooling fan and other
moving parts.
4. Check all battery terminals and remove any
excessive corrosion before you attach the battery
cables. Ensure the vent caps are tight and level.
5. Turn the heater fan on in both vehicles to protect
any electrical surges. Turn all other accessories off.
Roadside Emergencies
170
Page 201 of 256

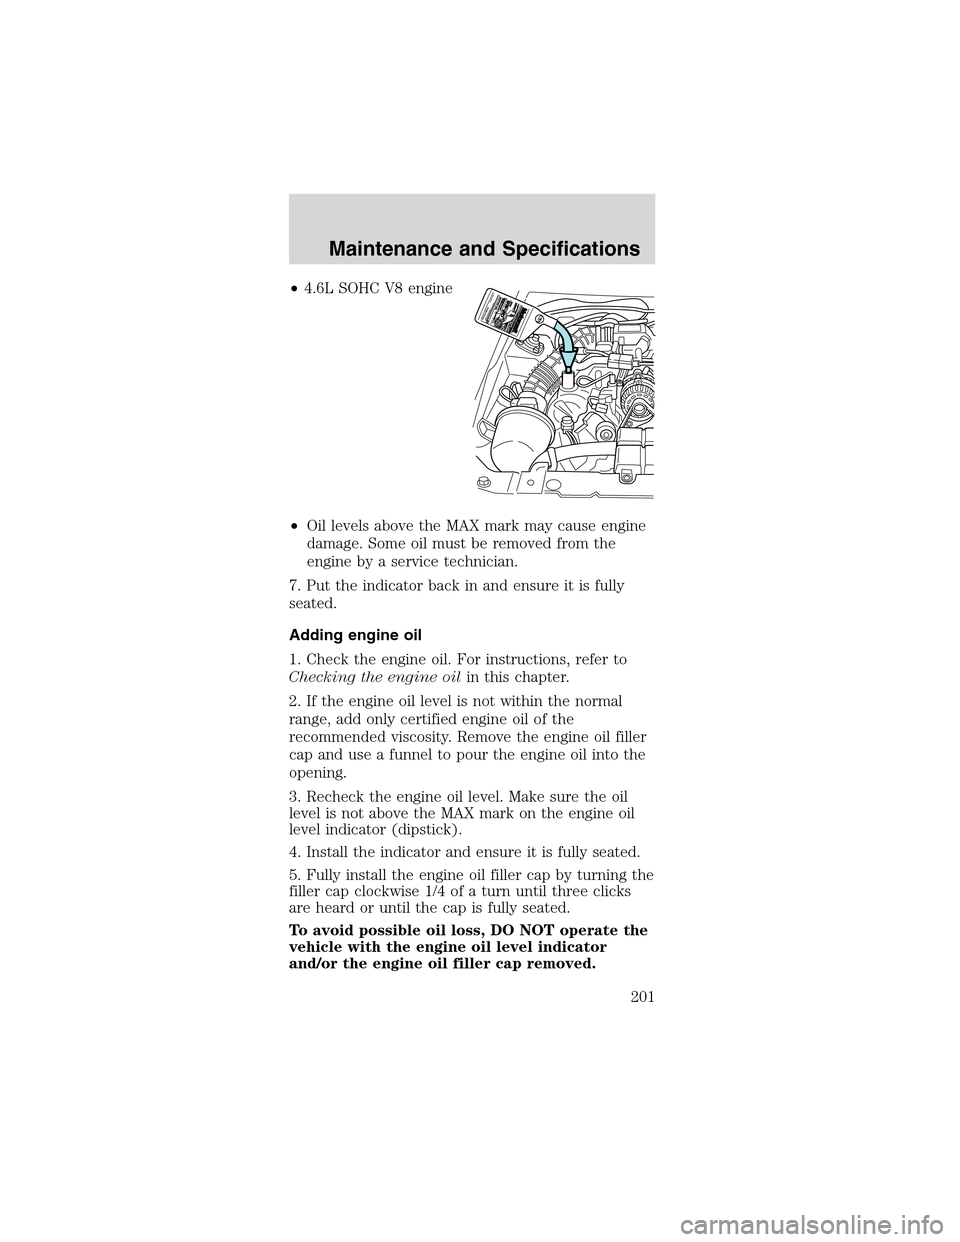
•4.6LSOHCV8 engine
•Oil levels above the MAX mark may cause engine
damage. Some oil must be removed from the
engine by a service technician.
7. Put the indicator back in and ensure it is fully
seated.
Adding engine oil
1. Check the engine oil. For instructions, refer to
Checking the engine oilin this chapter.
2. If the engine oil level is not within the normal
range, add only certified engine oil of the
recommended viscosity. Remove the engine oil filler
cap and use a funnel to pour the engine oil into the
opening.
3. Recheck the engine oil level. Make sure the oil
level is not above the MAX mark on the engine oil
level indicator (dipstick).
4. Install the indicator and ensure it is fully seated.
5. Fully install the engine oil filler cap by turning the
filler cap clockwise 1/4 of a turn until three clicks
are heard or until the cap is fully seated.
To avoid possible oil loss, DO NOT operate the
vehicle with the engine oil level indicator
and/or the engine oil filler cap removed.
Maintenance and Specifications
201
Page 205 of 256

3. Run the engine until it reaches normal operating
temperature.
4. Allow the engine to idle for at least one minute.
5. Turn the A/C on and allow the engine to idle for
at least one minute.
6. Drive the vehicle to complete the relearning
process.
•The vehicle may need to be driven 16 km (10
miles) or more to relearn the idle and fuel trim
strategy.
•If you do not allow the engine to relearn its
idle trim, the idle quality of your vehicle may
be adversely affected until the idle trim is
eventually relearned.
When the battery is disconnected or a new battery
installed, the transmission must relearn its adaptive
strategy. As a result of this, the transmission may
shift firmly. This operation is considered normal and
will not affect function or durability of the
transmission. Over time the adaptive learning
process will fully update transmission operation to
its optimum shift feel.
If the battery has been disconnected or a new
battery has been installed, the clock and the preset
radio stations must be reset once the battery is
reconnected.
•Always dispose of
automotive batteries
in a responsible
manner. Follow your
local authorized
standards for
disposal. Call your
local authorized
recycling center to find out more about recycling
automotive batteries.
LEAD
RETURN
RECYCLE
Maintenance and Specifications
205
Page 209 of 256

water as soon as possible. Water alone (without
engine coolant) can cause engine damage from
corrosion, overheating or freezing.
•Do not use alcohol, methanol or brine or any
engine coolants mixed with alcohol or
methanol antifreeze (coolant).Alcohol and
other liquids can cause engine damage from
overheating or freezing.
•Do not add extra inhibitors or additives to
the coolant.These can be harmful and
compromise the corrosion protection of the
engine coolant.
•Do not mix with recycled coolant unless from
a Ford-approved recycling process (seeUse of
Recycled Engine Coolantsection).
To reduce the risk of personal injury, make
sure the engine is cool before unscrewing
the coolant pressure relief cap. The cooling system
is under pressure; steam and hot liquid can come
out forcefully when the cap is loosened slightly.
If you must remove the pressure relief cap or
radiator cap (depending upon engine application),
follow these steps to avoid personal injury:
1. Before you remove the cap, turn the engine off
and let it cool.
2. When the engine is cool, wrap a thick cloth
around the cap. Slowly turn cap counterclockwise
until pressure begins to release.
3. Step back while the pressure releases.
4. When you are sure that all the pressure has been
released, use the cloth to turn it counterclockwise
and remove the cap.
Engine coolant refill procedure-3.8L V6 engine
Note:Use the following procedure when refilling the
cooling system of a vehicle equipped with a 3.8L V6
engine. Failure to follow this warning may result in
damage to the engine and engine cooling system.
Maintenance and Specifications
209
Page 216 of 256

Usethe following guidelines to avoid static build-up
when filling an ungrounded fuel container:
•Place approved fuel container on the ground.
•DO NOT fill a fuel container while it is in the
vehicle (including the cargo area).
•Keep the fuel pump nozzle in contact with the
fuel container while filling.
•DO NOT use a device that would hold the fuel
pump handle in the fill position.
Fuel Filler Cap
Your fuel tank filler cap has an indexed design with
a 1/8 turn on/off feature.
When fueling your vehicle:
1. Turn the engine off.
2. Carefully turn the filler cap counterclockwise 1/8
of a turn until it stops.
3. Pull to remove the cap from the fuel filler pipe.
4. To install the cap, align the tabs on the cap with
the notches on the filler pipe.
5. Turn the filler cap clockwise 1/8 of a turn until it
stops.
“Check Fuel Cap”illuminates when the ignition is
turned to the ON position to ensure your bulb is
working. When this light turns on, check the fuel
filler cap. Continuing to operate the vehicle with the
Check Fuel Cap light on, can activate the Service
Engine Soon warning. When the fuel filler cap is
properly re-installed, the light(s) will turn off after a
period of normal driving.It may take a long
period of time for the system to detect an
improperly installed fuel filler cap.
If you must replace the fuel filler cap, replace
it with a fuel filler cap that is designed for
your vehicle. The customer warranty may be
void for any damage to the fuel tank or fuel
system if the correct genuine Ford or
Motorcraft fuel filler cap is not used.
Maintenance and Specifications
216
Page 249 of 256

C
Capacities for
refilling fluids .......... 238
Cargo net ................... 78
CD player .................. 43
CD-single premium ... 19
Certification Label .. 243
Changing a tire ....... 165
Child safety
restraints ................. 120
child safety
belts ....................... 120
Child safety seats .... 123
attaching with
tether straps ......... 127
in front seat .......... 125
in rear seat ............ 125
Cleaning your vehicle
engine
compartment ......... 188
instrument panel .. 190
interior ................... 191
plastic parts .......... 190
washing .................. 187
waxing ................... 187
wheels .................... 188
wiper blades .......... 190
Climate control
(see Air conditioning
or Heating) ................ 63
Clock .............. 24, 34, 48
Clutch
adjusting ................ 228
operation while
driving ................... 150
recommended
shift speeds ........... 151Console ...................... 84
Controls
power seat ............. 100
Convertible ................ 85
cleaning ................. 192
installation of
the boot ................... 86
lowering the
convertible top ........ 85
raising the
convertible top ........ 87
Coolant
checking and
adding .................... 206
refill
capacities ....... 212, 238
specifications... 240, 242
Cruise control
(see Speed control) .. 80
Customer
Assistance ................ 157
Ford accessories
for your vehicle .... 192
Ford Extended
Service Plan .......... 178
Getting assistance
outside the U.S.
and Canada ........... 183
Getting roadside
assistance .............. 157
Getting the service
you need ............... 176
Ordering additional
owner’s literature . 184
The Dispute
Settlement Board . 179
Utilizing the
Mediation/Arbitration
Program ................. 183
Index
249
Page:
< prev 1-8 9-16 17-24