2003 DODGE RAM transmission
[x] Cancel search: transmissionPage 666 of 2895
The vacuum chamber contains a diaphragm with a
cable attached to control the throttle linkage.
OPERATION
A speed control servo is not used with any
5.7L V-8 engine, or with the 5.9L diesel engine
when equipped with a manual transmission.
The Powertrain Control Module (PCM) controls the
solenoid valve body. The solenoid valve body controls
the application and release of vacuum to the dia-
phragm of the vacuum servo. The servo unit cannot
be repaired and is serviced only as a complete assem-
bly.
Power is supplied to the servo's by the PCM
through the brake switch. The PCM controls the
ground path for the vacuum and vent solenoids.
The dump solenoid is energized anytime it receives
power. If power to the dump solenoid is interrupted,
the solenoid dumps vacuum in the servo. This pro-
vides a safety backup to the vent and vacuum sole-
noids.
The vacuum and vent solenoids must be grounded
at the PCM to operate. When the PCM grounds the
vacuum servo solenoid, the solenoid allows vacuum
to enter the servo and pull open the throttle plate
using the cable. When the PCM breaks the ground,
the solenoid closes and no more vacuum is allowed to
enter the servo. The PCM also operates the vent sole-
noid via ground. The vent solenoid opens and closes a
passage to bleed or hold vacuum in the servo as
required.
The PCM duty cycles the vacuum and vent sole-
noids to maintain the set speed, or to accelerate and
decelerate the vehicle. To increase throttle opening,
the PCM grounds the vacuum and vent solenoids. To
decrease throttle opening, the PCM removes the
grounds from the vacuum and vent solenoids. When
the brake is released, if vehicle speed exceeds 30
mph to resume, 35 mph to set, and the RES/ACCEL
switch has been depressed, ground for the vent and
vacuum circuits is restored.
REMOVAL
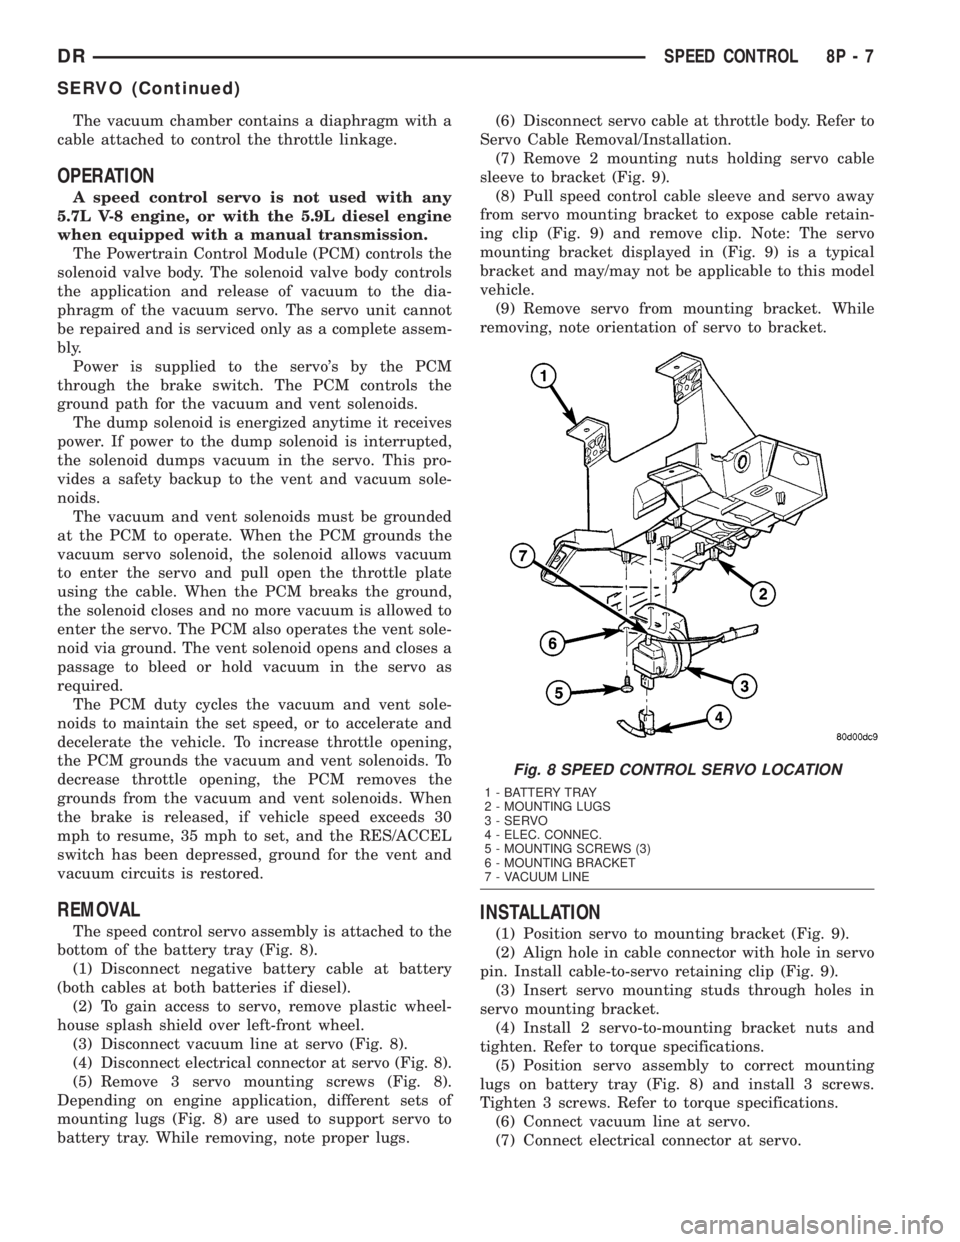
The speed control servo assembly is attached to the
bottom of the battery tray (Fig. 8).
(1) Disconnect negative battery cable at battery
(both cables at both batteries if diesel).
(2) To gain access to servo, remove plastic wheel-
house splash shield over left-front wheel.
(3) Disconnect vacuum line at servo (Fig. 8).
(4) Disconnect electrical connector at servo (Fig. 8).
(5) Remove 3 servo mounting screws (Fig. 8).
Depending on engine application, different sets of
mounting lugs (Fig. 8) are used to support servo to
battery tray. While removing, note proper lugs.(6) Disconnect servo cable at throttle body. Refer to
Servo Cable Removal/Installation.
(7) Remove 2 mounting nuts holding servo cable
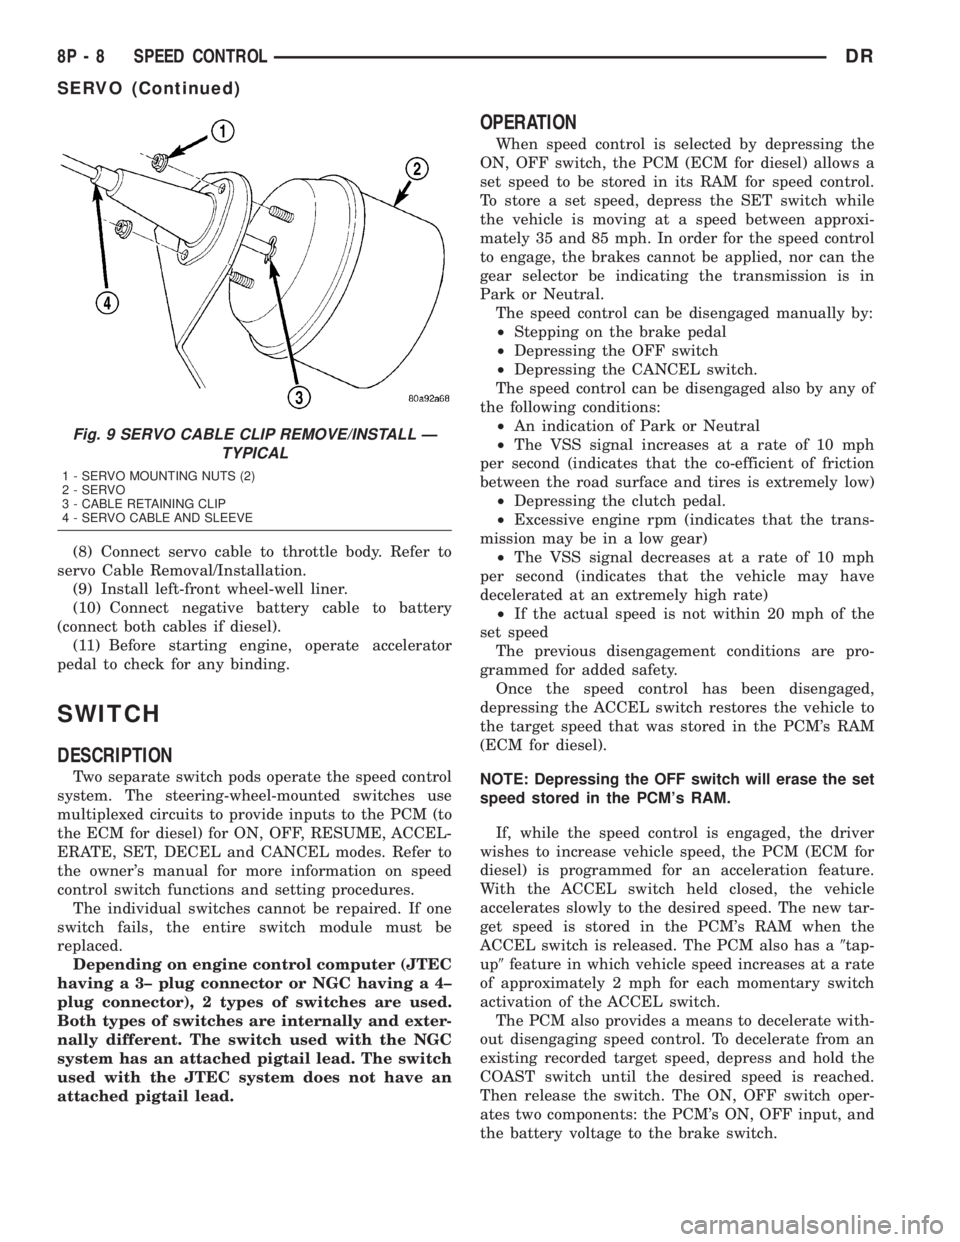
sleeve to bracket (Fig. 9).
(8) Pull speed control cable sleeve and servo away
from servo mounting bracket to expose cable retain-
ing clip (Fig. 9) and remove clip. Note: The servo
mounting bracket displayed in (Fig. 9) is a typical
bracket and may/may not be applicable to this model
vehicle.
(9) Remove servo from mounting bracket. While
removing, note orientation of servo to bracket.
INSTALLATION
(1) Position servo to mounting bracket (Fig. 9).
(2) Align hole in cable connector with hole in servo
pin. Install cable-to-servo retaining clip (Fig. 9).
(3) Insert servo mounting studs through holes in
servo mounting bracket.
(4) Install 2 servo-to-mounting bracket nuts and
tighten. Refer to torque specifications.
(5) Position servo assembly to correct mounting
lugs on battery tray (Fig. 8) and install 3 screws.
Tighten 3 screws. Refer to torque specifications.
(6) Connect vacuum line at servo.
(7) Connect electrical connector at servo.
Fig. 8 SPEED CONTROL SERVO LOCATION
1 - BATTERY TRAY
2 - MOUNTING LUGS
3 - SERVO
4 - ELEC. CONNEC.
5 - MOUNTING SCREWS (3)
6 - MOUNTING BRACKET
7 - VACUUM LINE
DRSPEED CONTROL 8P - 7
SERVO (Continued)
Page 667 of 2895
(8) Connect servo cable to throttle body. Refer to
servo Cable Removal/Installation.
(9) Install left-front wheel-well liner.
(10) Connect negative battery cable to battery
(connect both cables if diesel).
(11) Before starting engine, operate accelerator
pedal to check for any binding.
SWITCH
DESCRIPTION
Two separate switch pods operate the speed control
system. The steering-wheel-mounted switches use
multiplexed circuits to provide inputs to the PCM (to
the ECM for diesel) for ON, OFF, RESUME, ACCEL-
ERATE, SET, DECEL and CANCEL modes. Refer to
the owner's manual for more information on speed
control switch functions and setting procedures.
The individual switches cannot be repaired. If one
switch fails, the entire switch module must be
replaced.
Depending on engine control computer (JTEC
having a 3± plug connector or NGC having a 4±
plug connector), 2 types of switches are used.
Both types of switches are internally and exter-
nally different. The switch used with the NGC
system has an attached pigtail lead. The switch
used with the JTEC system does not have an
attached pigtail lead.
OPERATION
When speed control is selected by depressing the
ON, OFF switch, the PCM (ECM for diesel) allows a
set speed to be stored in its RAM for speed control.
To store a set speed, depress the SET switch while
the vehicle is moving at a speed between approxi-
mately 35 and 85 mph. In order for the speed control
to engage, the brakes cannot be applied, nor can the
gear selector be indicating the transmission is in
Park or Neutral.
The speed control can be disengaged manually by:
²Stepping on the brake pedal
²Depressing the OFF switch
²Depressing the CANCEL switch.
The speed control can be disengaged also by any of
the following conditions:
²An indication of Park or Neutral
²The VSS signal increases at a rate of 10 mph
per second (indicates that the co-efficient of friction
between the road surface and tires is extremely low)
²Depressing the clutch pedal.
²Excessive engine rpm (indicates that the trans-
mission may be in a low gear)
²The VSS signal decreases at a rate of 10 mph
per second (indicates that the vehicle may have
decelerated at an extremely high rate)
²If the actual speed is not within 20 mph of the
set speed
The previous disengagement conditions are pro-
grammed for added safety.
Once the speed control has been disengaged,
depressing the ACCEL switch restores the vehicle to
the target speed that was stored in the PCM's RAM
(ECM for diesel).
NOTE: Depressing the OFF switch will erase the set
speed stored in the PCM's RAM.
If, while the speed control is engaged, the driver
wishes to increase vehicle speed, the PCM (ECM for
diesel) is programmed for an acceleration feature.
With the ACCEL switch held closed, the vehicle
accelerates slowly to the desired speed. The new tar-
get speed is stored in the PCM's RAM when the
ACCEL switch is released. The PCM also has a9tap-
up9feature in which vehicle speed increases at a rate
of approximately 2 mph for each momentary switch
activation of the ACCEL switch.
The PCM also provides a means to decelerate with-
out disengaging speed control. To decelerate from an
existing recorded target speed, depress and hold the
COAST switch until the desired speed is reached.
Then release the switch. The ON, OFF switch oper-
ates two components: the PCM's ON, OFF input, and
the battery voltage to the brake switch.
Fig. 9 SERVO CABLE CLIP REMOVE/INSTALL Ð
TYPICAL
1 - SERVO MOUNTING NUTS (2)
2 - SERVO
3 - CABLE RETAINING CLIP
4 - SERVO CABLE AND SLEEVE
8P - 8 SPEED CONTROLDR
SERVO (Continued)
Page 697 of 2895
WIPER MODULE
DESCRIPTION
The wiper motor bracket is secured with two
screws below the wiper motor through two rubber
insulators to the bottom of the cowl plenum panel
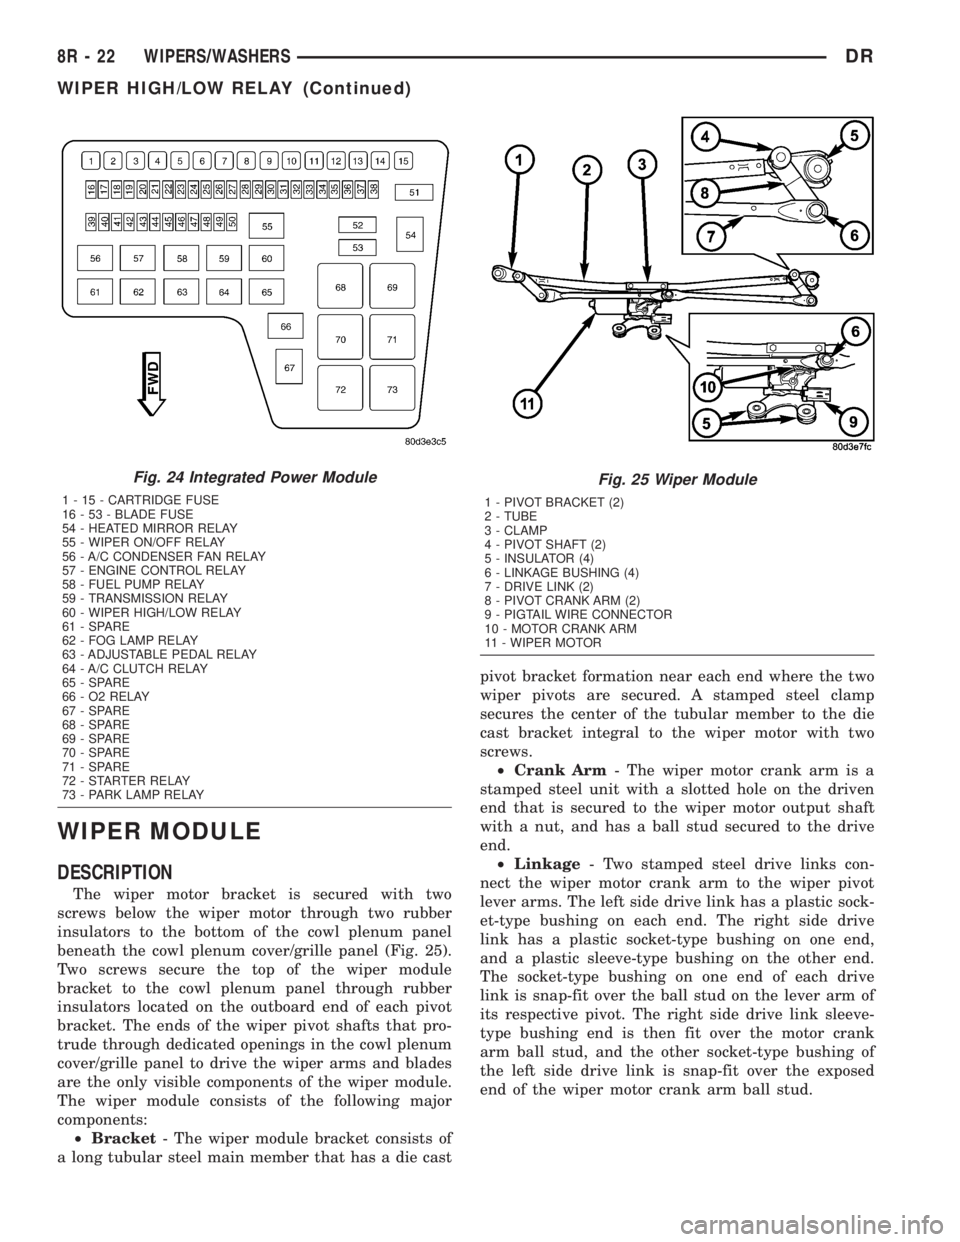
beneath the cowl plenum cover/grille panel (Fig. 25).
Two screws secure the top of the wiper module
bracket to the cowl plenum panel through rubber
insulators located on the outboard end of each pivot
bracket. The ends of the wiper pivot shafts that pro-
trude through dedicated openings in the cowl plenum
cover/grille panel to drive the wiper arms and blades
are the only visible components of the wiper module.
The wiper module consists of the following major
components:
²Bracket- The wiper module bracket consists of
a long tubular steel main member that has a die castpivot bracket formation near each end where the two
wiper pivots are secured. A stamped steel clamp
secures the center of the tubular member to the die
cast bracket integral to the wiper motor with two
screws.
²Crank Arm- The wiper motor crank arm is a
stamped steel unit with a slotted hole on the driven
end that is secured to the wiper motor output shaft
with a nut, and has a ball stud secured to the drive
end.
²Linkage- Two stamped steel drive links con-
nect the wiper motor crank arm to the wiper pivot
lever arms. The left side drive link has a plastic sock-
et-type bushing on each end. The right side drive
link has a plastic socket-type bushing on one end,
and a plastic sleeve-type bushing on the other end.
The socket-type bushing on one end of each drive
link is snap-fit over the ball stud on the lever arm of
its respective pivot. The right side drive link sleeve-
type bushing end is then fit over the motor crank
arm ball stud, and the other socket-type bushing of
the left side drive link is snap-fit over the exposed
end of the wiper motor crank arm ball stud.
Fig. 24 Integrated Power Module
1 - 15 - CARTRIDGE FUSE
16 - 53 - BLADE FUSE
54 - HEATED MIRROR RELAY
55 - WIPER ON/OFF RELAY
56 - A/C CONDENSER FAN RELAY
57 - ENGINE CONTROL RELAY
58 - FUEL PUMP RELAY
59 - TRANSMISSION RELAY
60 - WIPER HIGH/LOW RELAY
61 - SPARE
62 - FOG LAMP RELAY
63 - ADJUSTABLE PEDAL RELAY
64 - A/C CLUTCH RELAY
65 - SPARE
66 - O2 RELAY
67 - SPARE
68 - SPARE
69 - SPARE
70 - SPARE
71 - SPARE
72 - STARTER RELAY
73 - PARK LAMP RELAY
Fig. 25 Wiper Module
1 - PIVOT BRACKET (2)
2 - TUBE
3 - CLAMP
4 - PIVOT SHAFT (2)
5 - INSULATOR (4)
6 - LINKAGE BUSHING (4)
7 - DRIVE LINK (2)
8 - PIVOT CRANK ARM (2)
9 - PIGTAIL WIRE CONNECTOR
10 - MOTOR CRANK ARM
11 - WIPER MOTOR
8R - 22 WIPERS/WASHERSDR
WIPER HIGH/LOW RELAY (Continued)
Page 698 of 2895
²Motor- The wiper motor features an integral
die cast bracket to which the wiper module bracket is
secured with a stamped steel clamp and two screws
near the top and which has two rubber insulated
mounting ears at the bottom. This die casting also
serves as the wiper motor transmission housing from
which the wiper motor output shaft exits. A nut
secures the wiper motor crank arm to the motor out-
put shaft. The two-speed permanent magnet wiper
motor features an integral transmission, an internal
park switch, and an internal automatic resetting cir-
cuit breaker.
²Pivots- The two front wiper pivots are secured
within the die cast pivot brackets on the outboard
ends of the wiper module main member. The lever
arms that extend from the center of the pivot shafts
each have a ball stud on their end. The upper end of
each pivot shaft where the wiper arms will be fas-
tened each has a serrated driver with a keyway. The
lower ends of the pivot shafts are installed through
lubricated bushings in the pivot brackets and are
secured with snap rings.
The wiper module cannot be adjusted or repaired.
If any component of the module is faulty or damaged,
the entire wiper module unit must be replaced.
OPERATION
The wiper module operation is controlled by the
battery current inputs received by the wiper motor
through the wiper on/off and wiper high/low relays.
The wiper motor speed is controlled by current flow
to either the low speed or the high speed set of
brushes. The park switch is a single pole, single
throw, momentary switch within the wiper motor
that is mechanically actuated by the wiper motor
transmission components. The park switch alter-
nately opens and closes the wiper park switch sense
circuit to ground, depending upon the position of the
wipers on the glass. This feature allows the motor to
complete its current wipe cycle after the wiper sys-
tem has been turned Off, and to park the wiper
blades in the lowest portion of the wipe pattern. The
automatic resetting circuit breaker protects the
motor from overloads. The wiper motor crank arm,
the two wiper linkage members, and the two wiper
pivots mechanically convert the rotary output of the
wiper motor to the back and forth wiping motion of
the wiper arms and blades on the glass.
REMOVAL
(1) Remove both wiper arms from the wiper pivots.
(Refer to 8 - ELECTRICAL/WIPERS/WASHERS/
WIPER ARM - REMOVAL).
(2) Unlatch and open the hood.
(3) Disconnect and isolate the battery negative
cable.
(4) Remove the cowl plenum cover/grille panel
from over the cowl plenum. (Refer to 23 - BODY/EX-
TERIOR/COWL GRILLE - REMOVAL).
(5) Disconnect the left headlamp and dash wire
harness connector for the wiper motor from the
motor pigtail wire connector (Fig. 26).
(6) Remove the two screws that secure the wiper
module to the top of the cowl plenum panel at the
pivot brackets.
(7) Remove the two screws that secure the wiper
module to the bottom of the cowl plenum panel.
(8) Remove the wiper module from the cowl ple-
num panel as a unit.
INSTALLATION
(1) Position the wiper module into the cowl ple-
num as a unit (Fig. 26).
(2) Install the two screws that secure the wiper
module to the top of the cowl plenum panel at the
pivot brackets. Tighten the screw on the driver side,
followed by the screw on the passenger side. Tighten
the screws to 7 N´m (60 in. lbs.).
(3) Install and tighten the screws that secure the
wiper module to the bottom of the cowl plenum
panel. Tighten the screw on the passenger side, fol-
lowed by the screw on the driver side. Tighten the
screws to 7 N´m (60 in. lbs.).
(4) Reconnect the left headlamp and dash wire
harness connector for the wiper motor to the motor
pigtail wire connector.
(5) Reinstall the cowl plenum cover/grille panel
over the cowl plenum. (Refer to 23 - BODY/EXTERI-
OR/COWL GRILLE - INSTALLATION).
(6) Reconnect the battery negative cable.
(7) Close and latch the hood.
(8) Reinstall both wiper arms onto the wiper piv-
ots. (Refer to 8 - ELECTRICAL/WIPERS/WASHERS/
WIPER ARMS - INSTALLATION).
DRWIPERS/WASHERS 8R - 23
WIPER MODULE (Continued)
Page 701 of 2895
DIAGNOSIS AND TESTING - WIPER ON/OFF
RELAY
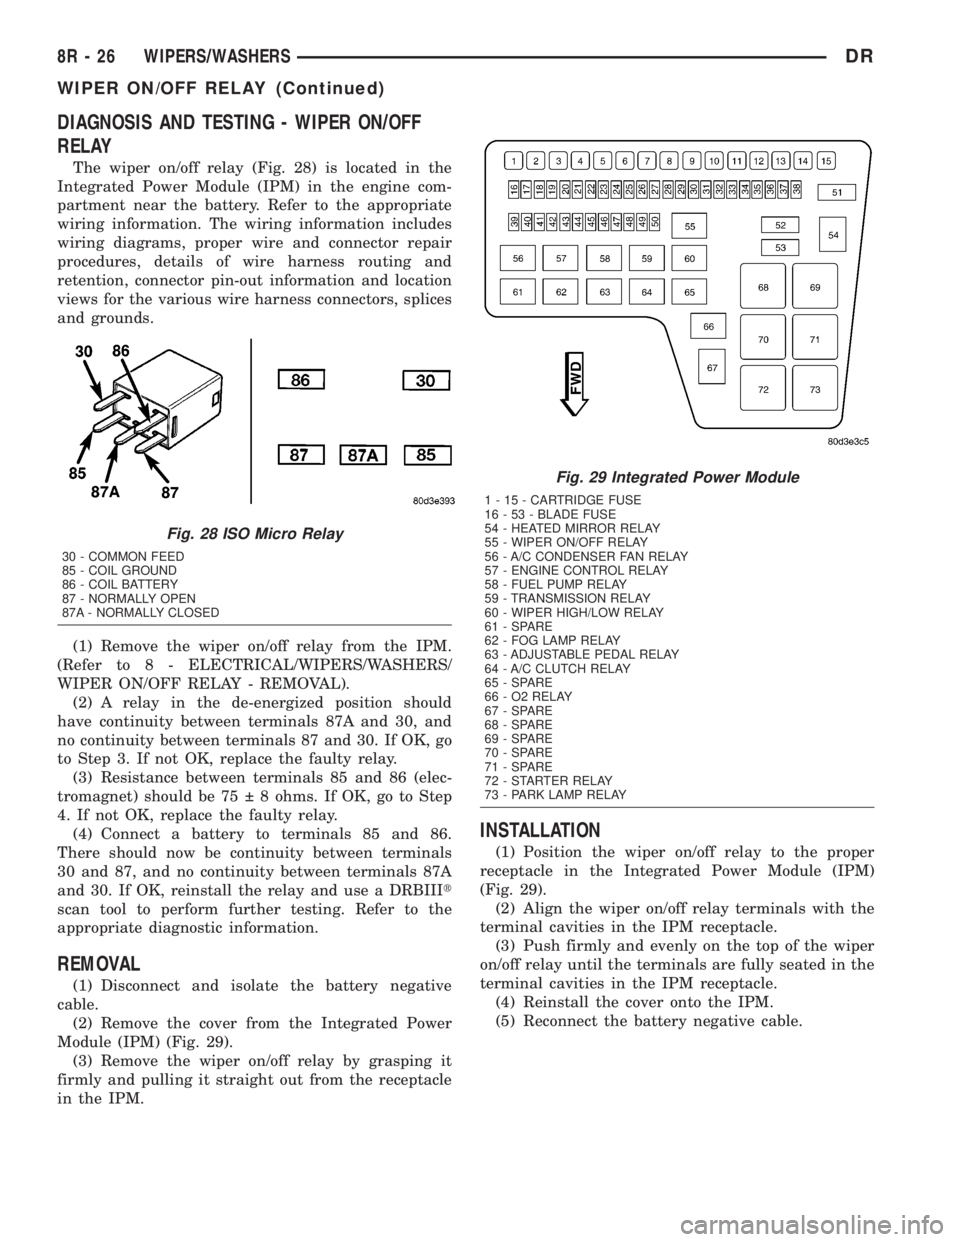
The wiper on/off relay (Fig. 28) is located in the
Integrated Power Module (IPM) in the engine com-
partment near the battery. Refer to the appropriate
wiring information. The wiring information includes
wiring diagrams, proper wire and connector repair
procedures, details of wire harness routing and
retention, connector pin-out information and location
views for the various wire harness connectors, splices
and grounds.
(1) Remove the wiper on/off relay from the IPM.
(Refer to 8 - ELECTRICAL/WIPERS/WASHERS/
WIPER ON/OFF RELAY - REMOVAL).
(2) A relay in the de-energized position should
have continuity between terminals 87A and 30, and
no continuity between terminals 87 and 30. If OK, go
to Step 3. If not OK, replace the faulty relay.
(3) Resistance between terminals 85 and 86 (elec-
tromagnet) should be 75 8 ohms. If OK, go to Step
4. If not OK, replace the faulty relay.
(4) Connect a battery to terminals 85 and 86.
There should now be continuity between terminals
30 and 87, and no continuity between terminals 87A
and 30. If OK, reinstall the relay and use a DRBIIIt
scan tool to perform further testing. Refer to the
appropriate diagnostic information.
REMOVAL
(1) Disconnect and isolate the battery negative
cable.
(2) Remove the cover from the Integrated Power
Module (IPM) (Fig. 29).
(3) Remove the wiper on/off relay by grasping it
firmly and pulling it straight out from the receptacle
in the IPM.
INSTALLATION
(1) Position the wiper on/off relay to the proper
receptacle in the Integrated Power Module (IPM)
(Fig. 29).
(2) Align the wiper on/off relay terminals with the
terminal cavities in the IPM receptacle.
(3) Push firmly and evenly on the top of the wiper
on/off relay until the terminals are fully seated in the
terminal cavities in the IPM receptacle.
(4) Reinstall the cover onto the IPM.
(5) Reconnect the battery negative cable.
Fig. 28 ISO Micro Relay
30 - COMMON FEED
85 - COIL GROUND
86 - COIL BATTERY
87 - NORMALLY OPEN
87A - NORMALLY CLOSED
Fig. 29 Integrated Power Module
1 - 15 - CARTRIDGE FUSE
16 - 53 - BLADE FUSE
54 - HEATED MIRROR RELAY
55 - WIPER ON/OFF RELAY
56 - A/C CONDENSER FAN RELAY
57 - ENGINE CONTROL RELAY
58 - FUEL PUMP RELAY
59 - TRANSMISSION RELAY
60 - WIPER HIGH/LOW RELAY
61 - SPARE
62 - FOG LAMP RELAY
63 - ADJUSTABLE PEDAL RELAY
64 - A/C CLUTCH RELAY
65 - SPARE
66 - O2 RELAY
67 - SPARE
68 - SPARE
69 - SPARE
70 - SPARE
71 - SPARE
72 - STARTER RELAY
73 - PARK LAMP RELAY
8R - 26 WIPERS/WASHERSDR
WIPER ON/OFF RELAY (Continued)
Page 702 of 2895
WIRING
TABLE OF CONTENTS
page page
WIRING DIAGRAM INFORMATION....... 8W-01-1
COMPONENT INDEX.................. 8W-02-1
POWER DISTRIBUTION............... 8W-10-1
GROUND DISTRIBUTION.............. 8W-15-1
BUS COMMUNICATIONS.............. 8W-18-1
CHARGING SYSTEM.................. 8W-20-1
STARTING SYSTEM.................. 8W-21-1
FUEL/IGNITION SYSTEM.............. 8W-30-1
TRANSMISSION CONTROL SYSTEM..... 8W-31-1
VEHICLE SPEED CONTROL............ 8W-33-1
REAR WHEEL ANTILOCK BRAKES....... 8W-34-1
ALL WHEEL ANTILOCK BRAKES........ 8W-35-1
VEHICLE THEFT SECURITY SYSTEM..... 8W-39-1
INSTRUMENT CLUSTER............... 8W-40-1
HORN/CIGAR LIGHTER/POWER OUTLET . . 8W-41-1
AIR CONDITIONING.................. 8W-42-1
AIRBAG SYSTEM.................... 8W-43-1INTERIOR LIGHTING.................. 8W-44-1
AUDIO SYSTEM..................... 8W-47-1
OVERHEAD CONSOLE................. 8W-49-1
FRONT LIGHTING.................... 8W-50-1
REAR LIGHTING..................... 8W-51-1
TURN SIGNALS...................... 8W-52-1
WIPERS............................ 8W-53-1
TRAILER TOW....................... 8W-54-1
POWER WINDOWS................... 8W-60-1
POWER DOOR LOCKS................ 8W-61-1
POWER MIRRORS................... 8W-62-1
POWER SEATS...................... 8W-63-1
SPLICE INFORMATION................ 8W-70-1
CONNECTOR PIN-OUTS............... 8W-80-1
CONNECTOR/GROUND/SPLICE
LOCATION........................ 8W-91-1
POWER DISTRIBUTION............... 8W-97-1 DRWIRING 8W - 1
Page 708 of 2895
TERMINOLOGY
This is a list of terms and definitions used in the
wiring diagrams.
LHD.................Left Hand Drive Vehicles
RHD ...............Right Hand Drive Vehicles
ATX . . Automatic Transmissions-Front Wheel Drive
MTX . . . Manual Transmissions-Front Wheel Drive
AT....Automatic Transmissions-Rear Wheel Drive
MT .....Manual Transmissions-Rear Wheel Drive
SOHC...........Single Over Head Cam Engine
DOHC..........Double Over Head Cam Engine
Built-Up-Export....... Vehicles Built For Sale In
Markets Other Than North America
Except Built-Up-Export........... Vehicles Built
For Sale In North America
DESCRIPTION - CIRCUIT INFORMATION
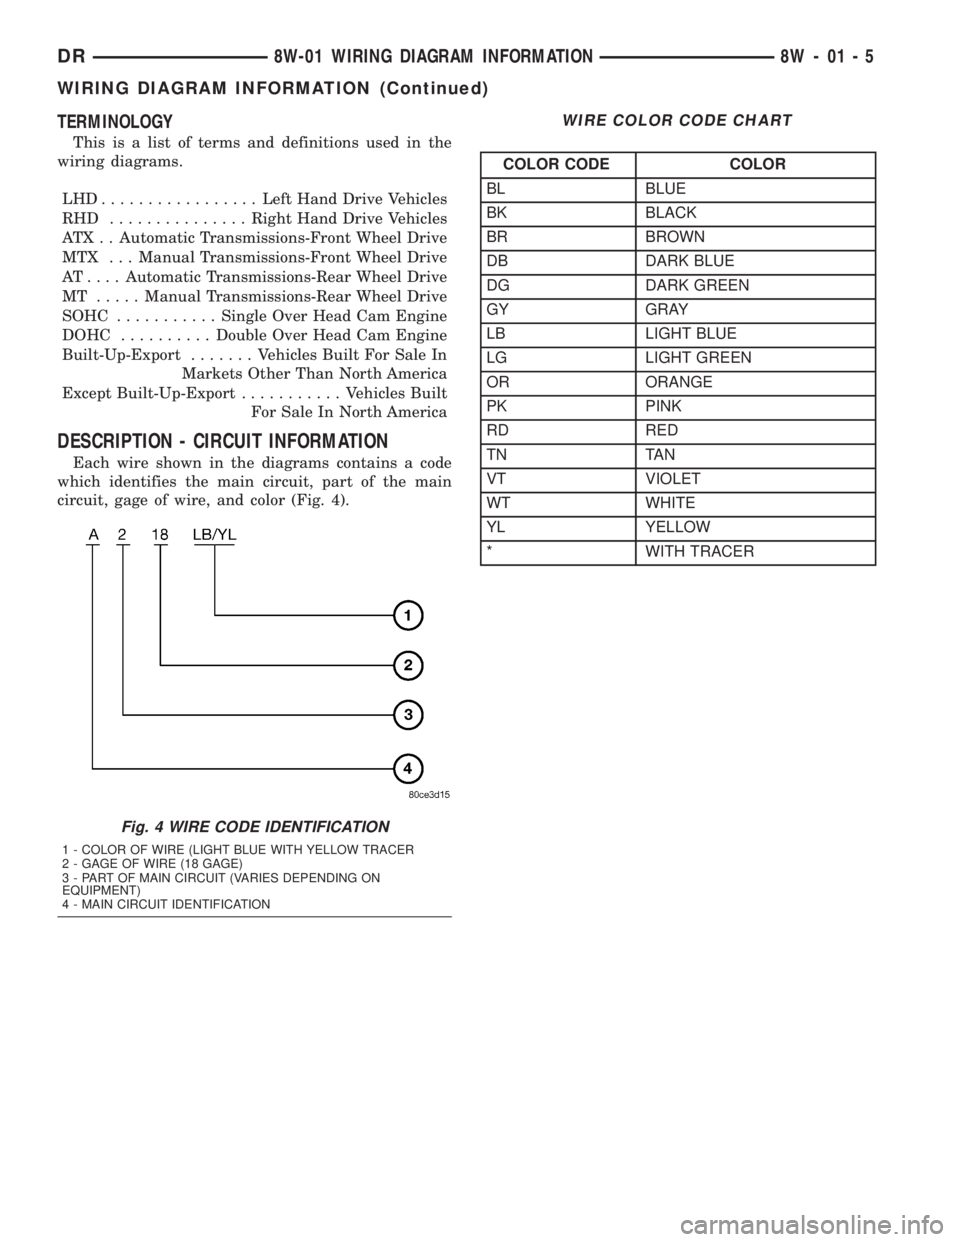
Each wire shown in the diagrams contains a code
which identifies the main circuit, part of the main
circuit, gage of wire, and color (Fig. 4).
WIRE COLOR CODE CHART
COLOR CODE COLOR
BL BLUE
BK BLACK
BR BROWN
DB DARK BLUE
DG DARK GREEN
GY GRAY
LB LIGHT BLUE
LG LIGHT GREEN
OR ORANGE
PK PINK
RD RED
TN TAN
VT VIOLET
WT WHITE
YL YELLOW
* WITH TRACER
Fig. 4 WIRE CODE IDENTIFICATION
1 - COLOR OF WIRE (LIGHT BLUE WITH YELLOW TRACER
2 - GAGE OF WIRE (18 GAGE)
3 - PART OF MAIN CIRCUIT (VARIES DEPENDING ON
EQUIPMENT)
4 - MAIN CIRCUIT IDENTIFICATION
DR8W-01 WIRING DIAGRAM INFORMATION 8W - 01 - 5
WIRING DIAGRAM INFORMATION (Continued)
Page 709 of 2895

DESCRIPTION - CIRCUIT FUNCTIONS
All circuits in the diagrams use an alpha/numeric
code to identify the wire and it's function. To identify
which circuit code applies to a system, refer to the
Circuit Identification Code Chart. This chart shows
the main circuits only and does not show the second-
ary codes that may apply to some models.
CIRCUIT IDENTIFICATION CODE CHART
CIRCUIT FUNCTION
A BATTERY FEED
B BRAKE CONTROLS
C CLIMATE CONTROLS
D DIAGNOSTIC CIRCUITS
E DIMMING ILLUMINATION
CIRCUITS
F FUSED CIRCUITS
G MONITORING CIRCUITS
(GAUGES)
H OPEN
I NOT USED
J OPEN
K POWERTRAIN CONTROL
MODULE
L EXTERIOR LIGHTING
M INTERIOR LIGHTING
N NOT USED
O NOT USED
P POWER OPTION (BATTERY
FEED)
Q POWER OPTIONS (IGNITION
FEED)
R PASSIVE RESTRAINT
S SUSPENSION/STEERING
T TRANSMISSION/TRANSAXLE/
TRANSFER CASE
U OPEN
V SPEED CONTROL, WIPER/
WASHER
W OPEN
X AUDIO SYSTEMS
Y OPEN
Z GROUNDS
DESCRIPTION - SECTION IDENTIFICATION AND
INFORMATION
The wiring diagrams are grouped into individual
sections. If a component is most likely found in a par-
ticular group, it will be shown complete (all wires,
connectors, and pins) within that group. For exam-
ple, the Auto Shutdown Relay is most likely to be
found in Group 30, so it is shown there complete. It
can, however, be shown partially in another group if
it contains some associated wiring.
Splice diagrams in Section 8W-70 show the entire
splice and provide references to other sections the
splices serves. Section 8W-70 only contains splice dia-
grams that are not shown in their entirety some-
where else in the wiring diagrams.
Section 8W-80 shows each connector and the cir-
cuits involved with that connector. The connectors
are identified using the name/number on the dia-
gram pages.
WIRING SECTION CHART
GROUP TOPIC
8W-01 thru
8W-09General information and Diagram
Overview
8W-10 thru
8W-19Main Sources of Power and
Vehicle Grounding
8W-20 thru
8W-29Starting and Charging
8W-30 thru
8W-39Powertrain/Drivetrain Systems
8W-40 thru
8W-49Body Electrical items and A/C
8W-50 thru
8W-59Exterior Lighting, Wipers and
Trailer Tow
8W-60 thru
8W-69Power Accessories
8W-70 Splice Information
8W-80 Connector Pin Outs
8W-91 Connector, Ground and Splice
Locations
8W - 01 - 6 8W-01 WIRING DIAGRAM INFORMATIONDR
WIRING DIAGRAM INFORMATION (Continued)