2003 DODGE RAM belt
[x] Cancel search: beltPage 616 of 2895
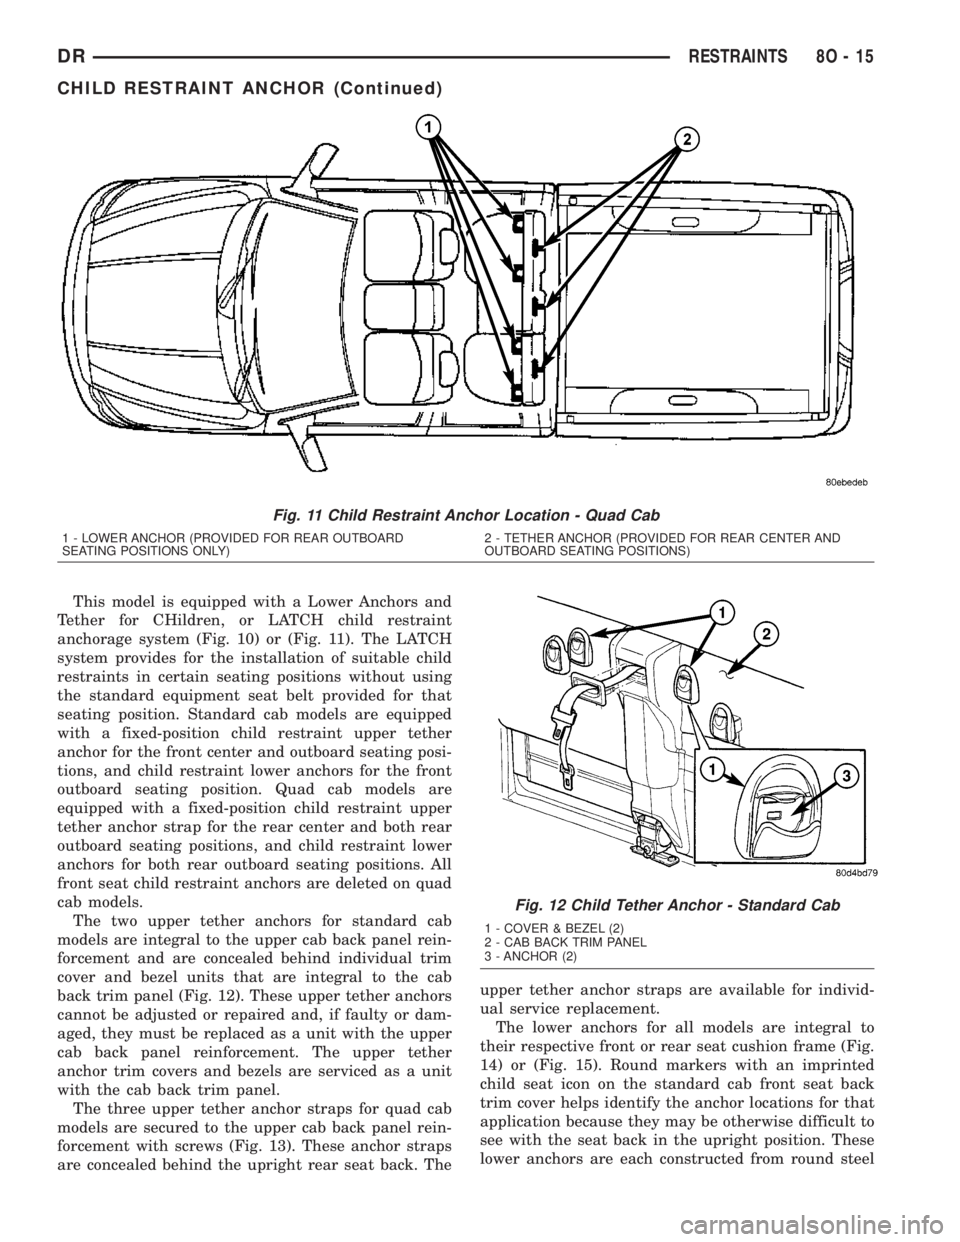
This model is equipped with a Lower Anchors and
Tether for CHildren, or LATCH child restraint
anchorage system (Fig. 10) or (Fig. 11). The LATCH
system provides for the installation of suitable child
restraints in certain seating positions without using
the standard equipment seat belt provided for that
seating position. Standard cab models are equipped
with a fixed-position child restraint upper tether
anchor for the front center and outboard seating posi-
tions, and child restraint lower anchors for the front
outboard seating position. Quad cab models are
equipped with a fixed-position child restraint upper
tether anchor strap for the rear center and both rear
outboard seating positions, and child restraint lower
anchors for both rear outboard seating positions. All
front seat child restraint anchors are deleted on quad
cab models.
The two upper tether anchors for standard cab
models are integral to the upper cab back panel rein-
forcement and are concealed behind individual trim
cover and bezel units that are integral to the cab
back trim panel (Fig. 12). These upper tether anchors
cannot be adjusted or repaired and, if faulty or dam-
aged, they must be replaced as a unit with the upper
cab back panel reinforcement. The upper tether
anchor trim covers and bezels are serviced as a unit
with the cab back trim panel.
The three upper tether anchor straps for quad cab
models are secured to the upper cab back panel rein-
forcement with screws (Fig. 13). These anchor straps
are concealed behind the upright rear seat back. Theupper tether anchor straps are available for individ-
ual service replacement.
The lower anchors for all models are integral to
their respective front or rear seat cushion frame (Fig.
14) or (Fig. 15). Round markers with an imprinted
child seat icon on the standard cab front seat back
trim cover helps identify the anchor locations for that
application because they may be otherwise difficult to
see with the seat back in the upright position. These
lower anchors are each constructed from round steel
Fig. 11 Child Restraint Anchor Location - Quad Cab
1 - LOWER ANCHOR (PROVIDED FOR REAR OUTBOARD
SEATING POSITIONS ONLY)2 - TETHER ANCHOR (PROVIDED FOR REAR CENTER AND
OUTBOARD SEATING POSITIONS)
Fig. 12 Child Tether Anchor - Standard Cab
1 - COVER & BEZEL (2)
2 - CAB BACK TRIM PANEL
3 - ANCHOR (2)
DRRESTRAINTS 8O - 15
CHILD RESTRAINT ANCHOR (Continued)
Page 617 of 2895

bar stock that is formed into a U-shape, then
securely welded at each end to the seat cushion
frame. They are each accessed from the front of their
respective seats, at each side where the seat back
meets the seat cushion. These lower anchors cannot
be adjusted or repaired and, if faulty or damaged,
they must be replaced as a unit with the seat cush-
ion frame. On quad cab models, if the lower anchors
have been bent or broken as a result of a vehicle col-
lision, the latch for the affected rear seat cushion
frame unit must also be replaced.WARNING: DURING AND FOLLOWING ANY SEAT
BELT OR CHILD RESTRAINT ANCHOR SERVICE,
CAREFULLY INSPECT ALL SEAT BELTS, BUCKLES,
MOUNTING HARDWARE, RETRACTORS, TETHER
STRAPS, AND ANCHORS FOR PROPER INSTALLA-
TION, OPERATION, OR DAMAGE. REPLACE ANY
BELT THAT IS CUT, FRAYED, OR TORN.
STRAIGHTEN ANY BELT THAT IS TWISTED.
TIGHTEN ANY LOOSE FASTENERS. REPLACE ANY
BELT THAT HAS A DAMAGED OR INOPERATIVE
BUCKLE OR RETRACTOR. REPLACE ANY BELT
THAT HAS A BENT OR DAMAGED LATCH PLATE
OR ANCHOR PLATE. REPLACE ANY CHILD
RESTRAINT ANCHOR OR THE UNIT TO WHICH THE
ANCHOR IS INTEGRAL THAT HAS BEEN BENT OR
DAMAGED. NEVER ATTEMPT TO REPAIR A SEAT
BELT OR CHILD RESTRAINT COMPONENT.
ALWAYS REPLACE DAMAGED OR FAULTY SEAT
BELT AND CHILD RESTRAINT COMPONENTS WITH
THE CORRECT, NEW AND UNUSED REPLACEMENT
PARTS LISTED IN THE DAIMLERCHRYSLER MOPAR
PARTS CATALOG.
OPERATION
See the owner's manual in the vehicle glove box for
more information on the proper use of all of the fac-
tory-installed child restraint anchors.
REMOVAL
The following procedure applies only to the rear
seat upper child tether straps used on quad cab mod-
els. The child restraint anchors used in other models
and locations are integral to other components and
cannot be serviced separately.
Fig. 13 Child Tether Strap - Quad Cab
1 - TETHER STRAP (3)
2 - CAB BACK PANEL
3 - SCREW (3)
Fig. 14 Child Restraint Lower Anchor - Standard
Cab Front Seat
1 - FRONT SEAT BACK
2 - LOWER ANCHOR (2) - PASSENGER SIDE OUTBOARD
SEATING POSITION ONLY
3 - LOWER ANCHOR MARKER (2)
4 - FRONT SEAT CUSHION
Fig. 15 Child Restraint Lower Anchor - Quad Cab
Rear Seat
1 - REAR SEAT BACK
2 - LOWER ANCHOR (2 PER OUTBOARD REAR SEATING
POSITION)
3 - REAR SEAT CUSHION
8O - 16 RESTRAINTSDR
CHILD RESTRAINT ANCHOR (Continued)
Page 618 of 2895
WARNING: DURING AND FOLLOWING ANY SEAT
BELT OR CHILD RESTRAINT ANCHOR SERVICE,
CAREFULLY INSPECT ALL SEAT BELTS, BUCKLES,
MOUNTING HARDWARE, RETRACTORS, TETHER
STRAPS, AND ANCHORS FOR PROPER INSTALLA-
TION, OPERATION, OR DAMAGE. REPLACE ANY
BELT THAT IS CUT, FRAYED, OR TORN.
STRAIGHTEN ANY BELT THAT IS TWISTED.
TIGHTEN ANY LOOSE FASTENERS. REPLACE ANY
BELT THAT HAS A DAMAGED OR INOPERATIVE
BUCKLE OR RETRACTOR. REPLACE ANY BELT
THAT HAS A BENT OR DAMAGED LATCH PLATE
OR ANCHOR PLATE. REPLACE ANY CHILD
RESTRAINT ANCHOR OR THE UNIT TO WHICH THE
ANCHOR IS INTEGRAL THAT HAS BEEN BENT OR
DAMAGED. NEVER ATTEMPT TO REPAIR A SEAT
BELT OR CHILD RESTRAINT COMPONENT.
ALWAYS REPLACE DAMAGED OR FAULTY SEAT
BELT AND CHILD RESTRAINT COMPONENTS WITH
THE CORRECT, NEW AND UNUSED REPLACEMENT
PARTS LISTED IN THE DAIMLERCHRYSLER MOPAR
PARTS CATALOG.
(1) Remove the rear seat from the vehicle. (Refer
to 23 - BODY/SEATS/SEAT - REAR - REMOVAL).
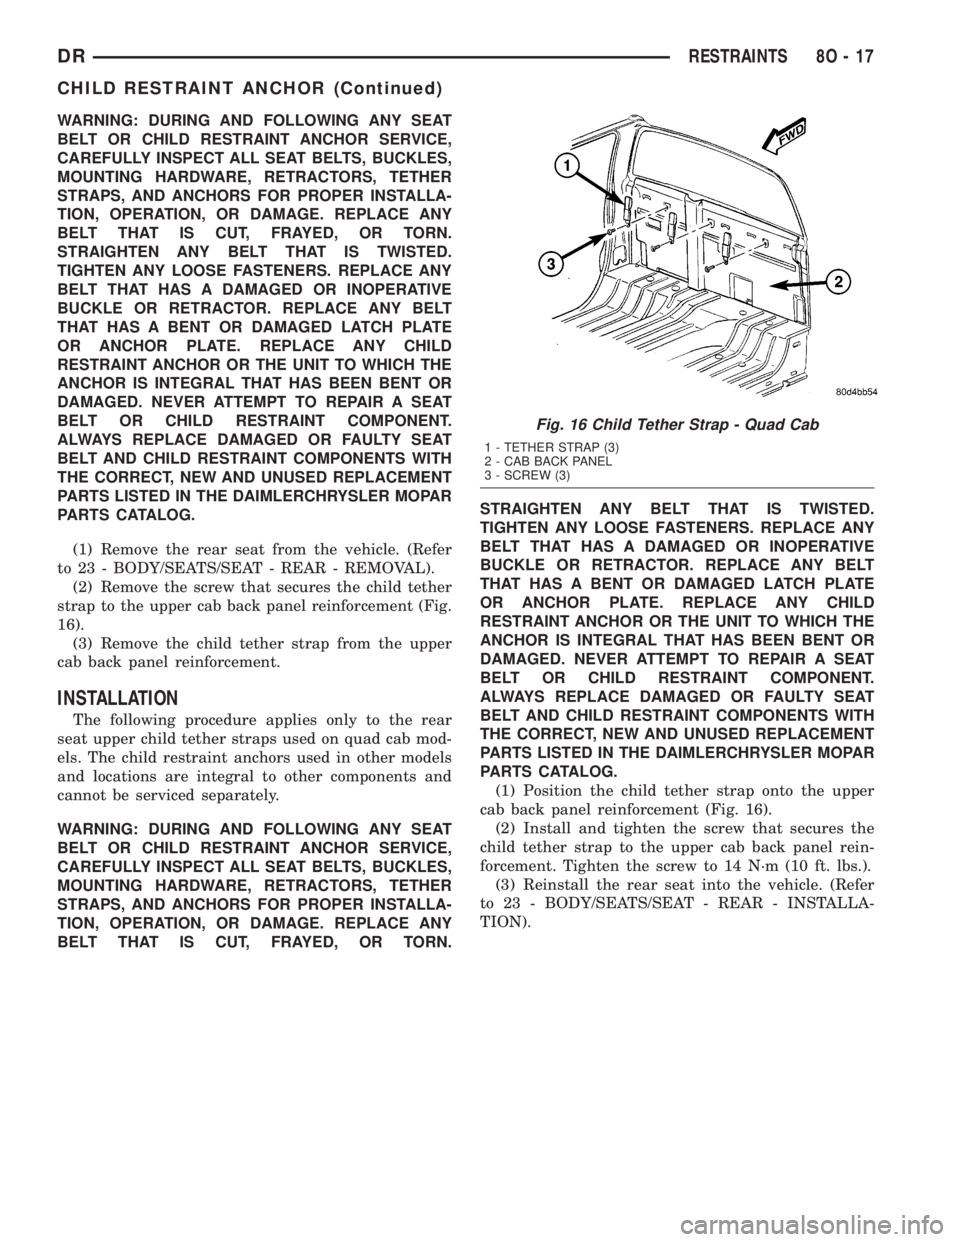
(2) Remove the screw that secures the child tether
strap to the upper cab back panel reinforcement (Fig.
16).
(3) Remove the child tether strap from the upper
cab back panel reinforcement.
INSTALLATION
The following procedure applies only to the rear
seat upper child tether straps used on quad cab mod-
els. The child restraint anchors used in other models
and locations are integral to other components and
cannot be serviced separately.
WARNING: DURING AND FOLLOWING ANY SEAT
BELT OR CHILD RESTRAINT ANCHOR SERVICE,
CAREFULLY INSPECT ALL SEAT BELTS, BUCKLES,
MOUNTING HARDWARE, RETRACTORS, TETHER
STRAPS, AND ANCHORS FOR PROPER INSTALLA-
TION, OPERATION, OR DAMAGE. REPLACE ANY
BELT THAT IS CUT, FRAYED, OR TORN.STRAIGHTEN ANY BELT THAT IS TWISTED.
TIGHTEN ANY LOOSE FASTENERS. REPLACE ANY
BELT THAT HAS A DAMAGED OR INOPERATIVE
BUCKLE OR RETRACTOR. REPLACE ANY BELT
THAT HAS A BENT OR DAMAGED LATCH PLATE
OR ANCHOR PLATE. REPLACE ANY CHILD
RESTRAINT ANCHOR OR THE UNIT TO WHICH THE
ANCHOR IS INTEGRAL THAT HAS BEEN BENT OR
DAMAGED. NEVER ATTEMPT TO REPAIR A SEAT
BELT OR CHILD RESTRAINT COMPONENT.
ALWAYS REPLACE DAMAGED OR FAULTY SEAT
BELT AND CHILD RESTRAINT COMPONENTS WITH
THE CORRECT, NEW AND UNUSED REPLACEMENT
PARTS LISTED IN THE DAIMLERCHRYSLER MOPAR
PARTS CATALOG.
(1) Position the child tether strap onto the upper
cab back panel reinforcement (Fig. 16).
(2) Install and tighten the screw that secures the
child tether strap to the upper cab back panel rein-
forcement. Tighten the screw to 14 N´m (10 ft. lbs.).
(3) Reinstall the rear seat into the vehicle. (Refer
to 23 - BODY/SEATS/SEAT - REAR - INSTALLA-
TION).
Fig. 16 Child Tether Strap - Quad Cab
1 - TETHER STRAP (3)
2 - CAB BACK PANEL
3 - SCREW (3)
DRRESTRAINTS 8O - 17
CHILD RESTRAINT ANCHOR (Continued)
Page 620 of 2895

ber boot is installed over the engagement dowel to
eliminate contact noise between the dowel and the
steering wheel. The two lobes on the turn signal can-
cel cam on the lower surface of the clockspring rotor
hub contact a turn signal cancel actuator of the
multi-function switch to provide automatic turn sig-
nal cancellation. The yellow sleeved pigtail wires on
the upper surface of the clockspring rotor connect the
clockspring to the driver airbag, while a steering
wheel wire harness connects the two connector recep-
tacles on the upper surface of the clockspring rotor to
the horn switch feed pigtail wire connector and, if
the vehicle is so equipped, to the optional speed con-
trol and remote radio switches on the steering wheel.
Like the clockspring in a timepiece, the clockspring
tape has travel limits and can be damaged by being
wound too tightly during full stop-to-stop steering
wheel rotation. To prevent this from occurring, the
clockspring is centered when it is installed on the
steering column. Centering the clockspring indexes
the clockspring tape to the movable steering compo-
nents so that the tape can operate within its
designed travel limits. However, if the clockspring is
removed from the steering column or if the steering
shaft is disconnected from the steering gear, the
clockspring spool can change position relative to the
movable steering components. The clockspring must
be re-centered following completion of this service or
the tape may be damaged.
Service replacement clocksprings are shipped pre-
centered and with a plastic locking pin installed.
This locking pin should not be disengaged until the
clockspring has been installed on the steering col-
umn. If the locking pin is removed or damaged before
the clockspring is installed on a steering column, the
clockspring centering procedure must be performed.
(Refer to 8 - ELECTRICAL/RESTRAINTS/CLOCK-
SPRING - STANDARD PROCEDURE - CLOCK-
SPRING CENTERING).
STANDARD PROCEDURE - CLOCKSPRING
CENTERING
The clockspring is designed to wind and unwind
when the steering wheel is rotated, but is only
designed to rotate the same number of turns (about
five complete rotations) as the steering wheel can be
turned from stop to stop. Centering the clockspring
indexes the clockspring tape to other steering compo-
nents so that it can operate within its designed
travel limits. The rotor of a centered clockspring can
be rotated two and one-half turns in either direction
from the centered position, without damaging the
clockspring tape.
However, if the clockspring is removed for service
or if the steering column is disconnected from the
steering gear, the clockspring tape can change posi-tion relative to the other steering components. The
clockspring must then be re-centered following com-
pletion of such service or the clockspring tape may be
damaged. Service replacement clocksprings are
shipped pre-centered, with a plastic locking pin
installed (Fig. 19). This locking pin should not be
removed until the clockspring has been installed on
the steering column. If the locking pin is removed
before the clockspring is installed on a steering col-
umn, the clockspring centering procedure must be
performed.
WARNING: ON VEHICLES EQUIPPED WITH AIR-
BAGS, DISABLE THE SUPPLEMENTAL RESTRAINT
SYSTEM BEFORE ATTEMPTING ANY STEERING
WHEEL, STEERING COLUMN, DRIVER AIRBAG,
PASSENGER AIRBAG, SEAT BELT TENSIONER,
SIDE CURTAIN AIRBAG, OR INSTRUMENT PANEL
COMPONENT DIAGNOSIS OR SERVICE. DISCON-
NECT AND ISOLATE THE BATTERY NEGATIVE
(GROUND) CABLE, THEN WAIT TWO MINUTES FOR
THE SYSTEM CAPACITOR TO DISCHARGE BEFORE
PERFORMING FURTHER DIAGNOSIS OR SERVICE.
THIS IS THE ONLY SURE WAY TO DISABLE THE
SUPPLEMENTAL RESTRAINT SYSTEM. FAILURE TO
TAKE THE PROPER PRECAUTIONS COULD
RESULT IN ACCIDENTAL AIRBAG DEPLOYMENT
AND POSSIBLE PERSONAL INJURY.
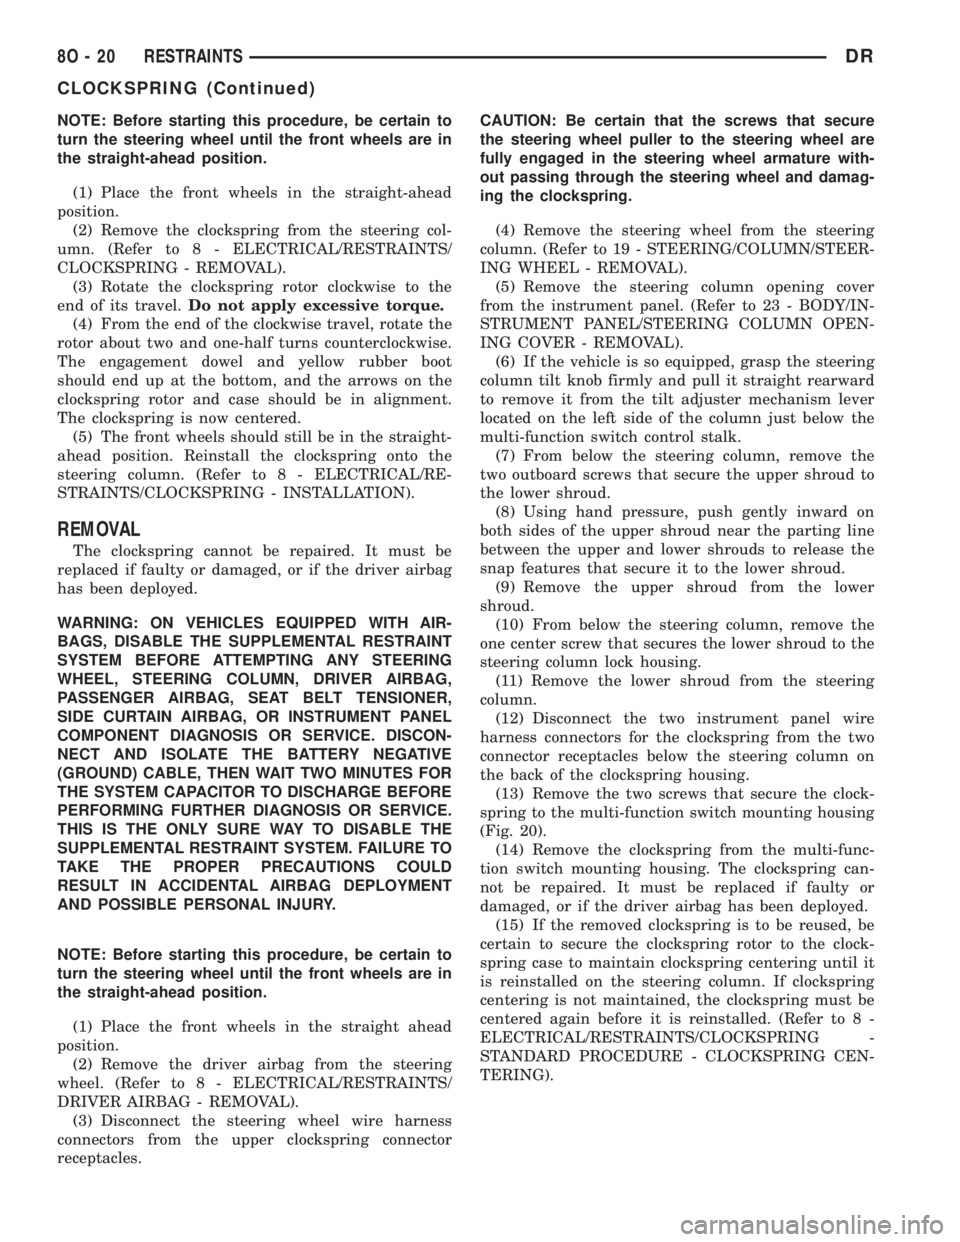
Fig. 19 Clockspring and Multi-Function Switch
1 - CLOCKSPRING
2 - LOCATING PIN
3 - SCREW (2)
4 - LOCKING PIN
5 - ENGAGEMENT DOWEL BOOT
DRRESTRAINTS 8O - 19
CLOCKSPRING (Continued)
Page 621 of 2895
NOTE: Before starting this procedure, be certain to
turn the steering wheel until the front wheels are in
the straight-ahead position.
(1) Place the front wheels in the straight-ahead
position.
(2) Remove the clockspring from the steering col-
umn. (Refer to 8 - ELECTRICAL/RESTRAINTS/
CLOCKSPRING - REMOVAL).
(3) Rotate the clockspring rotor clockwise to the
end of its travel.Do not apply excessive torque.
(4) From the end of the clockwise travel, rotate the
rotor about two and one-half turns counterclockwise.
The engagement dowel and yellow rubber boot
should end up at the bottom, and the arrows on the
clockspring rotor and case should be in alignment.
The clockspring is now centered.
(5) The front wheels should still be in the straight-
ahead position. Reinstall the clockspring onto the
steering column. (Refer to 8 - ELECTRICAL/RE-
STRAINTS/CLOCKSPRING - INSTALLATION).
REMOVAL
The clockspring cannot be repaired. It must be
replaced if faulty or damaged, or if the driver airbag
has been deployed.
WARNING: ON VEHICLES EQUIPPED WITH AIR-
BAGS, DISABLE THE SUPPLEMENTAL RESTRAINT
SYSTEM BEFORE ATTEMPTING ANY STEERING
WHEEL, STEERING COLUMN, DRIVER AIRBAG,
PASSENGER AIRBAG, SEAT BELT TENSIONER,
SIDE CURTAIN AIRBAG, OR INSTRUMENT PANEL
COMPONENT DIAGNOSIS OR SERVICE. DISCON-
NECT AND ISOLATE THE BATTERY NEGATIVE
(GROUND) CABLE, THEN WAIT TWO MINUTES FOR
THE SYSTEM CAPACITOR TO DISCHARGE BEFORE
PERFORMING FURTHER DIAGNOSIS OR SERVICE.
THIS IS THE ONLY SURE WAY TO DISABLE THE
SUPPLEMENTAL RESTRAINT SYSTEM. FAILURE TO
TAKE THE PROPER PRECAUTIONS COULD
RESULT IN ACCIDENTAL AIRBAG DEPLOYMENT
AND POSSIBLE PERSONAL INJURY.
NOTE: Before starting this procedure, be certain to
turn the steering wheel until the front wheels are in
the straight-ahead position.
(1) Place the front wheels in the straight ahead
position.
(2) Remove the driver airbag from the steering
wheel. (Refer to 8 - ELECTRICAL/RESTRAINTS/
DRIVER AIRBAG - REMOVAL).
(3) Disconnect the steering wheel wire harness
connectors from the upper clockspring connector
receptacles.CAUTION: Be certain that the screws that secure
the steering wheel puller to the steering wheel are
fully engaged in the steering wheel armature with-
out passing through the steering wheel and damag-
ing the clockspring.
(4) Remove the steering wheel from the steering
column. (Refer to 19 - STEERING/COLUMN/STEER-
ING WHEEL - REMOVAL).
(5) Remove the steering column opening cover
from the instrument panel. (Refer to 23 - BODY/IN-
STRUMENT PANEL/STEERING COLUMN OPEN-
ING COVER - REMOVAL).
(6) If the vehicle is so equipped, grasp the steering
column tilt knob firmly and pull it straight rearward
to remove it from the tilt adjuster mechanism lever
located on the left side of the column just below the
multi-function switch control stalk.
(7) From below the steering column, remove the
two outboard screws that secure the upper shroud to
the lower shroud.
(8) Using hand pressure, push gently inward on
both sides of the upper shroud near the parting line
between the upper and lower shrouds to release the
snap features that secure it to the lower shroud.
(9) Remove the upper shroud from the lower
shroud.
(10) From below the steering column, remove the
one center screw that secures the lower shroud to the
steering column lock housing.
(11) Remove the lower shroud from the steering
column.
(12) Disconnect the two instrument panel wire
harness connectors for the clockspring from the two
connector receptacles below the steering column on
the back of the clockspring housing.
(13) Remove the two screws that secure the clock-
spring to the multi-function switch mounting housing
(Fig. 20).
(14) Remove the clockspring from the multi-func-
tion switch mounting housing. The clockspring can-
not be repaired. It must be replaced if faulty or
damaged, or if the driver airbag has been deployed.
(15) If the removed clockspring is to be reused, be
certain to secure the clockspring rotor to the clock-
spring case to maintain clockspring centering until it
is reinstalled on the steering column. If clockspring
centering is not maintained, the clockspring must be
centered again before it is reinstalled. (Refer to 8 -
ELECTRICAL/RESTRAINTS/CLOCKSPRING -
STANDARD PROCEDURE - CLOCKSPRING CEN-
TERING).
8O - 20 RESTRAINTSDR
CLOCKSPRING (Continued)
Page 622 of 2895
INSTALLATION
The clockspring cannot be repaired. It must be
replaced if faulty or damaged, or if the driver airbag
has been deployed.
If the clockspring is not properly centered in rela-
tion to the steering wheel, steering shaft and steer-
ing gear, it may be damaged. (Refer to 8 -
ELECTRICAL/RESTRAINTS/CLOCKSPRING -
STANDARD PROCEDURE - CLOCKSPRING CEN-
TERING). Service replacement clocksprings are
shipped pre-centered, with a plastic locking pin
installed. This locking pin should not be removed
until the clockspring has been installed on the steer-
ing column. If the locking pin is removed before the
clockspring is installed on a steering column, the
clockspring centering procedure must be performed.
WARNING: ON VEHICLES EQUIPPED WITH AIR-
BAGS, DISABLE THE SUPPLEMENTAL RESTRAINT
SYSTEM BEFORE ATTEMPTING ANY STEERING
WHEEL, STEERING COLUMN, DRIVER AIRBAG,
PASSENGER AIRBAG, SEAT BELT TENSIONER,
SIDE CURTAIN AIRBAG, OR INSTRUMENT PANEL
COMPONENT DIAGNOSIS OR SERVICE. DISCON-
NECT AND ISOLATE THE BATTERY NEGATIVE
(GROUND) CABLE, THEN WAIT TWO MINUTES FOR
THE SYSTEM CAPACITOR TO DISCHARGE BEFORE
PERFORMING FURTHER DIAGNOSIS OR SERVICE.THIS IS THE ONLY SURE WAY TO DISABLE THE
SUPPLEMENTAL RESTRAINT SYSTEM. FAILURE TO
TAKE THE PROPER PRECAUTIONS COULD
RESULT IN ACCIDENTAL AIRBAG DEPLOYMENT
AND POSSIBLE PERSONAL INJURY.
NOTE: Before starting this procedure, be certain
that the front wheels are still in the straight-ahead
position.
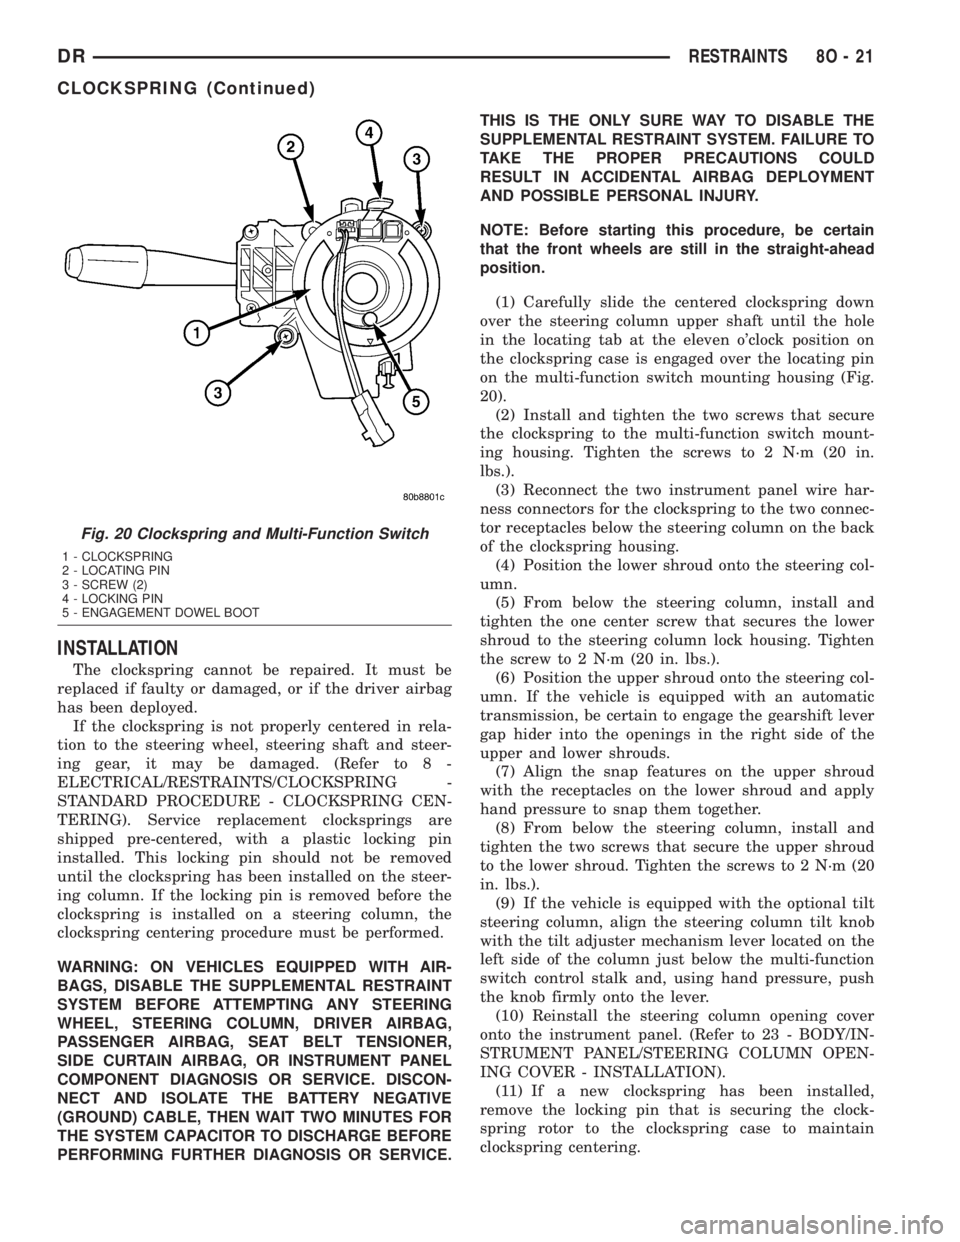
(1) Carefully slide the centered clockspring down
over the steering column upper shaft until the hole
in the locating tab at the eleven o'clock position on
the clockspring case is engaged over the locating pin
on the multi-function switch mounting housing (Fig.
20).
(2) Install and tighten the two screws that secure
the clockspring to the multi-function switch mount-
ing housing. Tighten the screws to 2 N´m (20 in.
lbs.).
(3) Reconnect the two instrument panel wire har-
ness connectors for the clockspring to the two connec-
tor receptacles below the steering column on the back
of the clockspring housing.
(4) Position the lower shroud onto the steering col-
umn.
(5) From below the steering column, install and
tighten the one center screw that secures the lower
shroud to the steering column lock housing. Tighten
the screw to 2 N´m (20 in. lbs.).
(6) Position the upper shroud onto the steering col-
umn. If the vehicle is equipped with an automatic
transmission, be certain to engage the gearshift lever
gap hider into the openings in the right side of the
upper and lower shrouds.
(7) Align the snap features on the upper shroud
with the receptacles on the lower shroud and apply
hand pressure to snap them together.
(8) From below the steering column, install and
tighten the two screws that secure the upper shroud
to the lower shroud. Tighten the screws to 2 N´m (20
in. lbs.).
(9) If the vehicle is equipped with the optional tilt
steering column, align the steering column tilt knob
with the tilt adjuster mechanism lever located on the
left side of the column just below the multi-function
switch control stalk and, using hand pressure, push
the knob firmly onto the lever.
(10) Reinstall the steering column opening cover
onto the instrument panel. (Refer to 23 - BODY/IN-
STRUMENT PANEL/STEERING COLUMN OPEN-
ING COVER - INSTALLATION).
(11) If a new clockspring has been installed,
remove the locking pin that is securing the clock-
spring rotor to the clockspring case to maintain
clockspring centering.
Fig. 20 Clockspring and Multi-Function Switch
1 - CLOCKSPRING
2 - LOCATING PIN
3 - SCREW (2)
4 - LOCKING PIN
5 - ENGAGEMENT DOWEL BOOT
DRRESTRAINTS 8O - 21
CLOCKSPRING (Continued)
Page 624 of 2895
inflator connects the inflator initiator to the vehicle
electrical system through a yellow-jacketed, two-wire
pigtail harness of the clockspring.
The driver airbag cannot be repaired, and must be
replaced if deployed or in any way damaged.
OPERATION
The driver airbag is deployed by electrical signals
generated by the Airbag Control Module (ACM)
through the driver airbag squib circuit to the initia-
tor in the airbag inflator. When the ACM sends the
proper electrical signal to the initiator the electrical
energy generates enough heat to initiate a small
pyrotechnic charge which, in turn ignites chemical
pellets within the inflator. Once ignited, these chem-
ical pellets burn rapidly and produce a large quantity
of inert gas. The inflator is sealed to the back of the
airbag housing and a diffuser in the inflator directs
all of the inert gas into the airbag cushion, causing
the cushion to inflate. As the cushion inflates, the
driver airbag trim cover will split at predetermined
breakout lines, then fold back out of the way along
with the horn switch unit. Following an airbag
deployment, the airbag cushion quickly deflates by
venting the inert gas towards the instrument panel
through vent holes within the fabric used to con-
struct the back (steering wheel side) panel of the air-
bag cushion.
Some of the chemicals used to create the inert gas
may be considered hazardous while in their solid
state before they are burned, but they are securely
sealed within the airbag inflator. Typically, all poten-
tially hazardous chemicals are burned during an air-
bag deployment event. The inert gas that is produced
when the chemicals are burned is harmless. How-
ever, a small amount of residue from the burned
chemicals may cause some temporary discomfort if it
contacts the skin, eyes, or breathing passages. If skin
or eye irritation is noted, rinse the affected area with
plenty of cool, clean water. If breathing passages are
irritated, move to another area where there is plenty
of clean, fresh air to breath. If the irritation is not
alleviated by these actions, contact a physician.
REMOVAL
The following procedure is for replacement of a
faulty or damaged driver airbag. If the airbag is
faulty or damaged, but not deployed, review the rec-
ommended procedures for handling non-deployed
supplemental restraints. (Refer to 8 - ELECTRICAL/
RESTRAINTS - STANDARD PROCEDURE - HAN-
DLING NON-DEPLOYED SUPPLEMENTAL
RESTRAINTS). If the driver airbag has beendeployed, review the recommended procedures for
service after a supplemental restraint deployment
before removing the airbag from the vehicle. (Refer to
8 - ELECTRICAL/RESTRAINTS - STANDARD PRO-
CEDURE - SERVICE AFTER A SUPPLEMENTAL
RESTRAINT DEPLOYMENT).
WARNING: ON VEHICLES EQUIPPED WITH AIR-
BAGS, DISABLE THE SUPPLEMENTAL RESTRAINT
SYSTEM BEFORE ATTEMPTING ANY STEERING
WHEEL, STEERING COLUMN, DRIVER AIRBAG,
PASSENGER AIRBAG, SEAT BELT TENSIONER,
SIDE CURTAIN AIRBAG, OR INSTRUMENT PANEL
COMPONENT DIAGNOSIS OR SERVICE. DISCON-
NECT AND ISOLATE THE BATTERY NEGATIVE
(GROUND) CABLE, THEN WAIT TWO MINUTES FOR
THE SYSTEM CAPACITOR TO DISCHARGE BEFORE
PERFORMING FURTHER DIAGNOSIS OR SERVICE.
THIS IS THE ONLY SURE WAY TO DISABLE THE
SUPPLEMENTAL RESTRAINT SYSTEM. FAILURE TO
TAKE THE PROPER PRECAUTIONS COULD
RESULT IN ACCIDENTAL AIRBAG DEPLOYMENT
AND POSSIBLE PERSONAL INJURY.
WARNING: WHEN REMOVING A DEPLOYED AIR-
BAG, RUBBER GLOVES, EYE PROTECTION, AND A
LONG-SLEEVED SHIRT SHOULD BE WORN. THERE
MAY BE DEPOSITS ON THE AIRBAG CUSHION AND
OTHER INTERIOR SURFACES. IN LARGE DOSES,
THESE DEPOSITS MAY CAUSE IRRITATION TO THE
SKIN AND EYES.
(1) Disconnect and isolate the battery negative
cable. Wait two minutes for the system capacitor to
discharge before further service.
(2) From the underside of the steering wheel,
remove the two screws that secure the two trim cov-
ers or speed control switches to each side of the
driver airbag trim cover.
(3) From the top of the steering wheel, remove the
two trim covers or speed control switches from the
pockets on each side of the driver airbag trim cover
to access the driver airbag mounting screws.
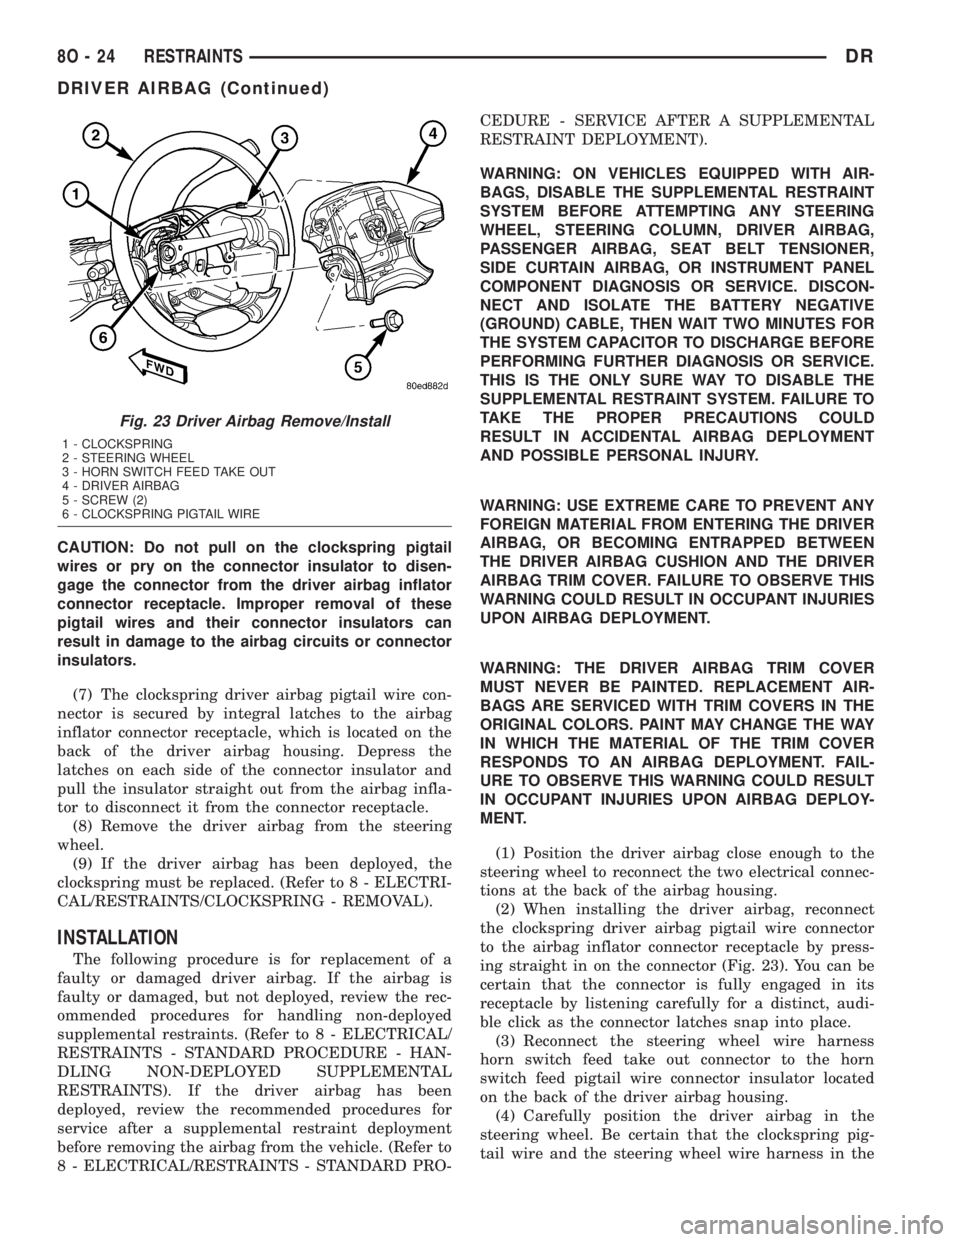
(4) Remove the two screws that secure the driver
airbag to the steering wheel armature (Fig. 23).
(5) Pull the driver airbag away from the steering
wheel far enough to access the two electrical connec-
tions at the back of the airbag housing.
(6) Disconnect the steering wheel wire harness
horn switch feed take out connector from the horn
switch feed pigtail wire connector insulator located
on the back of the driver airbag housing.
DRRESTRAINTS 8O - 23
DRIVER AIRBAG (Continued)
Page 625 of 2895
CAUTION: Do not pull on the clockspring pigtail
wires or pry on the connector insulator to disen-
gage the connector from the driver airbag inflator
connector receptacle. Improper removal of these
pigtail wires and their connector insulators can
result in damage to the airbag circuits or connector
insulators.
(7) The clockspring driver airbag pigtail wire con-
nector is secured by integral latches to the airbag
inflator connector receptacle, which is located on the
back of the driver airbag housing. Depress the
latches on each side of the connector insulator and
pull the insulator straight out from the airbag infla-
tor to disconnect it from the connector receptacle.
(8) Remove the driver airbag from the steering
wheel.
(9) If the driver airbag has been deployed, the
clockspring must be replaced. (Refer to 8 - ELECTRI-
CAL/RESTRAINTS/CLOCKSPRING - REMOVAL).
INSTALLATION
The following procedure is for replacement of a
faulty or damaged driver airbag. If the airbag is
faulty or damaged, but not deployed, review the rec-
ommended procedures for handling non-deployed
supplemental restraints. (Refer to 8 - ELECTRICAL/
RESTRAINTS - STANDARD PROCEDURE - HAN-
DLING NON-DEPLOYED SUPPLEMENTAL
RESTRAINTS). If the driver airbag has been
deployed, review the recommended procedures for
service after a supplemental restraint deployment
before removing the airbag from the vehicle. (Refer to
8 - ELECTRICAL/RESTRAINTS - STANDARD PRO-CEDURE - SERVICE AFTER A SUPPLEMENTAL
RESTRAINT DEPLOYMENT).
WARNING: ON VEHICLES EQUIPPED WITH AIR-
BAGS, DISABLE THE SUPPLEMENTAL RESTRAINT
SYSTEM BEFORE ATTEMPTING ANY STEERING
WHEEL, STEERING COLUMN, DRIVER AIRBAG,
PASSENGER AIRBAG, SEAT BELT TENSIONER,
SIDE CURTAIN AIRBAG, OR INSTRUMENT PANEL
COMPONENT DIAGNOSIS OR SERVICE. DISCON-
NECT AND ISOLATE THE BATTERY NEGATIVE
(GROUND) CABLE, THEN WAIT TWO MINUTES FOR
THE SYSTEM CAPACITOR TO DISCHARGE BEFORE
PERFORMING FURTHER DIAGNOSIS OR SERVICE.
THIS IS THE ONLY SURE WAY TO DISABLE THE
SUPPLEMENTAL RESTRAINT SYSTEM. FAILURE TO
TAKE THE PROPER PRECAUTIONS COULD
RESULT IN ACCIDENTAL AIRBAG DEPLOYMENT
AND POSSIBLE PERSONAL INJURY.
WARNING: USE EXTREME CARE TO PREVENT ANY
FOREIGN MATERIAL FROM ENTERING THE DRIVER
AIRBAG, OR BECOMING ENTRAPPED BETWEEN
THE DRIVER AIRBAG CUSHION AND THE DRIVER
AIRBAG TRIM COVER. FAILURE TO OBSERVE THIS
WARNING COULD RESULT IN OCCUPANT INJURIES
UPON AIRBAG DEPLOYMENT.
WARNING: THE DRIVER AIRBAG TRIM COVER
MUST NEVER BE PAINTED. REPLACEMENT AIR-
BAGS ARE SERVICED WITH TRIM COVERS IN THE
ORIGINAL COLORS. PAINT MAY CHANGE THE WAY
IN WHICH THE MATERIAL OF THE TRIM COVER
RESPONDS TO AN AIRBAG DEPLOYMENT. FAIL-
URE TO OBSERVE THIS WARNING COULD RESULT
IN OCCUPANT INJURIES UPON AIRBAG DEPLOY-
MENT.
(1) Position the driver airbag close enough to the
steering wheel to reconnect the two electrical connec-
tions at the back of the airbag housing.
(2) When installing the driver airbag, reconnect
the clockspring driver airbag pigtail wire connector
to the airbag inflator connector receptacle by press-
ing straight in on the connector (Fig. 23). You can be
certain that the connector is fully engaged in its
receptacle by listening carefully for a distinct, audi-
ble click as the connector latches snap into place.
(3) Reconnect the steering wheel wire harness
horn switch feed take out connector to the horn
switch feed pigtail wire connector insulator located
on the back of the driver airbag housing.
(4) Carefully position the driver airbag in the
steering wheel. Be certain that the clockspring pig-
tail wire and the steering wheel wire harness in the
Fig. 23 Driver Airbag Remove/Install
1 - CLOCKSPRING
2 - STEERING WHEEL
3 - HORN SWITCH FEED TAKE OUT
4 - DRIVER AIRBAG
5 - SCREW (2)
6 - CLOCKSPRING PIGTAIL WIRE
8O - 24 RESTRAINTSDR
DRIVER AIRBAG (Continued)