Page 1654 of 2177

ADJUSTMENT
(1) Park the vehicle on level ground and set the
parking brake.
(2) Place the gearshift lever in gated park (P) and
remove ignition key.
(3) Loosen the cable adjustment screw at the
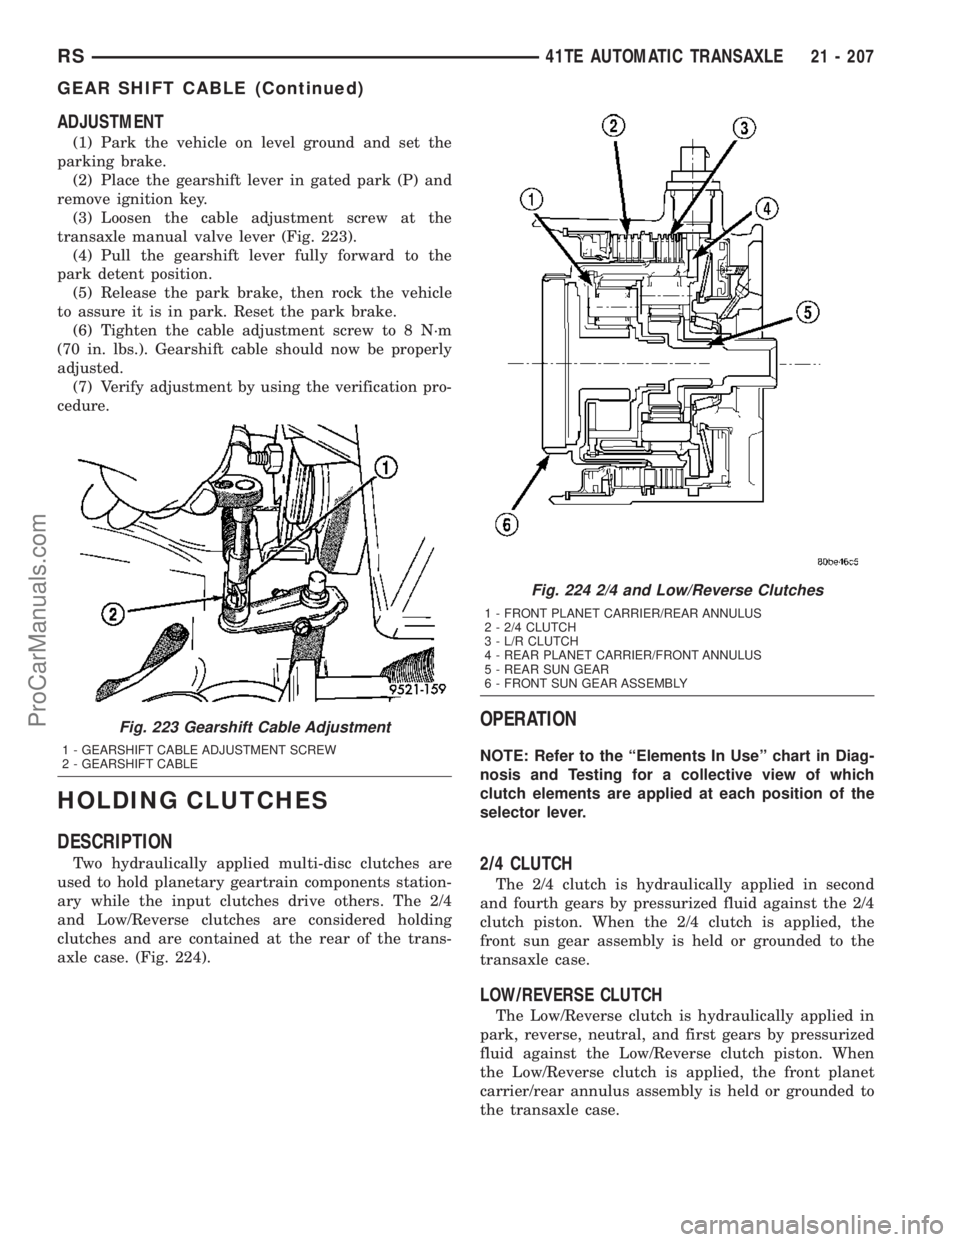
transaxle manual valve lever (Fig. 223).
(4) Pull the gearshift lever fully forward to the
park detent position.
(5) Release the park brake, then rock the vehicle
to assure it is in park. Reset the park brake.
(6) Tighten the cable adjustment screw to 8 N´m
(70 in. lbs.). Gearshift cable should now be properly
adjusted.
(7) Verify adjustment by using the verification pro-
cedure.
HOLDING CLUTCHES
DESCRIPTION
Two hydraulically applied multi-disc clutches are
used to hold planetary geartrain components station-
ary while the input clutches drive others. The 2/4
and Low/Reverse clutches are considered holding
clutches and are contained at the rear of the trans-
axle case. (Fig. 224).
OPERATION
NOTE: Refer to the ªElements In Useº chart in Diag-
nosis and Testing for a collective view of which
clutch elements are applied at each position of the
selector lever.
2/4 CLUTCH
The 2/4 clutch is hydraulically applied in second
and fourth gears by pressurized fluid against the 2/4
clutch piston. When the 2/4 clutch is applied, the
front sun gear assembly is held or grounded to the
transaxle case.
LOW/REVERSE CLUTCH
The Low/Reverse clutch is hydraulically applied in
park, reverse, neutral, and first gears by pressurized
fluid against the Low/Reverse clutch piston. When
the Low/Reverse clutch is applied, the front planet
carrier/rear annulus assembly is held or grounded to
the transaxle case.
Fig. 223 Gearshift Cable Adjustment
1 - GEARSHIFT CABLE ADJUSTMENT SCREW
2 - GEARSHIFT CABLE
Fig. 224 2/4 and Low/Reverse Clutches
1 - FRONT PLANET CARRIER/REAR ANNULUS
2 - 2/4 CLUTCH
3 - L/R CLUTCH
4 - REAR PLANET CARRIER/FRONT ANNULUS
5 - REAR SUN GEAR
6 - FRONT SUN GEAR ASSEMBLY
RS41TE AUTOMATIC TRANSAXLE21 - 207
GEAR SHIFT CABLE (Continued)
ProCarManuals.com
Page 1655 of 2177

INPUT CLUTCH ASSEMBLY
DISASSEMBLY
(1) Mount input clutch assembly to Input Clutch
Pressure Fixture (Tool 8391).
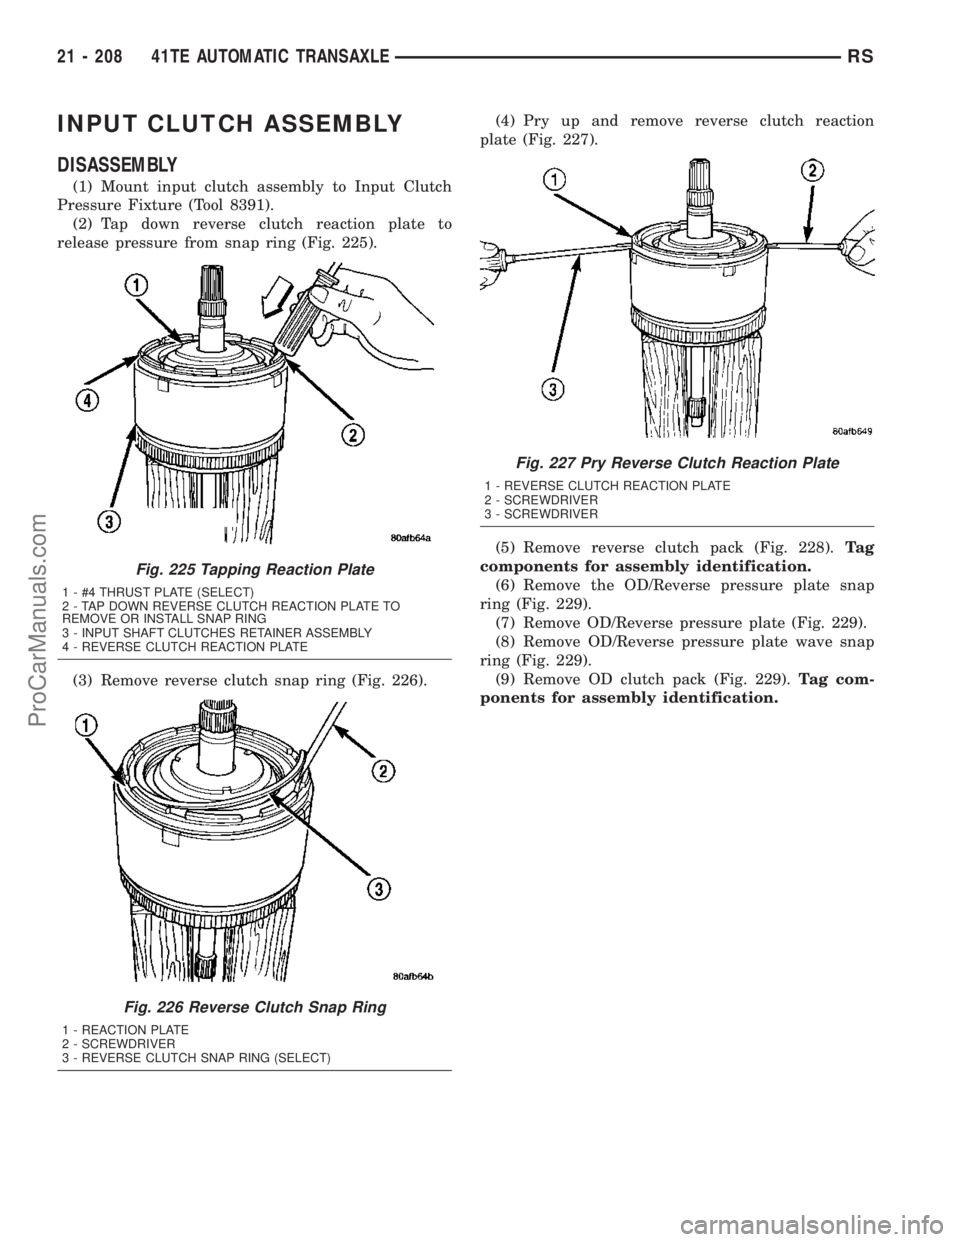
(2) Tap down reverse clutch reaction plate to
release pressure from snap ring (Fig. 225).
(3) Remove reverse clutch snap ring (Fig. 226).(4) Pry up and remove reverse clutch reaction
plate (Fig. 227).
(5) Remove reverse clutch pack (Fig. 228).Ta g
components for assembly identification.
(6) Remove the OD/Reverse pressure plate snap
ring (Fig. 229).
(7) Remove OD/Reverse pressure plate (Fig. 229).
(8) Remove OD/Reverse pressure plate wave snap
ring (Fig. 229).
(9) Remove OD clutch pack (Fig. 229).Tag com-
ponents for assembly identification.
Fig. 225 Tapping Reaction Plate
1 - #4 THRUST PLATE (SELECT)
2 - TAP DOWN REVERSE CLUTCH REACTION PLATE TO
REMOVE OR INSTALL SNAP RING
3 - INPUT SHAFT CLUTCHES RETAINER ASSEMBLY
4 - REVERSE CLUTCH REACTION PLATE
Fig. 226 Reverse Clutch Snap Ring
1 - REACTION PLATE
2 - SCREWDRIVER
3 - REVERSE CLUTCH SNAP RING (SELECT)
Fig. 227 Pry Reverse Clutch Reaction Plate
1 - REVERSE CLUTCH REACTION PLATE
2 - SCREWDRIVER
3 - SCREWDRIVER
21 - 208 41TE AUTOMATIC TRANSAXLERS
ProCarManuals.com
Page 1656 of 2177
Fig. 228 Reverse Clutch Assembly
1 - SNAP RING
2 - REACTION PLATE
3 - CLUTCH DISC (2)4 - CLUTCH PLATE (1)
5 - INPUT CLUTCH ASSEMBLY
RS41TE AUTOMATIC TRANSAXLE21 - 209
INPUT CLUTCH ASSEMBLY (Continued)
ProCarManuals.com
Page 1657 of 2177
(10) Remove and inspect OD and UD Shafts, as
well as #3 thrust washer and plate, and #2 needle
bearing (Fig. 230).
(11) Remove the OD/UD reaction plate tapered
snap ring, reaction plate, and first friction disc (Fig.
231).(12) Remove the UD clutch flat snap ring and rest
of UD clutch pack (Fig. 231).Tag clutch pack for
assembly identification.
CAUTION: Compress return spring just enough to
remove or install snap ring.
Fig. 229 Overdrive Clutch Assembly
1 - SNAP RING
2 - OD/REVERSE PRESSURE PLATE
3 - SNAP RING (WAVE)4 - CLUTCH DISC (4)
5 - CLUTCH STEEL (3)
6 - INPUT CLUTCH ASSEMBLY
21 - 210 41TE AUTOMATIC TRANSAXLERS
INPUT CLUTCH ASSEMBLY (Continued)
ProCarManuals.com
Page 1658 of 2177
Fig. 230 Overdrive/Underdrive Shafts
1 - OVERDRIVE SHAFT
2 - #3 THRUST PLATE (3 TABS)
3 - #3 THRUST WASHER (5 TABS)4 - UNDERDRIVE SHAFT
5 - #2 NEEDLE BEARING (3 TABS)
6 - INPUT CLUTCH ASSEMBLY
RS41TE AUTOMATIC TRANSAXLE21 - 211
INPUT CLUTCH ASSEMBLY (Continued)
ProCarManuals.com
Page 1659 of 2177
(13) Using Tool 5059A and an arbor press, com-
press UD clutch piston/spring enough to remove snap
ring (Fig. 232) (Fig. 233).
(14) Remove spring retainer, spring, and piston
(Fig. 233).
(15) Remove input hub tapered snap ring (Fig.
234) (Fig. 240).
(16) Tap on input hub with soft faced hammer and
separate input hub from OD/Reverse piston and
clutch retainer (Fig. 235).
Fig. 231 Underdrive Clutch Assembly
1 - SNAP RING (TAPERED)
2 - OD/UD REACTION PLATE
3 - CLUTCH DISC4 - SNAP RING (FLAT)
5 - CLUTCH PLATE
6 - INPUT CLUTCH ASSEMBLY
Fig. 232 UD Spring Retainer Snap Ring
1 - SNAP RING PLIERS
2 - ARBOR PRESS RAM
3 - SNAP RING
4 - SPECIAL TOOL 5059A
21 - 212 41TE AUTOMATIC TRANSAXLERS
INPUT CLUTCH ASSEMBLY (Continued)
ProCarManuals.com
Page 1660 of 2177
Fig. 233 Underdrive Clutch Piston, Spring and Retainer
1 - SNAP RING
2 - SPRING RETAINER
3 - SPRING
4 - UD CLUTCH PISTON5 - SEAL, OUTER
6 - SEAL, INNER
7 - INPUT CLUTCH ASSEMBLY
Fig. 234 Input Hub Tapered Snap Ring
1 - INPUT SHAFT
2 - INPUT HUB SNAP RING (TAPERED SIDE UP WITH TABS IN
CAVITY)
3 - SNAP RING PLIERSFig. 235 Tap on Input Hub
1 - INPUT SHAFT AND HUB ASSEMBLY
2 - PLASTIC HAMMER
RS41TE AUTOMATIC TRANSAXLE21 - 213
INPUT CLUTCH ASSEMBLY (Continued)
ProCarManuals.com
Page 1661 of 2177

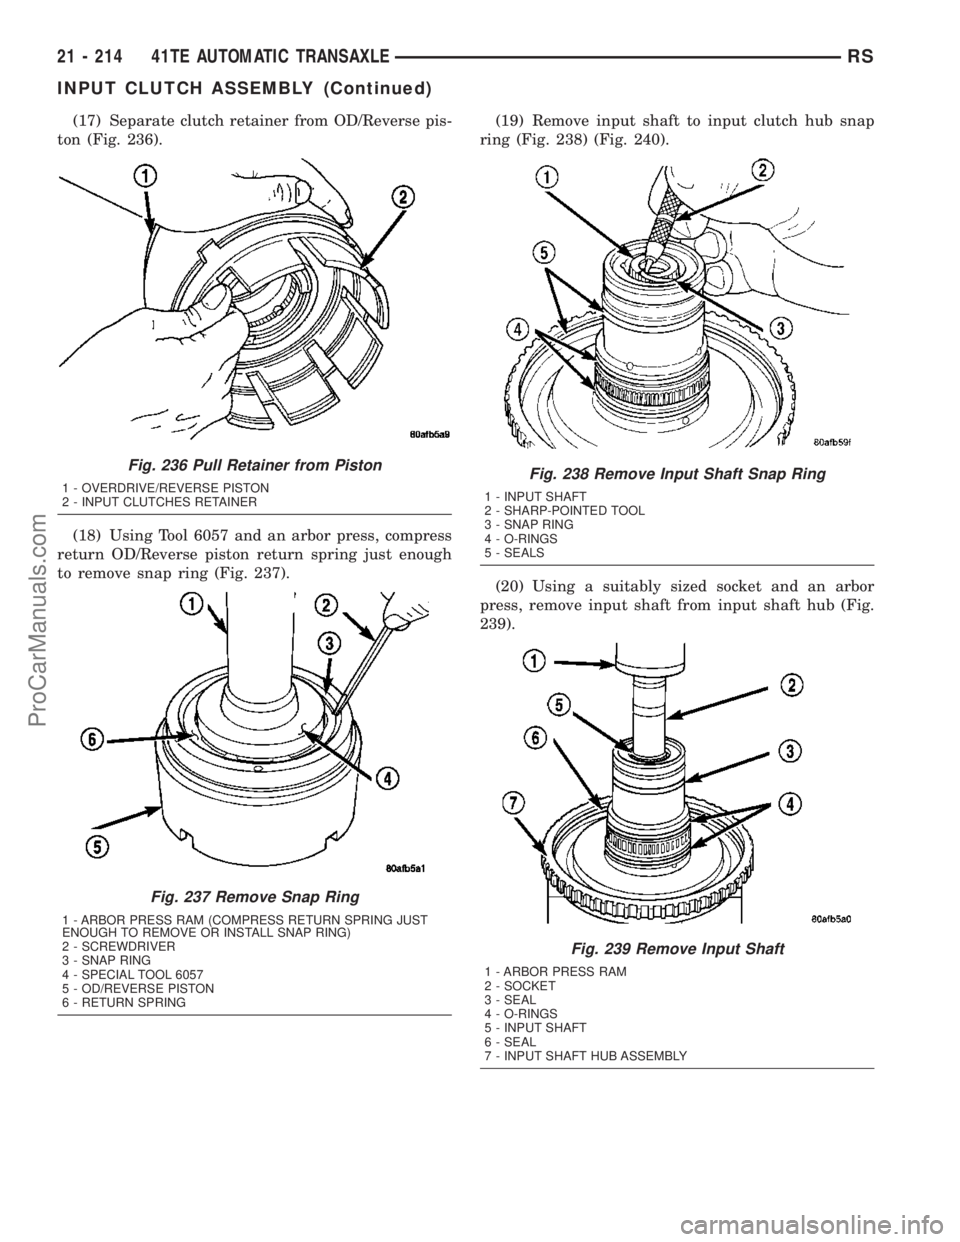
(17) Separate clutch retainer from OD/Reverse pis-
ton (Fig. 236).
(18) Using Tool 6057 and an arbor press, compress
return OD/Reverse piston return spring just enough
to remove snap ring (Fig. 237).(19) Remove input shaft to input clutch hub snap
ring (Fig. 238) (Fig. 240).
(20) Using a suitably sized socket and an arbor
press, remove input shaft from input shaft hub (Fig.
239).
Fig. 236 Pull Retainer from Piston
1 - OVERDRIVE/REVERSE PISTON
2 - INPUT CLUTCHES RETAINER
Fig. 237 Remove Snap Ring
1 - ARBOR PRESS RAM (COMPRESS RETURN SPRING JUST
ENOUGH TO REMOVE OR INSTALL SNAP RING)
2 - SCREWDRIVER
3 - SNAP RING
4 - SPECIAL TOOL 6057
5 - OD/REVERSE PISTON
6 - RETURN SPRING
Fig. 238 Remove Input Shaft Snap Ring
1 - INPUT SHAFT
2 - SHARP-POINTED TOOL
3 - SNAP RING
4 - O-RINGS
5 - SEALS
Fig. 239 Remove Input Shaft
1 - ARBOR PRESS RAM
2 - SOCKET
3 - SEAL
4 - O-RINGS
5 - INPUT SHAFT
6 - SEAL
7 - INPUT SHAFT HUB ASSEMBLY
21 - 214 41TE AUTOMATIC TRANSAXLERS
INPUT CLUTCH ASSEMBLY (Continued)
ProCarManuals.com