2003 CHEVROLET EXPRESS CARGO VAN light
[x] Cancel search: lightPage 155 of 386

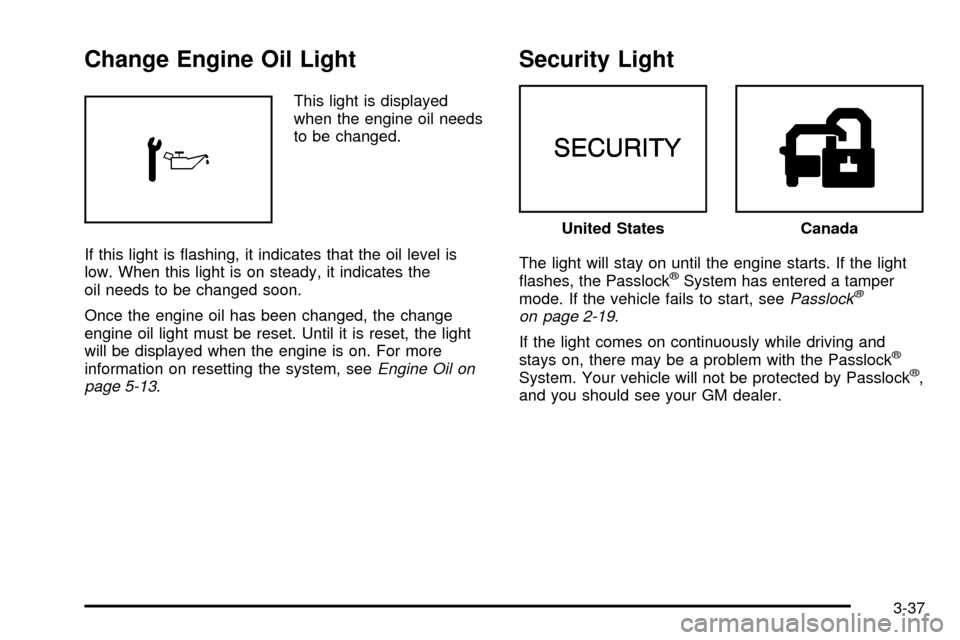
Change Engine Oil Light
This light is displayed
when the engine oil needs
to be changed.
If this light is ¯ashing, it indicates that the oil level is
low. When this light is on steady, it indicates the
oil needs to be changed soon.
Once the engine oil has been changed, the change
engine oil light must be reset. Until it is reset, the light
will be displayed when the engine is on. For more
information on resetting the system, see
Engine Oil on
page 5-13.
Security Light
The light will stay on until the engine starts. If the light
¯ashes, the PasslockžSystem has entered a tamper
mode. If the vehicle fails to start, seePasslockž
on page 2-19.
If the light comes on continuously while driving and
stays on, there may be a problem with the Passlock
ž
System. Your vehicle will not be protected by Passlockž,
and you should see your GM dealer.
United StatesCanada
3-37
Page 156 of 386

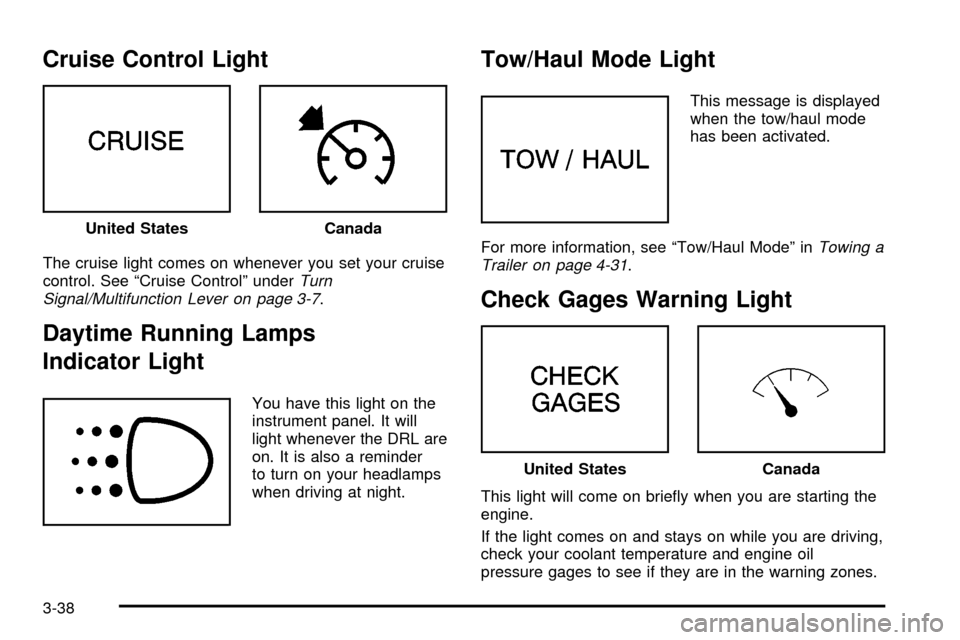
Cruise Control Light
The cruise light comes on whenever you set your cruise
control. See ªCruise Controlº underTurn
Signal/Multifunction Lever on page 3-7.
Daytime Running Lamps
Indicator Light
You have this light on the
instrument panel. It will
light whenever the DRL are
on. It is also a reminder
to turn on your headlamps
when driving at night.
Tow/Haul Mode Light
This message is displayed
when the tow/haul mode
has been activated.
For more information, see ªTow/Haul Modeº in
Towing a
Trailer on page 4-31.
Check Gages Warning Light
This light will come on brie¯y when you are starting the
engine.
If the light comes on and stays on while you are driving,
check your coolant temperature and engine oil
pressure gages to see if they are in the warning zones. United States
Canada
United StatesCanada
3-38
Page 184 of 386

LOAD CDZ:Press the LOAD side of this button to
load CDs into the compact disc player. This compact
disc player will hold up to six discs.
To insert one disc, do the following:
1. Turn the ignition on.
2. Press and release the LOAD side of the LOAD
CD button.
3. Wait for the light, located to the right of the slot, to
turn green.
4. Load a disc. Insert the disc partway into the slot,
label side up. The player will pull the disc in.
When a disc is inserted, the CD symbol will be
displayed. If you select an equalization setting for your
disc, it will be activated each time you play a disc.
If the radio is on or off, the disc will begin to play
automatically.
To insert multiple discs, do the following:
1. Turn the ignition on.
2. Press and hold the LOAD side of the LOAD CD
button for two seconds.
You will hear a beep and the light, located to the
right of the slot, will begin to ¯ash and LOAD
ALL will appear on the display.3. Once the light stops ¯ashing and turns green, load
a disc. Insert the disc partway into the slot, label
side up. The player will pull the disc in.
Once the disc is loaded, the light will begin ¯ashing
again. Once the light stops ¯ashing and turns
green you can load another disc. The disc player
takes up to six discs. Do not try to load more
than six.
To load more than one disc but less than six, complete
Steps 1 through 3. When you have ®nished loading
discs, with the radio on or off, press the LOAD side of
the LOAD CD button to cancel the loading function. The
radio will begin to play the last CD loaded.
When a disc is inserted, the CD symbol will be
displayed. If more than one disc has been loaded, a
number for each disc will be displayed. If you select an
equalization setting for your disc, it will be activated
each time you play a disc.
If the radio is on or off, the last disc loaded will begin to
play automatically.
As each new track starts to play, the track number will
appear on the display.
3-66
Page 185 of 386

Playing a Speci®c Loaded
Compact Disc
For every CD loaded, a number will appear on the radio
display. To play a speci®c CD, ®rst press the CD AUX
button to start playing a CD. Then press the numbered
pushbutton that corresponds to the CD you want to
play. A small bar will appear under the CD number that
is playing, and the track number will appear.
If an error appears on the radio display, see ªCompact
Disc Messagesº later in this section.
LOAD CD
Z(Eject):Pressing the CD eject side of
this button will eject a single disc or multiple discs.
To eject the disc that is currently playing, press
and release this button. To eject multiple discs, press
and hold this button for two seconds. You will hear
a beep and the light will ¯ash to let you know when a
disc is being ejected.
REMOVE CD will be displayed. You can now remove
the disc. If the disc is not removed, after 25 seconds, the
disc will be automatically pulled back into the receiver.
If you try to push the disc back into the receiver,
before the 25 second time period is complete, the
receiver will sense an error and will try to eject the disc
several times before stopping.Do not repeatedly press the CD eject side of the
LOAD CD eject button to eject a disc after you have
tried to push it in manually. The receivers 25-second
eject timer will reset at each press of eject, which
will cause the receiver to not eject the disc until the
25-second time period has elapsed.
Once the player stops and the disc is ejected, remove
the disc. After removing the disc, press the PWR
knob off and then on again. This will clear the
disc-sensing feature and enable discs to be loaded into
the player again.{REV (Reverse):Press and hold this button to
reverse quickly within a track. You will hear sound at a
reduced volume. Release it to play the passage.
The display will show elapsed time.
FWD
|(Forward):Press and hold this button to
advance quickly within a track. You will hear sound at a
reduced volume. Release it to play the passage. The
display will show elapsed time.
3-67
Page 189 of 386

Rear Seat Audio (RSA)
This feature allows rear seat passengers to listen to and
control any of the music sources: radio, cassette
tapes and CDs. However, the rear seat passengers can
only control the music sources that the front seat
passengers are not listening to. For example, rear seat
passengers may listen to a cassette tape or CD
through headphones, while the driver listens to the radio
through the front speakers. The rear seat passengers
have control of the volume for each set of headphones.
Be aware that the front seat audio controls always
have priority over the RSA controls. If the front seat
passengers switch the source for the main radio
to a remote source, the RSA will play the same remote
source.
Primary Radio Controls
The following function is controlled by the knob on the
main radio:
PWR (Power):Push this knob twice to turn RSA off.
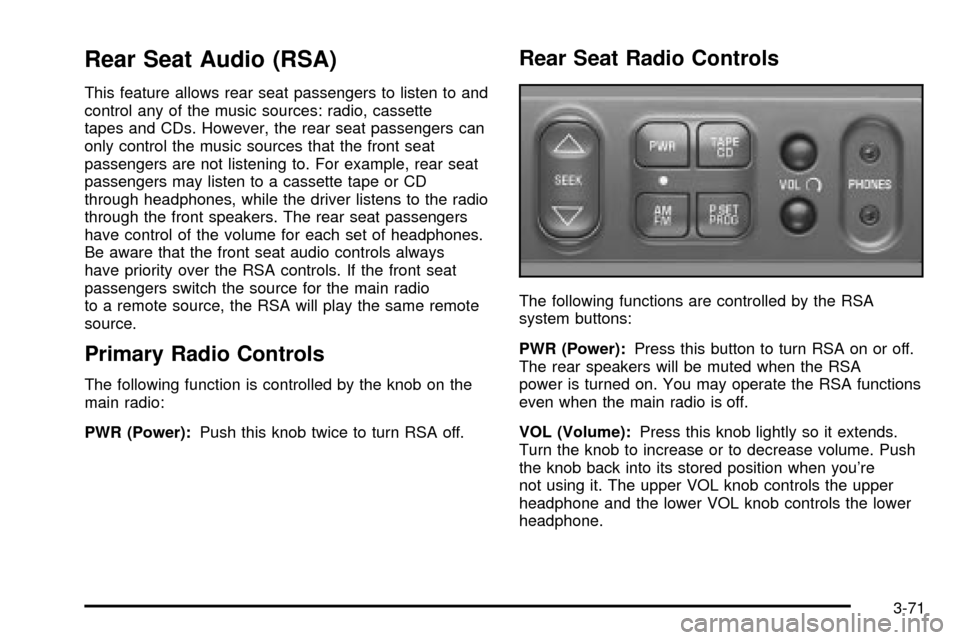
Rear Seat Radio Controls
The following functions are controlled by the RSA
system buttons:
PWR (Power):Press this button to turn RSA on or off.
The rear speakers will be muted when the RSA
power is turned on. You may operate the RSA functions
even when the main radio is off.
VOL (Volume):Press this knob lightly so it extends.
Turn the knob to increase or to decrease volume. Push
the knob back into its stored position when you're
not using it. The upper VOL knob controls the upper
headphone and the lower VOL knob controls the lower
headphone.
3-71
Page 191 of 386

Theft-Deterrent Feature
(Non-RDS Radios)
THEFTLOCKžis designed to discourage theft of your
radio. The feature works automatically by learning
a portion of the Vehicle Identi®cation Number (VIN).
If the radio is moved to a different vehicle, it will
not operate and LOC will be displayed.
With THEFTLOCK
žactivated, your radio will not
operate if stolen.
Theft-Deterrent Feature
(RDS Radios)
THEFTLOCKžis designed to discourage theft of your
radio. The feature works automatically by learning
a portion of the Vehicle Identi®cation Number (VIN).
If the radio is moved to a different vehicle, it will
not operate and LOCKED will be displayed.When the radio and vehicle are turned off, the blinking
red light indicates that THEFTLOCK
žis armed.
With THEFTLOCK
žactivated, your radio will not operate
if stolen.
Understanding Radio Reception
AM
The range for most AM stations is greater than for FM,
especially at night. The longer range, however, can
cause stations to interfere with each other. AM can pick
up noise from things like storms and power lines. Try
reducing the treble to reduce this noise if you ever get it.
FM
FM stereo will give you the best sound, but FM signals
will reach only about 10 to 40 miles (16 to 65 km).
Tall buildings or hills can interfere with FM signals,
causing the sound to come and go.
3-73
Page 192 of 386

Care of Your Cassette Tape Player
A tape player that is not cleaned regularly can cause
reduced sound quality, ruined cassettes or a damaged
mechanism. Cassette tapes should be stored in their
cases away from contaminants, direct sunlight and
extreme heat. If they aren't, they may not operate
properly or may cause failure of the tape player.
Your tape player should be cleaned regularly after every
50 hours of use. Your radio may display CLEAN to
indicate that you have used your tape player for
50 hours without resetting the tape clean timer. If this
message appears on the display, your cassette
tape player needs to be cleaned. It will still play tapes,
but you should clean it as soon as possible to
prevent damage to your tapes and player. If you notice
a reduction in sound quality, try a known good
cassette to see if the tape or the tape player is at fault.
If this other cassette has no improvement in sound
quality, clean the tape player.
For best results, use a scrubbing action, non-abrasive
cleaning cassette with pads which scrub the tape
head as the hubs of the cleaner cassette turn. The
recommended cleaning cassette is available through
your dealership.When cleaning the cassette tape player with the
recommended non-abrasive cleaning cassette, it is
possible that the cassette may eject, because the cut
tape detection feature on your radio may recognize it as
a broken tape, in error. To prevent the cleaning
cassette from being ejected, use the following steps:
1. Turn the ignition on.
2. Turn the radio off.
3. Press and hold the TAPE DISC button for ®ve
seconds. READY will appear on the display and
the cassette symbol will ¯ash for ®ve seconds.
4. Insert the scrubbing action cleaning cassette.
5. Eject the cleaning cassette after the manufacturer's
recommended cleaning time.
When the cleaning cassette has been ejected, the cut
tape detection feature is active again.
You may also choose a non-scrubbing action, wet-type
cleaner which uses a cassette with a fabric belt to
clean the tape head. This type of cleaning cassette will
not eject on its own. A non-scrubbing action cleaner
may not clean as thoroughly as the scrubbing type
cleaner. The use of a non-scrubbing action, dry-type
cleaning cassette is not recommended.
3-74
Page 193 of 386

After you clean the player, press and hold the eject
button for ®ve seconds to reset the CLEAN indicator.
The radio will display --- or CLEANED to show the
indicator was reset.
Cassettes are subject to wear and the sound quality
may degrade over time. Always make sure the cassette
tape is in good condition before you have your tape
player serviced.
Care of Your CDs
Handle discs carefully. Store them in their original cases
or other protective cases and away from direct sunlight
and dust. If the surface of a disc is soiled, dampen
a clean, soft cloth in a mild, neutral detergent solution
and clean it, wiping from the center to the edge.
Be sure never to touch the side without writing when
handling discs. Pick up discs by grasping the outer
edges or the edge of the hole and the outer edge.
Care of Your CD Player
The use of CD lens cleaner discs is not advised, due to
the risk of contaminating the lens of the CD optics
with lubricants internal to the CD mechanism.
Fixed Mast Antenna
The ®xed mast antenna can withstand most car washes
without being damaged. If the mast should ever
become slightly bent, you can straighten it out by hand.
If the mast is badly bent, as it might be by vandals,
you should replace it.
Check occasionally to be sure the mast is still tightened
to the fender. If tightening is required, tighten by
hand, then with a wrench one quarter turn.
Chime Level Adjustment
The radio is the vehicle chime producer. The chime is
produced from the driver's side front door speakers.
To change the volume level, press and hold
pushbutton 6 with the ignition on and the radio power
off. The chime volume level will change from the normal
level to loud, and LOUD will be displayed on the
radio. To change back to the default or normal setting,
press and hold pushbutton 6 again. The chime level
will change from the loud level to normal, and NORMAL
will be displayed. Each time the chime volume is
changed, three chimes will sound to indicate the change.
Removing the radio and not replacing it with a factory
radio or chime module will disable vehicle chimes.
3-75