2003 BMW 760LI SEDAN check engine
[x] Cancel search: check enginePage 15 of 229
At a glance
Controls
Driving tips
Communications
Navigation
Entertainment
Mobility
Reference
13
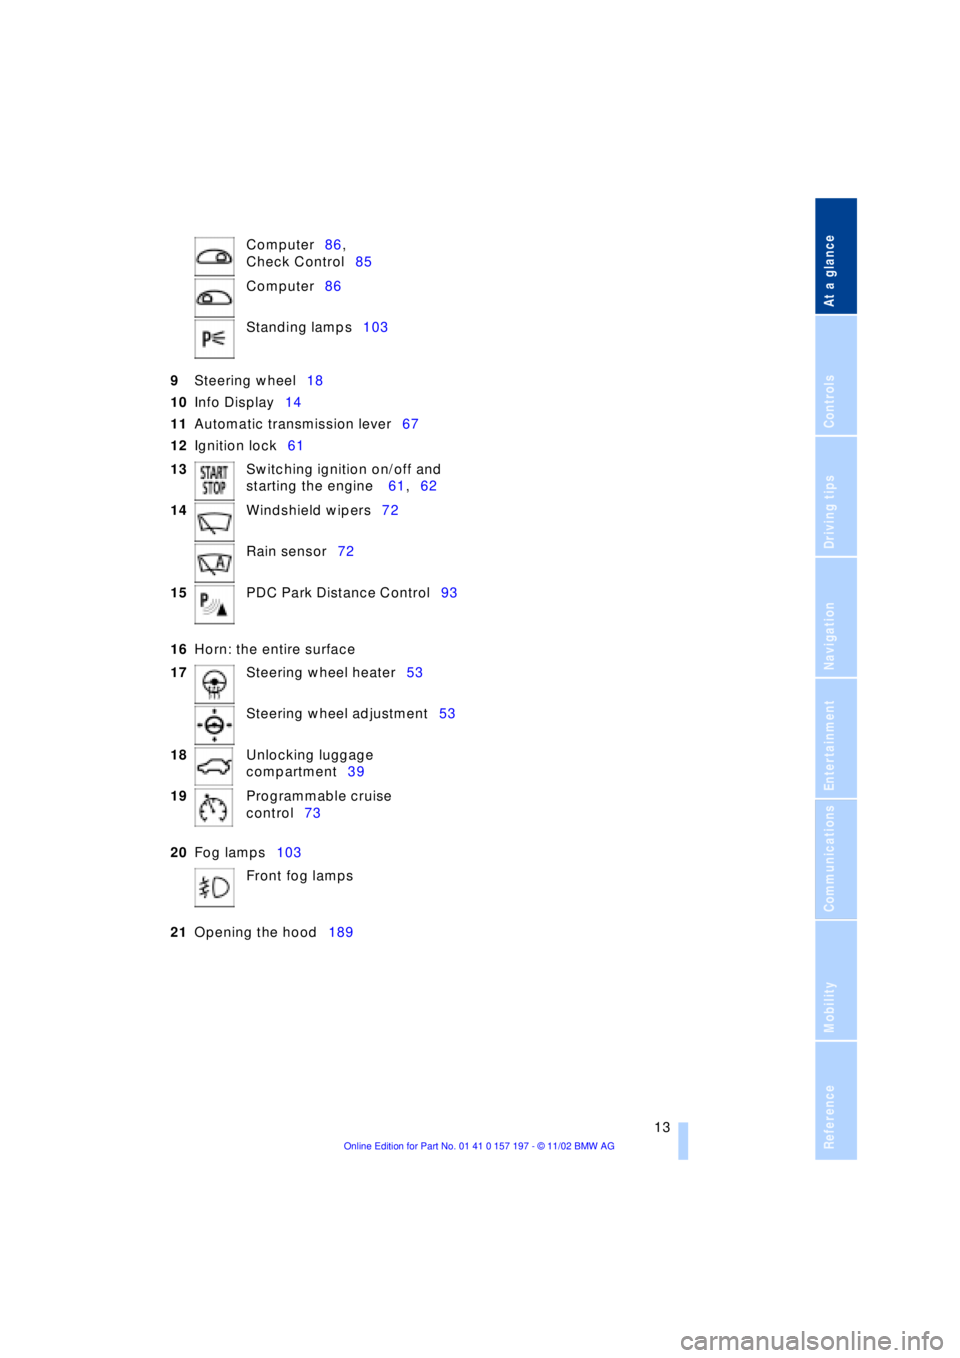
9Steering wheel18
10Info Display14
11Automatic transmission lever67
12Ignition lock61
16Horn: the entire surface
20Fog lamps103
21Opening the hood189 Computer86,
Check Control85
Computer86
Standing lamps103
13Switching ignition on/off and
starting the engine 61,62
14Windshield wipers72
Rain sensor72
15PDC Park Distance Control93
17Steering wheel heater53
Steering wheel adjustment53
18Unlocking luggage
compartment39
19Programmable cruise
control73
Front fog lamps
Page 17 of 229
At a glance
Controls
Driving tips
Communications
Navigation
Entertainment
Mobility
Reference
15
Indicator and warning lamps
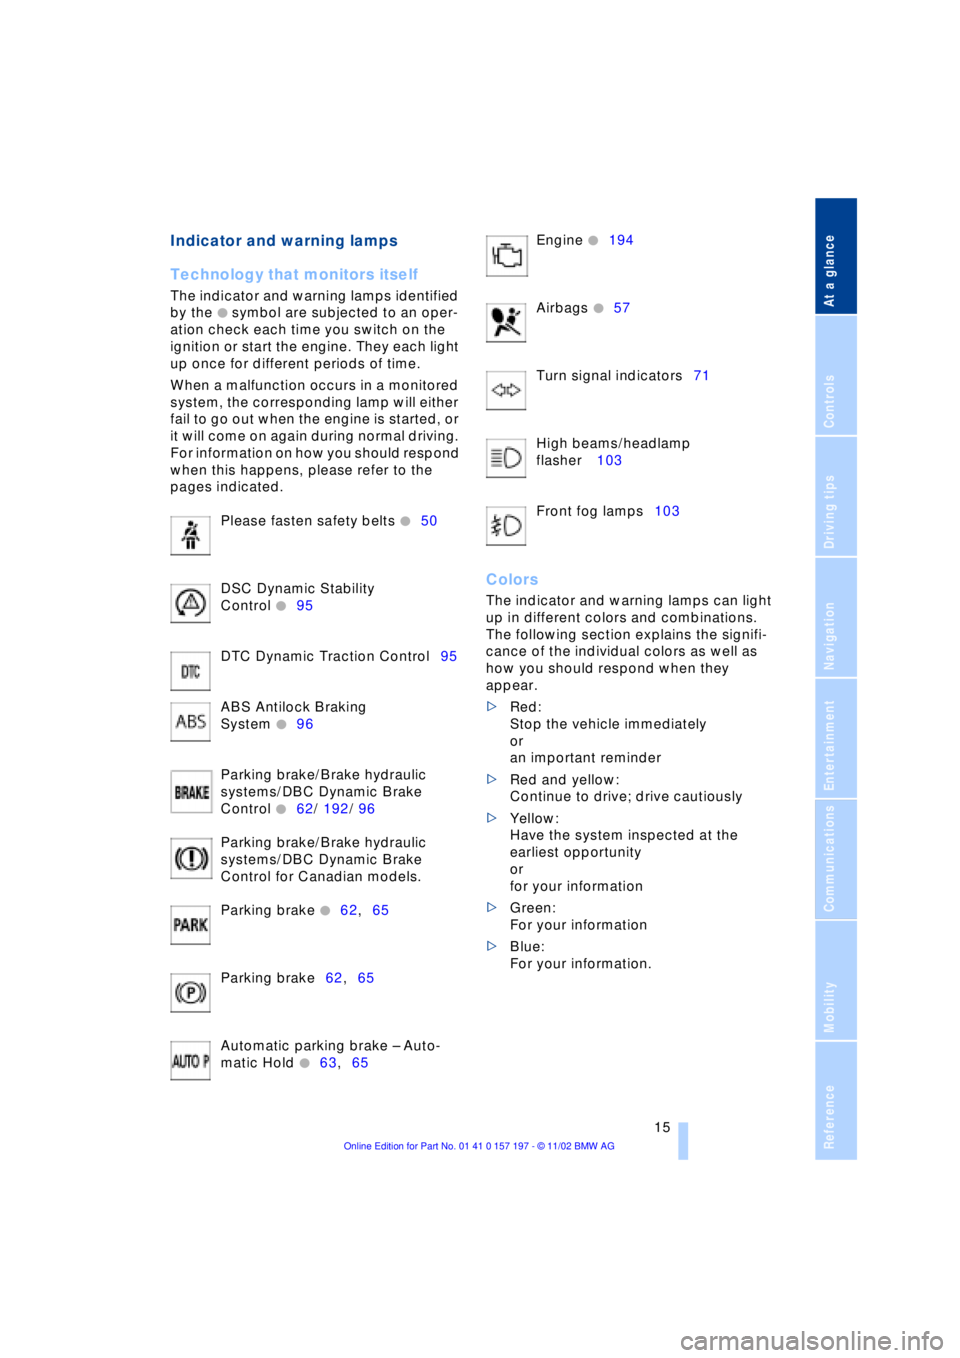
Technology that monitors itself
The indicator and warning lamps identified
by the
+ symbol are subjected to an oper-
ation check each time you switch on the
ignition or start the engine. They each light
up once for different periods of time.
When a malfunction occurs in a monitored
system, the corresponding lamp will either
fail to go out when the engine is started, or
it will come on again during normal driving.
For information on how you should respond
when this happens, please refer to the
pages indicated.
Please fasten safety belts
+50
DSC Dynamic Stability
Control
+95
DTC Dynamic Traction Control95
ABS Antilock Braking
System
+96
Parking brake/Brake hydraulic
systems/DBC Dynamic Brake
Control
+62/ 192/ 96
Parking brake/Brake hydraulic
systems/DBC Dynamic Brake
Control for Canadian models.
Parking brake
+62,65
Parking brake62,65
Automatic parking brake Ð Auto-
matic Hold
+63,65 Engine
+194
Airbags
+57
Turn signal indicators71
High beams/headlamp
flasher 103
Front fog lamps103
Colors
The indicator and warning lamps can light
up in different colors and combinations.
The following section explains the signifi-
cance of the individual colors as well as
how you should respond when they
appear.
>Red:
Stop the vehicle immediately
or
an important reminder
>Red and yellow:
Continue to drive; drive cautiously
>Yellow:
Have the system inspected at the
earliest opportunity
or
for your information
>Green:
For your information
>Blue:
For your information.
Page 67 of 229
At a glance
Controls
Driving tips
Communications
Navigation
Entertainment
Mobility
Reference
65
For your safety
Automatic Hold is automatically deacti-
vated when
>the engine is switched off
>the system detects that the driver's seat
is not occupied while the engine is run-
ning
>the hood is opened while the engine is
running
>the luggage compartment is opened
with the transmission in reverse while
the engine is running, and
>when the parking brake is used to bring
the vehicle to a stop.
The indicator lamp changes from
green to red, and the AUTO P letters in the
Info Display disappear.
Before starting off again, briefly press the
button to disengage the parking brake
manually, refer to page 63, or reactivate
Automatic Hold, refer to page 64.
Before leaving the vehicle with the
engine running, always move the
automatic transmission's selector lever to
position P and ensure that the parking
brake is engaged. The vehicle could start to
roll if you fail to observe these precautions.
Never leave an unattended vehicle with the
engine running, as such a vehicle repre-
sents a potential safety hazard.<
Automatic Hold is automatically
deactivated whenever the system
detects any tendency for the wheels to spin
in response to slippery road surfaces. Note
the status reports in the Check Control.
You can find more detailed information on
Check Control on page 85.<
Malfunctions
If a malfunction occurs, the indicator
lamp lights up yellow in the Info Dis-
play and a status report will appear in the
Check Control. Please note any supple-
mentary information that appears in the
Control Display.
Releasing the parking brake
manually
You can respond to any interruptions in the
supply of electrical power, for instance, if
the battery is discharged or disconnected,
by releasing the parking brake manually.
Before proceeding to release the
parking brake manually, and each
time you park the vehicle without engaging
the parking brake, always ensure that the
automatic transmission's selector lever is
in position P, refer to page 67. Note the
range indicated in the Info Display.
If it is not possible to avoid parking on an
extremely steep slope, use some supple-
mentary means, such as a wheel chock, to
make certain that the vehicle will not roll,
refer to page 198. Otherwise the danger
exists that the vehicle could roll when
parked on a very steep hill.<
Should it also be necessary to release the
automatic transmission's lockout manually,
for instance, if the battery is discharged,
always adhere to the following sequence:
1.If necessary, start by manually releasing
the parking brake
2.Then release the automatic transmis-
sion's lockout manually, refer to
page 70.
Jump-starting and towing, refer to
pages 202 and 203.
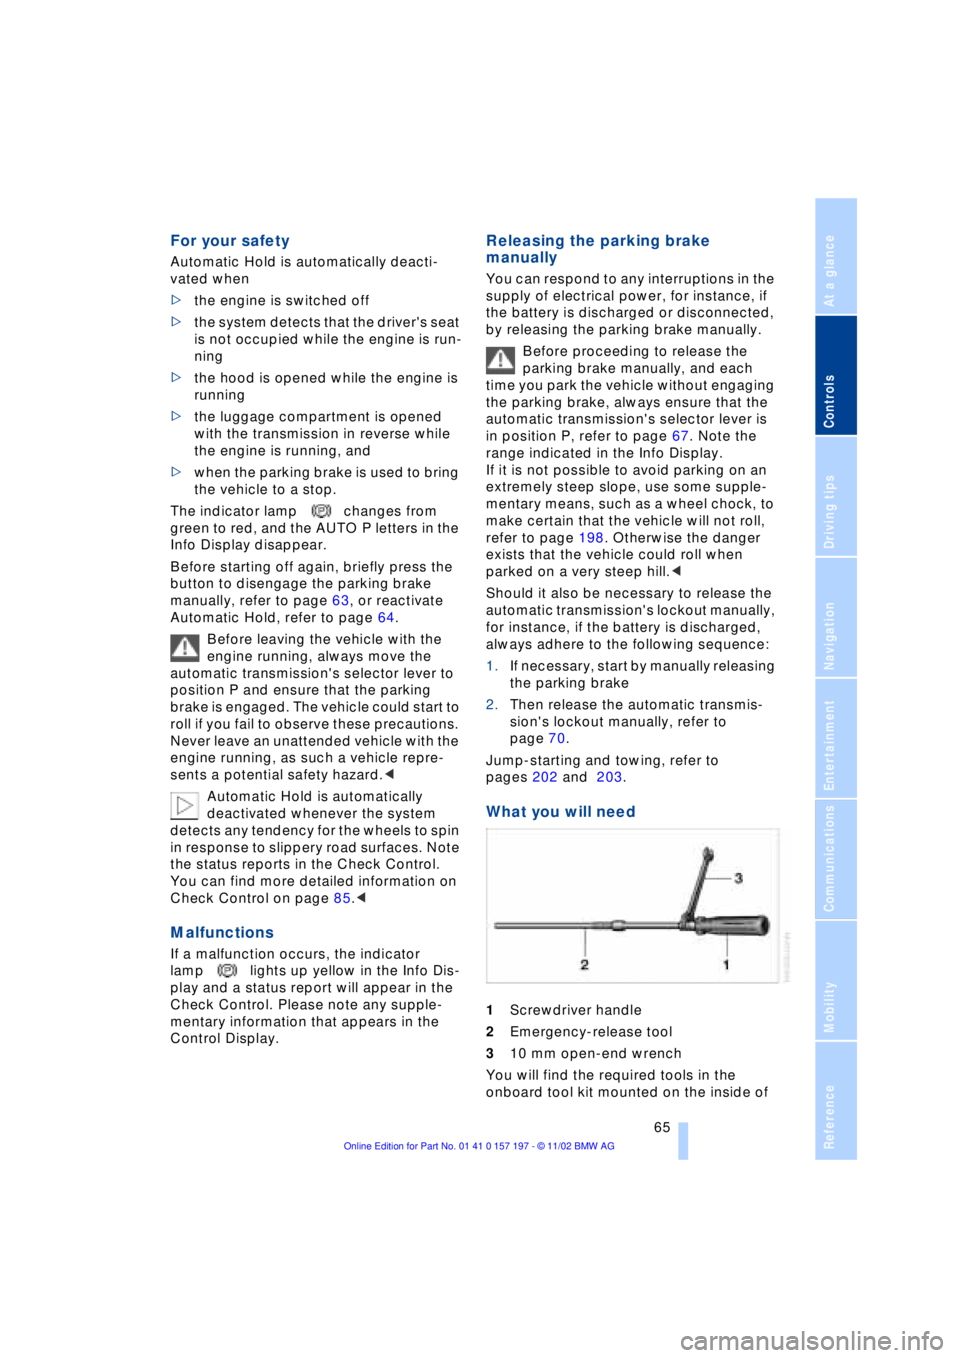
What you will need
1Screwdriver handle
2Emergency-release tool
310 mm open-end wrench
You will find the required tools in the
onboard tool kit mounted on the inside of
Page 69 of 229
At a glance
Controls
Driving tips
Communications
Navigation
Entertainment
Mobility
Reference
67
Automatic transmission
with L mode
While you can drive as with a conventional
automatic transmission, you also have the
option of retaining your current gear selec-
tion with the L/D button on the steering
wheel, refer to page 68.
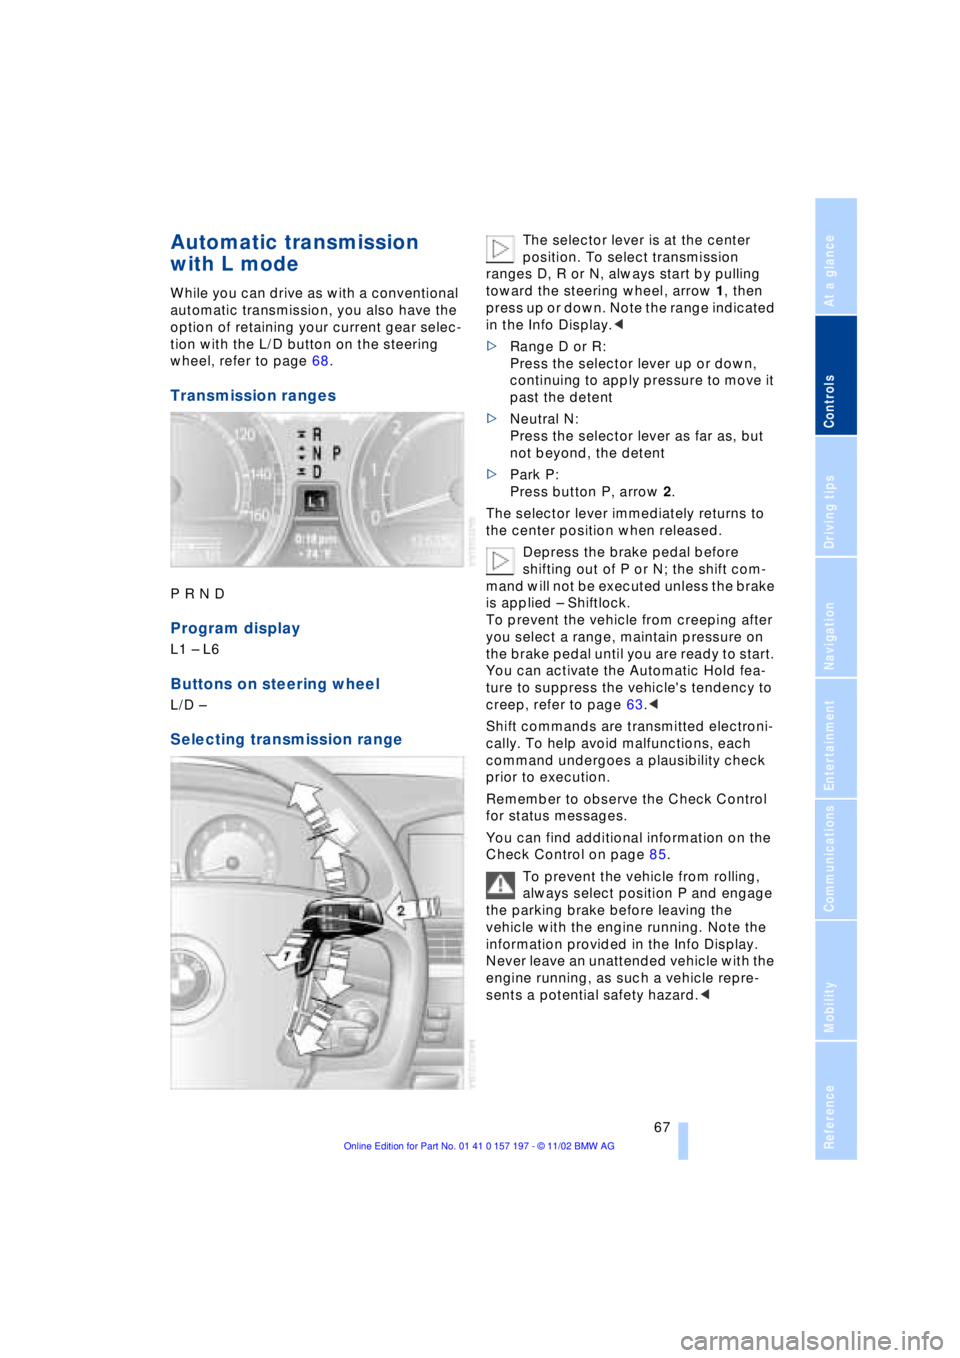
Transmission ranges
P R N D
Program display
L1 Ð L6
Buttons on steering wheel
L/D Ð
Selecting transmission range
The selector lever is at the center
position. To select transmission
ranges D, R or N, always start by pulling
toward the steering wheel, arrow 1, then
press up or down. Note the range indicated
in the Info Display.<
>Range D or R:
Press the selector lever up or down,
continuing to apply pressure to move it
past the detent
>Neutral N:
Press the selector lever as far as, but
not beyond, the detent
>Park P:
Press button P, arrow 2.
The selector lever immediately returns to
the center position when released.
Depress the brake pedal before
shifting out of P or N; the shift com-
mand will not be executed unless the brake
is applied Ð Shiftlock.
To prevent the vehicle from creeping after
you select a range, maintain pressure on
the brake pedal until you are ready to start.
You can activate the Automatic Hold fea-
ture to suppress the vehicle's tendency to
creep, refer to page 63.<
Shift commands are transmitted electroni-
cally. To help avoid malfunctions, each
command undergoes a plausibility check
prior to execution.
Remember to observe the Check Control
for status messages.
You can find additional information on the
Check Control on page 85.
To prevent the vehicle from rolling,
always select position P and engage
the parking brake before leaving the
vehicle with the engine running. Note the
information provided in the Info Display.
Never leave an unattended vehicle with the
engine running, as such a vehicle repre-
sents a potential safety hazard.<
Page 70 of 229
Driving
68
P Ñ Park
Press the button.
Select only when the vehicle is stationary.
The transmission lockout prevents the rear
wheels from turning. The lockout disen-
gages when you press the selector lever
toward D, N or R while the engine is run-
ning.
P is automatically engaged when you
remove the remote control unit from
the ignition lock after parking the vehicle.<
R Ñ Reverse
Press the selector lever upward, con-
tinuing to apply pressure to move it past
the detent. Select R only when the vehicle
is stationary.
N Ð Neutral
Press the selector lever as far as the
detent, but no further. Select N only if your
journey is interrupted for a long period.
>From D press the selector lever up
>From R press the selector lever down.
Note the arrows indicating direction in the
range display.
N is selected automatically whenever
the remote control unit remains
locked in the ignition lock after the ignition
is switched off. This function is useful in
automatic car washes, etc.
After approx. 30 minutes the system auto-
matically engages P. Remember to
observe the Check Control for status mes-
sages.<
D Drive Ð Automatic
Press the selector lever down, con-
tinuing beyond the detent. This is the range
recommended for normal vehicle opera-
tion. All forward gears are available.
Under normal operating conditions, fuel
consumption is lowest when driving in
position D.
Kickdown
The kickdown mode provides maximum
acceleration.
Press the accelerator pedal beyond full-
throttle detent point.
L mode
We recommend the L mode for times when
you wish to suppress certain shifts, for
instance, when ascending or descending
steep grades.
When the L mode is activated the transmis-
sion remains in your current gear, which
also appears in the Info Display, refer to
page 67. The transmission continues to
shift through the available ratios, but does
not proceed beyond the gear in the display.
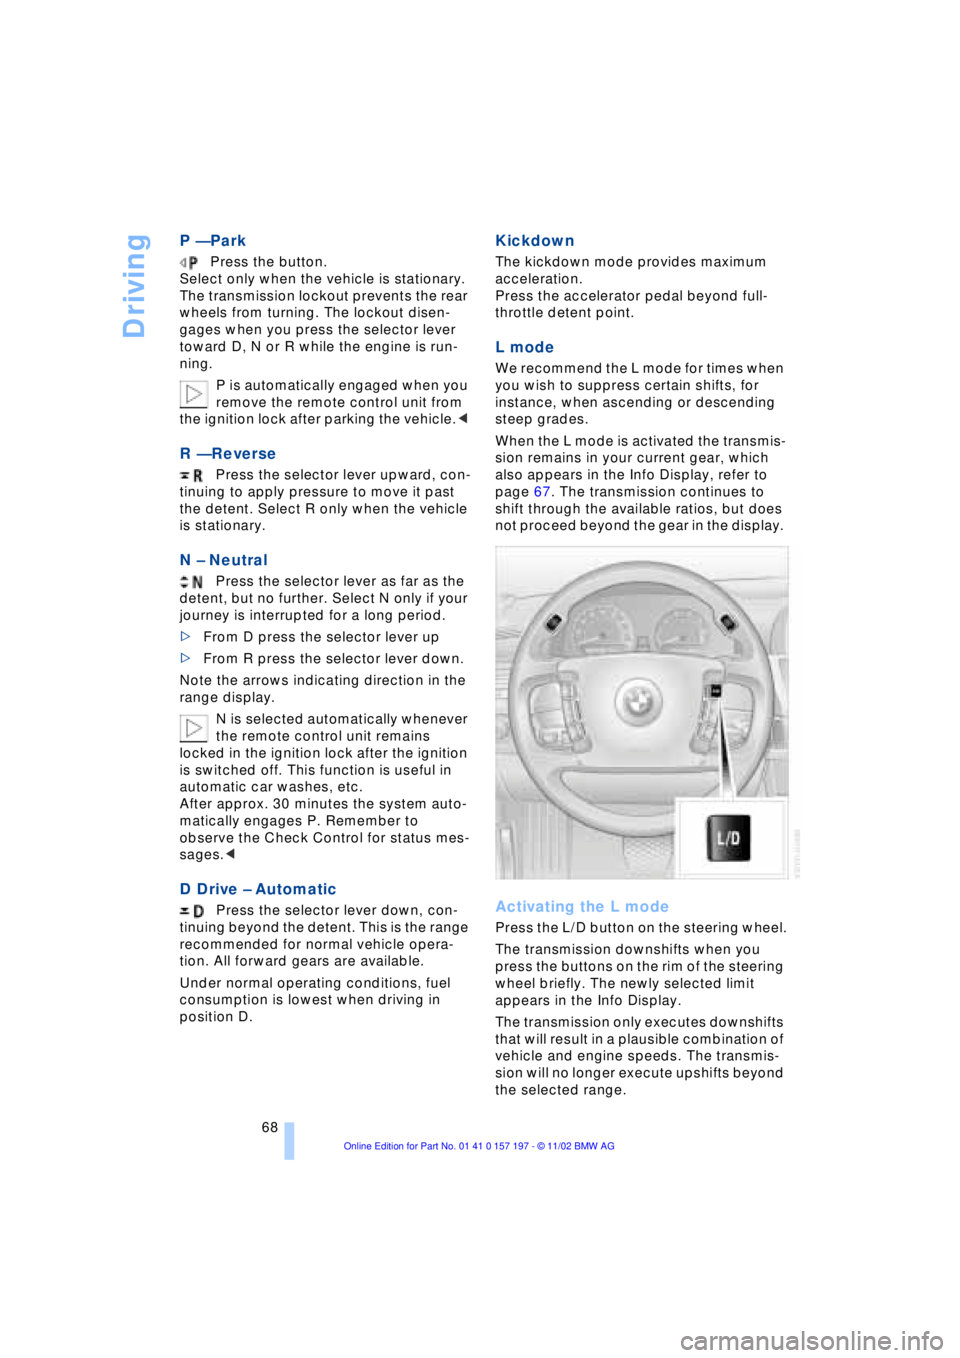
Activating the L mode
Press the L/D button on the steering wheel.
The transmission downshifts when you
press the buttons on the rim of the steering
wheel briefly. The newly selected limit
appears in the Info Display.
The transmission only executes downshifts
that will result in a plausible combination of
vehicle and engine speeds. The transmis-
sion will no longer execute upshifts beyond
the selected range.
Page 72 of 229
Driving
70 To obtain maximum acceleration, for
passing maneuvers, etc., during
operation in the manual mode, use the
kickdown or downshift manually.<
Malfunctions
A status report will appear in the Check
Control to alert you to any malfunctions in
the transmission-control system. Please
note any supplementary information that
appears in the Control Display. The direc-
tional arrows also start to flash in the Info
Display.
While it will remain still possible to move
the selector lever to any desired position,
the transmission will revert to operation in
its default mode with only a limited number
of forward gears.
Some types of malfunction will make it
impossible to engage all gears.
The engine may respond with reduced
output when accelerating from a standing
start.
If this happens, avoid extreme engine loads
and consult the nearest BMW center.
If no status messages appear in the
Info Display you should accelerate
carefully to confirm that you are driving in
the desired direction.
Never work in the engine compartment
with any of the forward or reverse gears
engaged, as the vehicle could start to
move. Engage the parking brake, refer to
page 62.<
Releasing transmission lockout
manually
You can respond to any interruptions in the
supply of electrical power, for instance, if
the battery is discharged or disconnected,
by releasing the transmission lockout man-
ually.
To prevent the drive wheels from
locking up and sliding, the transmis-
sion lockout must always be released man-
ually before the vehicle is towed.< Press the brake pedal before
releasing the transmission lockout
manually. If the brakes are not applied, the
vehicle could start to roll if parked on a
steep slope.
The transmission lockout should only be
released for towing. Remember to engage
the transmission lockout when you repark
the vehicle after moving it.
Should it also be necessary to release the
parking brake manually, owing to a dis-
charged battery, etc., always adhere to the
following sequence:
1.Start by manually releasing the parking
brake, refer to page 65
2.Then proceed to manually release the
transmission lockout.<
Jump-starting and towing, refer to
pages 202 and 203.
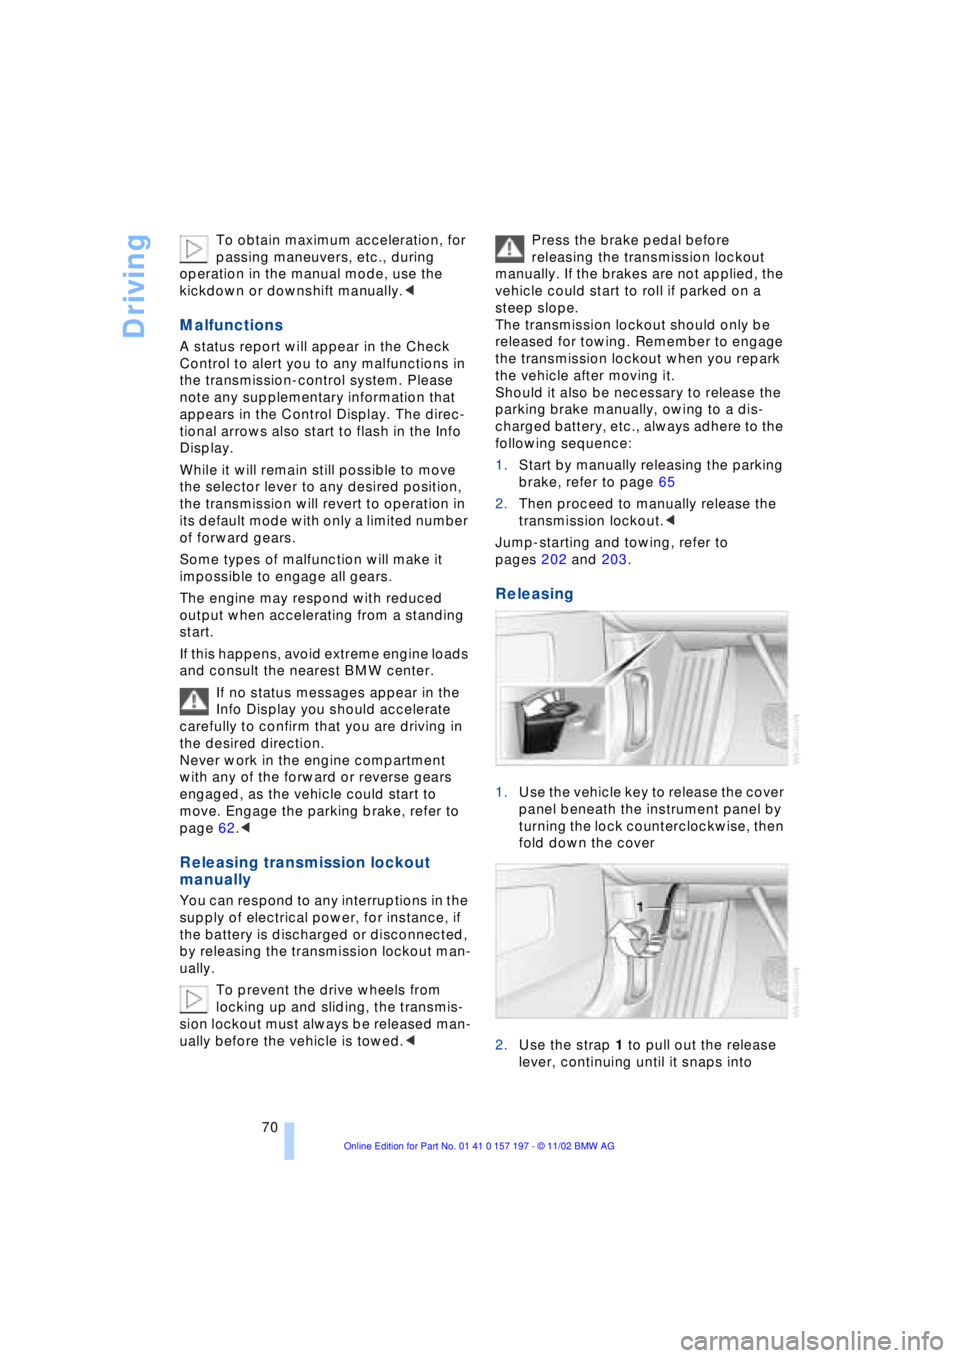
Releasing
1.Use the vehicle key to release the cover
panel beneath the instrument panel by
turning the lock counterclockwise, then
fold down the cover
2.Use the strap 1 to pull out the release
lever, continuing until it snaps into
Page 84 of 229
Everything under control
82
Everything under control
Odometer, outside temperature display, clock
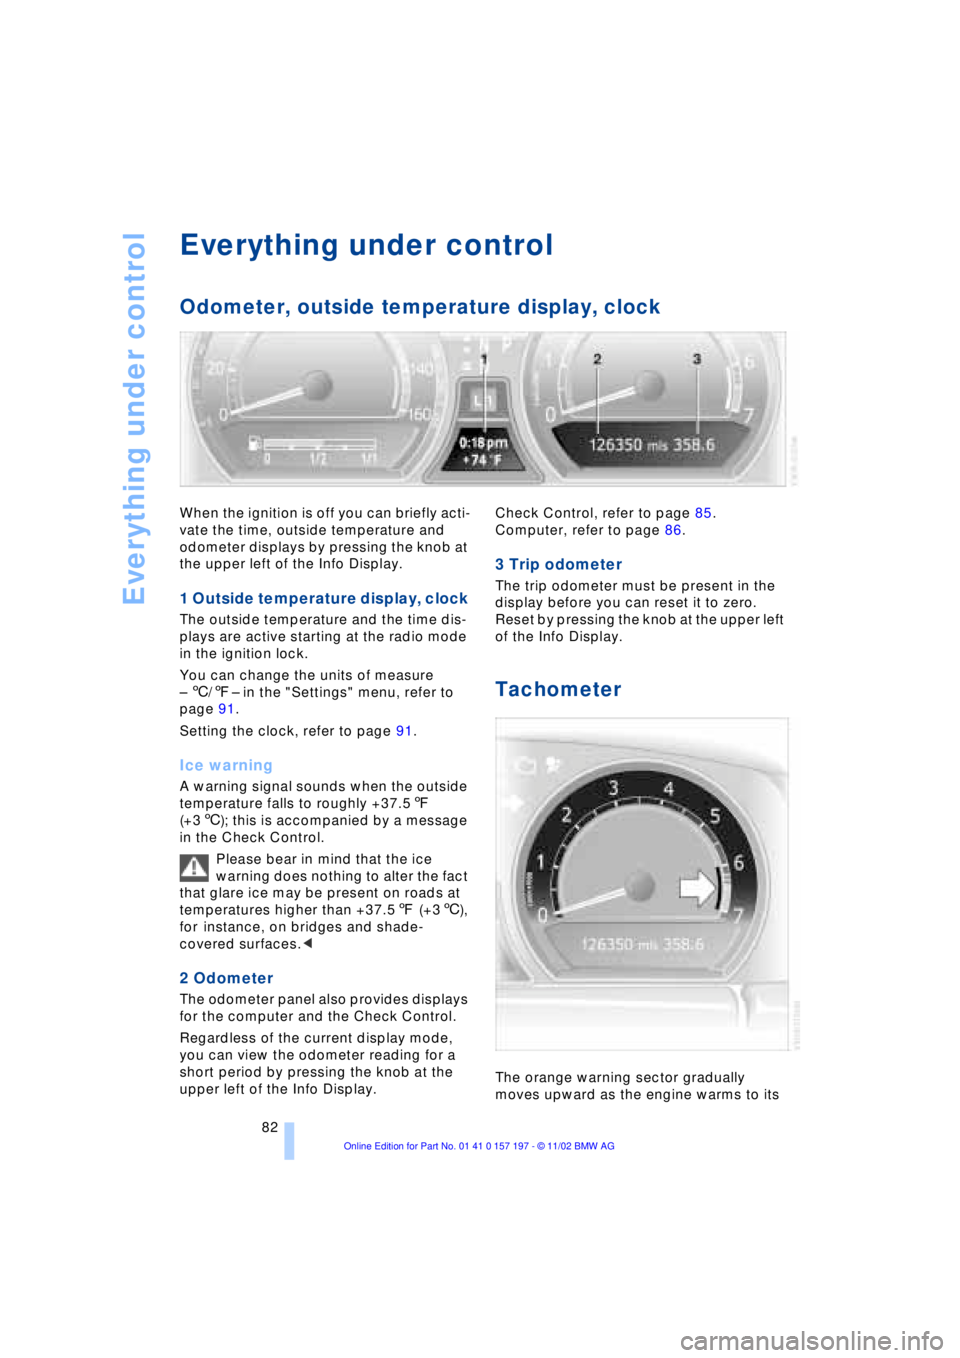
When the ignition is off you can briefly acti-
vate the time, outside temperature and
odometer displays by pressing the knob at
the upper left of the Info Display.
1 Outside temperature display, clock
The outside temperature and the time dis-
plays are active starting at the radio mode
in the ignition lock.
You can change the units of measure
Ð 6/7Ð in the "Settings" menu, refer to
page 91.
Setting the clock, refer to page 91.
Ice warning
A warning signal sounds when the outside
temperature falls to roughly +37.57
(+36); this is accompanied by a message
in the Check Control.
Please bear in mind that the ice
warning does nothing to alter the fact
that glare ice may be present on roads at
temperatures higher than +37.57 (+36),
for instance, on bridges and shade-
covered surfaces.<
2 Odometer
The odometer panel also provides displays
for the computer and the Check Control.
Regardless of the current display mode,
you can view the odometer reading for a
short period by pressing the knob at the
upper left of the Info Display. Check Control, refer to page 85.
Computer, refer to page 86.
3 Trip odometer
The trip odometer must be present in the
display before you can reset it to zero.
Reset by pressing the knob at the upper left
of the Info Display.
Tachometer
The orange warning sector gradually
moves upward as the engine warms to its
Page 89 of 229
At a glance
Controls
Driving tips
Communications
Navigation
Entertainment
Mobility
Reference
87
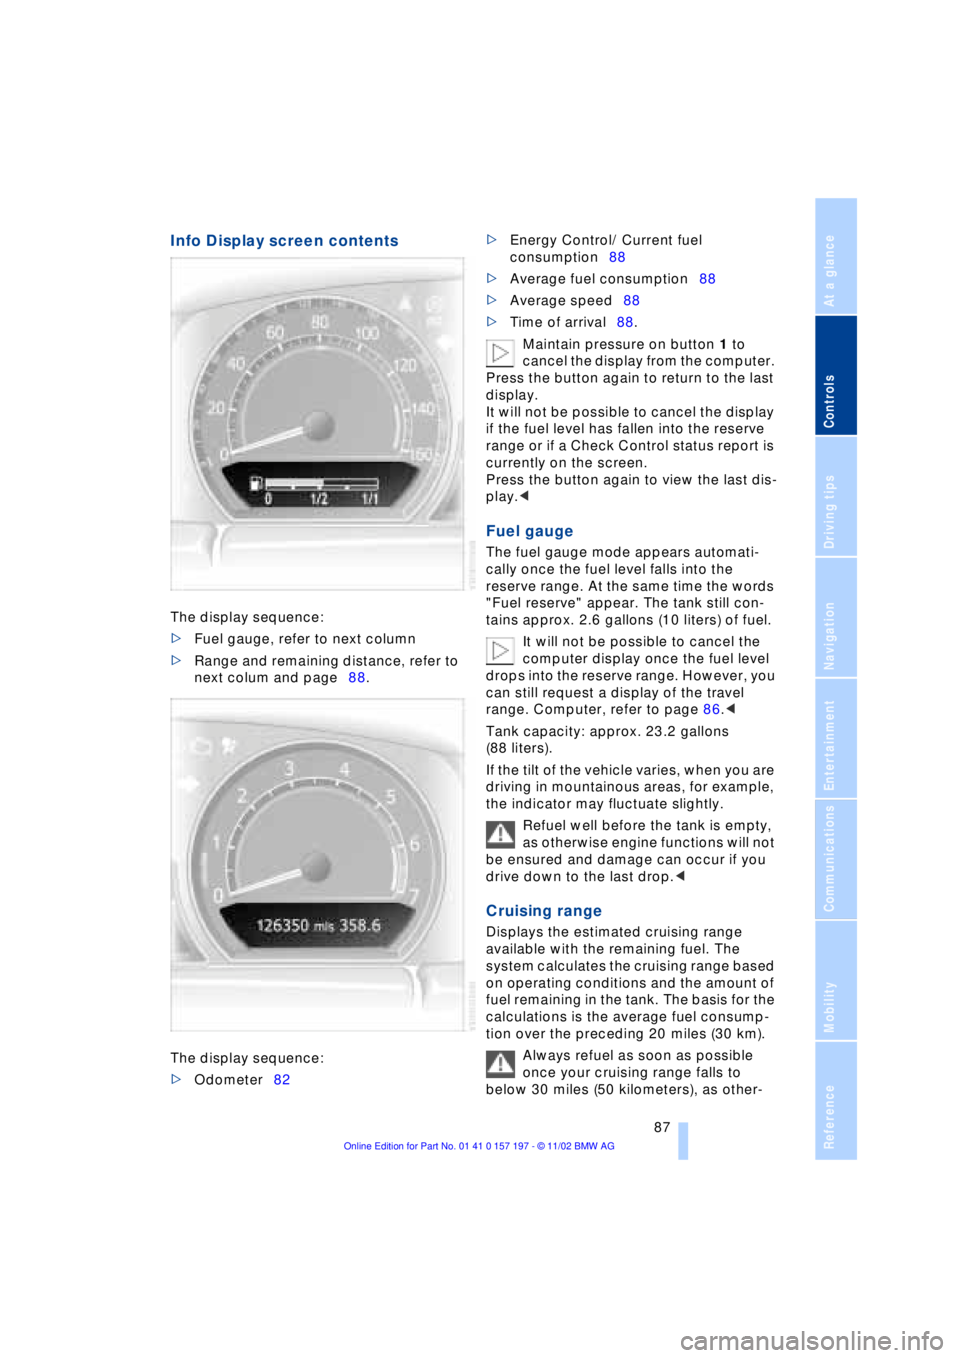
Info Display screen contents
The display sequence:
>Fuel gauge, refer to next column
>Range and remaining distance, refer to
next colum and page88.
The display sequence:
>Odometer82 >Energy Control/ Current fuel
consumption88
>Average fuel consumption88
>Average speed88
>Time of arrival88.
Maintain pressure on button 1 to
cancel the display from the computer.
Press the button again to return to the last
display.
It will not be possible to cancel the display
if the fuel level has fallen into the reserve
range or if a Check Control status report is
currently on the screen.
Press the button again to view the last dis-
play.<
Fuel gauge
The fuel gauge mode appears automati-
cally once the fuel level falls into the
reserve range. At the same time the words
"Fuel reserve" appear. The tank still con-
tains approx. 2.6 gallons (10 liters) of fuel.
It will not be possible to cancel the
computer display once the fuel level
drops into the reserve range. However, you
can still request a display of the travel
range. Computer, refer to page 86.<
Tank capacity: approx. 23.2 gallons
(88 liters).
If the tilt of the vehicle varies, when you are
driving in mountainous areas, for example,
the indicator may fluctuate slightly.
Refuel well before the tank is empty,
as otherwise engine functions will not
be ensured and damage can occur if you
drive down to the last drop.<
Cruising range
Displays the estimated cruising range
available with the remaining fuel. The
system calculates the cruising range based
on operating conditions and the amount of
fuel remaining in the tank. The basis for the
calculations is the average fuel consump-
tion over the preceding 20 miles (30 km).
Always refuel as soon as possible
once your cruising range falls to
below 30 miles (50 kilometers), as other-