2003 BMW 540I SEDAN warning
[x] Cancel search: warningPage 20 of 187
20n
Indicator and warning lamps
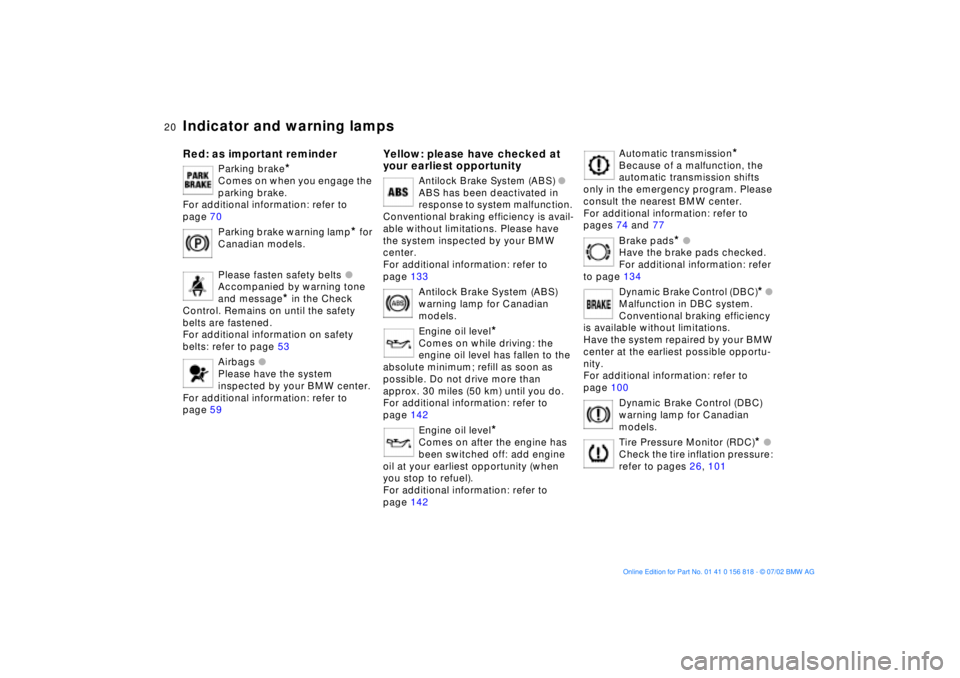
Red: as important reminder
Parking brake
*
Comes on when you engage the
parking brake.
For additional information: refer to
page 70
Parking brake warning lamp
*
for
Canadian models.
Please fasten safety belts
l
Accompanied by warning tone
and message
*
in the Check
Control. Remains on until the safety
belts are fastened.
For additional information on safety
belts: refer to page 53
Airbags
l
Please have the system
inspected by your BMW center.
For additional information: refer to
page 59
Yellow: please have checked at
your earliest opportunity
Antilock Brake System (ABS)
l
ABS has been deactivated in
response to system malfunction.
Conventional braking efficiency is avail-
able without limitations. Please have
the system inspected by your BMW
center.
For additional information: refer to
page 133
Antilock Brake System (ABS)
warning lamp for Canadian
models.
Engine oil level
*
Comes on while driving: the
engine oil level has fallen to the
absolute minimum; refill as soon as
possible. Do not drive more than
approx. 30 miles (50 km) until you do.
For additional information: refer to
page 142
Engine oil level
*
Comes on after the engine has
been switched off: add engine
oil at your earliest opportunity (when
you stop to refuel).
For additional information: refer to
page 142
Automatic transmission
*
Because of a malfunction, the
automatic transmission shifts
only in the emergency program. Please
consult the nearest BMW center.
For additional information: refer to
pages 74 and 77
Brake pads
*
l
Have the brake pads checked.
For additional information: refer
to page 134
Dynamic Brake Control (DBC)
*
l
Malfunction in DBC system.
Conventional braking efficiency
is available without limitations.
Have the system repaired by your BMW
center at the earliest possible opportu-
nity.
For additional information: refer to
page 100
Dynamic Brake Control (DBC)
warning lamp for Canadian
models.
Tire Pressure Monitor (RDC)
*
l
Check the tire inflation pressure:
refer to pages 26, 101
Page 21 of 187
21n
OverviewControlsMaintenanceRepairsDataIndex
Indicator and warning lamps
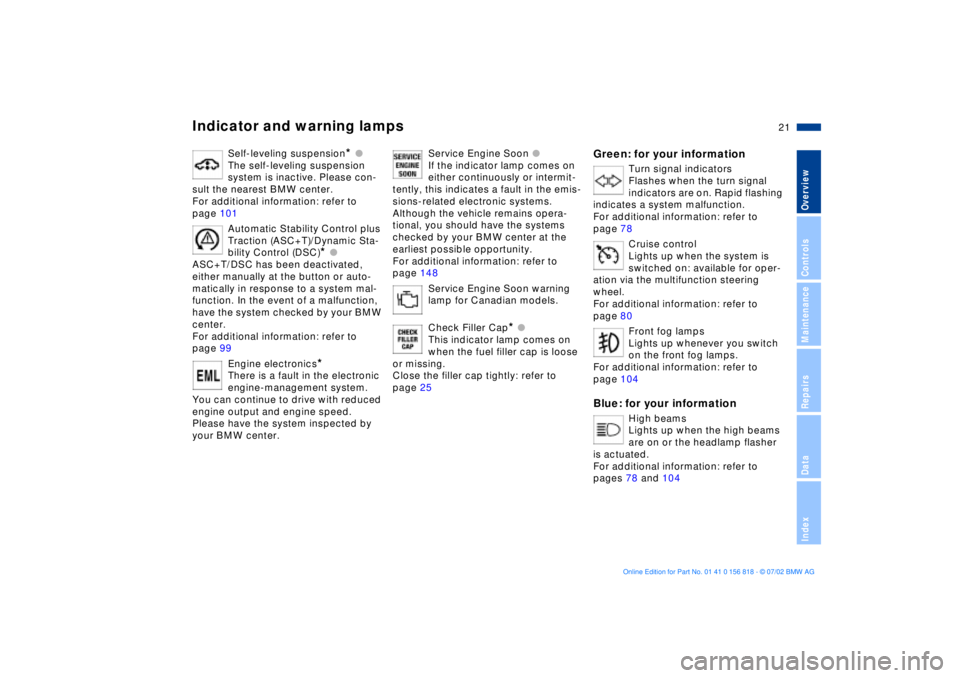
Self-leveling suspension
* l
The self-leveling suspension
system is inactive. Please con-
sult the nearest BMW center.
For additional information: refer to
page 101
Automatic Stability Control plus
Traction (ASC+T)/Dynamic Sta-
bility Control (DSC)
* l
ASC+T/DSC has been deactivated,
either manually at the button or auto-
matically in response to a system mal-
function. In the event of a malfunction,
have the system checked by your BMW
center.
For additional information: refer to
page 99
Engine electronics
*
There is a fault in the electronic
engine-management system.
You can continue to drive with reduced
engine output and engine speed.
Please have the system inspected by
your BMW center.
Service Engine Soon l
If the indicator lamp comes on
either continuously or intermit-
tently, this indicates a fault in the emis-
sions-related electronic systems.
Although the vehicle remains opera-
tional, you should have the systems
checked by your BMW center at the
earliest possible opportunity.
For additional information: refer to
page 148
Service Engine Soon warning
lamp for Canadian models.
Check Filler Cap
* l
This indicator lamp comes on
when the fuel filler cap is loose
or missing.
Close the filler cap tightly: refer to
page 25
Green: for your information
Turn signal indicators
Flashes when the turn signal
indicators are on. Rapid flashing
indicates a system malfunction.
For additional information: refer to
page 78
Cruise control
Lights up when the system is
switched on: available for oper-
ation via the multifunction steering
wheel.
For additional information: refer to
page 80
Front fog lamps
Lights up whenever you switch
on the front fog lamps.
For additional information: refer to
page 104
Blue: for your information
High beams
Lights up when the high beams
are on or the headlamp flasher
is actuated.
For additional information: refer to
pages 78 and 104
Page 23 of 187
23n
OverviewControlsMaintenanceRepairsDataIndex
Warning triangle
*
First-aid kit
*
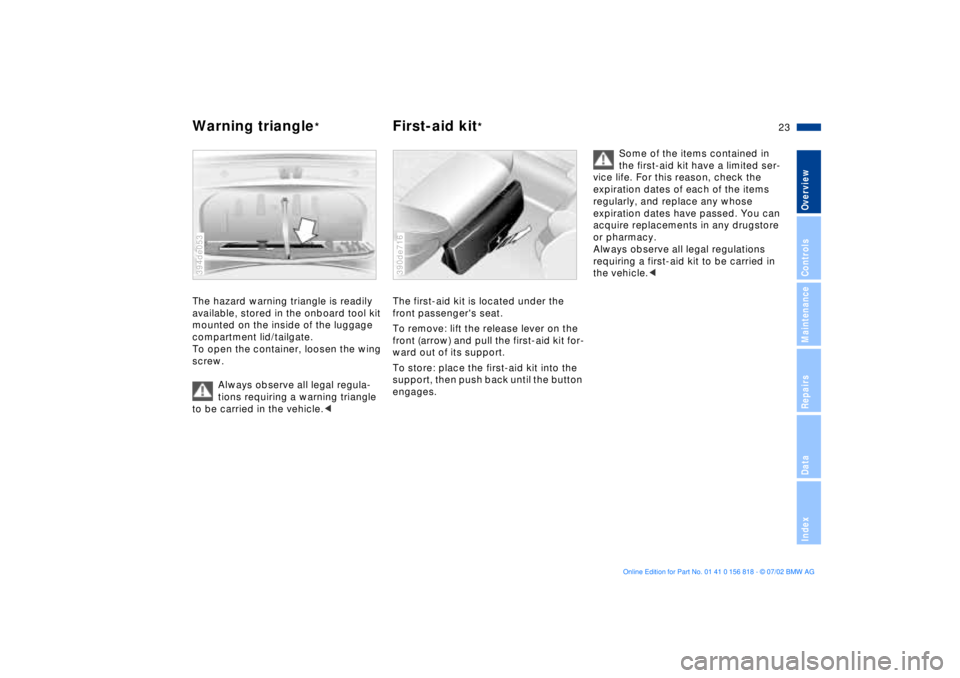
The hazard warning triangle is readily
available, stored in the onboard tool kit
mounted on the inside of the luggage
compartment lid/tailgate.
To open the container, loosen the wing
screw.
Always observe all legal regula-
tions requiring a warning triangle
to be carried in the vehicle.< 394de053
The first-aid kit is located under the
front passenger's seat.
To remove: lift the release lever on the
front (arrow) and pull the first-aid kit for-
ward out of its support.
To store: place the first-aid kit into the
support, then push back until the button
engages.390de716
Some of the items contained in
the first-aid kit have a limited ser-
vice life. For this reason, check the
expiration dates of each of the items
regularly, and replace any whose
expiration dates have passed. You can
acquire replacements in any drugstore
or pharmacy.
Always observe all legal regulations
requiring a first-aid kit to be carried in
the vehicle.<
Page 32 of 187
32n
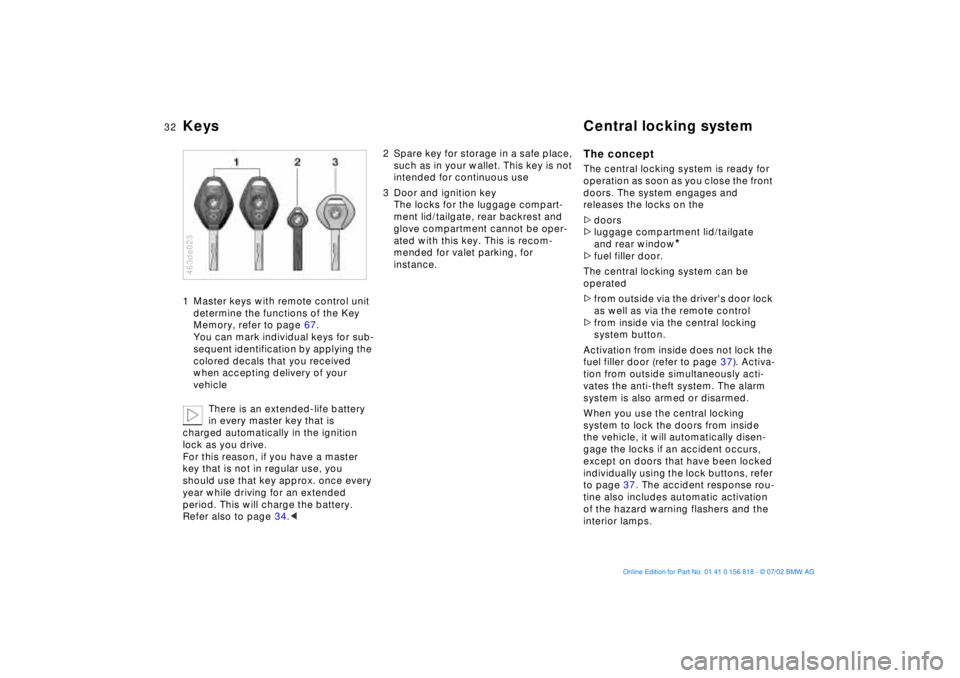
Keys Central locking system1 Master keys with remote control unit
determine the functions of the Key
Memory, refer to page 67.
You can mark individual keys for sub-
sequent identification by applying the
colored decals that you received
when accepting delivery of your
vehicle
There is an extended-life battery
in every master key that is
charged automatically in the ignition
lock as you drive.
For this reason, if you have a master
key that is not in regular use, you
should use that key approx. once every
year while driving for an extended
period. This will charge the battery.
Refer also to page 34.< 463de023
2 Spare key for storage in a safe place,
such as in your wallet. This key is not
intended for continuous use
3 Door and ignition key
The locks for the luggage compart-
ment lid/tailgate, rear backrest and
glove compartment cannot be oper-
ated with this key. This is recom-
mended for valet parking, for
instance.
The conceptThe central locking system is ready for
operation as soon as you close the front
doors. The system engages and
releases the locks on the
>doors
>luggage compartment lid/tailgate
and rear window
*
>fuel filler door.
The central locking system can be
operated
>from outside via the driver's door lock
as well as via the remote control
>from inside via the central locking
system button.
Activation from inside does not lock the
fuel filler door (refer to page 37). Activa-
tion from outside simultaneously acti-
vates the anti-theft system. The alarm
system is also armed or disarmed.
When you use the central locking
system to lock the doors from inside
the vehicle, it will automatically disen-
gage the locks if an accident occurs,
except on doors that have been locked
individually using the lock buttons, refer
to page 37. The accident response rou-
tine also includes automatic activation
of the hazard warning flashers and the
interior lamps.
Page 42 of 187
42n
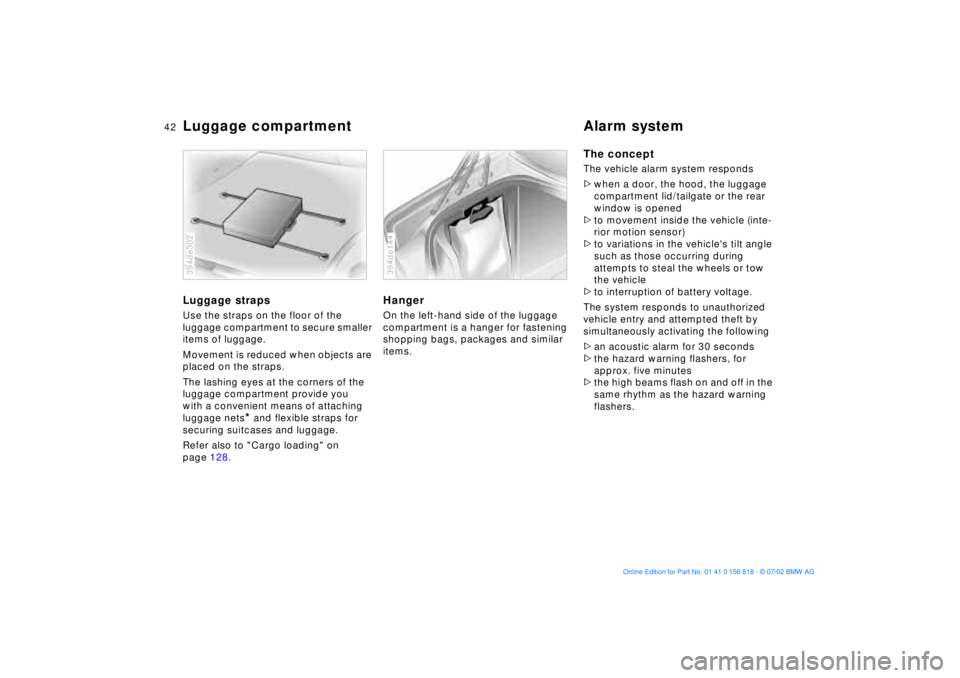
Luggage compartment Alarm systemLuggage strapsUse the straps on the floor of the
luggage compartment to secure smaller
items of luggage.
Movement is reduced when objects are
placed on the straps.
The lashing eyes at the corners of the
luggage compartment provide you
with a convenient means of attaching
luggage nets
* and flexible straps for
securing suitcases and luggage.
Refer also to "Cargo loading" on
page 128.
394de302
HangerOn the left-hand side of the luggage
compartment is a hanger for fastening
shopping bags, packages and similar
items.394de144
The conceptThe vehicle alarm system responds
>when a door, the hood, the luggage
compartment lid/tailgate or the rear
window is opened
>to movement inside the vehicle (inte-
rior motion sensor)
>to variations in the vehicle's tilt angle
such as those occurring during
attempts to steal the wheels or tow
the vehicle
>to interruption of battery voltage.
The system responds to unauthorized
vehicle entry and attempted theft by
simultaneously activating the following
>an acoustic alarm for 30 seconds
>the hazard warning flashers, for
approx. five minutes
>the high beams flash on and off in the
same rhythm as the hazard warning
flashers.
Page 60 of 187
60n
Airbags
Never apply stickers or adhesive-
backed objects of any kind to the
airbag covers. Never attempt to reup-
holster the covers or modify them in any
way. If the airbags deploy in response
to an accident, if you note any signs of
system malfunction, or if you wish to
have any parts of the airbag passenger-
restraint system deactivated, always
contact your BMW center, to whom we
strongly urge you to entrust all testing,
repair and dismantling operations.
Never attempt to modify or tamper with
either the system's electrical wiring or
any of its individual components.
System components include the uphol-
stered surfaces on the steering wheel,
instrument panel, the trim panels on the
front and rear doors and the roof braces
as well as the sides of the headliner
above the doors. Never attempt to
remove or dismantle the steering
wheel.
To ensure compliance with official
safety regulations, always entrust dis-
posal of airbag generators to your BMW
center. Attempts to carry out service
procedures undertaken by anyone
other than specially-trained profes-
sionals can result in system failure or
undesired airbag deployment, both of
which can lead to personal injury. If the
airbags deploy in response to an acci-
dent, always remember to avoid all
contact with system components, as
they are hot and can cause burns in the
period immediately following deploy-
ment.<
All vehicle occupants should
always sit upright and be properly
restrained (infants and small children in
appropriate child-restraint systems;
larger children and adults using the
safety belts). Never let an occupant's
head rest near or on a side airbag: the
inflating airbag could cause a serious or
fatal injury. Please note that the word
"Airbag" imprinted on the door trim
panel indicates the airbag's location.
Accident research shows that the
safest place for children in an automo-
bile is in the rear seat. However, a child
sitting in the rear seat and not properly
restrained may place his or her head on
or near the side airbag, if installed. For
example, a child Ð even though belted Ð
may fall asleep with his or her head
against the side airbag. It may be diffi-
cult for a driver to ensure that children
in the rear seat will remain properly
positioned at all times and do not place
their heads on or near the side airbag.
Therefore, we recommend that the
rear-seat side airbags, if provided, be
deactivated if you plan to transport chil-
dren in the rear seat.
The rear-seat side airbags may already
have been deactivated, either at the
time of manufacture or by a BMW
center. Labels in the rear door opening
should indicate the status of your rear-
seat side airbags. If you are uncertain of
their status, or wish to have the airbags
activated or deactivated, please con-
tact your BMW center.<
Even when all these guidelines are fol-
lowed, there is still a small residual risk
of injuries to the face, hands and arms
occurring in isolated instances.
The ignition and inflation noise may
provoke a mild temporary hearing loss
in extremely sensitive individuals.
Airbag warning information is also pro-
vided on the sun visors.
Page 68 of 187
68n
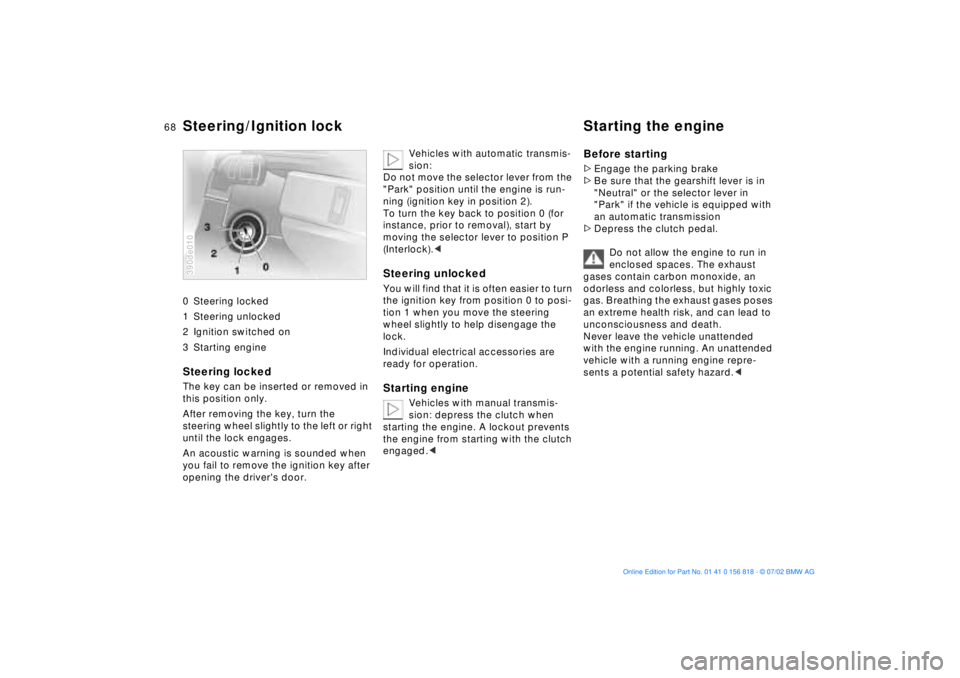
0 Steering locked
1 Steering unlocked
2 Ignition switched on
3 Starting engine
Steering locked The key can be inserted or removed in
this position only.
After removing the key, turn the
steering wheel slightly to the left or right
until the lock engages.
An acoustic warning is sounded when
you fail to remove the ignition key after
opening the driver's door. 390de010
Vehicles with automatic transmis-
sion:
Do not move the selector lever from the
"Park" position until the engine is run-
ning (ignition key in position 2).
To turn the key back to position 0 (for
instance, prior to removal), start by
moving the selector lever to position P
(Interlock).<
Steering unlocked You will find that it is often easier to turn
the ignition key from position 0 to posi-
tion 1 when you move the steering
wheel slightly to help disengage the
lock.
Individual electrical accessories are
ready for operation.Starting engine
Vehicles with manual transmis-
sion: depress the clutch when
starting the engine. A lockout prevents
the engine from starting with the clutch
engaged.<
Before starting>Engage the parking brake
>Be sure that the gearshift lever is in
"Neutral" or the selector lever in
"Park" if the vehicle is equipped with
an automatic transmission
>Depress the clutch pedal.
Do not allow the engine to run in
enclosed spaces. The exhaust
gases contain carbon monoxide, an
odorless and colorless, but highly toxic
gas. Breathing the exhaust gases poses
an extreme health risk, and can lead to
unconsciousness and death.
Never leave the vehicle unattended
with the engine running. An unattended
vehicle with a running engine repre-
sents a potential safety hazard.<
Steering/Ignition lock Starting the engine
Page 82 of 187
82n
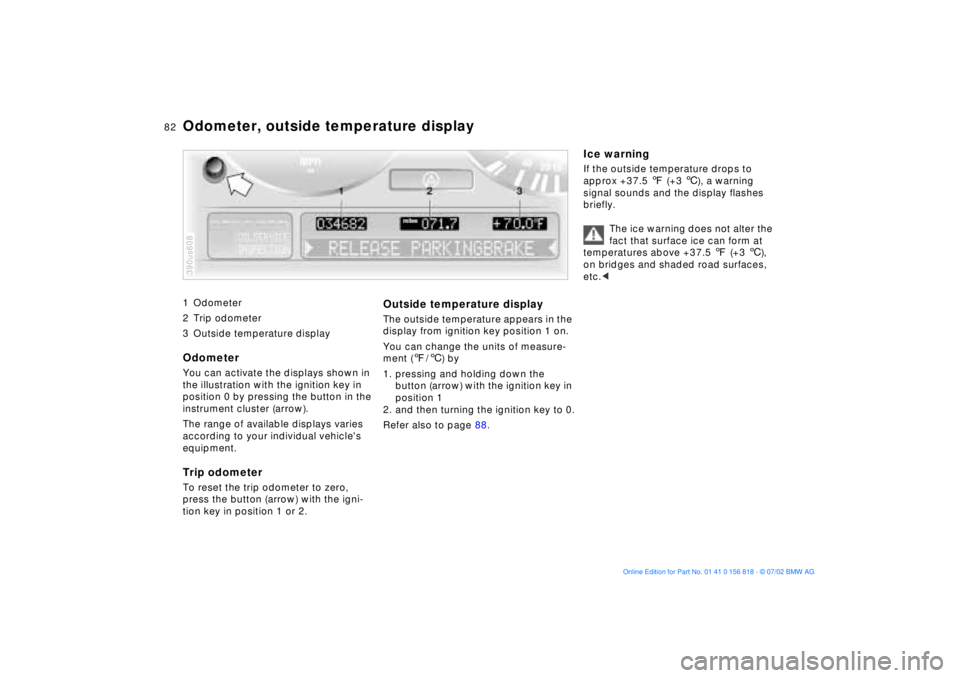
1 Odometer
2 Trip odometer
3 Outside temperature display
Odometer You can activate the displays shown in
the illustration with the ignition key in
position 0 by pressing the button in the
instrument cluster (arrow).
The range of available displays varies
according to your individual vehicle's
equipment.Trip odometerTo reset the trip odometer to zero,
press the button (arrow) with the igni-
tion key in position 1 or 2.390us608
Outside temperature displayThe outside temperature appears in the
display from ignition key position 1 on.
You can change the units of measure-
ment (7/6) by
1. pressing and holding down the
button (arrow) with the ignition key in
position 1
2. and then turning the ignition key to 0.
Refer also to page 88.
Ice warningIf the outside temperature drops to
approx +37.5 7 (+3 6), a warning
signal sounds and the display flashes
briefly.
The ice warning does not alter the
fact that surface ice can form at
temperatures above +37.5 7 (+3 6),
on bridges and shaded road surfaces,
etc.<
Odometer, outside temperature display