Page 7 of 94

Checking the spark plug ................................ 6-7
Transmission oil ............................................. 6-8
Coolant ......................................................... 6-10
Cleaning the air filter element ..................... 6-13
Adjusting the carburetor ............................... 6-15
Adjusting the engine idling speed ................ 6-16
Adjusting the throttle cable free play ............ 6-17
Tires ............................................................. 6-17
Cast wheels ................................................. 6-19
Adjusting the clutch lever free play .............. 6-20
Adjusting the brake lever free play ............... 6-21
Adjusting the brake pedal position ............... 6-22
Adjusting the rear brake light switch ............ 6-22
Checking the front and rear brake pads ....... 6-23
Checking the brake fluid level ...................... 6-24
Changing the brake fluid .............................. 6-25
Drive chain slack .......................................... 6-25
Lubricating the drive chain ........................... 6-26
Checking and lubricating the cables ............ 6-27
Checking and lubricating the throttle grip
and cable ................................................... 6-28
Adjusting the Autolube pump ....................... 6-28
Checking and lubricating the brake and
shift pedals ................................................. 6-29
Checking and lubricating the brake and
clutch levers .................................................6-29
Checking and lubricating the sidestand ....... 6-29Lubricating the rear suspension ................... 6-30
Checking the front fork ................................. 6-30
Checking the steering .................................. 6-31
Checking the wheel bearings ....................... 6-32
Battery .......................................................... 6-32
Replacing the fuse ....................................... 6-33
Replacing a headlight bulb ........................... 6-34
Replacing the tail/brake light bulb ................ 6-35
Replacing a turn signal light bulb ................. 6-36
Supporting the motorcycle ........................... 6-37
Front wheel .................................................. 6-37
Rear wheel ................................................... 6-39
Troubleshooting ........................................... 6-41
Troubleshooting charts ................................ 6-42
MOTORCYCLE CARE AND STORAGE ........... 7-1
Care ............................................................... 7-1
Storage .......................................................... 7-4
SPECIFICATIONS ............................................ 8-1
Conversion table ............................................ 8-5
CONSUMER INFORMATION .............................9-1
Identification numbers .................................... 9-1
Key identification number ............................... 9-1
Vehicle identification number ......................... 9-1
Model label ..................................................... 9-2
TABLE OF CONTENTS
789
5AE-28199-E5 honbun 7/6/01 10:18 AM Page 6
Page 29 of 94

4-1
EAU01114
PRE-OPERATION CHECKS
4The condition of a vehicle is the owner’s responsibility. Vital components can start to deteriorate quickly and unexpect-
edly, even if the vehicle remains unused (for example, as a result of exposure to the elements). Any damage, fluid leak-
age or loss of tire air pressure could have serious consequences. Therefore, it is very important, in addition to a thor-
ough visual inspection, to check the following points before each ride.
EAU03439
Pre-operation check list
ITEM CHECKS PAGE
Fuel•Check fuel level in fuel tank.
•Refuel if necessary.
•Check fuel line for leakage.3-7–3-9
2-stroke engine oil•Check oil level in oil tank.
•If necessary, add recommended oil to specified level.
•Check vehicle for oil leakage.3-10
Transmission oil•Check oil level in transmission case.
•If necessary, add recommended oil to specified level.6-8–6-10
Coolant•Check coolant level in reservoir.
•If necessary, add recommended coolant to specified level.
•Check cooling system for leakage.6-10–6-13
Front brake•Check operation.
•If soft or spongy, have Yamaha dealer bleed hydraulic system.
•Check lever free play.
•Adjust if necessary.
•Check fluid level in reservoir.
•If necessary, add recommended brake fluid to specified level.
•Check hydraulic system for leakage.3-7, 6-21, 6-23–6-24
5AE-28199-E5 honbun 7/6/01 10:18 AM Page 28
Page 40 of 94
6-4
PERIODIC MAINTENANCE AND MINOR REPAIR
6
EAU03884
NOTE:
8The air filter needs more frequent service if you are riding in unusually wet or dusty areas.
8Hydraulic brake service
9Regularly check and, if necessary, correct the brake fluid level.
9Every two years replace the internal components of the brake master cylinders and calipers, and change the
brake fluid.
9Replace the brake hoses every four years and if cracked or damaged.21 Transmission oil•Check oil level.√√√√√ √
•Change.√√
22
*Cooling system•Check coolant level and vehicle for coolant leakage.√√√√ √
•Change.Every 3 years
23*Front and rear brake
switches•Check operation.√√√√√ √
24 Moving parts and cables•Lubricate.√√√√ √
25*Lights, signals and
switches•Check operation.
•Adjust headlight beam.√√√√√ √ NO. ITEM CHECK OR MAINTENANCE JOBODOMETER READING (× 1,000 km)
ANNUAL
CHECK
1 6 12 18 24
5AE-28199-E5 honbun 7/6/01 10:18 AM Page 39
Page 61 of 94

6-25
PERIODIC MAINTENANCE AND MINOR REPAIR
6
EAU03976
Changing the brake fluidHave a Yamaha dealer change the
brake fluid at the intervals specified in
the NOTE after the periodic mainte-
nance and lubrication chart. In addi-
tion, have the oil seals of the master
cylinders and calipers as well as the
brake hoses replaced at the intervals
listed below or whenever they are
damaged or leaking.
8Oil seals: Replace every two
years.
8Brake hoses: Replace every four
years.
EAU00744
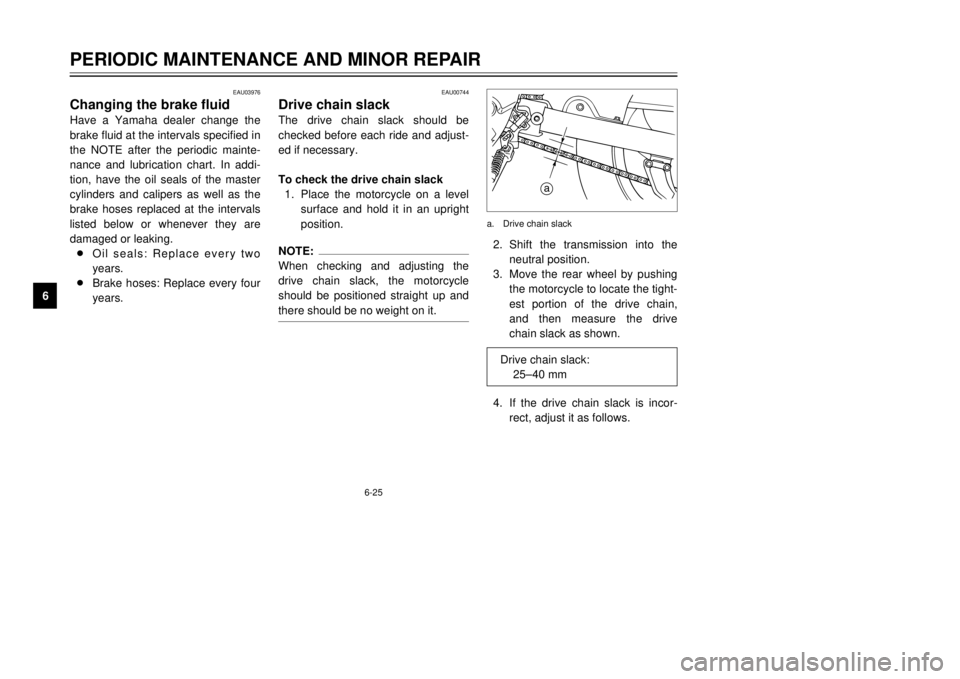
Drive chain slackThe drive chain slack should be
checked before each ride and adjust-
ed if necessary.
To check the drive chain slack
1. Place the motorcycle on a level
surface and hold it in an upright
position.NOTE:
When checking and adjusting the
drive chain slack, the motorcycle
should be positioned straight up and
there should be no weight on it.
2. Shift the transmission into the
neutral position.
3. Move the rear wheel by pushing
the motorcycle to locate the tight-
est portion of the drive chain,
and then measure the drive
chain slack as shown.
4. If the drive chain slack is incor-
rect, adjust it as follows.
a
a. Drive chain slack
Drive chain slack:
25–40 mm
5AE-28199-E5 honbun 7/6/01 10:18 AM Page 60