2002 YAMAHA TDR 125 clutch
[x] Cancel search: clutchPage 6 of 94

EAU00009
TABLE OF CONTENTS
GIVE SAFETY THE RIGHT OF WAY ............... 1-1
DESCRIPTION .................................................. 2-1
Left view ......................................................... 2-1
Right view ...................................................... 2-2
Controls and instruments ............................... 2-3INSTRUMENT AND CONTROL FUNCTIONS
..... 3-1
Main switch/steering lock ............................... 3-1
Indicator and warning lights ........................... 3-2
Speedometer unit ........................................... 3-3
Tachometer .................................................... 3-3
Coolant temperature gauge ........................... 3-4
Handlebar switches ........................................ 3-4
Clutch lever .................................................... 3-6
Shift pedal ...................................................... 3-6
Brake lever ..................................................... 3-7
Brake pedal .................................................... 3-7
Fuel tank cap ................................................. 3-7
Fuel (except for Switzerland and Austria) ...... 3-8
Fuel (for Switzerland and Austria)................... 3-8
Catalytic converter
(for Switzerland and Austria) ........................ 3-9
2-stroke engine oil ........................................ 3-10
Fuel cock ...................................................... 3-11
Starter (choke) lever .................................... 3-12
Seat .............................................................. 3-12Helmet holder ............................................... 3-13
Adjusting the shock absorber assembly ........3-13
YEIS handling precautions ........................... 3-14
YPVS ........................................................... 3-15
Sidestand ..................................................... 3-15
Ignition circuit cut-off system ........................ 3-16
PRE-OPERATION CHECKS ............................ 4-1
Pre-operation check list ................................. 4-1
OPERATION AND IMPORTANT RIDING
POINTS ............................................................. 5-1
Starting a cold engine .................................... 5-1
Starting a warm engine .................................. 5-2
Shifting ........................................................... 5-3
Recommended shift points
(for Switzerland only) ................................... 5-3
Tips for reducing fuel consumption ............... 5-4
Engine break-in .............................................. 5-4
Parking ........................................................... 5-5
PERIODIC MAINTENANCE AND MINOR
REPAIR ............................................................. 6-1
Owner’s tool kit .............................................. 6-1
Periodic maintenance and lubrication chart ... 6-2
Removing and installing the cowlings and
panel ............................................................ 6-5
123
456
5AE-28199-E5 honbun 7/6/01 10:18 AM Page 5
Page 7 of 94

Checking the spark plug ................................ 6-7
Transmission oil ............................................. 6-8
Coolant ......................................................... 6-10
Cleaning the air filter element ..................... 6-13
Adjusting the carburetor ............................... 6-15
Adjusting the engine idling speed ................ 6-16
Adjusting the throttle cable free play ............ 6-17
Tires ............................................................. 6-17
Cast wheels ................................................. 6-19
Adjusting the clutch lever free play .............. 6-20
Adjusting the brake lever free play ............... 6-21
Adjusting the brake pedal position ............... 6-22
Adjusting the rear brake light switch ............ 6-22
Checking the front and rear brake pads ....... 6-23
Checking the brake fluid level ...................... 6-24
Changing the brake fluid .............................. 6-25
Drive chain slack .......................................... 6-25
Lubricating the drive chain ........................... 6-26
Checking and lubricating the cables ............ 6-27
Checking and lubricating the throttle grip
and cable ................................................... 6-28
Adjusting the Autolube pump ....................... 6-28
Checking and lubricating the brake and
shift pedals ................................................. 6-29
Checking and lubricating the brake and
clutch levers .................................................6-29
Checking and lubricating the sidestand ....... 6-29Lubricating the rear suspension ................... 6-30
Checking the front fork ................................. 6-30
Checking the steering .................................. 6-31
Checking the wheel bearings ....................... 6-32
Battery .......................................................... 6-32
Replacing the fuse ....................................... 6-33
Replacing a headlight bulb ........................... 6-34
Replacing the tail/brake light bulb ................ 6-35
Replacing a turn signal light bulb ................. 6-36
Supporting the motorcycle ........................... 6-37
Front wheel .................................................. 6-37
Rear wheel ................................................... 6-39
Troubleshooting ........................................... 6-41
Troubleshooting charts ................................ 6-42
MOTORCYCLE CARE AND STORAGE ........... 7-1
Care ............................................................... 7-1
Storage .......................................................... 7-4
SPECIFICATIONS ............................................ 8-1
Conversion table ............................................ 8-5
CONSUMER INFORMATION .............................9-1
Identification numbers .................................... 9-1
Key identification number ............................... 9-1
Vehicle identification number ......................... 9-1
Model label ..................................................... 9-2
TABLE OF CONTENTS
789
5AE-28199-E5 honbun 7/6/01 10:18 AM Page 6
Page 11 of 94

2-3
DESCRIPTION
2
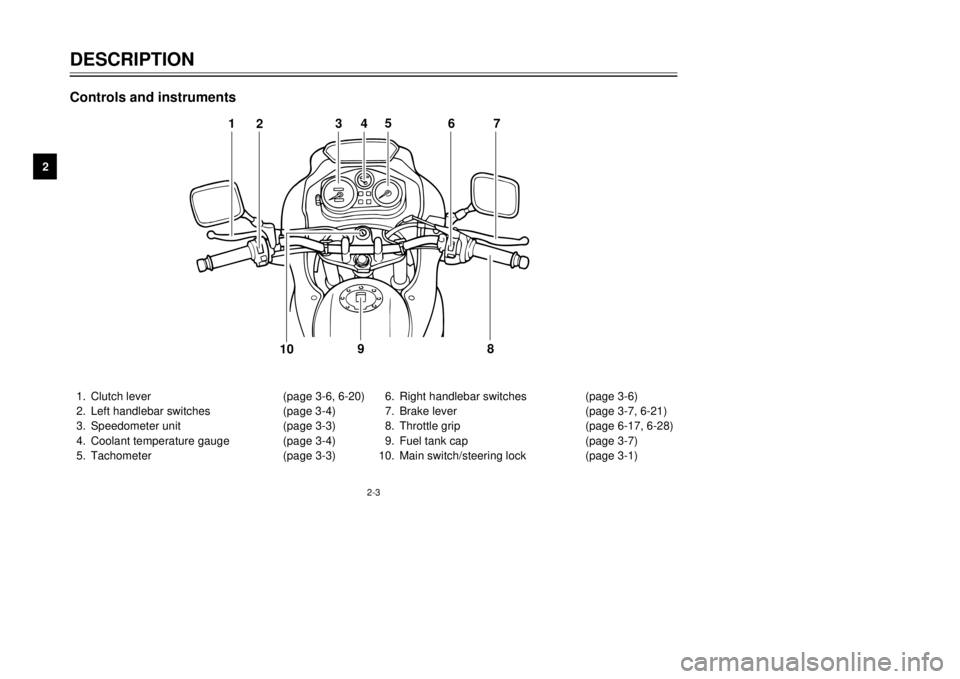
1. Clutch lever (page 3-6, 6-20)
2. Left handlebar switches (page 3-4)
3. Speedometer unit (page 3-3)
4. Coolant temperature gauge (page 3-4)
5. Tachometer (page 3-3)6. Right handlebar switches (page 3-6)
7. Brake lever (page 3-7, 6-21)
8. Throttle grip (page 6-17, 6-28)
9. Fuel tank cap (page 3-7)
10. Main switch/steering lock (page 3-1)
1
2345
67
8 9
10
Controls and instruments
5AE-28199-E5 honbun 7/6/01 10:18 AM Page 10
Page 13 of 94

3-2
EAU03034
Indicator and warning lights
EAU00057
Turn signal indicator light “5”
This indicator light flashes when the
turn signal switch is pushed to the left
or right.
EAU00063
High beam indicator light “&”
This indicator light comes on when
the high beam of the headlight is
switched on.
EAU04304
2-stroke engine oil level warning
light “
7
”
This warning light comes on when
the 2-stroke engine oil level is low.
The electrical circuit of the warning
light can be checked according to the
following procedure.
1. Set the engine stop switch to
"#" and turn the key to "ON".
2. Shift the transmission into the
neutral position or pull the clutch
lever.
3. Push the start switch. If the
warning light does not come on
while pushing the start switch,
have a Yamaha dealer check the
electrical circuit.
NOTE:
Even if the 2-stroke engine oil level is
sufficient, the warning light may flick-
er when riding on a slope or during
sudden acceleration or deceleration,
but this is not a malfunction.
EAU00061
Neutral indicator light “N”
This indicator light comes on when
the transmission is in the neutral
position.
INSTRUMENT AND CONTROL FUNCTIONS
3
1
2
3
4
1. Turn signal indicator light “5”
2. High beam indicator light “&”
3. 2-stroke enjine oil level warning light “
7
”
4. Neutral indicator light “N”
5AE-28199-E5 honbun 7/6/01 10:18 AM Page 12
Page 17 of 94

3-6
EAU03890
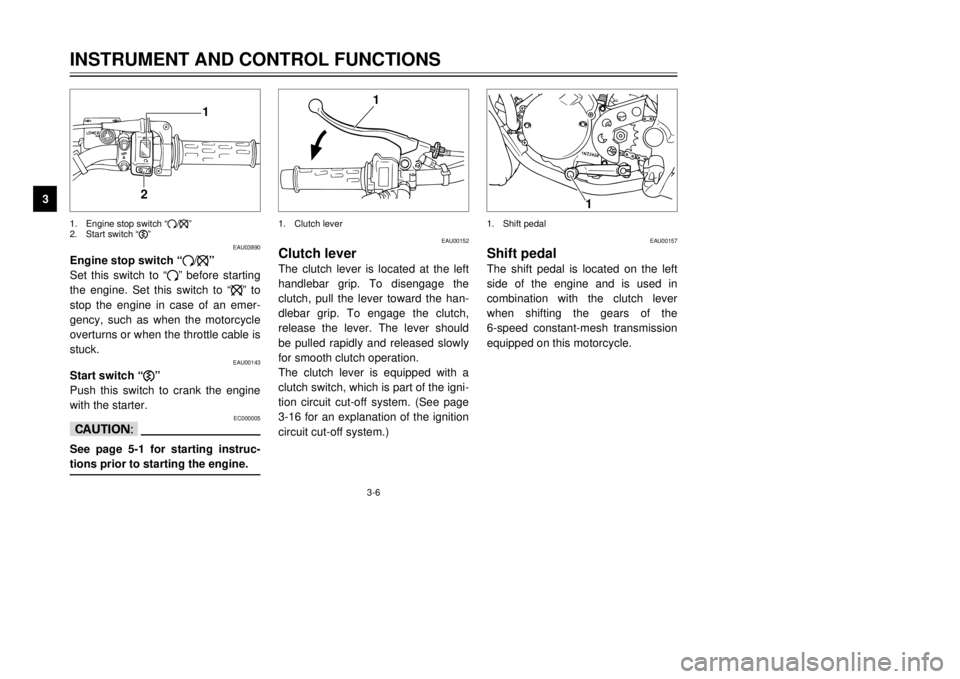
Engine stop switch “#/$”
Set this switch to “#” before starting
the engine. Set this switch to “$” to
stop the engine in case of an emer-
gency, such as when the motorcycle
overturns or when the throttle cable is
stuck.
EAU00143
Start switch “,”
Push this switch to crank the engine
with the starter.
EC000005
cCSee page 5-1 for starting instruc-
tions prior to starting the engine.
EAU00152
Clutch leverThe clutch lever is located at the left
handlebar grip. To disengage the
clutch, pull the lever toward the han-
dlebar grip. To engage the clutch,
release the lever. The lever should
be pulled rapidly and released slowly
for smooth clutch operation.
The clutch lever is equipped with a
clutch switch, which is part of the igni-
tion circuit cut-off system. (See page
3-16 for an explanation of the ignition
circuit cut-off system.)
EAU00157
Shift pedalThe shift pedal is located on the left
side of the engine and is used in
combination with the clutch lever
when shifting the gears of the
6-speed constant-mesh transmission
equipped on this motorcycle.
INSTRUMENT AND CONTROL FUNCTIONS
3
21
1
1
1. Engine stop switch “#/$”
2. Start switch “,”1. Shift pedal 1. Clutch lever
5AE-28199-E5 honbun 7/6/01 10:18 AM Page 16
Page 27 of 94

3-16
EW000044
wThe motorcycle must not be ridden
with the sidestand down, or if the
sidestand cannot be properly
moved up (or does not stay up),
otherwise the sidestand could con-
tact the ground and distract the
operator, resulting in a possible
loss of control. Yamaha’s ignition
circuit cut-off system has been
designed to assist the operator in
fulfilling the responsibility of rais-
ing the sidestand before starting
off. Therefore, check this system
regularly as described below and
have a Yamaha dealer repair it if it
does not function properly.
EAU03720
Ignition circuit cut-off
systemThe ignition circuit cut-off system
(comprising the sidestand switch,
clutch switch and neutral switch) has
the following functions.
8It prevents starting when the
transmission is in gear and the
sidestand is up, but the clutch
lever is not pulled.
8It prevents starting when the
transmission is in gear and the
clutch lever is pulled, but the
sidestand is still down.
8It cuts the running engine when
the transmission is in gear and
the sidestand is moved down.
Periodically check the operation of
the ignition circuit cut-off system
according to the following procedure.
EW000045
wIf a malfunction is noted, have a
Yamaha dealer check the system
before riding.
INSTRUMENT AND CONTROL FUNCTIONS
3 5AE-28199-E5 honbun 7/6/01 10:18 AM Page 26
Page 28 of 94

3-17
INSTRUMENT AND CONTROL FUNCTIONS
3
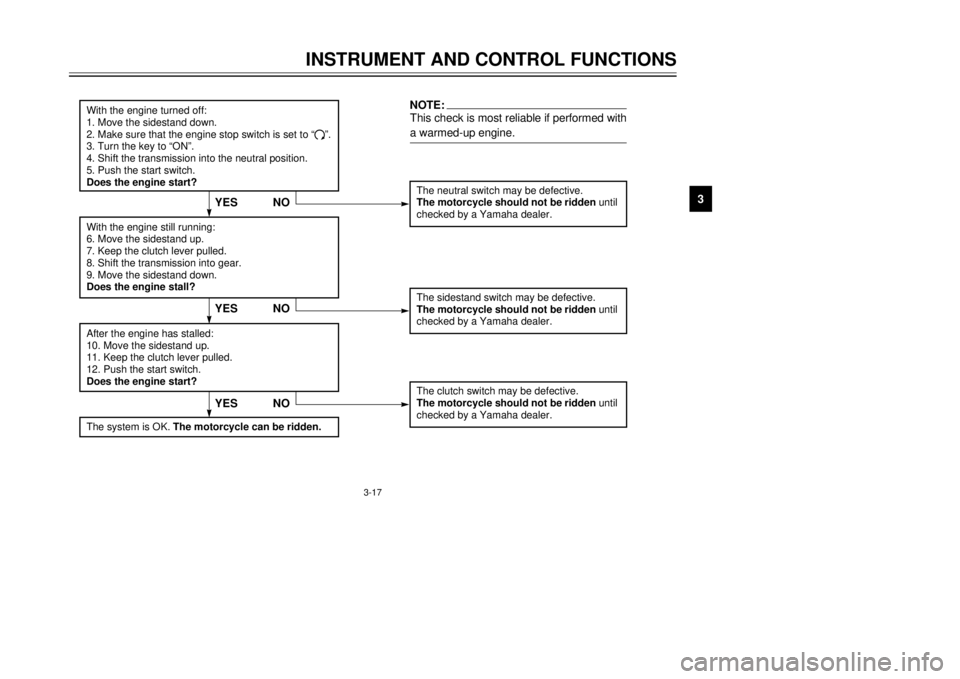
With the engine turned off:
1. Move the sidestand down.
2. Make sure that the engine stop switch is set to “
#”.
3. Turn the key to “ON”.
4. Shift the transmission into the neutral position.
5. Push the start switch.
Does the engine start?
The neutral switch may be defective.
The motorcycle should not be ridden until
checked by a Yamaha dealer.
With the engine still running:
6. Move the sidestand up.
7. Keep the clutch lever pulled.
8. Shift the transmission into gear.
9. Move the sidestand down.
Does the engine stall?After the engine has stalled:
10. Move the sidestand up.
11. Keep the clutch lever pulled.
12. Push the start switch.
Does the engine start?
The sidestand switch may be defective.
The motorcycle should not be ridden until
checked by a Yamaha dealer.The clutch switch may be defective.
The motorcycle should not be ridden until
checked by a Yamaha dealer.
NO
NOTE:This check is most reliable if performed with
a warmed-up engine.
YESYES NO
The system is OK. The motorcycle can be ridden.
YES NO
5AE-28199-E5 honbun 7/6/01 10:18 AM Page 27
Page 30 of 94

4-2
PRE-OPERATION CHECKS
4
Rear brake•Check operation.
•If soft or spongy, have Yamaha dealer bleed hydraulic system.
•Check fluid level in reservoir.
•If necessary, add recommended brake fluid to specified level.
•Check hydraulic system for leakage.3-7, 6-22–6-24
Clutch•Check operation.
•Lubricate cable if necessary.
•Check lever free play.
•Adjust if necessary.3-6, 6-20–6-21
Throttle grip•Make sure that operation is smooth.
•Check free play.
•If neccessary, have Yamaha dealer make adjustment or lubricate.6-17, 6-28
Control cables•Make sure that operation is smooth.
•Lubricate if necessary.6-27
Drive chain•Check chain slack.
•Adjust if necessary.
•Check chain condition.
•Lubricate if necessary.6-25–6-27
Wheels and tires•Check for damage.
•Check tire condition and tread depth.
•Check air pressure.
•Correct if necessary.6-17–6-19
Brake and shift pedals•Make sure that operation is smooth.
•Lubricate pedal pivoting points if necessary.6-29
Brake and clutch levers•Make sure that operation is smooth.
•Lubricate lever pivoting points if necessary.6-29
Sidestand•Make sure that operation is smooth.
•Lubricate pivot if necessary.6-29–6-30 ITEM CHECKS PAGE
5AE-28199-E5 honbun 7/6/01 10:18 AM Page 29