Page 7 of 94

Checking the spark plug ................................ 6-7
Transmission oil ............................................. 6-8
Coolant ......................................................... 6-10
Cleaning the air filter element ..................... 6-13
Adjusting the carburetor ............................... 6-15
Adjusting the engine idling speed ................ 6-16
Adjusting the throttle cable free play ............ 6-17
Tires ............................................................. 6-17
Cast wheels ................................................. 6-19
Adjusting the clutch lever free play .............. 6-20
Adjusting the brake lever free play ............... 6-21
Adjusting the brake pedal position ............... 6-22
Adjusting the rear brake light switch ............ 6-22
Checking the front and rear brake pads ....... 6-23
Checking the brake fluid level ...................... 6-24
Changing the brake fluid .............................. 6-25
Drive chain slack .......................................... 6-25
Lubricating the drive chain ........................... 6-26
Checking and lubricating the cables ............ 6-27
Checking and lubricating the throttle grip
and cable ................................................... 6-28
Adjusting the Autolube pump ....................... 6-28
Checking and lubricating the brake and
shift pedals ................................................. 6-29
Checking and lubricating the brake and
clutch levers .................................................6-29
Checking and lubricating the sidestand ....... 6-29Lubricating the rear suspension ................... 6-30
Checking the front fork ................................. 6-30
Checking the steering .................................. 6-31
Checking the wheel bearings ....................... 6-32
Battery .......................................................... 6-32
Replacing the fuse ....................................... 6-33
Replacing a headlight bulb ........................... 6-34
Replacing the tail/brake light bulb ................ 6-35
Replacing a turn signal light bulb ................. 6-36
Supporting the motorcycle ........................... 6-37
Front wheel .................................................. 6-37
Rear wheel ................................................... 6-39
Troubleshooting ........................................... 6-41
Troubleshooting charts ................................ 6-42
MOTORCYCLE CARE AND STORAGE ........... 7-1
Care ............................................................... 7-1
Storage .......................................................... 7-4
SPECIFICATIONS ............................................ 8-1
Conversion table ............................................ 8-5
CONSUMER INFORMATION .............................9-1
Identification numbers .................................... 9-1
Key identification number ............................... 9-1
Vehicle identification number ......................... 9-1
Model label ..................................................... 9-2
TABLE OF CONTENTS
789
5AE-28199-E5 honbun 7/6/01 10:18 AM Page 6
Page 13 of 94

3-2
EAU03034
Indicator and warning lights
EAU00057
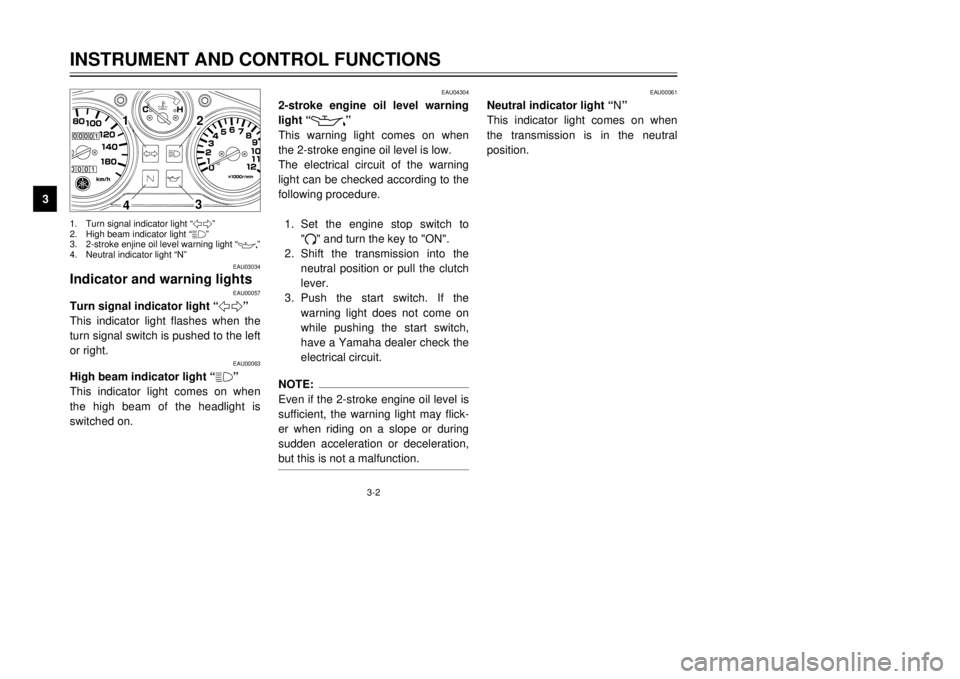
Turn signal indicator light “5”
This indicator light flashes when the
turn signal switch is pushed to the left
or right.
EAU00063
High beam indicator light “&”
This indicator light comes on when
the high beam of the headlight is
switched on.
EAU04304
2-stroke engine oil level warning
light “
7
”
This warning light comes on when
the 2-stroke engine oil level is low.
The electrical circuit of the warning
light can be checked according to the
following procedure.
1. Set the engine stop switch to
"#" and turn the key to "ON".
2. Shift the transmission into the
neutral position or pull the clutch
lever.
3. Push the start switch. If the
warning light does not come on
while pushing the start switch,
have a Yamaha dealer check the
electrical circuit.
NOTE:
Even if the 2-stroke engine oil level is
sufficient, the warning light may flick-
er when riding on a slope or during
sudden acceleration or deceleration,
but this is not a malfunction.
EAU00061
Neutral indicator light “N”
This indicator light comes on when
the transmission is in the neutral
position.
INSTRUMENT AND CONTROL FUNCTIONS
3
1
2
3
4
1. Turn signal indicator light “5”
2. High beam indicator light “&”
3. 2-stroke enjine oil level warning light “
7
”
4. Neutral indicator light “N”
5AE-28199-E5 honbun 7/6/01 10:18 AM Page 12
Page 15 of 94

3-4
EAU01652
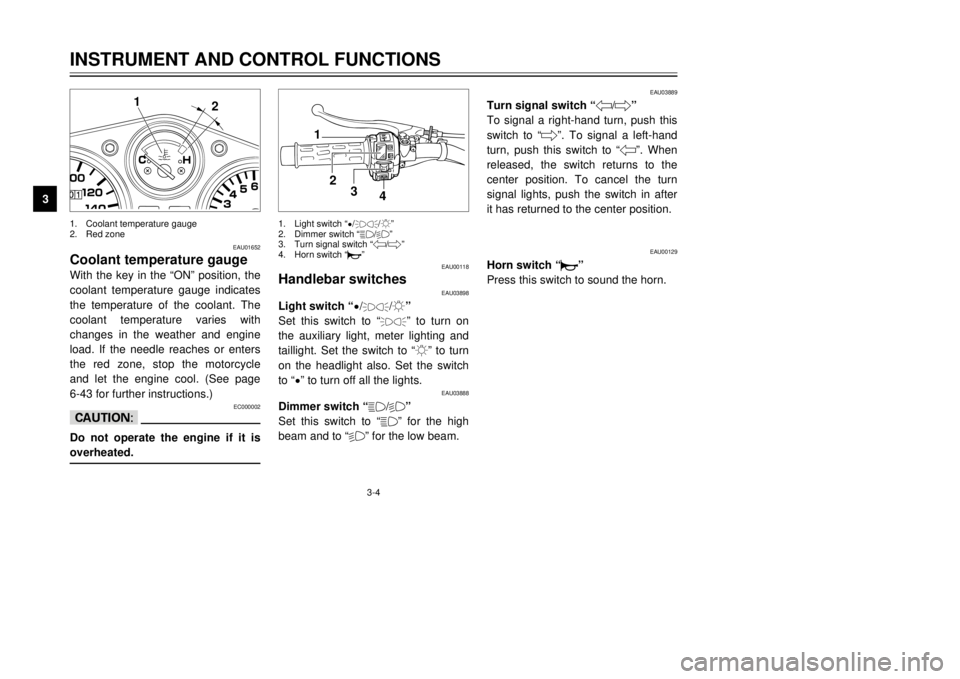
Coolant temperature gaugeWith the key in the “ON” position, the
coolant temperature gauge indicates
the temperature of the coolant. The
coolant temperature varies with
changes in the weather and engine
load. If the needle reaches or enters
the red zone, stop the motorcycle
and let the engine cool. (See page
6-43 for further instructions.)
EC000002
cCDo not operate the engine if it is
overheated.
EAU00118
Handlebar switches
EAU03898
Light switch “
9/
'
/:”
Set this switch to “'
” to turn on
the auxiliary light, meter lighting and
taillight. Set the switch to “:” to turn
on the headlight also. Set the switch
to “
9” to turn off all the lights.
EAU03888
Dimmer switch “&/%”
Set this switch to “&” for the high
beam and to “%” for the low beam.
EAU03889
Turn signal switch “4/6”
To signal a right-hand turn, push this
switch to “6”. To signal a left-hand
turn, push this switch to “4”. When
released, the switch returns to the
center position. To cancel the turn
signal lights, push the switch in after
it has returned to the center position.
EAU00129
Horn switch “*”
Press this switch to sound the horn.
INSTRUMENT AND CONTROL FUNCTIONS
3
2 1
1
2
3
4
1. Coolant temperature gauge
2. Red zone1. Light switch “
9/
'
/:”
2. Dimmer switch “&/%”
3. Turn signal switch “4/6”
4. Horn switch “*”
5AE-28199-E5 honbun 7/6/01 10:18 AM Page 14
Page 72 of 94
6-36
PERIODIC MAINTENANCE AND MINOR REPAIR
6 3. Remove the socket (together
with the bulb) by turning it coun-
terclockwise.
4. Remove the defective bulb by
pushing it in and turning it coun-
terclockwise.
5. Insert a new bulb into the socket,
push it in, and then turn it clock-
wise until it stops.
6. Install the socket (together with
the bulb) by turning it clockwise.
7. Install the panel and the seat.
EAU03497
Replacing a turn signal light
bulb1. Remove the turn signal light lens
by removing the screw.2. Remove the defective bulb by
pushing it in and turning it coun-
terclockwise.
3. Insert a new bulb into the socket,
push it in, and then turn it clock-
wise until it stops.
4. Install the lens by installing the
screw.
ECA00065
cCDo not overtighten the screw, oth-
erwise the lens may break.
1
12
1
1. Socket 1. Lens
2. Screw1. Bulb
5AE-28199-E5 honbun 7/6/01 10:18 AM Page 71
Page 88 of 94
8-4
SPECIFICATIONS
8
Headlight typeQuartz bulb (halogen)
Bulb voltage, wattage ×quantity
Headlight 12 V, 60/55W ×2
12 V, 35/35W ×2 (GB, IRL)
Tail/brake light 12 V, 5/21W ×2
Front turn signal light 12 V, 21W ×2
Rear turn signal light 12 V, 21W ×2
Auxiliary light 12 V, 4W ×2
12 V, 3.4W ×2 (GB, IRL)
Meter lighting 12 V, 3.4W ×3
Neutral indicator light 12 V, 3.4W ×1
High beam indicator light 12 V, 3.4W ×1
Oil level warning light 12 V, 3.4W ×1
Turn indicator light 12 V, 3.4W ×1
Fuse20A
5AE-28199-E5 honbun 7/6/01 10:18 AM Page 87