Page 49 of 75
EAH20304Spark plug inspection
The spark plug is an important engine
component and is easy to inspect. The con-
dition of the spark plug can indicate the
condition of the engine. The ideal color on
the white insulator around the center elec-
trode is a medium-to-light tan color for a
motorcycle that is being ridden normally.
Do not attempt to diagnose any problems
yourself. Instead, take the motorcycle to a
Yamaha dealer. You should periodically re-
move and inspect the spark plug because
heat and deposits will cause the spark plug
to slowly break down and erode. If elec-
trode erosion becomes excessive, or if car-
bon and other deposits are excessive, you
should replace the spark plug with the
specified plug.
49
Standard spark plug:
C7HSA/NGK or U22FS-U/DENSO
1
1. Spark plug gap
5SD O/M-3 9/4/01 2:50 PM Page 49 (1,1)
Page 50 of 75
Before installing the spark plug, measure
the electrode gap with a wire thickness
gauge; adjust the gap to specification as
necessary.
When installing the plug, always clean the
gasket surface and use a new gasket. Wipe
off any grime from the threads and tighten
the spark plug to the specified torque.EUU03801NOTE:
If a torque wrench is not available when
you are installing a spark plug, a good esti-
mate of the correct torque is 1/4 to 1/2 turn
past finger tight. Have the spark plug
torqued to the correct value as soon as
possible with a torque wrench.
50
Spark plug gap:
0.6–0.7 mmSpark plug torque:
12.5 Nm (1.25 m•kg)
5SD O/M-3 9/4/01 2:50 PM Page 50 (1,1)
Page 51 of 75
EAU03851*Brake leverFront and rear brake leversThere should be no free play at the brake
lever end. If there is free play, have a
Yamaha dealer inspect the brake system.
51
5SD O/M-3 9/4/01 2:50 PM Page 51 (1,1)
Page 52 of 75
EW000099wA soft or spongy feeling in the brake lever
can indicate the presence of air in the hy-
draulic system. If there is air in the hy-
draulic system, have a Yamaha dealer
bleed the system before operating the mo-
torcycle. Air in the hydraulic system will
diminish the braking performance, which
may result in loss of control and an acci-
dent.
52
5SD O/M-3 9/4/01 2:50 PM Page 52 (1,1)
Page 53 of 75
Rear brake adjustment
The rear brake pedal free play should be
adjusted to 20–30 mm at the brake pedal
end. Turn the adjusting nut on the brake
rod clockwise to reduce free play or coun-
terclockwise to increase free play.EUU69800w1. The rear brake pedal adjustment must
be checked whenever the chain is ad-
justed or the rear wheel is removed
and then reinstalled.
2. Check the operation of the brake light
after adjusting the rear brake.
53
A. Free play: 20–30 mm
q
1. Adjusting nut
5SD O/M-3 9/4/01 2:50 PM Page 53 (1,1)
Page 54 of 75
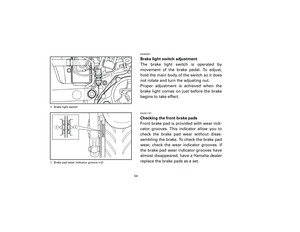
EAH83301Brake light switch adjustment
The brake light switch is operated by
movement of the brake pedal. To adjust,
hold the main body of the switch so it does
not rotate and turn the adjusting nut.
Proper adjustment is achieved when the
brake light comes on just before the brake
begins to take effect.EAU01119*Checking the front brake pads
Front brake pad is provided with wear indi-
cator grooves. This indicator allow you to
check the brake pad wear without disas-
sembling the brake. To check the brake pad
wear, check the wear indicator grooves. If
the brake pad wear indicator grooves have
almost disappeared, have a Yamaha dealer
replace the brake pads as a set.
54
q
1. Brake light switch
q
q
1. Brake pad wear indicator groove (
×2)
5SD O/M-3 9/4/01 2:50 PM Page 54 (1,1)
Page 55 of 75
EAH81601Checking the rear brake shoes
A wear indicator is provided on rear brake.
This indicator allows checking of shoe
wear without disassembling the brake.
Apply the brake and check the position of
the indicator. If the indicator reaches to the
wear limit line, ask a Yamaha dealer to re-
place the shoes.EAU00732Checking the brake fluid level
Insufficient brake fluid may allow air to
enter the brake system, possibly causing it
to become ineffective.
Before riding, check that the brake fluid is
above the minimum level mark and replen-
ish if necessary. A low brake fluid level
may indicate worn brake pads and/or brake
system leakage. If the brake level is low, be
sure to check the brake pads for wear and
the brake system for leakage.
55
1
2
1. Wear limit 2. Indicator
q
1. Minimum level mark
5SD O/M-3 9/4/01 2:50 PM Page 55 (1,1)
Page 56 of 75

Observe these precautions:
8When checking the fluid level, make
sure that the top of the master cylin-
der is level by turning the handlebars.
8Use only the recommended quality
brake fluid, otherwise the rubber seals
may deteriorate, causing leakage and
poor braking performance.NOTE:
If DOT 4 is not available, DOT 3 can be
used.8Refill with the same type of brake
fluid. Mixing fluids may result in a
harmful chemical reaction and lead to
poor braking performance.8Be careful that water does not enter
the master cylinder when refilling.
Water will significantly lower the boil-
ing point of the fluid and may result in
vapor lock.
8Brake fluid may deteriorate painted
surfaces or plastic parts. Always clean
up spilled fluid immediately.
8As the brake pads wear, it is normal
for the brake fluid level to gradually
go down. However, if the brake fluid
level goes down suddenly, have a
Yamaha dealer check the cause.
56
Recommended brake fluid: DOT 4
5SD O/M-3 9/4/01 2:50 PM Page 56 (1,1)