Page 25 of 72
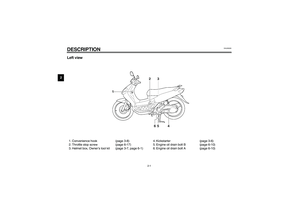
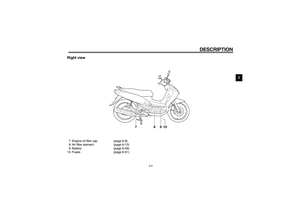
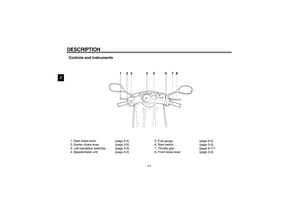
OPERATION AND IMPORTANT RIDING POINTS
5-5
5
EAU00460
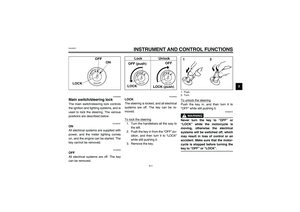
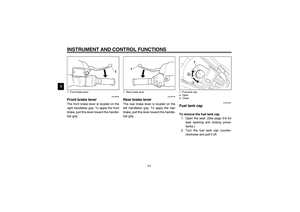
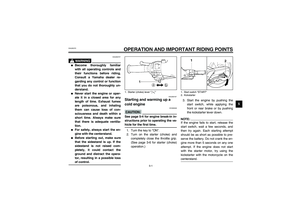
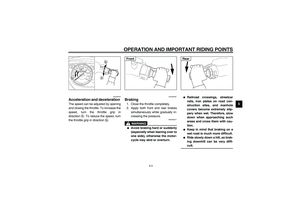
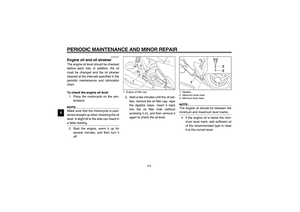
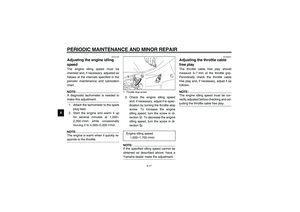
Parking When parking, stop the engine, and
then remove the key from the main
switch.
EW000058
WARNING
_ �
Since the engine and exhaust
system can become very hot,
park in a place where pedestri-
ans or children are not likely to
touch them.
�
Do not park on a slope or on
soft ground, otherwise the
motorcycle may overturn.
_U5MXE0.book Page 5 Thursday, December 20, 2001 2:08 PM
Page 26 of 72
OPERATION AND IMPORTANT RIDING POINTS
5-6
5
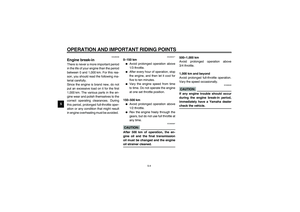
General noteMuch can be gained from the correct use and mainte-
nance of a motorcycle.
1. THE CUSTOMERS CAN USE THE FULLEST
POTENTIAL OF YAMAHA MOTORCYCLES2. A MOTORCYCLE CAN KEEP ITS PERFORMANCE
CAPABILITY FOR A LONGER TIMEU5MXE0.book Page 6 Thursday, December 20, 2001 2:08 PM
Page 27 of 72
OPERATION AND IMPORTANT RIDING POINTS
5-7
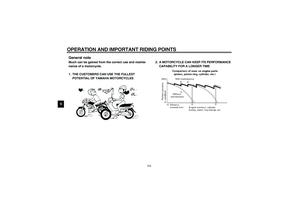
5 3. FUEL COST AND REPAIR EXPENSES CAN BE
KEPT TO A MINIMUM4. A MOTORCYCLE CAN DEMAND A HIGH PRICE
WHEN IT IS TRADED IN AS A USED PRODUCT
U5MXE0.book Page 7 Thursday, December 20, 2001 2:08 PM
Page 28 of 72

6-1
6
EAU00462
6-PERIODIC MAINTENANCE AND MINOR REPAIR
EAU00464
Safety is an obligation of the owner.
Periodic inspection, adjustment and lu-
brication will keep your vehicle in the
safest and most efficient condition pos-
sible. The most important points of in-
spection, adjustment, and lubrication
are explained on the following pages.
The intervals given in the periodic
maintenance and lubrication chart
should be simply considered as a gen-
eral guide under normal riding condi-
tions. However, DEPENDING ON THE
WEATHER, TERRAIN, GEOGRAPHI-
CAL LOCATION, AND INDIVIDUAL
USE, THE MAINTENANCE INTER-
VALS MAY NEED TO BE SHORT-
ENED.
EW000060
WARNING
_ If you are not familiar with motor-
cycle maintenance work, have a
Yamaha dealer do it for you. _
EAU03846*
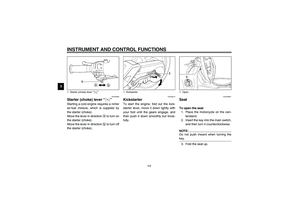
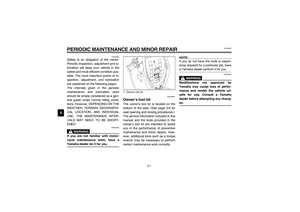
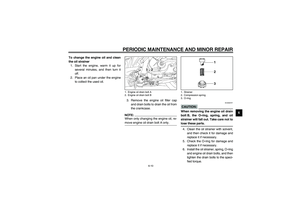
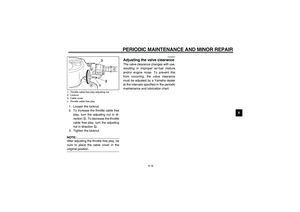
Owner’s tool kit The owner’s tool kit is located on the
bottom of the seat. (See page 3-6 for
seat opening and closing procedures.)
The service information included in this
manual and the tools provided in the
owner’s tool kit are intended to assist
you in the performance of preventive
maintenance and minor repairs. How-
ever, additional tools such as a torque
wrench may be necessary to perform
certain maintenance work correctly.
NOTE:_ If you do not have the tools or experi-
ence required for a particular job, have
a Yamaha dealer perform it for you. _
EW000063
WARNING
_ Modifications not approved by
Yamaha may cause loss of perfor-
mance and render the vehicle un-
safe for use. Consult a Yamaha
dealer before attempting any chang-
es. _
1. Owner’s tool kit
U5MXE0.book Page 1 Thursday, December 20, 2001 2:08 PM
Page 29 of 72

0.5 2 4 8 12
1*Fuel line
Check f")
PERIODIC MAINTENANCE AND MINOR REPAIR
6-2
6
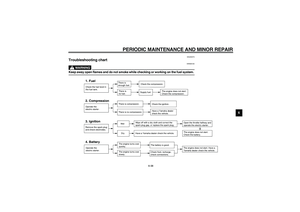
EAU00473
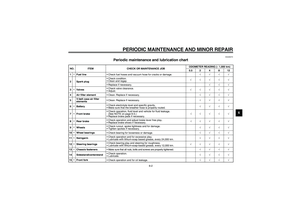
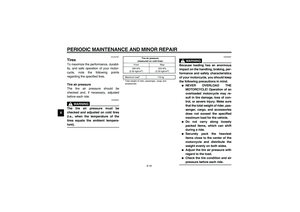
Periodic maintenance and lubrication chart
CP-03ENO. ITEM CHECK OR MAINTENANCE JOBODOMETER READING (
×1,000 km)
0.5 2 4 8 12
1*Fuel line
Check fuel hoses and vacuum hose for cracks or damage.√√√√
2 Spark plugCheck condition.
Clean and regap.√√√√√
Replace if necessary.√√√
3*ValvesCheck valve clearance.
Adjust.√√√√√
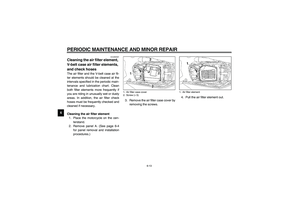
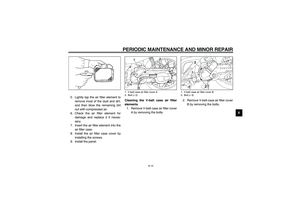
4 Air filter element
Clean. Replace if necessary.√√√√
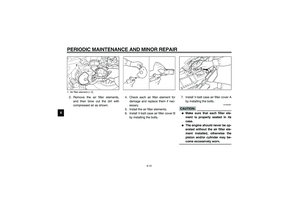
5V-belt case air filter
elementsClean. Replace if necessary.√√√√
6*BatteryCheck electrolyte level and specific gravity.
Make sure that the breather hose is properly routed.√√√√
7*Front brakeCheck operation, fluid level and vehicle for fluid leakage.
(See NOTE on page 6-3.)
Replace brake pads if necessary.√√√√√
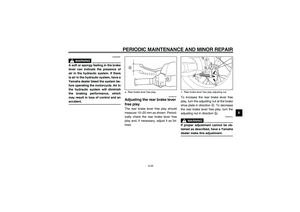
8*Rear brakeCheck operation and adjust brake lever free play.
Replace brake shoes if necessary.√√√√√
9*WheelsCheck runout, spoke tightness and for damage.
Tighten spokes if necessary.√√√√
10*Wheel bearings
Check bearing for looseness or damage.√√√√
11*SwingarmCheck operation and for excessive play.
Lubricate with lithium-soap based grease, every 24,000 km.√√√√
12*Steering bearingsCheck bearing play and steering for roughness.
Lubricate with lithium-soap-based grease, every 12,000 km.√√√√√
13*Chassis fasteners
Make sure that all nuts, bolts and screws are properly tightened.√√√√
14 Sidestand/centerstandCheck operation.
Lubricate.√√√√
15*Front fork
Check operation and for oil leakage.√√√√
U5MXE0.book Page 2 Thursday, December 20, 2001 2:08 PM
Page 30 of 72

PERIODIC MAINTENANCE AND MINOR REPAIR
6-3
6
* Since these items require special tools, data and technical skills, have a Yamaha dealer perform the service.
EAU03057*
NOTE:_ �
From 16,000 km, repeat the maintenance intervals starting from 4,000 km.
�
Depending on riding conditions, the V-belt replacement interval may vary.
�
The air filter needs more frequent service if you are riding in unusually wet or dusty areas.
�
Hydraulic brake system
After disassembling the brake master cylinder, and caliper cylinder, always change the fluid. Regularly check the
brake fluid level and fill reservoir as required.
Replace the oil seals on the inner parts of the brake master cylinder and caliper cylinder every two years.
Replace the brake hose every four years or if cracked or damaged.
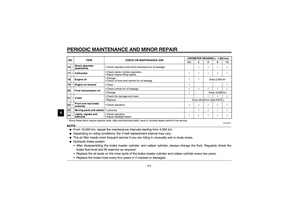
_16
*Shock absorber
assembliesCheck operation and shock absorbers for oil leakage.√√√√
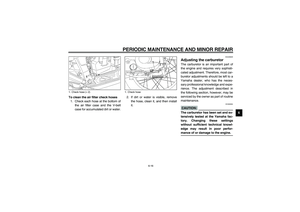
17*CarburetorCheck starter (choke) operation.
Adjust engine idling speed.√√√√√
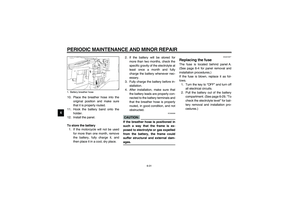
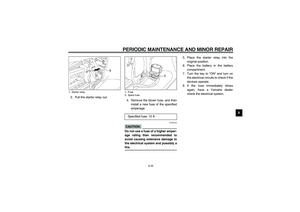
18 Engine oilChange.
Check oil level and vehicle for oil leakage.√√Every 2,000 km
19*Engine oil strainer
Clean.√√
20 Final transmission oilCheck vehicle for oil leakage.√√√√√
Change.√Every 10,000 km
21*V-beltCheck the damage and wear.√√√
Replace. Every 25,000 km (See NOTE.)
22*Front and rear brake
switchesCheck operation.√√√√√
23 Moving parts and cables
Lubricate.√√√√
24*Lights, signals and
switchesCheck operation.
Adjust headlight beam.√√√√√ NO. ITEM CHECK OR MAINTENANCE JOBODOMETER READING (
×1,000 km)
0.5 2 4 8 12
U5MXE0.book Page 3 Thursday, December 20, 2001 2:08 PM
Page 31 of 72
PERIODIC MAINTENANCE AND MINOR REPAIR
6-4
6
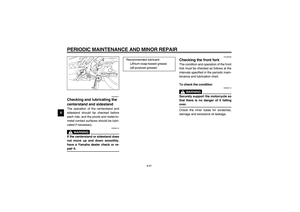
EAU03516
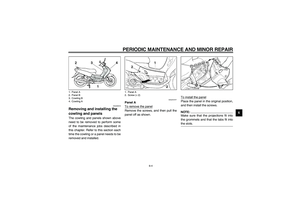
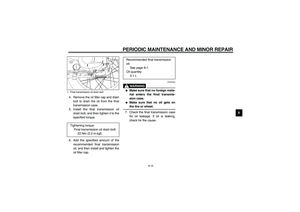
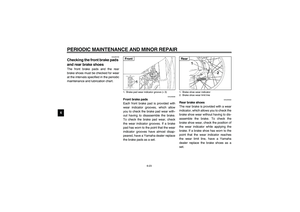
Removing and installing the
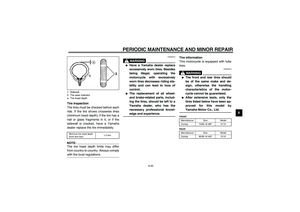
cowling and panels The cowling and panels shown above
need to be removed to perform some
of the maintenance jobs described in
this chapter. Refer to this section each
time the cowling or a panel needs to be
removed and installed.
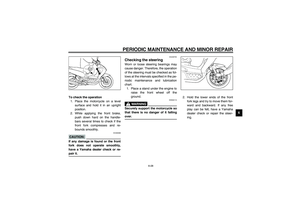
EAU01074*
Panel A
To remove the panelRemove the screws, and then pull the
panel off as shown.To install the panel
Place the panel in the original position,
and then install the screws.NOTE:_ Make sure that the projections fit into
the grommets and that the tabs fit into
the slots. _
1. Panel A
2. Panel B
3. Cowling B
4. Cowling A
1. Panel A
2. Screw (× 2)
U5MXE0.book Page 4 Thursday, December 20, 2001 2:08 PM
Page 32 of 72
PERIODIC MAINTENANCE AND MINOR REPAIR
6-5
6
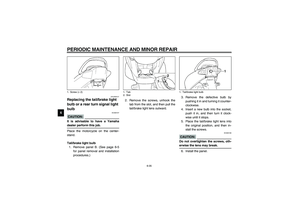
EAU03971
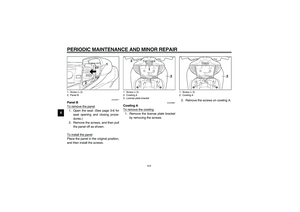
Panel B
To remove the panel1. Open the seat. (See page 3-6 for
seat opening and closing proce-
dures.)
2. Remove the screws, and then pull
the panel off as shown.
To install the panelPlace the panel in the original position,
and then install the screws.
EAU03886*
Cowling A
To remove the cowling1. Remove the license plate bracket
by removing the screws.2. Remove the screws on cowling A.
1. Screw (× 2)
2. Panel B
1. Screw (× 2)
2. Cowling A
3. License plate bracket
1. Screw (× 2)
2. Cowling A
U5MXE0.book Page 5 Thursday, December 20, 2001 2:08 PM


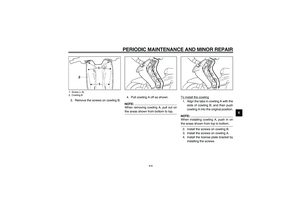


2. Remove the screws, and then pull
the pane")