Page 17 of 122
13
MEXICAN
SEAFOOD
OTHER
ALL SHOPPING
GROCERY STORE
SHOPPING
ALL TRAVEL
AIRPORT (all search areas)
BUS STATION
COMMUTER RAIL STATION
FERRY TERMINAL
HISTORICAL MONUMENTS
HOTEL
PARK AND RIDE
RENTAL CAR AGENCY
REST AREA
TOURIST INFORMATION
TRAIN STATION
ALL OTHER
BUSINESS FACILITY
CITY CENTER/NAMED
PLACE
Page 18 of 122

14Touching the
ºMarked Pointº switch
on the destination screen displays your
list of registered marked points. See
page 49 on registering and editing
marked points.
UN024
When you touch the of your desired
item, the screen changes and displays
the map location of the selected destina-
tion and the route preference. (See ºEn-
tering Destinationº on page 19.) There are 4 ways to list the marked point
by touching switches on bottom of the
screen.
Sort by Mark:
Touch this switch to list the
marked points by the registered icon. There
are 16 different normal purpose icons, 5 spe-
cial purpose icons and 3 sound icons. (For
details, see page 51.)
Sort by Date: Touch this switch to list the
marked points in order of registered date.
Sort by Name: Touch this switch to list the
marked points in alphabetical order.
Sort by Dist: Touch this switch to list the
marked points in order of shorter distance
from your current location.
While driving, only special purpose icons will
be shown on the screen. Touch the
ºPrevious Destinationº
switch on the destination screen.
UN025
The screen lists to 10 previously set destina-
tions. During driving, the screen lists 5 pre-
viously set destinations.
Select your desired destination. The
screen changes and displays the map
location of the selected destination and
the route preference. (See ºEntering
Destinationº on page 19.)
Destination Input by MARKED
POINT
Destination Input by PREVIOUS
DESTINATION
Page 19 of 122

15
You can delete the list of previous destina-
tions
while you stop your car, if you no longer
need them. However, the system must de-
lete the complete list and does not allow re-
moving single entries.
When you touch the
ºDelete Allº
switch, a message appears to confirm
your request to delete the list. If you are
sure, touch the
ºYESº switch. If not,
touch the
ºNOº switch. Touch the
ºHomeº switch on the des-
tination input screen.
The screen changes and displays the
map location of your home and route
preference. (See ºEntering Destinationº
on page 19.)
The system starts the guidance from your
current position to your home immediately
after you touch the
ºHomeº switch during
driving.
If your home is not registered yet,
the
ºHomeº switch is dimmed.
For the steps to register your home, see
ºRegistration of your homeº on page 26. By touching the
ºEmergencyº switch
on the destination input screen, the dis-
play changes to a screen to select police
stations, hospitals or dealers. During
driving, only nearby police stations, hos-
pitals or dealers are shown. The current
position is shown with an address, the
latitude and the longitude at the top of the
screen.
UN026
When you touch your desired emergency
category, the selected emergency category
list is displayed.
Destination Input by HOME Destination Input by
EMERGENCY
Page 20 of 122
16
UN027
The distance from your current position up to
the destination is displayed on the right of the
name.
You can see the names of the emergency
destinations in alphabetical order by touch-
ing the
ºName Sortº switch on the
screen.
Touch the
of your desired item. The
screen changes and displays the map
location of the selected destination and
the route preference. (See
ºEntering
Destinationº on page 19.)
Touch the
ºInfoº switch on the screen to
display the selected emergency destination
name, address and telephone number.
INFORMATION
The navigation system does not guide in areas while route guidance is un-available. (See page 38.)
Touch the ºIntersectionº switch on
the destination screen.
UN028
Input the name of the two intersecting
streets which are located near the des-
tination to be set.
When you touch the
ºListº switch or the
number of sites becomes 4 or less, the list of
matching street names appears.
Destination Input by
INTERSECTION
Page 21 of 122

17
UN029
Touch the of your desired item. After
inputting the two intersecting streets, the
screen changes and displays the map
location of the selected destination and
the route preference. (See ºEntering
Destinationº on page 19.)
EMV3111U
If the same two streets cross at more than
one intersection, the screen changes and
displays the menu to select the city name
where the streets intersect. Select the city,
and the map location of the selected destina-
tion and the route preference. (See ºEnter-
ing Destinationº on page 19.) To input a freeway entrance or exit, touch
the
ºFwy Entrance/Exitº switch on
the destination input screen.
UN030
Be sure to use the complete name of the
freeway or highway, including the hyphen,
when entering the destination. Freeways
and interstates use an ºIº (I-405). US high-
ways use the state designation before the
number (CA-118).
As the number of matching freeways de-
creases, you can touch the
ºListº switch to
display the list. When the number of sites be-
comes 4 or less, the list screen appears au-
tomatically.
Destination Input by FREEWAY
ENTRANCE or EXIT
Page 22 of 122
18
UN031
Select the desired freeway by touching
the .
UN032
You can then select either a freeway ºEn-
tranceº
or ºExitº.
UN033
Touch the of the desired entrance or
exit name. The screen changes and dis-
plays the map location of the selected
destination and the route preference.
(See ºEntering Destinationº on page 19.) There are 2 ways to list the freeway en-
trance or exit.
Dist Sort: Touch this switch to list the en-
trances or exits in order of distance from your
current location.UN034
Name
Sort: Touch this switch to list the en-
trances or exits in alphabetical order.
Page 23 of 122

19
Touch the
ºPrevious Starting
Pointº
switch on the destination screen.
The screen changes and displays the
map location of the previous starting
point and the route preference. (See ºEn-
tering Destinationº.)
If you have not used the navigation yet, the
ºPrevious Starting Pointº switch is
dimmed. Touch
the
ºMapº switch on the destina-
tion screen.
UN035
The screen changes and displays the
map location of the current position and
the route preference. (See ºEntering
Destinationº.) After you input the destination by one of
the ten methods, the screen changes and
displays the map location of
the selected
destination and the route preference.
You can move and set the cursor at a de-
sired point. (For the method of how to move
the cursor, see page 3.)
When you touch the
ºEnterº switch, the
system starts searching for a route to your
destination using the conditions entered.
Route Preference
Touch the
ºChangeº switch to change the
conditions which are to determine the route
to your destination.
Destination Input by PREVIOUS
STARTING POINT Destination Input by MAP Entering Destination
Page 24 of 122

20You are given a number of choices on the
conditions which the system uses to deter-
mine the route to your destination.
UN202
Touch the Onº switch of ºMinimize
Freeway Useº to search for a route other
than freeways as much as possible. (In
some cases, the route cannot avoid running
on a freeway.)
Touch the
Onº switch of ºMinimize Toll
Road Useº to search for a route other than
toll roads as much as possible.
Touch the
Onº switch of ºMinimize
Ferry Useº to search for a route without us-
ing a ferry as much as possible.
The switches you select are highlighted in
green. After choosing conditions, touch the
ºEnterº switch.
UN037
During the route search, ºRoute Search-
ingº appears at the top of the screen and
changes color from the left. When the
search is completed, three types of
routes are displayed on the screen.
UN038
Touch the ºNextº switch to choose one
from the three routes. Route 1:
A route on which you can reach the
destination in the shortest time.
Route 2: A route on which you can reach the
destination in the shortest distance.
Route 3: Other route.
After selecting one, you can start the route
guidance by touching the
ºStartº switch or
starting to move your vehicle.
If you want to set a way point between the
starting point and the destination or change
the search condition, touch the
ºChg.
Routeº
switch. The screen changes and
displays the change route menu. (For de-
tails, see page 22.)
When you keep touching the
ºStartº
switch until you hear a beep, Demo Mode will
start.
 1
1 2
2 3
3 4
4 5
5 6
6 7
7 8
8 9
9 10
10 11
11 12
12 13
13 14
14 15
15 16
16 17
17 18
18 19
19 20
20 21
21 22
22 23
23 24
24 25
25 26
26 27
27 28
28 29
29 30
30 31
31 32
32 33
33 34
34 35
35 36
36 37
37 38
38 39
39 40
40 41
41 42
42 43
43 44
44 45
45 46
46 47
47 48
48 49
49 50
50 51
51 52
52 53
53 54
54 55
55 56
56 57
57 58
58 59
59 60
60 61
61 62
62 63
63 64
64 65
65 66
66 67
67 68
68 69
69 70
70 71
71 72
72 73
73 74
74 75
75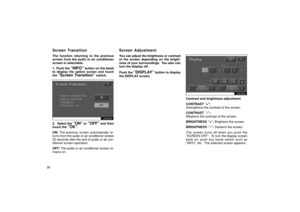 76
76 77
77 78
78 79
79 80
80 81
81 82
82 83
83 84
84 85
85 86
86 87
87 88
88 89
89 90
90 91
91 92
92 93
93 94
94 95
95 96
96 97
97 98
98 99
99 100
100 101
101 102
102 103
103 104
104 105
105 106
106 107
107 108
108 109
109 110
110 111
111 112
112 113
113 114
114 115
115 116
116 117
117 118
118 119
119 120
120 121
121
BUS STATION
COMMUTER RAIL STATION
FERRY TERMINAL
HISTORICAL MONUMENTS
HOTEL
PARK AND RIDE
RENTAL CAR")

