Page 167 of 1690
± COOLINGENGINE COOLANT (1CD±FTV)
16±45
AVENSIS REPAIR MANUAL (RM1018E)
3. CHECK FOR ENGINE COOLANT LEAKS
(a) Fill the radiator with coolant and attach a radiator cap tester.
(b) Pump it to 137 kPa (1.4 kgf/cm
2,
19.9 psi), and check that the pressure does not drop.
Page 168 of 1690
160MH±01
A64364
Radiator CapCylinder Block
Drain Cock Plug
Drain Pipe
Radiator
Drain Cock Plug
± COOLINGENGINE COOLANT (1ZZ±FE/3ZZ±FE)
16±7
AVENSIS REPAIR MANUAL (RM1018E)
ENGINE COOLANT (1ZZ±FE/3ZZ±FE)
REPLACEMENT
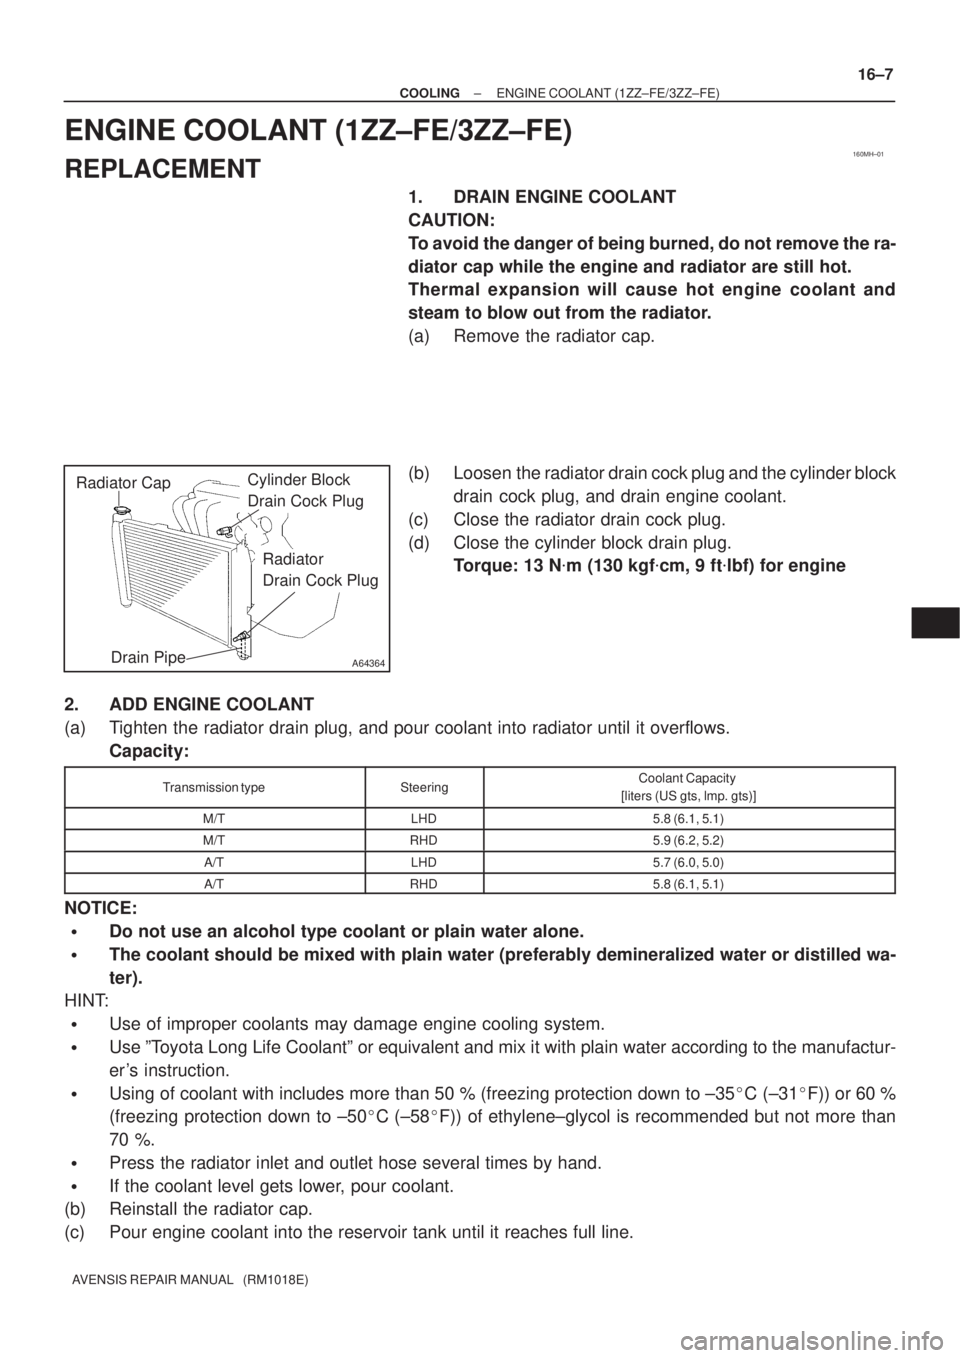
1. DRAIN ENGINE COOLANT
CAUTION:
To avoid the danger of being burned, do not remove the ra-
diator cap while the engine and radiator are still hot.
Thermal expansion will cause hot engine coolant and
steam to blow out from the radiator.
(a) Remove the radiator cap.
(b) Loosen the radiator drain cock plug and the cylinder block
drain cock plug, and drain engine coolant.
(c) Close the radiator drain cock plug.
(d) Close the cylinder block drain plug.
Torque: 13 N�m (130 kgf�cm, 9 ft�lbf) for engine
2. ADD ENGINE COOLANT
(a) Tighten the radiator drain plug, and pour coolant into radiator until it overflows.
Capacity:
Transmission typeSteeringCoolant Capacity
[liters (US gts, lmp. gts)]
M/TLHD5.8 (6.1, 5.1)
M/TRHD5.9 (6.2, 5.2)
A/TLHD5.7 (6.0, 5.0)
A/TRHD5.8 (6.1, 5.1)
NOTICE:
�Do not use an alcohol type coolant or plain water alone.
�The coolant should be mixed with plain water (preferably demineralized water or distilled wa-
ter).
HINT:
�Use of improper coolants may damage engine cooling system.
�Use ºToyota Long Life Coolantº or equivalent and mix it with plain water according to the manufactur-
er's instruction.
�Using of coolant with includes more than 50 % (freezing protection down to ±35�C (±31�F)) or 60 %
(freezing protection down to ±50�C (±58�F)) of ethylene±glycol is recommended but not more than
70 %.
�Press the radiator inlet and outlet hose several times by hand.
�If the coolant level gets lower, pour coolant.
(b) Reinstall the radiator cap.
(c) Pour engine coolant into the reservoir tank until it reaches full line.
Page 169 of 1690
16±8
±
COOLING ENGINE COOLANT(1ZZ±FE/3ZZ±FE)
AVENSIS REPAIR MANUAL (RM1018E)
(d)Warm up the engine until the thermostat valve begins to open.
HINT:
Press the radiator inlet and outlet hose several times by hand during th\
e warming up.
(e)Stop the engine and wait until the coolant temperature gets cold. Then remov\
e the radiator cap to check the coolant level.
�If the level gets lower, perform the procedures from (a) through (e) again.
�If the level does not gets lower, fill the reservoir tank with engine coolant.
3.CHECK FOR ENGINE COOLANT LEAKS (See page 16±1)
Page 170 of 1690
160MX±01
16±24
±
COOLING RADIATOR ASSY(1AZ±FE)
AVENSIS REPAIR MANUAL (RM1018E)
RADIATOR ASSY(1AZ±FE)
REPLACEMENT
1.DRAIN COOLANT (See page 16±19)
2.REMOVE RADIATOR SUPPORT OPENING COVER
3.REMOVE ENGINE ROOM COVER SIDE
4.REMOVE ENGINE UNDER COVER RH
5.DISCONNECT RADIATOR HOSE INLET
6.DISCONNECT RADIATOR HOSE OUTLET
7.REMOVE RADIATOR SUPPORT UPPER
(a)Disconnect the fan w/ motor wire harness, connector and the horn connect\
or.
(b)Remove 4 bolts, the nut and the radiator support.
8.REMOVE RADIATOR ASSY
(a)Remove 2 upper support, and radiator assembly
9.REMOVE RADIATOR SUPPORT LOWER
10.REMOVE FAN ASSY W/MOTOR
(a)Remove 6 bolts and fan w/motor.
11.INSTALL FAN ASSY W/MOTOR
12.INSTALL RADIATOR SUPPORT LOWER
13.INSTALL RADIATOR ASSY
14.INSTALL RADIATOR SUPPORT UPPER
(a)Install radiator support with 2 bolts. Torque: 19 N �m (194 kgf �cm,14 ft �lbf)
15.ADD COOLANT (See page 16±19)
16.INSPECT CHECK FOR ENGINE COOLANT LEAKS (See page 16±13)
Page 171 of 1690
160MS±01
16±36
±
COOLING RADIATOR ASSY(1AZ±FSE)
AVENSIS REPAIR MANUAL (RM1018E)
RADIATOR ASSY(1AZ±FSE)
REPLACEMENT
1.DRAIN COOLANT (See page 16±31)
2.REMOVE RADIATOR SUPPORT OPENING COVER
3.REMOVE ENGINE ROOM COVER SIDE
4.REMOVE ENGINE UNDER COVER RH
5.DISCONNECT RADIATOR HOSE INLET
6.DISCONNECT RADIATOR HOSE OUTLET
7.REMOVE RADIATOR SUPPORT UPPER
(a)Disconnect the fan w/ motor wire harness, connector and the horn connect\
or.
(b)Remove 4 bolts, the nut and the radiator support.
8.REMOVE RADIATOR ASSY
(a)Remove 2 upper support, and radiator assembly
9.REMOVE RADIATOR SUPPORT LOWER
10.REMOVE FAN ASSY W/MOTOR
(a)Remove 6 bolts and fan w/motor.
11.INSTALL FAN ASSY W/MOTOR
12.INSTALL RADIATOR SUPPORT LOWER
13.INSTALL RADIATOR ASSY
14.INSTALL RADIATOR SUPPORT UPPER
(a)Install radiator support with 2 bolts. Torque: 19 N �m (194 kgf �cm,14 ft �lbf)
15.ADD COOLANT (See page 16±31)
16.INSPECT CHECK FOR ENGINE COOLANT LEAKS (See page 16±25)
Page 172 of 1690
160MG±01
±
COOLING RADIATOR ASSY(1CD±FTV)
16±51
AVENSIS REPAIR MANUAL (RM1018E)
RADIATOR ASSY(1CD±FTV)
REPLACEMENT
1.DRAIN ENGINE COOLANT(See page 16±44)
2.REMOVE RADIATOR SUPPORT OPENING COVER
3.REMOVE ENGINE ROOM COVER SIDE
4.REMOVE RADIATOR RESERVE TANK ASSY(See page 16±50)
5.DISCONNECT RADIATOR HOSE INLET
6.DISCONNECT RADIATOR HOSE OUTLET
7.REMOVE RADIATOR ASSY
(a)Remove the 2 bolts and separate the relay box.
(b)Remove the 2 upper support and radiator assy.
8.REMOVE RADIATOR SUPPORT LOWER
9.REMOVE FAN ASSY W/MOTOR
(a)Remove the 2 bolts and the fan w/motor.
10.INSTALL FAN ASSY W/MOTOR
Torque: 7.5 N �m (76 kgf �cm, 66 in. �lbf)
11.INSTALL RADIATOR ASSY
(a)Install the 2 upper support and the radiator assembly to the vehicle. Torque: 19 N �m (194 kgf �cm, 14 ft �lbf)
(b)Install the 2 bolts and the relay box.
Torque: 5.3 N �m (54 kgf �cm, 47 in. �lbf)
12.INSTALL RADIATOR RESERVE TANK ASSY(See page 16±50)
13.ADD ENGINE COOLANT(See page 16±44)
14.CHECK FOR ENGINE COOLANT LEAKS(See page 16±44)
Page 173 of 1690
160MK±01
A76724
A79300Upper Hook
±
COOLING RADIATOR ASSY(1ZZ±FE/3ZZ±FE)
16±11
AVENSIS REPAIR MANUAL (RM1018E)
RADIATOR ASSY(1ZZ±FE/3ZZ±FE)
REPLACEMENT
1.REMOVE RADIATOR SUPPORT OPENING COVER (See page 14±27)
2.REMOVE ENGINE ROOM COVER SIDE (See page 14±27)
3.ENGINE UNDER COVER SUB±ASSY NO.1 (See page 14±27)
4.DRAIN ENGINE COOLANT (See page 16±1)
5. DISCONNECT RADIATOR HOSE INLET
(a) Disconnect the radiator hose inlet from the radiator.
6. DISCONNECT RADIATOR HOSE OUTLET
(a) Disconnect the radiator hose outlet from the radiator.
7. DISCONNECT OIL COOLER INLET TUBE NO.1 (A/T TRANSAXLE)
(a) Disconnect the oil cooler inlet tube from the radiator.
8. DISCONNECT OIL COOLER OUTLET TUBE NO.1 (A/T TRANSAXLE)
(a) Disconnect the oil cooler outlet tube from the radiator.
9. REMOVE RADIATOR ASSY
(a) Disconnect the fan connector and the 2 harness clamps.
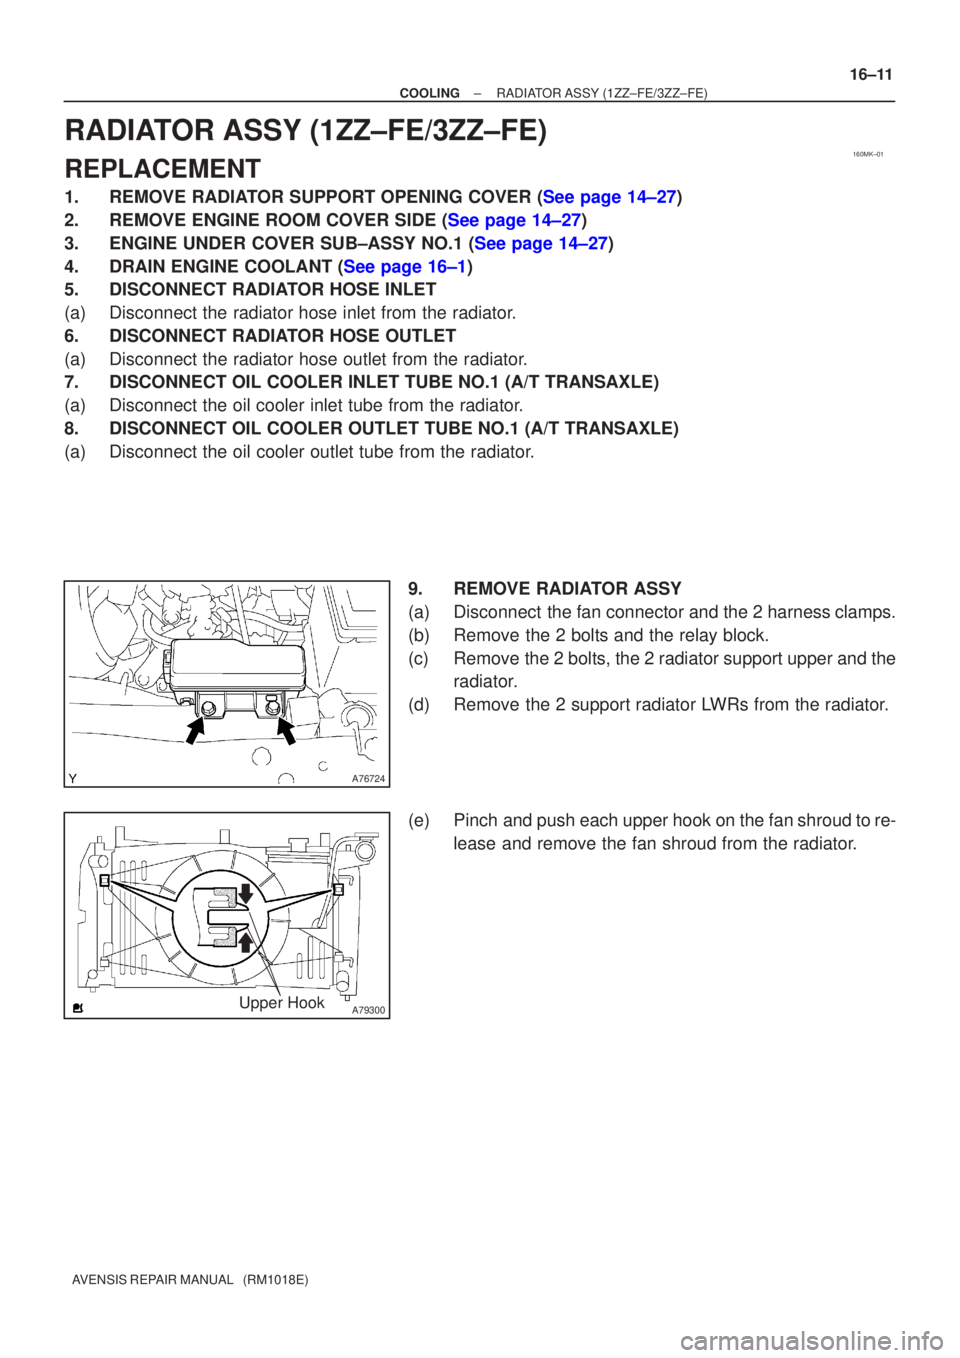
(b) Remove the 2 bolts and the relay block.
(c) Remove the 2 bolts, the 2 radiator support upper and theradiator.
(d) Remove the 2 support radiator LWRs from the radiator.
(e) Pinch and push each upper hook on the fan shroud to re- lease and remove the fan shroud from the radiator.
Page 174 of 1690
A79301
Upper Hook
Fan
Shroud
Radiator
16±12
±
COOLING RADIATOR ASSY(1ZZ±FE/3ZZ±FE)
AVENSIS REPAIR MANUAL (RM1018E)
10.INSTALL RADIATOR ASSY
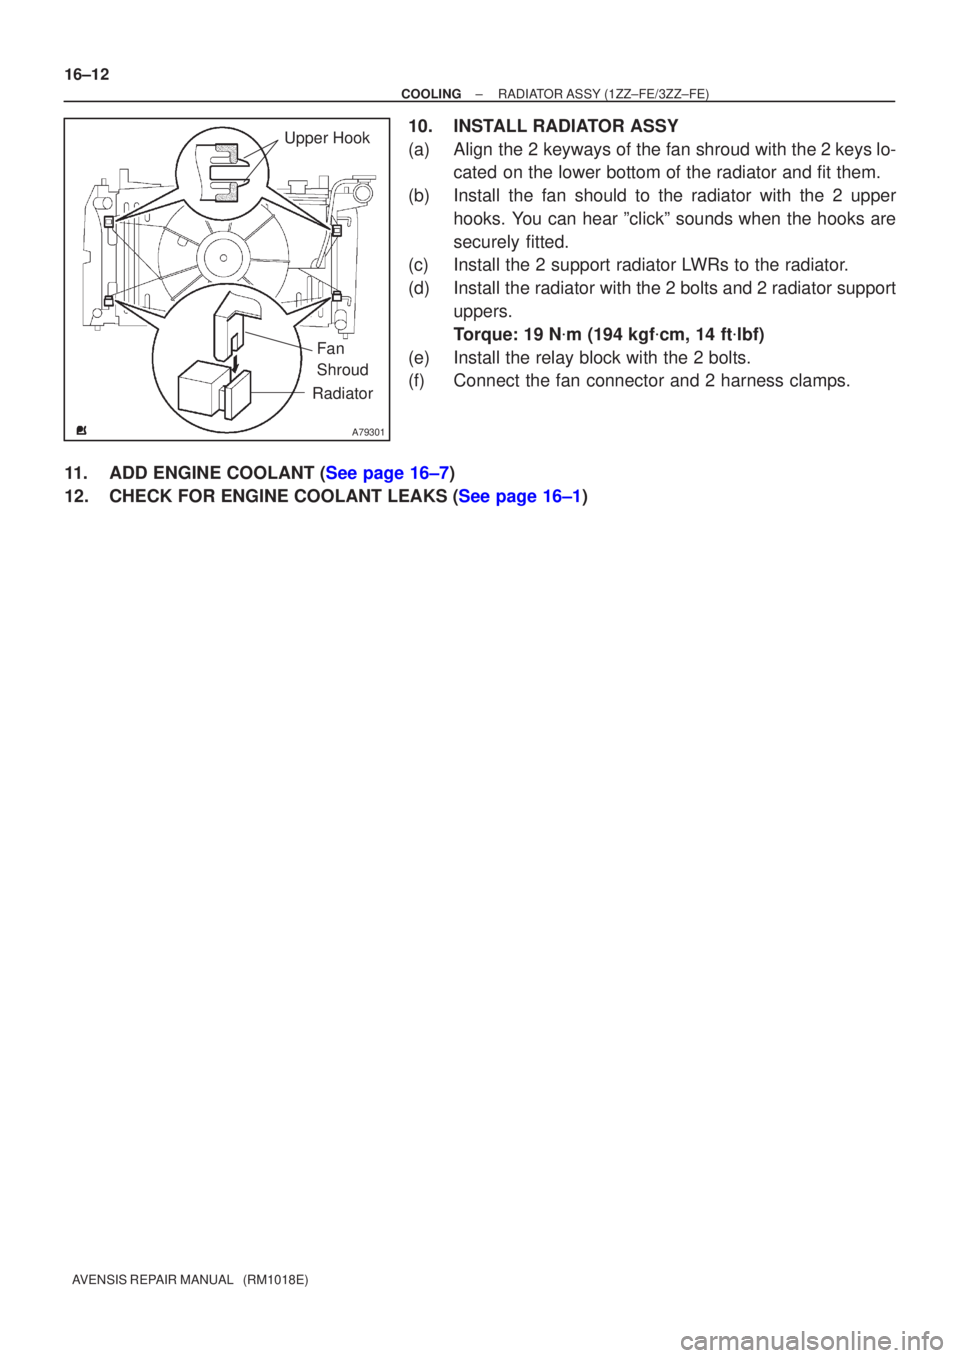
(a)Align the 2 keyways of the fan shroud with the 2 keys lo- cated on the lower bottom of the radiator and fit them.
(b)Install the fan should to the radiator with the 2 upper hooks. You can hear ºclickº sounds when the hooks are
securely fitted.
(c)Install the 2 support radiator LWRs to the radiator.
(d)Install the radiator with the 2 bolts and 2 radiator support
uppers.
Torque: 19 N �m (194 kgf �cm, 14 ft �lbf)
(e)Install the relay block with the 2 bolts.
(f)Connect the fan connector and 2 harness clamps.
11.ADD ENGINE COOLANT (See page 16±7)
12.CHECK FOR ENGINE COOLANT LEAKS (See page 16±1)