Page 1488 of 1690
600K8±01
H42769
60±68
±
SUPPLEMENTAL RESTRAINT SYSTEM AIR BAG SENSOR REAR LH
AVENSIS REPAIR MANUAL (RM1018E)
REPLACEMENT
HINT:
Replacement procedure of the RH side is the same as that for the LH side.
1.PRECAUTION (See page 60±1)
2.DISCONNECT BATTERY NEGATIVE TERMINAL (See page 60±1)
3.REMOVE REAR DOOR SCUFF PLATE LH (See page 76±36)
4.REMOVE REAR SEAT CUSHION ASSEMBLY (SEDAN MODELS) (See page 76±36)
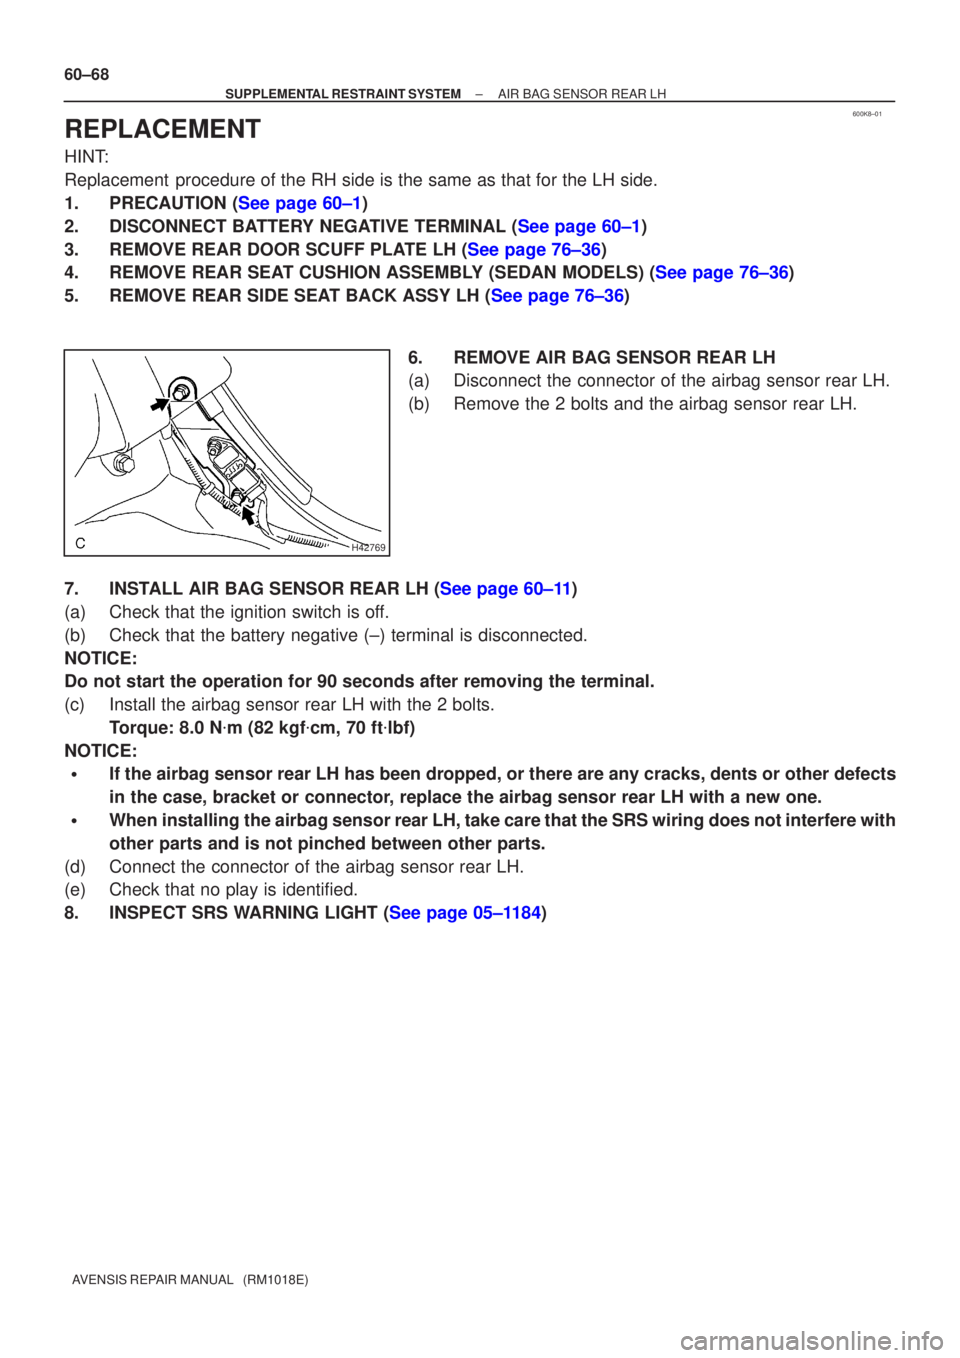
5.REMOVE REAR SIDE SEAT BACK ASSY LH (See page 76±36) 6. REMOVE AIR BAG SENSOR REAR LH
(a) Disconnect the connector of the airbag sensor rear LH.
(b) Remove the 2 bolts and the airbag sensor rear LH.
7.INSTALL AIR BAG SENSOR REAR LH (See page 60±11)
(a) Check that the ignition switch is off.
(b) Check that the battery negative (±) terminal is disconnected.
NOTICE:
Do not start the operation for 90 seconds after removing the terminal.
(c) Install the airbag sensor rear LH with the 2 bolts. Torque: 8.0 N �m (82 kgf �cm, 70 ft �lbf)
NOTICE:
�If the airbag sensor rear LH has been dropped, or there are any cracks, \
dents or other defects
in the case, bracket or connector, replace the airbag sensor rear LH with a new one.
�When installing the airbag sensor rear LH, take care that the SRS wiring does not interfere \
with
other parts and is not pinched between other parts.
(d) Connect the connector of the airbag sensor rear LH.
(e) Check that no play is identified.
8.INSPECT SRS WARNING LIGHT (See page 05±1184)
Page 1491 of 1690
600K1±01
H43005
H42755
Sedan/Liftback Models:
A
B
C
E
D F
G
60±38
±
SUPPLEMENTAL RESTRAINT SYSTEM CURTAIN SHIELD AIR BAG ASSY LH
AVENSIS REPAIR MANUAL (RM1018E)
REPLACEMENT
HINT:
Replacement procedure of the RH side is the same as that for with LH side.
1.PRECAUTION (See page 60±1)
2.DISCONNECT BATTERY NEGATIVE TERMINAL (See page 60±1)
3.REMOVE ROOF HEADLINING ASSY (SEDAN MODELS) (See page 76±36)
4.REMOVE ROOF HEADLINING ASSY (LIFTBACK MODELS) (See page 76±45)
5.REMOVE ROOF HEADLINING ASSY (WAGON MODELS) (See page 76±54) 6. REMOVE CURTAIN SHIELD AIR BAG ASSY LH(SEDAN/LIFTBACK MODELS)
(a) Using a screwdriver, disconnect the connector of the cur- tain shield airbag assy LH.
(b) After removing the 4 screws and the 3 bolts in order as fol- lows, remove the curtain shield airbag assy LH.
A � B � C � D � E � F � G
Page 1507 of 1690
6009P±04
H42622
H43002
±
SUPPLEMENTAL RESTRAINT SYSTEM HORN BUTTON ASSY
60±17
AVENSIS REPAIR MANUAL (RM1018E)
REPLACEMENT
1.PRECAUTION (See page 60±1)
2.DISCONNECT BATTERY NEGATIVE TERMINAL (See page 60±1)
3. REMOVE HORN BUTTON ASSY
(a) Place the front wheels facing straight ahead.
(b) Using a torx socket wrench (T30), loosen the 2 torxscrews until the groove along the screw circumference
catches on the screw case.
(c) Pull out the horn button assy from the steering wheel assy and support the horn button assy with one hand as shown
in the illustration.
NOTICE:
When removing the horn button assy, do not pull the airbag
wire harness.
(d) Using a screwdriver, disconnect the airbag connectors.
(e) Disconnect the horn connector.
(f) Remove the horn button assy.
Page 1517 of 1690
600K4±01
H42660
H42661
H42665
60±54
±
SUPPLEMENTAL RESTRAINT SYSTEM INSTRUMENT PANEL AIR BAG ASSY
AVENSIS REPAIR MANUAL (RM1018E)
REPLACEMENT
1.PRECAUTION (See page 60±1)
2.DISCONNECT BATTERY NEGATIVE TERMINAL (See page 60±1)
3. REMOVE INSTRUMENT PANEL HOLE COVER
(a) Using a screwdriver, remove the 2 instrument panel hole cover. 4. REMOVE INSTRUMENT PANEL AIR BAG ASSY
(a) Using a screwdriver disconnect the airbag connector.
(b) Remove the 4 bolts, 2 nuts and the instrument panel air-bag assy.
5. INSTALL INSTRUMENT PANEL AIR BAG ASSY
(a) Install the instrument panel airbag assy.
(b) Connect the airbag connector.
(c) Install the 4 bolts and the 2 nuts. Torque: 18.0 N �m (184 kgf �cm, 13 ft �lbf)
(d) Install the instrument panel hole cover.
6.INSPECT INSTRUMENT PANEL AIR BAG ASSY (See page 60±11)
7.INSPECT SRS WARNING LIGHT (See page 05±1184)
Page 1525 of 1690
600JY±01
H42642
H42643
H42644
Hook
Airbag DoorHook
Front
±
SUPPLEMENTAL RESTRAINT SYSTEM INSTRUMENT PANEL PASSENGER AIR BAG ASSY
60±29
AVENSIS REPAIR MANUAL (RM1018E)
REPLACEMENT
1.PRECAUTION (See page 60±1)
2.DISCONNECT BATTERY NEGATIVE TERMINAL (See page 60±1)
3.REMOVE GLOVE COMPARTMENT DOOR ASSY (See page 71±11)
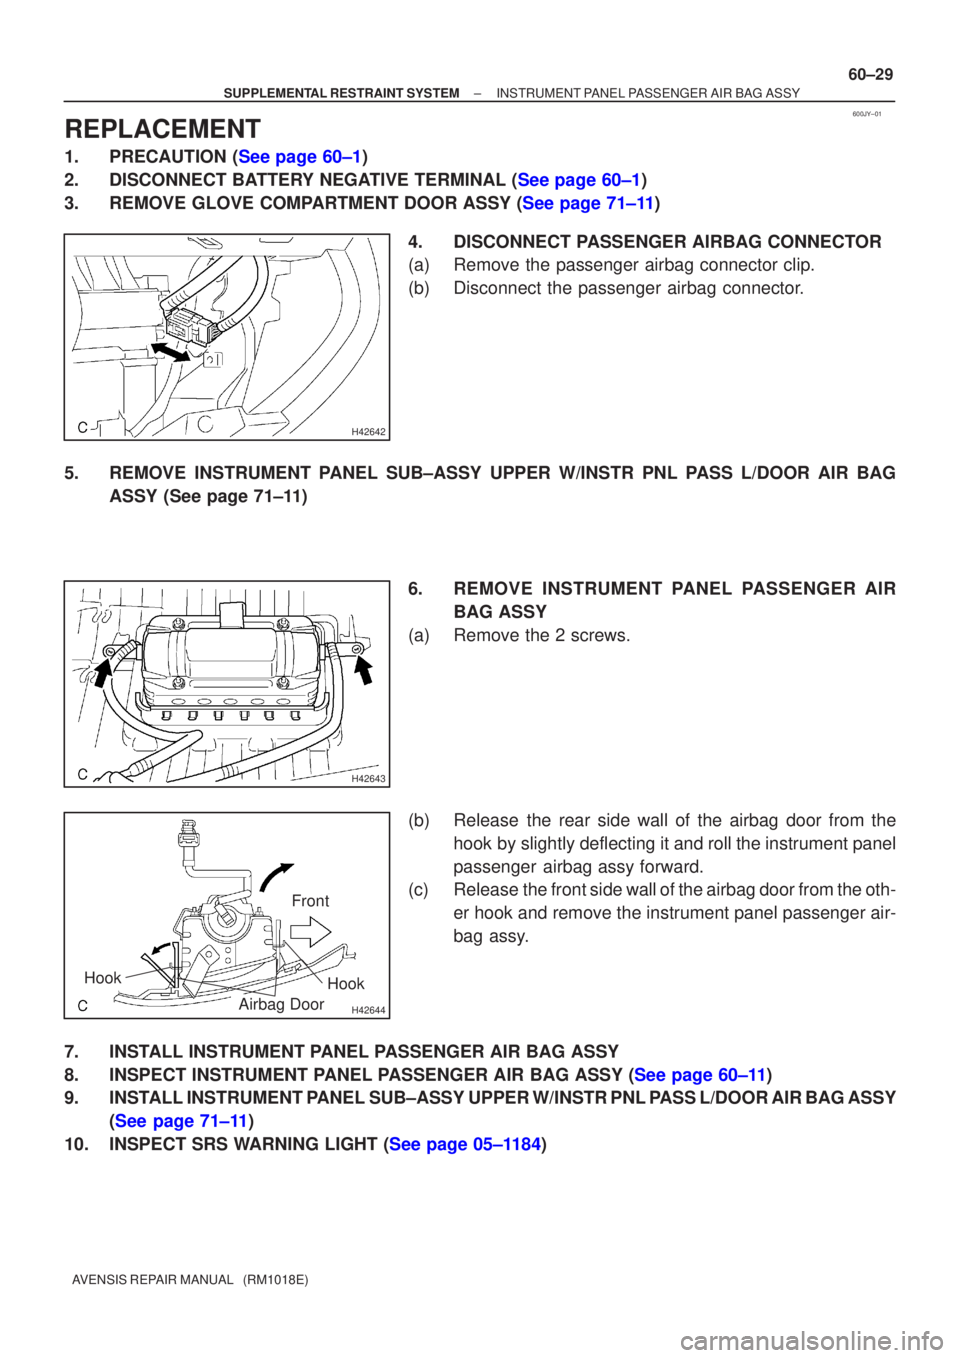
4. DISCONNECT PASSENGER AIRBAG CONNECTOR
(a) Remove the passenger airbag connector clip.
(b) Disconnect the passenger airbag connector.
5. REMOVE INSTRUMENT PANEL SUB±ASSY UPPER W/INSTR PNL PASS L/DOOR AIR BAG ASSY (See page 71±11)
6. REMOVE INSTRUMENT PANEL PASSENGER AIRBAG ASSY
(a) Remove the 2 screws.
(b) Release the rear side wall of the airbag door from the hook by slightly deflecting it and roll the instrument panel
passenger airbag assy forward.
(c) Release the front side wall of the airbag door from the oth-
er hook and remove the instrument panel passenger air-
bag assy.
7. INSTALL INSTRUMENT PANEL PASSENGER AIR BAG ASSY
8.INSPECT INSTRUMENT PANEL PASSENGER AIR BAG ASSY (See page 60±11)
9. INSTALL INSTRUMENT PANEL SUB±ASSY UPPER W/INSTR PNL PASS L/DOOR AIR BAG ASSY (See page 71±11)
10.INSPECT SRS WARNING LIGHT (See page 05±1184)
Page 1533 of 1690
600AB±04
H42640
60±70
±
SUPPLEMENTAL RESTRAINT SYSTEM SEAT POSITION AIR BAG SENSOR
AVENSIS REPAIR MANUAL (RM1018E)
REPLACEMENT
HINT:
Replacement procedure of the RH side is the same as that of the LH side.
1.PRECAUTION (See page 60±1)
2.DISCONNECT BATTERY NEGATIVE TERMINAL (See page 60±1)
3.REMOVE SEAT TRACK COVER LH (See page 72±16)
4.REMOVE SEAT TRACK BRACKET COVER INNER LH (See page 72±16)
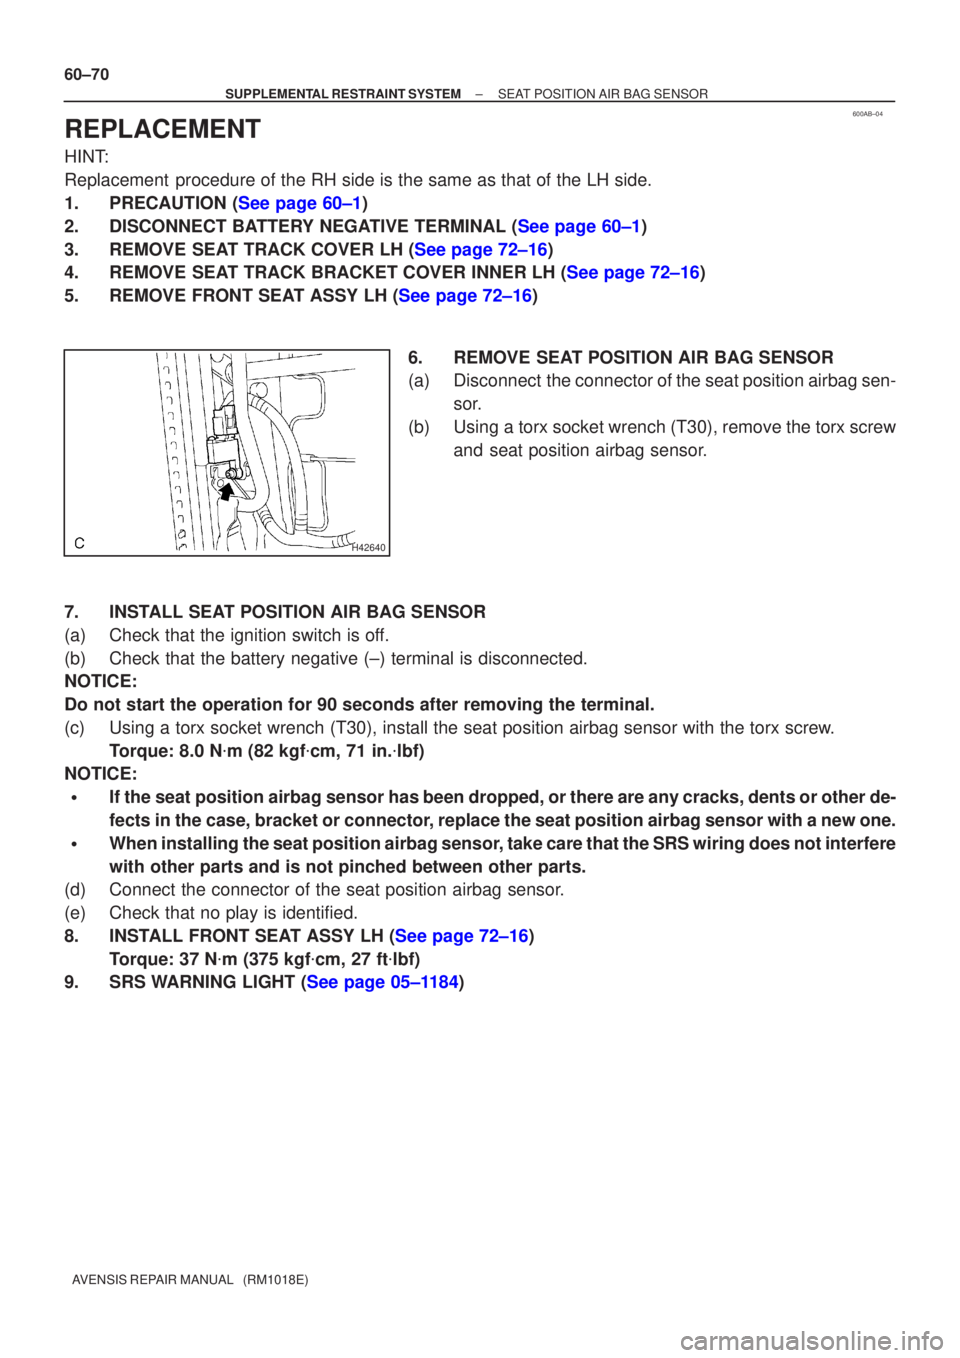
5.REMOVE FRONT SEAT ASSY LH (See page 72±16) 6. REMOVE SEAT POSITION AIR BAG SENSOR
(a) Disconnect the connector of the seat position airbag sen-sor.
(b) Using a torx socket wrench (T30), remove the torx screw and seat position airbag sensor.
7. INSTALL SEAT POSITION AIR BAG SENSOR
(a) Check that the ignition switch is off.
(b) Check that the battery negative (±) terminal is disconnected.
NOTICE:
Do not start the operation for 90 seconds after removing the terminal.
(c) Using a torx socket wrench (T30), install the seat position airbag sen\
sor with the torx screw. Torque: 8.0 N �m (82 kgf �cm, 71 in. �lbf)
NOTICE:
�If the seat position airbag sensor has been dropped, or there are any cracks, dents or other de-
fects in the case, bracket or connector, replace the seat position airbag sensor with a new one.
�When installing the seat position airbag sensor, take care that the SRS wiring does not interfere
with other parts and is not pinched between other parts.
(d) Connect the connector of the seat position airbag sensor.
(e) Check that no play is identified.
8.INSTALL FRONT SEAT ASSY LH (See page 72±16)
Torque: 37 N �m (375 kgf �cm, 27 ft �lbf)
9.SRS WARNING LIGHT (See page 05±1184)
Page 1535 of 1690
600A7±03
H42767
60±66
±
SUPPLEMENTAL RESTRAINT SYSTEM SIDE AIR BAG SENSOR ASSY LH
AVENSIS REPAIR MANUAL (RM1018E)
REPLACEMENT
HINT:
Replacement procedure of the RH side is the same as that for with LH side.
1.PRECAUTION (See page 60±1)
2.DISCONNECT BATTERY NEGATIVE TERMINAL (See page 60±1)
3.REMOVE FRONT DOOR SCUFF PLATE LH (See page 76±36)
4.REMOVE REAR DOOR SCUFF PLATE LH (See page 76±36)
5.REMOVE FRONT DOOR WEATHERSTRIP LH (See page 76±36)
6.REMOVE REAR DOOR WEATHERSTRIP LH (See page 76±36)
7.REMOVE CENTER PILLAR GARNISH LOWER LH (See page 76±36)
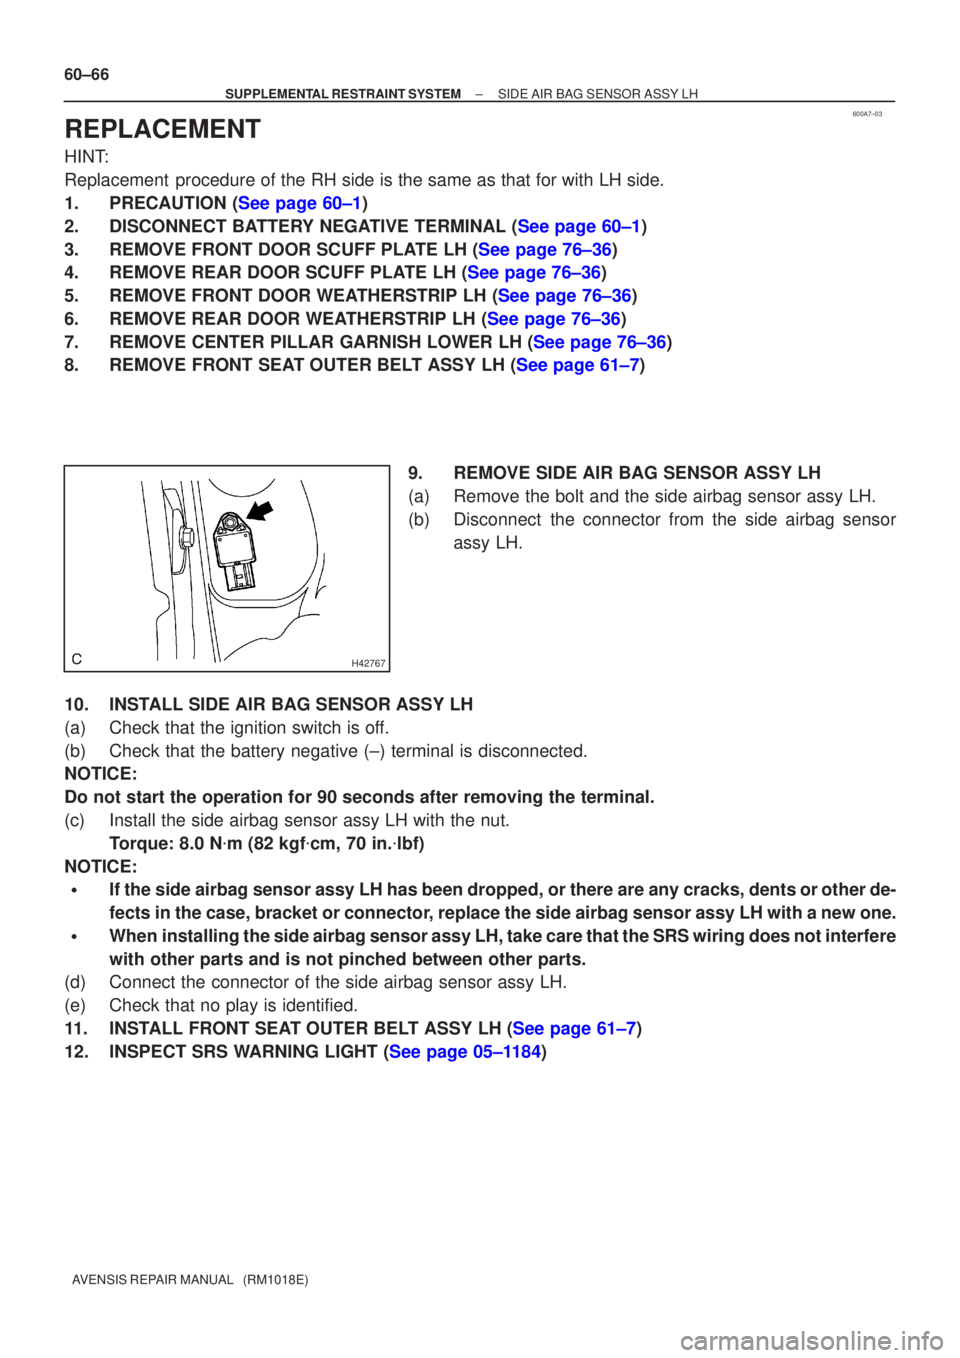
8.REMOVE FRONT SEAT OUTER BELT ASSY LH (See page 61±7) 9. REMOVE SIDE AIR BAG SENSOR ASSY LH
(a) Remove the bolt and the side airbag sensor assy LH.
(b) Disconnect the connector from the side airbag sensorassy LH.
10. INSTALL SIDE AIR BAG SENSOR ASSY LH
(a) Check that the ignition switch is off.
(b) Check that the battery negative (±) terminal is disconnected.
NOTICE:
Do not start the operation for 90 seconds after removing the terminal.
(c) Install the side airbag sensor assy LH with the nut. Torque: 8.0 N �m (82 kgf �cm, 70 in. �lbf)
NOTICE:
�If the side airbag sensor assy LH has been dropped, or there are any cra\
cks, dents or other de-
fects in the case, bracket or connector, replace the side airbag sensor assy LH with a new one.
�When installing the side airbag sensor assy LH, take care that the SRS wiring\
does not interfere
with other parts and is not pinched between other parts.
(d) Connect the connector of the side airbag sensor assy LH.
(e) Check that no play is identified.
11.INSTALL FRONT SEAT OUTER BELT ASSY LH (See page 61±7)
12.INSPECT SRS WARNING LIGHT (See page 05±1184)
Page 1536 of 1690
6009S±04
H42634
H42636 Claw
60±26
±
SUPPLEMENTAL RESTRAINT SYSTEM SPIRAL CABLE SUB±ASSY
AVENSIS REPAIR MANUAL (RM1018E)
SPIRAL CABLE SUB±ASSY
REPLACEMENT
HINT:
COMPONENTS: See page 60±16
1.PRECAUTION (See page 60±1)
2.DISCONNECT BATTERY NEGATIVE TERMINAL (See page 60±1)
3. PLACE FRONT WHEELS FACING STRAIGHT AHEAD
4.REMOVE HORN BUTTON ASSY (See page 60±17)
5.REMOVE STEERING WHEEL ASSY (See page 50±9) SST 09950±50013 (09951±05010, 09952±05010, 09953±05020, 09954±\
05021)
6.REMOVE INSTRUMENT PANEL HOLE COVER (See page 60±54)
7.REMOVE INSTRUMENT PANEL AIR BAG ASSY (See page 60±54)
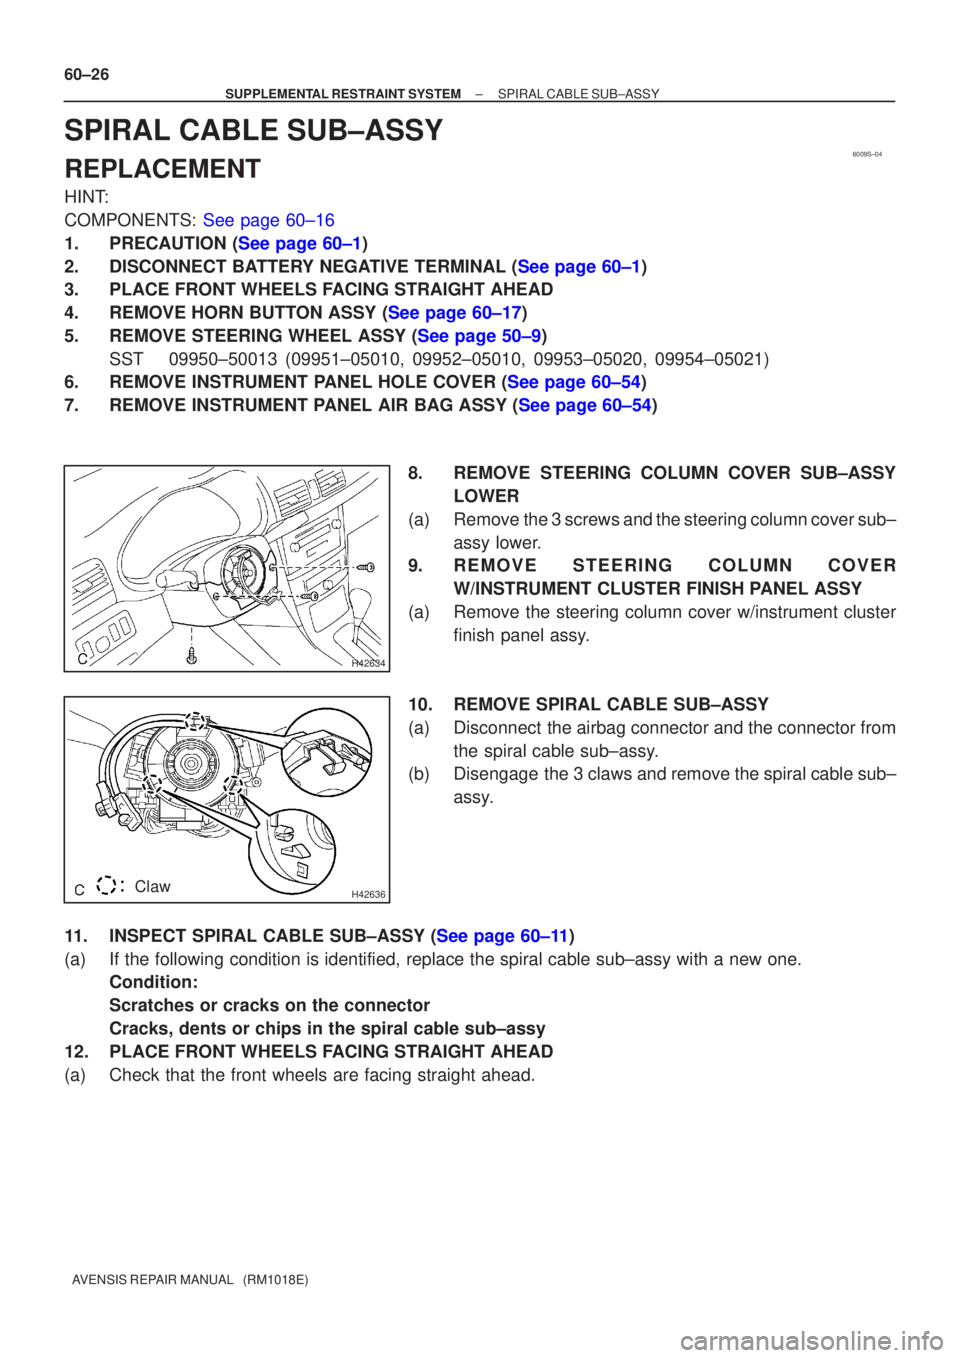
8. REMOVE STEERING COLUMN COVER SUB±ASSYLOWER
(a) Remove the 3 screws and the steering column cover sub± assy lower.
9. REMOVE STEERING COLUMN COVER
W/INSTRUMENT CLUSTER FINISH PANEL ASSY
(a) Remove the steering column cover w/instrument cluster finish panel assy.
10. REMOVE SPIRAL CABLE SUB±ASSY
(a) Disconnect the airbag connector and the connector from the spiral cable sub±assy.
(b) Disengage the 3 claws and remove the spiral cable sub±
assy.
11.INSPECT SPIRAL CABLE SUB±ASSY (See page 60±11)
(a) If the following condition is identified, replace the spiral cable sub±\
assy with a new one. Condition:
Scratches or cracks on the connector
Cracks, dents or chips in the spiral cable sub±assy
12. PLACE FRONT WHEELS FACING STRAIGHT AHEAD
(a) Check that the front wheels are facing straight ahead.