Page 150 of 182
16-09-2002
Rear lights
1 - Brake lights (P 21 W).
2 - Reversing lights (P 21 W).
3 - Direction indicators (PY 21 W).
4 - Fog lamps / Side lights
(P 21/4 W). ☞
Unscrew the two bolts Aand
release the unit,
☞ Disconnect the connector B,
☞ Unscrew the two bolts Cat the
rear of the unit,
☞ Change the faulty bulb.
PRACTICAL INFORMATION 149
Number plate lights (C 5 W) ☞ Insert a thin screwdriver into one of the external holes of the lens.
☞ Push it outwards to unclip it.
☞ Remove the lens.
☞ Unscrew the bolt and release theassembly towards the right to
extract the bulb holder.
☞ Change the faulty bulb.
Chassis cab lights (W 5 W) ☞Unscrew the four bolts to gain access to the bulbs.
Third brake light (W 5 W) ☞
Unscrew the 2 fixing screws.
☞ Release the lamp unit by pushing it outwards.
☞ Disconnect the connector.
☞ Squeeze the two tabs to release
the bulb holder.
☞ Change the faulty bulb.
☞ When refitting, ensure that thelamp unit seal has been put back
in place correctly.
Page 155 of 182

16-09-2002
PRACTICAL INFORMATION151
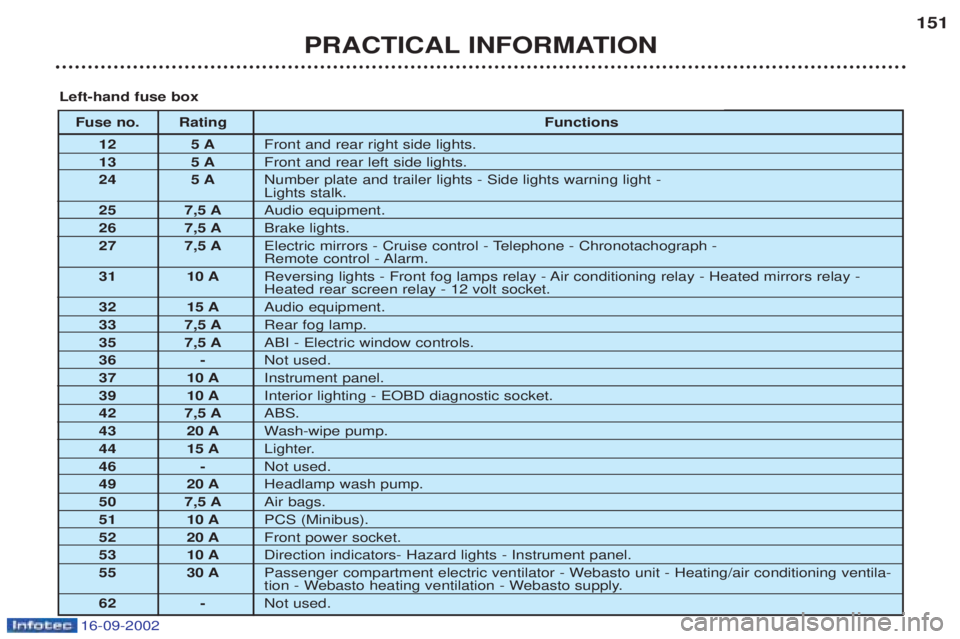
Fuse no. Rating
Functions
12 5 A Front and rear right side lights.
13 5 A Front and rear left side lights.
24 5 A Number plate and trailer lights - Side lights warning light - Lights stalk.
25 7,5 A Audio equipment.
26 7,5 A Brake lights.
27 7,5 A Electric mirrors - Cruise control - Telephone - Chronotachograph -
Remote control - Alarm.
31 10 A Reversing lights - Front fog lamps relay - Air conditioning relay - Heated mirrors relay -Heated rear screen relay - 12 volt socket.
32 15 A Audio equipment.
33 7,5 A Rear fog lamp.
35 7,5 A ABI - Electric window controls.
36 - Not used.
37 10 A Instrument panel.
39 10 A Interior lighting - EOBD diagnostic socket.
42 7,5 A ABS.
43 20 A Wash-wipe pump.
44 15 A Lighter.
46 - Not used.
49 20 A Headlamp wash pump.
50 7,5 A Air bags.
51 10 A PCS (Minibus).
52 20 A Front power socket.
53 10 A Direction indicators- Hazard lights - Instrument panel.
55 30 A Passenger compartment electric ventilator - Webasto unit - Heating/air conditioning ventila-
tion - Webasto heating ventilation - Webasto supply.
62 - Not used.
Left-hand fuse box
Page 157 of 182

16-09-2002
PRACTICAL INFORMATION155
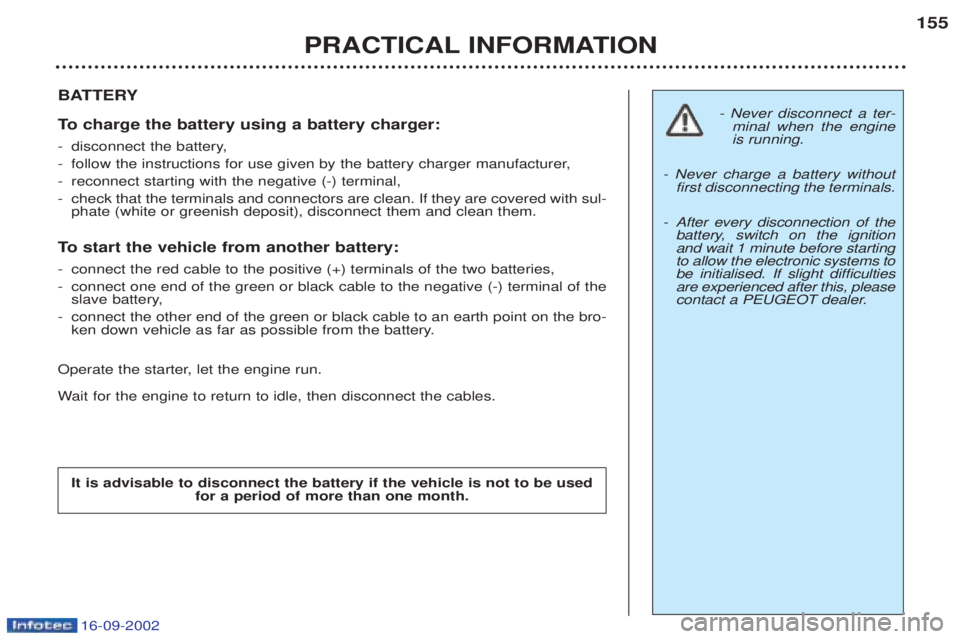
BATTERY
To
charge the battery using a battery charger:
- disconnect the battery,
- follow the instructions for use given by the battery charger manufacturer,
- reconnect starting with the negative (-) terminal,
- check that the terminals and connectors are clean. If they are covered with sul- phate (white or greenish deposit), disconnect them and clean them.
To start the vehicle from another battery:
- connect the red cable to the positive (+) terminals of the two batteries,
- connect one end of the green or black cable to the negative (-) terminal of the
slave battery,
- connect the other end of the green or black cable to an earth point on the bro-
ken down vehicle as far as possible from the battery.
Operate the starter, let the engine run. W ait for the engine to return to idle, then disconnect the cables.
- Never disconnect a ter-
minal when the engine is running.
- Never charge a battery without first disconnecting the terminals.
- After every disconnection of the
battery, switch on the ignitionand wait 1 minute before startingto allow the electronic systems tobe initialised. If slight difficultiesare experienced after this, please
contact a PEUGEOT dealer.
It is advisable to disconnect the battery if the vehicle is not to be used for a period of more than one month.
Page 158 of 182
16-09-2002
PRACTICAL INFORMATION
156
FITTING AUDIO EQUIPMENT
Y our vehicle is equipped with certain
factory-fitted audio equipment under the storage box: Ð roof aerial,
Ð coaxial aerial cable,
Ð basic interference suppression,
Ð supply to front speakers (instru- ment panel),
Ð supply to door speakers,
Ð supply to rear speakers (Minibus),
Ð two 8-way connectors. FITTING SPEAKERS The factory-fitted equipment allows the fitting of: In the front: Ð
165 mm diameter speakers in the front doors,
Ð 100 mm diameter speakers on theinstrument panel,
At the rear (Minibus): Ð 165 mm diameter speakers on the rear side panels (2nd row ofseats),
Ð 100 mm diameter speakers on therear pillars.
Consult a PEUGEOT dealer. A1 : Ð
A2 : Ð
A3 : Ð
A4 : (+) Accessories
A5 : Ð
A6 : (+) Side light
A7 : (+) Permanent
A8 : Earth
B1 : Ð
B2 : Ð
B3 : (+) Front right speaker
B4 : (-) Front right speaker
B5 : (+) Front left speaker
B6 : (Ð) Front left speaker
B7 : Ð
B8 : Ð
Page 160 of 182

16-09-2002
TOWING A TRAILER,
CARAVAN, BOAT ETC.
Only use original PEUGEOT tow bars that have been tested andapproved from the design stage ofyour vehicle. The tow bar must be fitted by a
PEUGEOT dealer. Y our vehicle is basically designed
for transporting people and luggage but it may also be used for towing a
trailer. Driving with a trailer subjects the towing vehicle to more significantstress and its driver must be particu-larly careful. Air density decreases with altitude, thus reducing engine performance.Above 1000 metres, the maximumtowing load must be reduced by 10%and so on for every 1000 metres ofaltitude. Driving advice Distribution of loads:
Distribute the
load in the trailer so that the heaviest items are as close as possible to theaxle and the nose weight approachesthe maximum permitted without excee-ding it. Cooling: towing a trailer on a slope
increases the temperature of the coolant. As the fan is electrically controlled, its cooling capacity is not dependenton the engine speed.
On the contrary, use a high gear to lower the engine speed, and reduceyour speed. The maximum towing load on a long slope depends on the gradient andthe outside temperature. In all cases, pay attention to the coolant temperature. If the warning light comes on, stop
the vehicle and switch off the engineas soon as possible. T
yres: check the tyre pressures of
the towing vehicle and of the trailer,observing the recommended pres-sures. Braking: towing increases the braking
distance.Lights: check the electrical signalling
on the trailer.Side wind: take into acount the
increased sensitivity to side wind.
PRACTICAL INFORMATION
158