Page 2 of 182

16-09-2002
3YOUR BOXER AT A GLANCE
1 -Storage compartment.
2 - Left side vent.
3 - Upper glove box. Passenger air bag.
4 - Storage tray.
5 - Controls:
- Rear door windows
de-icing.
- Fog lamps.- Hazard lights.- Rear fog lamps- ASR.
6 - Audio equipment location or
storage compartment.
7 - Folding writing table.
8 - Central adjustable heating/
ventilation vents and airflow regulation.
9 - Gear lever.
10 - Lights and direction
indicators stalk. 11 -
Instrument dials.
12 - Windscreen wash-wipe
stalk.
13 - Right side vent.
14 - Storage compartment.
15 - Programmable heating.
16 - Right fuse box.
17 - Bonnet release control.
18 - Headlamp height
adjustment.
19 - Driver's air bag. Horn.
20 - Steering wheel adjustment
control.
21 - 12 V accessories socket.
22 - Heating/air conditioning
controls. 23 -
Ashtray.
24 - Storage compartment.
25 - Lighter.
26 - Passenger air bag
disarming control*.
27 - Lower glove box.
28 - Storage compartment.
29 - Left fuse box.
* According to destination.
Page 4 of 182
16-09-2002
Vehicles fitted with front fog
lamps and a rear fog lamp
Front fog lamps. Rear fog lamps. WINDSCREEN WIPERS 4
Single wipe.
0 Off.
1 Intermittent wipe.
2 Normal wipe (moderate rainfall).
3 Rapid wipe (heavy rainfall).
Windscreen wash-wipe: pull thestalk towards you.
5YOUR BOXER AT A GLANCE
STEERING WHEEL
STALKS LIGHTING Front and rear lights
Lights off.
Side lights. Dipped headlamps. Main beam headlamps.
121122
Page 116 of 182

16-09-2002
YOUR BOXER IN DETAIL121
THE LIGHTS STALK Front and rear lights Selection is by turning the ring.
Lights off Side lights Dipped headlamps
Main beam head- lamps Dipped / Main beam change Push the stalk forwards to switch on the main beam headlamps. Pull the stalk towards you to switch
them off. Note:
with the ignition off, when the
driver's door is opened, a buzzer sounds if you have left your lights on. Front fog lamps Press the button in the centre of the
instrument panel. The warning lighton the button comes on. The front fog lamps operate with the dipped and main beam headlamps. Direction indicators (flashers)
Left: downwards.
Right: upwards.
Rear fog lamps Press the button in the centre of the
instrument panel. The warning lighton the button comes on. The rear fog lamps operate with the dipped and main beam headlamps.
In good or rainy weather, both day and night, therear fog lamps are dazz-ling and are prohibited. Do not forget to switch the
fog lamps off when they are no lon- ger needed.
Page 148 of 182

16-09-2002
PRACTICAL INFORMATION147
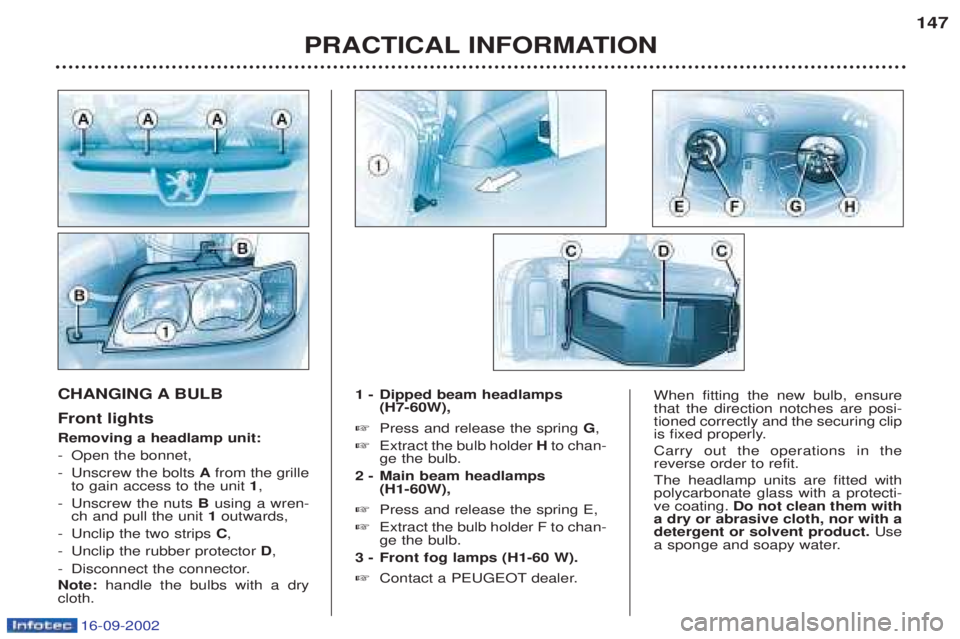
CHANGING A BULB Front lights Removing a headlamp unit: -
Open the bonnet,
- Unscrew the bolts Afrom the grille
to gain access to the unit 1,
- Unscrew the nuts Busing a wren-
ch and pull the unit 1outwards,
- Unclip the two strips C,
- Unclip the rubber protector D,
- Disconnect the connector. Note: handle the bulbs with a dry
cloth. 1 - Dipped beam headlamps
(H7-60W),
☞ Press and release the spring G,
☞ Extract the bulb holder Hto chan-
ge the bulb.
2 - Main beam headlamps (H1-60W),
☞ Press and release the spring E,
☞ Extract the bulb holder F to chan- ge the bulb.
3 - Front fog lamps (H1-60 W). ☞ Contact a PEUGEOT dealer.When fitting the new bulb, ensure that the direction notches are posi-tioned correctly and the securing clip
is fixed properly. Carry out the operations in the reverse order to refit. The headlamp units are fitted with polycarbonate glass with a protecti-ve coating. Do not clean them with
a dry or abrasive cloth, nor with adetergent or solvent product. Use
a sponge and soapy water.
Page 150 of 182
16-09-2002
Rear lights
1 - Brake lights (P 21 W).
2 - Reversing lights (P 21 W).
3 - Direction indicators (PY 21 W).
4 - Fog lamps / Side lights
(P 21/4 W). ☞
Unscrew the two bolts Aand
release the unit,
☞ Disconnect the connector B,
☞ Unscrew the two bolts Cat the
rear of the unit,
☞ Change the faulty bulb.
PRACTICAL INFORMATION 149
Number plate lights (C 5 W) ☞ Insert a thin screwdriver into one of the external holes of the lens.
☞ Push it outwards to unclip it.
☞ Remove the lens.
☞ Unscrew the bolt and release theassembly towards the right to
extract the bulb holder.
☞ Change the faulty bulb.
Chassis cab lights (W 5 W) ☞Unscrew the four bolts to gain access to the bulbs.
Third brake light (W 5 W) ☞
Unscrew the 2 fixing screws.
☞ Release the lamp unit by pushing it outwards.
☞ Disconnect the connector.
☞ Squeeze the two tabs to release
the bulb holder.
☞ Change the faulty bulb.
☞ When refitting, ensure that thelamp unit seal has been put back
in place correctly.
Page 155 of 182

16-09-2002
PRACTICAL INFORMATION151
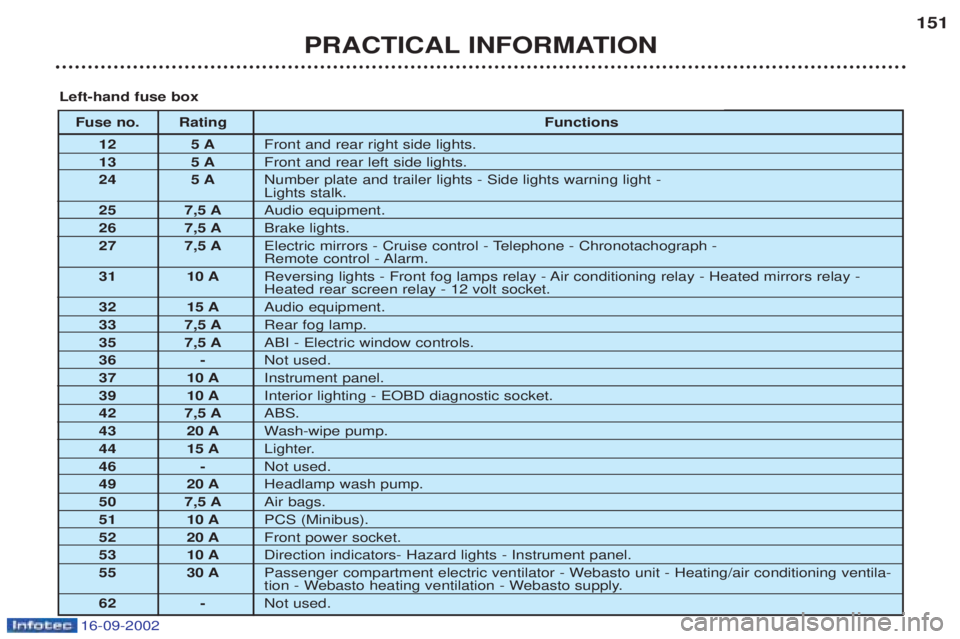
Fuse no. Rating
Functions
12 5 A Front and rear right side lights.
13 5 A Front and rear left side lights.
24 5 A Number plate and trailer lights - Side lights warning light - Lights stalk.
25 7,5 A Audio equipment.
26 7,5 A Brake lights.
27 7,5 A Electric mirrors - Cruise control - Telephone - Chronotachograph -
Remote control - Alarm.
31 10 A Reversing lights - Front fog lamps relay - Air conditioning relay - Heated mirrors relay -Heated rear screen relay - 12 volt socket.
32 15 A Audio equipment.
33 7,5 A Rear fog lamp.
35 7,5 A ABI - Electric window controls.
36 - Not used.
37 10 A Instrument panel.
39 10 A Interior lighting - EOBD diagnostic socket.
42 7,5 A ABS.
43 20 A Wash-wipe pump.
44 15 A Lighter.
46 - Not used.
49 20 A Headlamp wash pump.
50 7,5 A Air bags.
51 10 A PCS (Minibus).
52 20 A Front power socket.
53 10 A Direction indicators- Hazard lights - Instrument panel.
55 30 A Passenger compartment electric ventilator - Webasto unit - Heating/air conditioning ventila-
tion - Webasto heating ventilation - Webasto supply.
62 - Not used.
Left-hand fuse box