Page 1496 of 1767
2. Check oil level.
Never start engine while checking oil level.
Filler plug:
:25-34N×m (2.5 - 3.5 kg-m, 18 - 25 ft-lb)
Changing M/T Oil
Oil capacity:
3.5 liters (6-1/8 Imp pt)
Checking Water Entry
Check water entry in the clutch housing by removing the seal-
ing grommet, whenever driving in deep water or mud.
Checking Transfer Oil
1. Check transfer for leakage.
2. Check oil level.
Never start engine while checking oil level.
ªDEXRON
TMº type Automatic Transmission Fluid is used for
the transfer in the factory. Never add gear oil (API GL-4) to
Automatic Transmission Fluid.
SMA103
SMA255A
SMA369B
SMT483A
YMA009
CHASSIS AND BODY MAINTENANCE
Checking M/T Oil (Cont'd)
MA-37
Page 1497 of 1767
Changing Transfer Oil
Oil capacity:
2.3 liters (2 Imp qt)
When changing transfer oil completely, either ªDEXRON
TMº type
Automatic Transmission Fluid or gear oil (API GL-4) may be used.
Do not mix Automatic Transmission Fluid and gear oil.
Checking Propeller Shaft
Check propeller shaft for damage, looseness or grease leakage.
Checking Differential Gear Oil
1. Check differential for oil leakage.
2. Check oil level.
YMA010
SMA566
SMA118A
SMA440B
SMA417
CHASSIS AND BODY MAINTENANCE
MA-38
Page 1503 of 1767
Checking Fluid Level and Leaks (Power
steering)
Check fluid level.
Fluid level can be checked when the fluid is either hot or cold.
CAUTION:
IDo not overfill.
IRecommended fluid is Automatic Transmission Fluid
ªDEXRON
TMº type.
ICheck lines for improper attachment, leaks, cracks, damage,
loose connections, chafing and deterioration.
Greasing Steering Linkage
Apply multi-purpose grease to point shown in the illustration.
Ventilation Air Filter
FUNCTION
Air inside passenger compartment is kept clean at either recircula-
tion or fresh mode by installing ventilation air filter into cooling unit.
REPLACEMENT PROCEDURES
IRemove glove box.
Refer to BT section.
ITake out ventilation air filter which is secured with one screw,
from cooling unit.
IReplace with new one and reinstall glove box.
NMA058
SST621A
EMA053
RHA336F
NMA070
CHASSIS AND BODY MAINTENANCE
MA-44
Page 1713 of 1767

Supplemental Restraint System (SRS) ªAIR
BAGº and ªSEAT BELT PRE-TENSIONERº
(Dual Air Bag System)
The Supplemental Restraint System ªAir Bagº and ªSeat Belt Pre-tensionerº, used along with a seat belt, help
to reduce the risk or severity of injury to the driver and front passenger in a frontal collision. The Supplemen-
tal Restraint System consists of air bag modules (located in the center of the steering wheel and on the
instrument panel on the passenger side), seat belt pre-tensioners, a diagnosis sensor unit, warning lamp, wir-
ing harness and spiral cable.
WARNING:
ITo avoid rendering the SRS inoperative (which could increase the risk of personal injury or death
in the event of a collision which would result in air bag inflation) all maintenance must be per-
formed by an authorized NISSAN dealer.
IImproper maintenance, including incorrect removal and installation of the SRS, can lead to per-
sonal injury caused by unintentional activation of the system.
IDo not use electrical test equipment on any circuit related to the SRS unless instructed to do so
in this Service Manual. SRS wiring harnesses are covered with yellow insulation (either just before
the harness connectors or for the complete harness), for easy identification.
Precautions for Steering System
IBefore disassembly, thoroughly clean the outside of the unit.
IDisassembly should be done in a clean work area. It is important to prevent the internal parts from
becoming contaminated by dirt or other foreign matter.
IWhen disassembling parts, be sure to place them in order on a part rack so they can be reinstalled
in their proper positions.
IUse nylon cloths or paper towels to clean the parts; common shop rags can leave lint that might
interfere with their operation.
IBefore inspection or reassembly, carefully clean all parts with a general purpose, non-flammable
solvent.
IBefore assembly, apply a coat of recommended ATF* to hydraulic parts. Vaseline may be applied
to O-rings and seals. Do not use any grease.
IReplace all gaskets, seals and O-rings. Avoid damaging O-rings, seals and gaskets during instal-
lation. Perform functional tests whenever designated.
*: Automatic transmission fluid
PRECAUTIONS
ST-2
Page 1715 of 1767

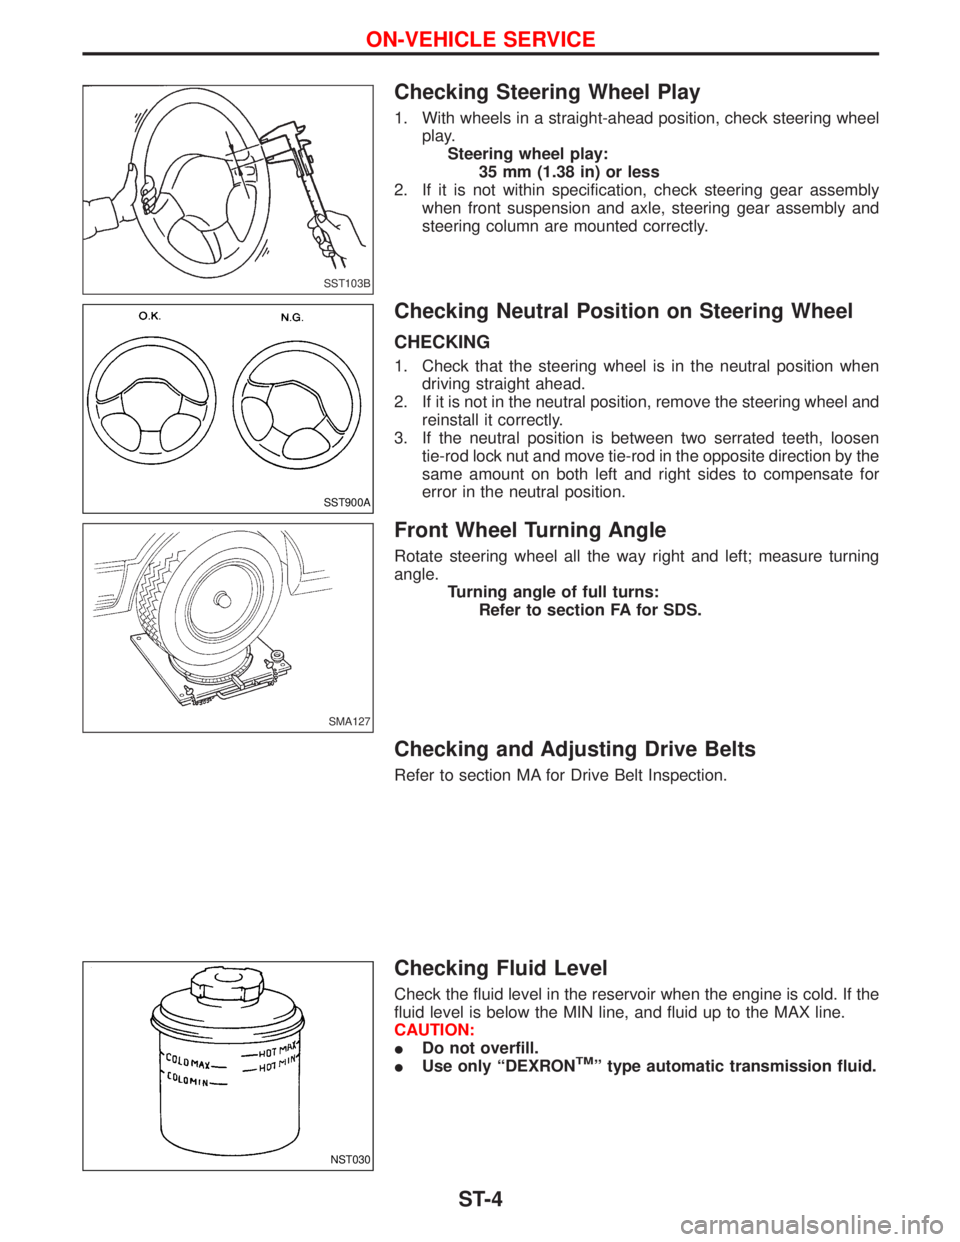
Checking Steering Wheel Play
1. With wheels in a straight-ahead position, check steering wheel
play.
Steering wheel play:
35 mm (1.38 in) or less
2. If it is not within specification, check steering gear assembly
when front suspension and axle, steering gear assembly and
steering column are mounted correctly.
Checking Neutral Position on Steering Wheel
CHECKING
1. Check that the steering wheel is in the neutral position when
driving straight ahead.
2. If it is not in the neutral position, remove the steering wheel and
reinstall it correctly.
3. If the neutral position is between two serrated teeth, loosen
tie-rod lock nut and move tie-rod in the opposite direction by the
same amount on both left and right sides to compensate for
error in the neutral position.
Front Wheel Turning Angle
Rotate steering wheel all the way right and left; measure turning
angle.
Turning angle of full turns:
Refer to section FA for SDS.
Checking and Adjusting Drive Belts
Refer to section MA for Drive Belt Inspection.
Checking Fluid Level
Check the fluid level in the reservoir when the engine is cold. If the
fluid level is below the MIN line, and fluid up to the MAX line.
CAUTION:
IDo not overfill.
IUse only ªDEXRON
TMº type automatic transmission fluid.
SST103B
SST900A
SMA127
NST030
ON-VEHICLE SERVICE
ST-4