2002 NISSAN ALTIMA ignition
[x] Cancel search: ignitionPage 91 of 249

LOCKING WITH POWER DOOR
LOCK SWITCH
To lock all the doors without a key, push the
door lock switch (driver or front passenger
side), to the lock position. When locking the
door this way, be certain not to leave the
key inside the vehicle.
When the power door lock switch (driver or
passenger side) is moved to the lock posi-
tion with the key in the ignition and any door
open, all doors will lock and then unlock
automatically.
CHILD SAFETY REAR DOOR
LOCK
Child safety locks help prevent rear doors
from being opened accidentally, especially
when small children are in the vehicle.
The child safety lock levers are located on
the edge of the rear doors.
When the lever is in the lock position, the
door can be opened only from the outside.
LPD0069LPD0070APD1010
3-4Pre-driving checks and adjustments
ZX
Page 92 of 249

It is possible to lock/unlock all doors, turn
the interior light on and activate the panic
alarm by using the remote controller from
outside the vehicle.
Be sure to remove the key from the
vehicle before locking the doors.
The keyfob can operate at a distance of
approximately 33 ft (10 m) from the vehicle.
The effective distance depends on the con-
ditions around the vehicle.
As many as five keyfobs can be used with
one vehicle. For information concerning the
purchase and use of additional keyfobs,
contact an authorized NISSAN dealer.
CAUTION
Listed below are conditions or occur-
rences which will damage the keyfob:
cDo not allow the keyfob to become
wet.
cDo not drop the keyfob.
cDo not strike the keyfob sharply
against another object.cDo not place the keyfob for an ex-
tended period in an area where tem-
peratures exceed 140ÉF (60ÉC).
HOW TO USE REMOTE KEY-
LESS ENTRY SYSTEM
Locking doors
1. Close all windows.
2. Remove the key from the ignition switch.
3. Close all doors.
All of the doors will lock when the
button on the keyfob is pushed
even though a door remains open. If
the doors are locked while any door is
open, the horn beep feature will not
function.
4. Push the
button on the keyfob. All
doors lock. The hazard lights flash twice
and the horn beeps once to indicate all
doors are locked.
cWhen the
button is pushed with all
doors locked, the hazard lights flash
twice and the horn beeps once as areminder that the doors are already
locked.
The horn may or may not beep once.
Refer to ``Silencing the horn beep fea-
ture'' later in this section for details.
REMOTE KEYLESS ENTRY
SYSTEM (if so equipped)
Pre-driving checks and adjustments3-5
ZX
Page 93 of 249

Unlocking doors
1. Push the UNLOCK button on the keyfob
once.
cOnly the driver's door unlocks
cThe hazard indicator flashes once if all
doors are completely closed with the
ignition key in any position except the ON
position.
cThe interior light turns on and the light
timer activates for 30 seconds when the
switch is in the centerjposition with the
ignition key in any position except the ON
position.2. Push the UNLOCK button on the keyfob
again within 5 seconds.
cAll doors unlock
cThe hazard indicator flashes once if all
doors are completely closed.
If the following operation is not carried
out within 1 minute after pressing the
ªUNLOCKº button, all doors will be
locked automatically.
cWhen any door is not opened.
cWhen the ignition key is not set in the
ON position.
The interior light can be turned off without
waiting for 30 seconds by turning the igni-
tion switch to the ON position or by locking
the doors with the keyfob.
Releasing the trunk lid
1. Push the trunk button on the keyfob for
longer than 0.5 second. The trunk re-
lease button on the keyfob will not oper-
ate when the ignition switch is in the ON
position.
2. The trunk lid opens.The trunk lid will not open with the trunk
lid release cancel switch turned to OFF.
See ªTrunk lidº later in this section for
cancel switch. It can be opened only with
the key.
Using the panic alarm
If you are near your vehicle and feel threat-
ened, you may activate the alarm to call
attention as follows:
1. Push and hold the PANIC button on the
keyfob forlonger than 0.5 seconds.
2. The theft warning alarm and headlights
will stay on for 25 seconds.
3. The panic alarm stops when:
cit has run for 25 seconds, or
cany button is pressed on the keyfob.
LPD0071
3-6Pre-driving checks and adjustments
ZX
Page 94 of 249

Silencing the horn beep feature
If desired, the horn beep feature can be
deactivated using the keyfob. The instruc-
tions are on the back of the keyfob.
To deactivate:Press and hold the
and
buttonsfor at least two seconds.
The hazard lights will flash three times to
confirm that the horn beep feature has been
deactivated.
To activate:Press and hold the
and
buttonsfor at least two seconds
once more.The hazard lights will flash once and the
horn will sound once to confirm that the horn
beep feature has been reactivated.
Deactivating the horn feature does not si-
lence the horn if the alarm is triggered.
Using the interior light
The interior light can be turned off without
waiting 30 seconds by inserting the key into
the ignition or locking the doors with the
multi-remote controller or pushing the inte-
rior light button to OFF.
Opening windows (if so equipped)
The keyfob allows you to open the front
windows simultaneously.
cTo open the front windows, press the
UNLOCK button on the keyfob forlonger
than 3 secondsafter the door is un-
locked.
The door windows will open while pressing
the UNLOCK button on the keyfob. This
function will operate for 45 seconds after the
ignition switch is turned off unless either
front door is opened.
This opening windows function of the key-
fob can be suspended using a CONSULT-IIdiagnostic tool. Please contact an autho-
rized NISSAN dealer.
The door windows cannot be closed by
using the keyfob.
LIC0168
Pre-driving checks and adjustments3-7
ZX
Page 103 of 249

OUTSIDE MIRROR REMOTE
CONTROL
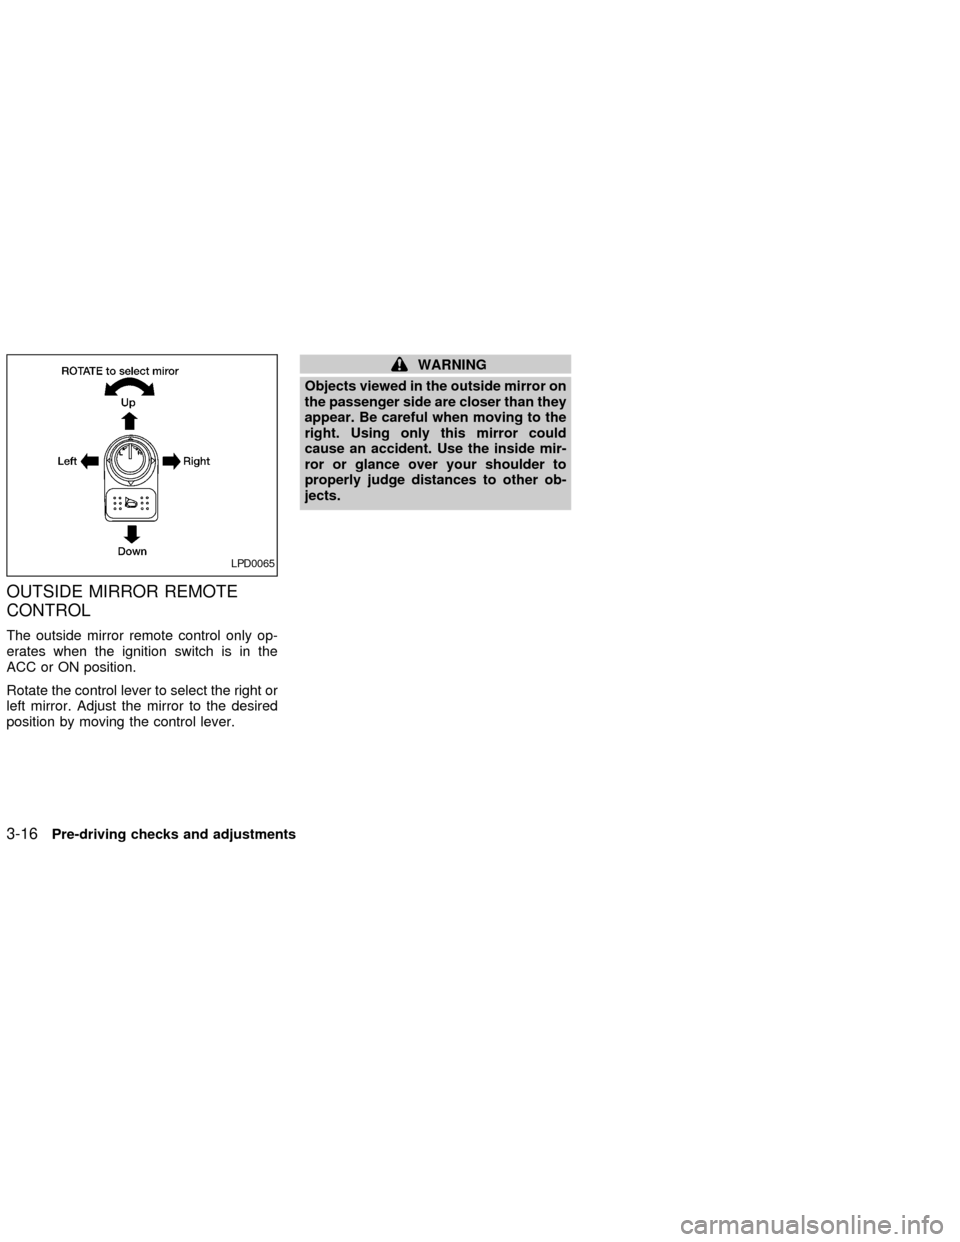
The outside mirror remote control only op-
erates when the ignition switch is in the
ACC or ON position.
Rotate the control lever to select the right or
left mirror. Adjust the mirror to the desired
position by moving the control lever.
WARNING
Objects viewed in the outside mirror on
the passenger side are closer than they
appear. Be careful when moving to the
right. Using only this mirror could
cause an accident. Use the inside mir-
ror or glance over your shoulder to
properly judge distances to other ob-
jects.
LPD0065
3-16Pre-driving checks and adjustments
ZX
Page 115 of 249

RADIO
Turn the ignition key to ACC or ON and
press the power on switch to turn on the
radio. If you listen to the radio with the
engine not running, the key should be
turned to the ACC position.
Radio reception is affected by station signal
strength, distance from radio transmitter,
buildings, bridges, mountains and other ex-
ternal influences. Intermittent changes in
reception quality normally are caused by
these external influences.
Using a cellular phone in or near the
vehicle may influence radio reception
quality.
Radio reception
Your NISSAN radio system is equipped with
state-of-the-art electronic circuits to en-
hance radio reception. These circuits are
designed to extend reception range, and to
enhance the quality of that reception.
However there are some general character-
istics of both FM and AM radio signals that
can affect radio reception quality in a mov-
ing vehicle, even when the finest equipment
is used. These characteristics are com-pletely normal in a given reception area,
and do not indicate any malfunction in your
NISSAN radio system.
Reception conditions will constantly change
because of vehicle movement. Buildings,
terrain, signal distance and interference
from other vehicles can work against ideal
reception. Described below are some of the
factors that can affect your radio reception.
FM RADIO RECEPTION
Range: FM range is normally limited to 25 to
30 miles (40 to 48 km), with monaural
(single channel) FM having slightly more
range than stereo FM. External influences
may sometimes interfere with FM station
reception even if the FM station is within 25
miles (40 km). The strength of the FM signal
is directly related to the distance between
the transmitter and receiver. FM signals
follow a line-of-sight path, exhibiting many
of the same characteristics as light. For
example they will reflect off objects.
Fade and drift: As your vehicle moves away
from a station transmitter, the signals will
tend to fade and/or drift.
Static and flutter: During signal interference
from buildings, large hills or due to antennaposition (usually in conjunction with in-
creased distance from the station transmit-
ter) static or flutter can be heard. This can
be reduced by adjusting the treble control
counterclockwise to reduce treble re-
sponse.
Multipath reception: Because of the reflec-
tive characteristics of FM signals, direct and
reflected signals reach the receiver at the
same time. The signals may cancel each
other, resulting in momentary flutter or loss
of sound.
AM RADIO RECEPTION
AM signals, because of their low frequency,
can bend around objects and skip along the
ground. In addition, the signals can be
bounced off the ionosphere and bent back
to earth. Because of these characteristics.
AM signals are also subject to interference
as they travel from transmitter to receiver.
Fading: Occurs while the vehicle is passing
through freeway underpasses or in areas
with many tall buildings. It can also occur for
several seconds during ionospheric turbu-
lence even in areas where no obstacles
exist.
Static: Caused by thunderstorms, electrical
AUDIO SYSTEM
4-12Heater, air conditioner and audio systems
ZX
Page 119 of 249

FM-AM RADIO WITH COMPACT
DISC (CD) PLAYER
ONzOFF/VOL control
Turn the ignition key to the ACC or ON
position, then push the PWR control knob. If
you listen to the radio with the engine not
running, turn the key to the ACC position.
The mode (radio or CD) that was playing
immediately before the system was turned
off resumes playing.
When no CD is loaded, the radio comes on.
Pushing the PWR control knob again turns
the system off.
Turn the PWR control knob to the right to
increase volume or to the left to decrease
volume.
Adjusting tone quality and speaker bal-
ance
Press the AUDIO button to enter the audio
adjust mode:
Bass!Mid!Treb!Fade!Bal
Press the TUNE/FF-REV (
or)or
SEEK/TRACK (or) to adjust to the
desired levels. The display will return to the
regular radio display after 7 seconds, or youmay press the AUDIO button again to return
to the regular radio display.
Clock operation
Pressing the MENU or CLOCK button dis-
plays the clock with the radio on or off.
Press the MENU or CLOCK button again to
turn off the clock display.
Clock set
1. Press and hold the MENU or CLOCK
button until it beeps (>2 seconds).
2. The hours will start flashing. Press
TUNE/FF-REV (
or)or
SEEK/TRACK (or) to adjust the
hours.
3. Press the MENU or CLOCK button to
switch to the minute adjustment.
4. Press TUNE/FF-REV (
or)or
SEEK/TRACK (or) to adjust
the minutes.
5. Press the MENU or CLOCK button again
to exit the clock set mode.
The display will return to the regular clock
display after 7 seconds, or you may press
the MENU or CLOCK button again to return
to the regular clock display.
FM-AM radio operation
FM-AM band select
Push the AM or the FM button to change
from AM to FM reception.
The FM stereo indicator, ST, illuminates
during FM stereo reception. When the ste-
reo broadcast signal is weak, the radio
automatically changes from stereo to mon-
aural reception.
Station signal strength, distance from radio
transmitter, buildings, bridges, mountains,
and other external influences affect radio
reception. Intermittent changes in reception
quality normally are caused by these exter-
nal influences.
Using a cellular phone in or near the
vehicle may influence radio reception
quality.
4-16Heater, air conditioner and audio systems
ZX
Page 121 of 249

radio displaysªNO STATIONºand
mutes the audio.
5. If the radio cannot fill all the presets, the
remaining presets are stored with 87.9
for FM, and 600 for AM.
The TUNE, SCAN, SEEK and preset
memory functions are available while Travel
Preset mode is on.
Canceling Travel Preset
Press the TRAVEL preset button (<1.5 sec-
onds) to clear the Travel Preset memory.
This turns off the Travel icon. The radio
returns to the last used preset of A, B or C in
the permanent preset memory.
Storing Travel Preset stations in perma-
nent memory
1. While in Travel Preset mode, press and
hold the TRAVEL preset button until it
beeps (>3 seconds).
2. The presets are transferred from Travel
Preset memory to the permanent preset
memory for A, B, and C.ªLOADºis
displayed.
3. The TRAVEL preset indicator turns off.Preset Scan
Pressing the Preset Scan button (<1.5 sec-
onds) scans the permanent preset memory
that is selected (A, B or C) from 1-6 for 5
seconds. If the Travel Preset is ON, the
travel preset that is selected (A, B, or C)
from 1-6 is scanned for 5 seconds.
All Preset Scan
Pressing the Preset Scan button (>1.5 sec-
onds) scans all the permanent preset
memory banks (A, B or C) from 1-6 for 5
seconds. If the Travel Preset is ON, all the
travel preset memory banks (A, B, or C)
from 1-6 are scanned for 5 seconds.
Canceling preset scan mode
Pressing any button except CLOCK,
EJECT, MIX and CD cancels the Preset
Scan mode.
Speed Sensitive Control Volume (SCV)
(if so equipped)
Your vehicle has Speed Sensitive Control
Volume (SCV) for audio. The audio volume
changes as the driving speed changes.
Press and hold the MENU button (>2 sec-
onds) until the radio beeps to start the
editing mode. Press the MENU button untilthe display showsªSCVº. This display will
last 2 seconds and then change toªOFFº.
Press TUNE/FF-REV (
or)to
change between:
Off!Low!Mid!High
Compact disc (CD) operation
Turn the ignition key to the ACC or ON
position.
CAUTION
cDo not force a compact disc (CD)
into the CD insert slot. This could
damage the CD and/or CD changer.
cTrying to load a CD with the CD door
closed could damage the CD and/or
CD changer.
CD button
When the CD button is pressed with a
compact disc loaded and the radio playing,
the radio turns off and the last used com-
pact disc starts to play.
FF (fast forward) REW
(rewind) buttons
When the TUNE/FF-REV (
or) but-
ton is pressed while the compact disc is
4-18Heater, air conditioner and audio systems
ZX