Page 69 of 307
 INTERIOR EQUIPMENT
56
Reprogramming a button
Individual HomeLink� buttons cannot be erased, however, to
reprogram a single button, follow the procedure ªProgramming
the HomeLink
�º.
(b) Operating th")
INTERIOR EQUIPMENT
56
Reprogramming a button
Individual HomeLink� buttons cannot be erased, however, to
reprogram a single button, follow the procedure ªProgramming
the HomeLink
�º.
(b) Operating the HomeLink�
To operate the HomeLink�, press the appropriate HomeLink�
button to activate the programmed device. The HomeLink�
indicator light should come on. The HomeLink� continues to
send the signal for up to 20 seconds as long as the button is
pressed.
(c) Erasing the entire HomeLink� memory
(all three programs)
To erase all previously programmed codes at one time, press
and hold down the 2 outside buttons for 20 seconds until the
indicator light flashes.
If you sell your vehicle, be sure to erase the programs stored
in the HomeLink
� memory.
CAUTION
� When programming the HomeLink� Universal
Transceiver, you may be operating a garage door or
other device. Make sure people and objects are out
of the way of the garage door or other device to
prevent potential harm or damage.
� Do not use this HomeLink
� Universal Transceiver
with any garage door opener that lacks the safety
stop and reverse feature as required by federal safety
standards. (This includes any garage door opener
model manufactured before April 1, 1982.) A garage
door opener which cannot detect an object (signaling
the door to stop and reverse), does not meet current
federal safety standards. Using a garage door
opener without these features increases risk of
serious injury or death.
Page 77 of 307
EXTERIOR EQUIPMENT
64
HOOD
SS15001
1. To open the hood, pull the hood lock release lever
under the instrument panel. The hood will spring up
slightly.
SV15005
2. Insert your fingers under the hood, push up the
auxiliary catch lever and lift the hood.
SV15002
3. Hold the hood open by inserting the support rod into
the slot.
CAUTION
After inserting the support rod into the slot, make sure
the rod supports the hood securely from falling down on
to your head or body.
NOTICE
Be sure to return the support rod to its clip beforeclosing the hood. Closing the hood with the support rod
up could cause the hood to bend.
Page 79 of 307
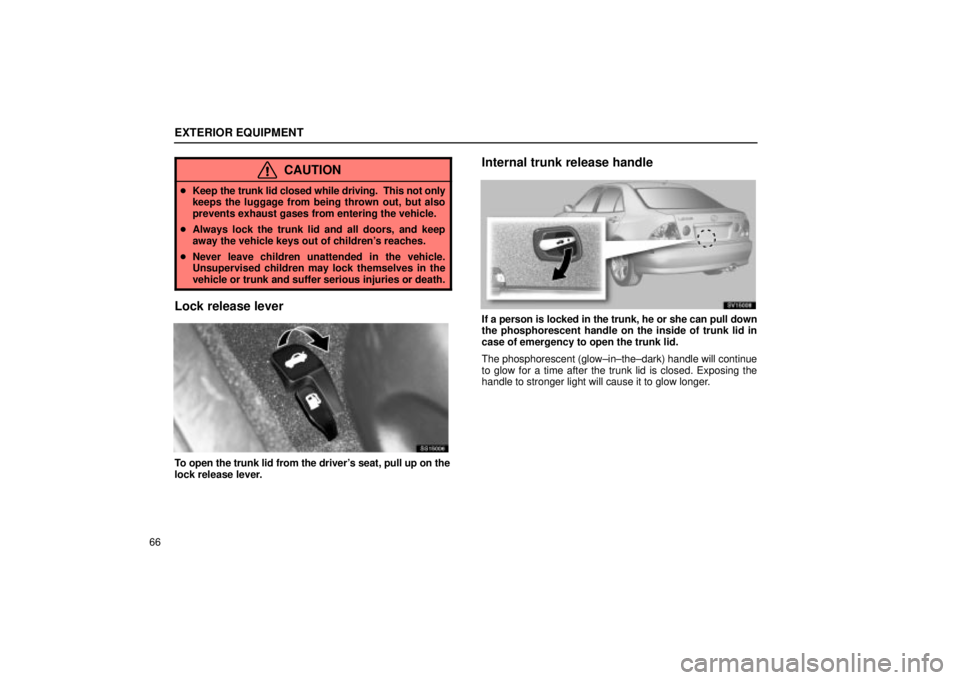
EXTERIOR EQUIPMENT
66
CAUTION
�Keep the trunk lid closed while driving. This not only
keeps the luggage from being thrown out, but also
prevents exhaust gases from entering the vehicle.
� Always lock the trunk lid and all doors, and keep
away the vehicle keys out of children's reaches.
� Never leave children unattended in the vehicle.
Unsupervised children may lock themselves in the
vehicle or trunk and suffer serious injuries or death.
Lock release lever
SS15006
To open the trunk lid from the driver's seat, pull up on the
lock release lever.
Internal trunk release handle
SV15008
If a person is locked in the trunk, he or she can pull down
the phosphorescent handle on the inside of trunk lid in
case of emergency to open the trunk lid.
The phosphorescent (glow±in±the±dark) handle will continue
to glow for a time after the trunk lid is closed. Exposing the
handle to stronger light will cause it to glow longer.
Page 81 of 307
 EXTERIOR EQUIPMENT
68
SV15009
2. To remove the fuel tank cap, turn the cap slowly
counterclockwise, then pause slightly before removing it.
After removing the cap, hang the tether as shown in the
illu")
EXTERIOR EQUIPMENT
68
SV15009
2. To remove the fuel tank cap, turn the cap slowly
counterclockwise, then pause slightly before removing it.
After removing the cap, hang the tether as shown in the
illustration.
It is not unusual to hear a slight swoosh when the cap is
opened. When installing the cap, turn the cap clockwise until
you hear a click.
If the cap is not tightened securely, the malfunction indicator
lamp comes on. Make sure the cap is tightened securely.
The indicator lamp goes off after driving several times. If the
indicator lamp does not go off, contact your Lexus dealer as
soon as possible.
CAUTION
� Make sure the cap is tightened securely to prevent
fuel spillage in case of an accident.
� Use only a genuine Lexus fuel tank cap for
replacement. It is designed to regulate fuel tank
pressure.
Refueling the vehicle
As soon as the correctly operated nozzle switches off
automatically for the first time, the tank is full. Do not try
to add more fuel, because fuel may spill out.
Page 86 of 307
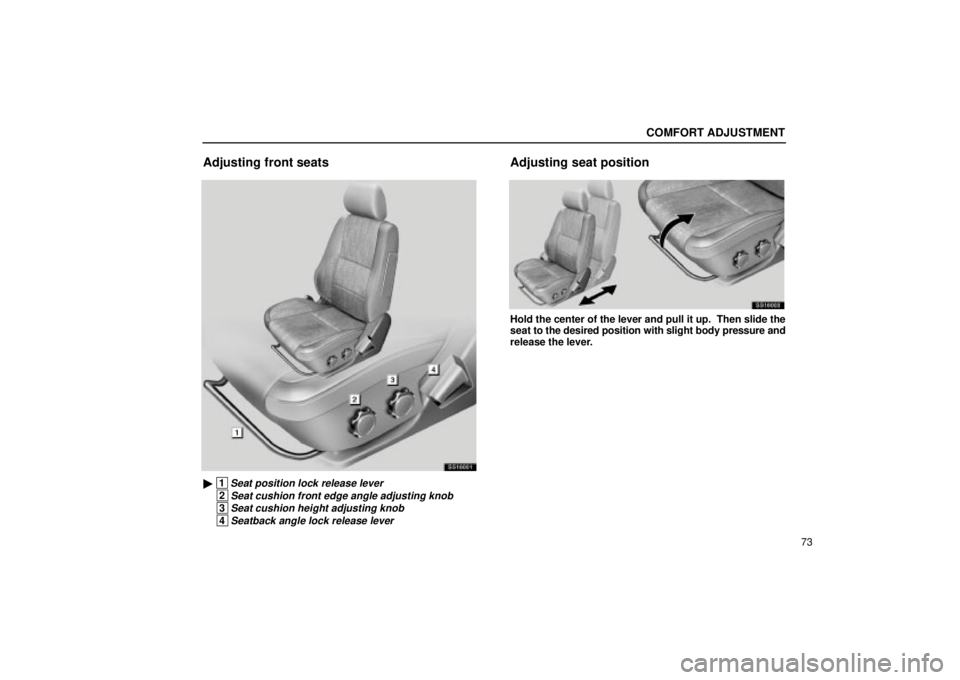
COMFORT ADJUSTMENT
73
Adjusting front seats
SS16001
� 1Seat position lock release lever
2Seat cushion front edge angle adjusting knob
3Seat cushion height adjusting knob
4Seatback angle lock release lever
Adjusting seat position
SS16003
Hold the center of the lever and pull it up. Then slide the
seat to the desired position with slight body pressure and
release the lever.
Page 96 of 307
 COMFORT ADJUSTMENT
83
INSIDE REAR VIEW MIRROR
SV16011
� 1Day 2Night
When driving at night, pull the lever toward you to reduce
the glare from the headlights of vehicles behind you.
Before adjusting t")
COMFORT ADJUSTMENT
83
INSIDE REAR VIEW MIRROR
SV16011
� 1Day 2Night
When driving at night, pull the lever toward you to reduce
the glare from the headlights of vehicles behind you.
Before adjusting the mirror to the position with most clarity,
push the day±night change lever forward (daylight driving
position).
Remember that by reducing glare you also lose some rear view
clarity.
CAUTION
Do not adjust the mirror while the vehicle is moving.
Doing so may cause the driver to mishandle the vehicle
and an accident may occur resulting in personal death
or injuries.
SEAT BELTS
Seat belt precautions
Lexus strongly urges that the driver and passengers in the
vehicle be properly restrained at all times with the seat belts
provided. Failure to do so could increase the chance of injury
and/or the severity of injury in accidents.
Child. Use a child restraint system appropriate for the child
until the child becomes large enough to properly wear the
vehicle's seat belts. See ºChild restraintº on page 104 for
details.
If a child is too large for a child restraint system, the child should
sit in the rear seat and must be restrained using the vehicle's
seat belt. According to accident statistics, the child is safer
when properly restrained in the rear seat than in the front seat.
If a child must sit in the front seat, the seat belts should be worn
properly. Do not let the child sit on your lap. It does not provide
sufficient restraint. If an accident occurs and the seat belts are
not worn properly, the force of the rapid inflation of the airbag
may cause severe injury to the child.
Do not allow the child to stand up or kneel on either rear or front
seats. An unrestrained child could suffer serious injury or
death during emergency braking or a collision.
Pregnant woman. Lexus recommends the use of a seat belt.
Ask your doctor for specific recommendations. The lap belt
should be worn securely and as low as possible over the hips
and not on the waist.
Page 98 of 307
 COMFORT ADJUSTMENT
85
The retractor will lock the belt during a sudden stop or on
impact. It also may lock if you lean forward too quickly. A slow,
easy motion will allow the belt to extend, and you")
COMFORT ADJUSTMENT
85
The retractor will lock the belt during a sudden stop or on
impact. It also may lock if you lean forward too quickly. A slow,
easy motion will allow the belt to extend, and you can move
around freely.
When a passenger's shoulder belt is completely extended and
is then retracted even slightly, the belt is locked in that position
and cannot be extended. This feature is used to hold the child
restraint system securely.
(For details, see ºChild restraintº on
page 104.) To free the belt again, fully retract the belt and then
pull the belt out once more.
If the seat belt cannot be pulled out of the retractor, firmly pull
the belt and release it. You will then be able to smoothly pull
the belt out of the retractor.
CAUTION
� After inserting the tab, make sure the tab and buckle
are locked and that the belt is not twisted.
� Do not insert coins, clips, etc. in the buckle as this
may prevent you from properly latching the tab and
buckle.
� If the seat belt does not function normally,
immediately contact your Lexus dealer. Do not use
the seat until the seat belt is fixed. It cannot protect
an adult occupant or your child from injury.
SV16014
Adjust the position of the lap and shoulder belts.
1
Position the lap belt as low as possible on your hips ± not
on your waist.
2 Adjust it to a snug fit by pulling the shoulder portion
upward through the latch plate.
CAUTION
�Both high±positioned lap belts and loose±fitting
belts could cause serious injuries due to sliding
under the lap belt during a collision or other
unintended result. Keep the lap belt positioned as
low on hips as possible.
� For your safety, do not place the shoulder belt under
your arm.
Page 102 of 307
 COMFORT ADJUSTMENT
89
SV16061
This indicator comes on when the ignition key is turned to
the ºACCº or ºONº position. It goes off after about 6
seconds. This means the front seat belt pretensione")
COMFORT ADJUSTMENT
89
SV16061
This indicator comes on when the ignition key is turned to
the ºACCº or ºONº position. It goes off after about 6
seconds. This means the front seat belt pretensioners are
operating properly.
The warning light system monitors the airbag sensor
assembly, front airbag sensors, side airbag sensors, front seat
belt pretensioner assemblies, inflators, warning light,
interconnecting wiring and power sources. (For details, see
ºService reminder indicators and warning buzzersº on page
38.)
SV16068
� 1Front airbag sensors
2Front seat belt pretensioner assemblies
3SRS warning light
4Airbag sensor assembly
The front seat belt pretensioner system consists mainly of the
above components and their locations are shown in the
illustration.
The front seat belt pretensioners are controlled by the airbag
sensor assembly. The airbag sensor assembly consists of a
safing sensor and airbag sensor.
When the front seat belt pretensioners are activated, an
operating noise may be heard and a small amount of
smoke±like gas may be released. This gas is harmless and
does not indicate that a fire is occurring.
Once the front seat belt pretensioners have been activated, the
seat belt retractors remain locked.
 EXTERIOR EQUIPMENT
64
HOOD
SS15001
1. To open the hood, pull the hood lock release lever
under the instrument panel. The hood will spring up
slightly.
SV15005
2. Insert your fingers under the hood, p")