Page 60 of 307
 SECTION 1 ± 4
47
INSTRUMENTS AND CONTROLS
Interior equipment
Vanity mirrors48
. . . . . . . . . . . . . . . . . . . . . . . . . . . . . . . . . . . . .\
. . . . . . .
Interior lights 49
. . . .")
SECTION 1 ± 4
47
INSTRUMENTS AND CONTROLS
Interior equipment
Vanity mirrors48
. . . . . . . . . . . . . . . . . . . . . . . . . . . . . . . . . . . . .\
. . . . . . .
Interior lights 49
. . . . . . . . . . . . . . . . . . . . . . . . . . . . . . . . . . . . .\
. . . . . . . .
Personal lights 49
. . . . . . . . . . . . . . . . . . . . . . . . . . . . . . . . . . . . .\
. . . . . .
Ignition switch light 50
. . . . . . . . . . . . . . . . . . . . . . . . . . . . . . . . . . . . .\
. . .
Clock 50
. . . . . . . . . . . . . . . . . . . . . . . . . . . . . . . . . . . . \
. . . . . . . . . . . . . . .
Outside temperature display 51
. . . . . . . . . . . . . . . . . . . . . . . . . . . . . . . .
Cigarette lighter and ashtray 52
. . . . . . . . . . . . . . . . . . . . . . . . . . . . . . . .
Power outlet 53
. . . . . . . . . . . . . . . . . . . . . . . . . . . . . . . . . . . . .\
. . . . . . . .
Glove box 53
. . . . . . . . . . . . . . . . . . . . . . . . . . . . . . . . . . . . .\
. . . . . . . . . . .
Garage door opener 54
. . . . . . . . . . . . . . . . . . . . . . . . . . . . . . . . . . . . .\
. .
Cup holders 57
. . . . . . . . . . . . . . . . . . . . . . . . . . . . . . . . . . . . .\
. . . . . . . . .
Warning reflector holder 58
. . . . . . . . . . . . . . . . . . . . . . . . . . . . . . . . . . .
Tie±down hooks 59
. . . . . . . . . . . . . . . . . . . . . . . . . . . . . . . . . . . . .\
. . . . .
Floor mat 59
. . . . . . . . . . . . . . . . . . . . . . . . . . . . . . . . . . . . .\
. . . . . . . . . . .
First±aid kit holder 60
. . . . . . . . . . . . . . . . . . . . . . . . . . . . . . . . . . . . .\
. . .
Luggage stowage precautions 61
. . . . . . . . . . . . . . . . . . . . . . . . . . . . . .
Page 61 of 307
INTERIOR EQUIPMENT
48
VANITY MIRRORS
SS14001
To use the vanity mirrors, swing the sun visor down and
open the cover.
The vanity light comes on when you open the cover.
Sun visors
SS14002
1To block out glare from the front , swing the sun visor
down.
2To block out glare from the side, remove the sun visor
from the hook and swing it to the side.
Page 62 of 307
INTERIOR EQUIPMENT
49
INTERIOR LIGHTS
SS14003
To turn on the interior light, slide the switch.
With the switch in the ºDOORº position, the light comes on
when any of the doors are opened. After all the doors are
closed, the light remains on for about 15 seconds and then
goes out.
However, in the following cases, the light goes out
immediately:
1. All the doors are closed when the ignition key is in ºACCº or
ºONº position.
2. The ignition key is turned to ºACCº or ºONº when the light
is still on.
3. All the doors are locked when the light is still on.
4. One door is closed with the lock button pushed in while the
other doors are locked.
PERSONAL LIGHTS
SS14005
�With moon roof
SS14006
�Without moon roof
To turn on the personal light, push the switch. To turn it
off, push the switch again.
Page 63 of 307
 INTERIOR EQUIPMENT
50
IGNITION SWITCH LIGHT
SS14007
For easy access to the ignition switch, the ignition switch
light comes on when any of the doors are opened.
The light remains on for about 15 secon")
INTERIOR EQUIPMENT
50
IGNITION SWITCH LIGHT
SS14007
For easy access to the ignition switch, the ignition switch
light comes on when any of the doors are opened.
The light remains on for about 15 seconds and goes out after
all the doors are closed. However, the light goes out
immediately when all the doors are locked or the ignition key
is in the ºACCº or ºONº position.
CLOCK
SS14008
The digital clock indicates the time with the ignition key at
the ºACCº or ºONº position. To reset the hour, press the
ºHº button. To reset the minutes, press the ºMº button.
To adjust the time to the nearest hour, press the º:00º
button.
For example, if the º:00º button is pressed when the time is
between 9:30 ± 9:59 or between 10:01 ± 10:29, the time will
change to 10:00.
If the electrical power source has been disconnected from the
clock, the time display will automatically be set to 1:00 (one
o'clock).
When the headlight switch is in the first or second click stop,
you can also adjust the brightness of the display using the
instrument panel light control dial.
Page 65 of 307
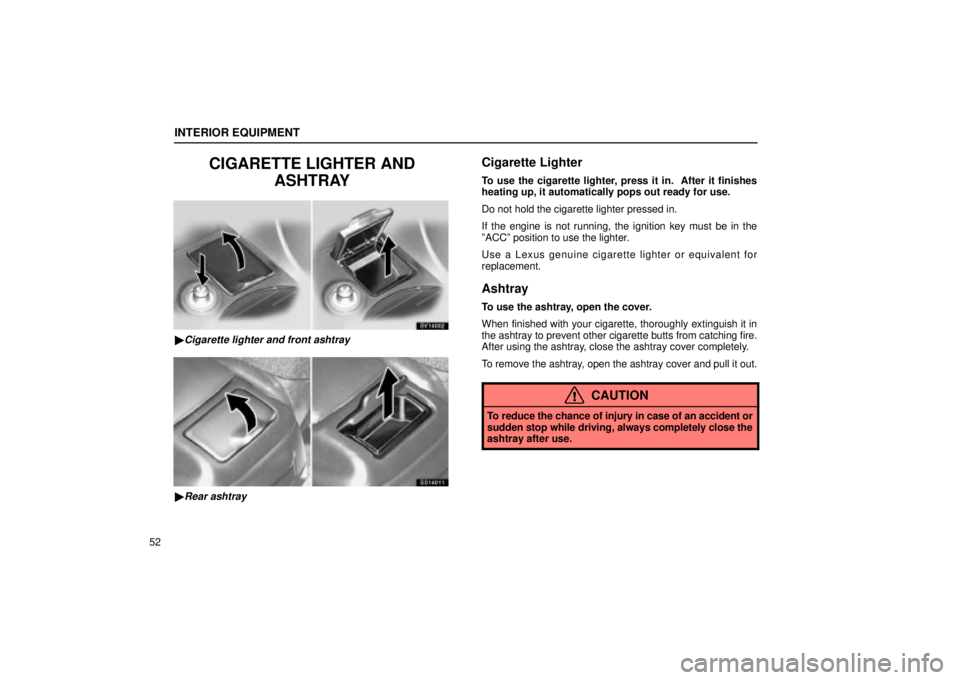
INTERIOR EQUIPMENT
52
CIGARETTE LIGHTER ANDASHTRAY
SV14002
�Cigarette lighter and front ashtray
SS14011
�Rear ashtray
Cigarette Lighter
To use the cigarette lighter, press it in. After it finishes
heating up, it automatically pops out ready for use.
Do not hold the cigarette lighter pressed in.
If the engine is not running, the ignition key must be in the
ºACCº position to use the lighter.
Use a Lexus genuine cigarette lighter or equivalent for
replacement.
Ashtray
To use the ashtray, open the cover.
When finished with your cigarette, thoroughly extinguish it in
the ashtray to prevent other cigarette butts from catching fire.
After using the ashtray, close the ashtray cover completely.
To remove the ashtray, open the ashtray cover and pull it out.
CAUTION
To reduce the chance of injury in case of an accident or
sudden stop while driving, always completely close the
ashtray after use.
Page 66 of 307
 INTERIOR EQUIPMENT
53
POWER OUTLET
SV14004
The power outlet is designed for power supply for car
accessories.
The ignition key must be in the ºACCº or ºONº position for t\
he
power outlet to be us")
INTERIOR EQUIPMENT
53
POWER OUTLET
SV14004
The power outlet is designed for power supply for car
accessories.
The ignition key must be in the ºACCº or ºONº position for t\
he
power outlet to be used.
NOTICE
�To prevent the fuse from being blown, do not use theelectricity over the total vehicle capacity of 12V 3.5A.
�To prevent the battery from being discharged, do notuse the power outlet longer than necessary when theengine is not running.
�Close the power outlet lid when the power outlet isnot in use. Inserting a foreign object other than theappropriate plug that fits the outlet, or allowing anyliquid into the outlet may cause electrical failure or
short circuits.
GLOVE BOX
SS14012
� 1Unlock 2Open 3Lock
To open the glove box door, pull the lever. To lock the
glove box door, insert the master key and turn it
clockwise.
With the tail lights on, the glove box light will come on when the
glove box door is open.
CAUTION
To reduce the chance of injury in case of an accident or
a sudden stop, always keep the glove box door closed
while driving.
Page 67 of 307
 INTERIOR EQUIPMENT
54
GARAGE DOOR OPENER
The garage door opener (HomeLink� Universal
Transceiver) is manufactured under license from
HomeLink
� and can be programmed to operate garage
doors, gates, en")
INTERIOR EQUIPMENT
54
GARAGE DOOR OPENER
The garage door opener (HomeLink� Universal
Transceiver) is manufactured under license from
HomeLink
� and can be programmed to operate garage
doors, gates, entry doors, door locks, home lighting
systems, and security systems, etc.
(a) Programming the HomeLink�
SV14007
� 1Buttons 2Indicator light
The HomeLink� in your vehicle has 3 buttons and you can
store one program for each button.
To ensure correct programming into the HomeLink
�, install a
new battery in the hand± held transmitter prior to
programming. The battery side of the hand± held transmitter must be pointed
away from the HomeLink
� during the programming process.
For Canadian users, follow the procedure in ªProgramming an
entrance gate/Programming all devices in the Canadian
marketº.
1. Decide which of 3 HomeLink
� buttons you want to program.
2. Place your hand± held garage transmitter 25 to 75 mm (1
to 3 in.) away from the surface of the HomeLink
�.
Keep the indicator light on the HomeLink
� in view while
programming.
3. Simultaneously press and hold the hand± held garage
transmitter button along with the selected HomeLink
� button.
4. When the indicator light on the HomeLink
� changes from a
slow to a rapid flash after 20 seconds, you can release both
buttons.
5. Test the operation of the HomeLink
� by pressing the newly
programmed button. If programming a garage door opener,
check to see if the garage door opens and closes.
If the garage door does not operate, identify if your garage
transmitter is of the ªRolling Codeº type. Press and hold the
programmed HomeLink
� button. The garage door has the
rolling code feature if the indicator light (on the HomeLink�)
flashes rapidly and then remains lit after 2 seconds. If your
garage transmitter is the ªRolling Codeº type, proceed to the
heading ªProgramming a rolling code systemº.
6. Repeat steps 2 through 5 for each remaining HomeLink
�
button to program another device.
Page 68 of 307
 INTERIOR EQUIPMENT
55
Programming a rolling code system
If your device is ªRolling Codeº equipped, it is necessary
to follow steps 1 through 4 under the heading
ªProgramming the HomeLink
�º before")
INTERIOR EQUIPMENT
55
Programming a rolling code system
If your device is ªRolling Codeº equipped, it is necessary
to follow steps 1 through 4 under the heading
ªProgramming the HomeLink
�º before proceeding with
the steps listed below.
1. Locate the ªtrainingº button on the ceiling mounted garage
door opener motor. The exact location and color of the button
may vary by brand of garage door opener. Refer to the owner's
guide supplied by the garage door opener manufacturer for the
location of this ªtrainingº button.
2. Press the ªtrainingº button on the ceiling mounted garage
door opener motor.
Following this step, you have 30 seconds in which to initiate
step 3 below.
3. Press and release the vehicle's programmed HomeLink
�
button twice. The garage door may open. If the door does
open, the programming process in complete. If the door does
not open, press and release the button a third time. This third
press and release will complete the programming process by
opening the garage door.
The ceiling mounted garage door opener motor should now
recognize the HomeLink
� unit and be able activate the garage
door up/down.
4. Repeat steps 1 through 3 for each remaining HomeLink
�
button to program another rolling code system.
Programming an entrance gate /
Programming all devices in the Canadian
market
1. Decide which of the 3 HomeLink� buttons you want to
program.
2. Place your hand± held gate/device transmitter 25 to 75 mm
(1 to 3 in.) away from the surface of the HomeLink
�.
Keep the indicator light on the HomeLink
� in view while
programming.
3. Press and hold the selected HomeLink
� button.
4. Continuously press and release (cycle) the hand± held
gate/device transmitter button every two seconds until step 5
is complete.
5. When the indicator light on the HomeLink
� changes from a
slow to a rapid flash after 20 seconds, you can release both
buttons.
6. Test the operation of the HomeLink
� by pressing the newly
programmed button. Check to see if the gate/device operates
correctly.
7. Repeat steps 1 through 6 for each remaining HomeLink
�
button to program another device.
Programming other devices
To program other devices such as home security systems,
home door locks or lighting, contact your authorized Lexus
dealer for assistance.
 INTERIOR EQUIPMENT
48
VANITY MIRRORS
SS14001
To use the vanity mirrors, swing the sun visor down and
open the cover.
The vanity light comes on when you open the cover.
Sun visors
SS14002
1To block ou")
 INTERIOR EQUIPMENT
49
INTERIOR LIGHTS
SS14003
To turn on the interior light, slide the switch.
With the switch in the ºDOORº position, the light comes on
when any of the doors are opened. After all")