Page 38 of 307
SWITCHES
25
FOG LIGHT SWITCH
SV12016
To turn on the fog lights, turn the switch to the ºONº
position. The fog lights come on only when the headlights
are on low beam.
WINDSHIELD WIPER AND WASHERSWITCH
SS12013b
� 1Interval adjuster 2Washer on
To turn the wipers on, move the lever down until you reach
the desired speed setting.
The ignition key must be in the ºONº position.
There are 3 settings:
ºINTº position: Intermittent operation
ºLOº position: Low speed operation
ºHIº position: High speed operation
Twist the interval adjuster upward to increase the wiping
time interval between sweeps, and downward to decrease
it.
The wiper lever must be in the ºINTº position.
Page 39 of 307
SWITCHES
26For mist wiper operations (a single wipe), pull the lever
toward you and release it.
To make the washer squirt, push the button on the end of
the lever.
For information on adding washer fluid, see ºAdding washer
fluidº on page 274.
In cold weather, warm the windshield with the defroster before
using the washer. This will help prevent icing, which could
block your vision.
NOTICE
Do not operate the wipers if the windshield is dry. It may
scratch the glass.
HEADLIGHT CLEANER SWITCH
SV12007
To spray fluid on the headlights, push the switch with the
headlights on.
The ignition key must be in the ºONº position.
Check the fluid level frequently as headlight cleaner uses fluid
a lot. For information on adding washer fluid, see ºAdding
washer fluidº on page 274.
NOTICE
Do not turn the headlight cleaner on with the washerfluid tank empty. It may cause the cleaner motor tooverheat.
Page 40 of 307
SWITCHES
27
REAR WINDOW DEFOGGERSWITCH
SK12006
To turn the electric rear window defogger on, push the
switch.
The ignition key must be in the ºONº position.
The thin heater wires on the inside of the rear window will
quickly clear the surface. An indicator light is on when the
defogger is operating.
The system will automatically shut off when the defogger has
operated about 15 minutes.
If further defrosting or defogging is desired, simply actuate the
switch again. When the surface has cleared, push the switch
once again to turn the defogger off. Continuous use may cause
the battery to discharge, especially during stop±and±go
driving. The defogger is not designed to dry rain water or to
melt snow.
NOTICE
�When cleaning the inside of the rear window, be
careful not to scratch or damage the heater wires orconnectors.
�To prevent the battery from being discharged, do notoperate the defogger continuously longer thannecessary.
Page 41 of 307

SWITCHES
28
POWER WINDOW SWITCHES
SV12019
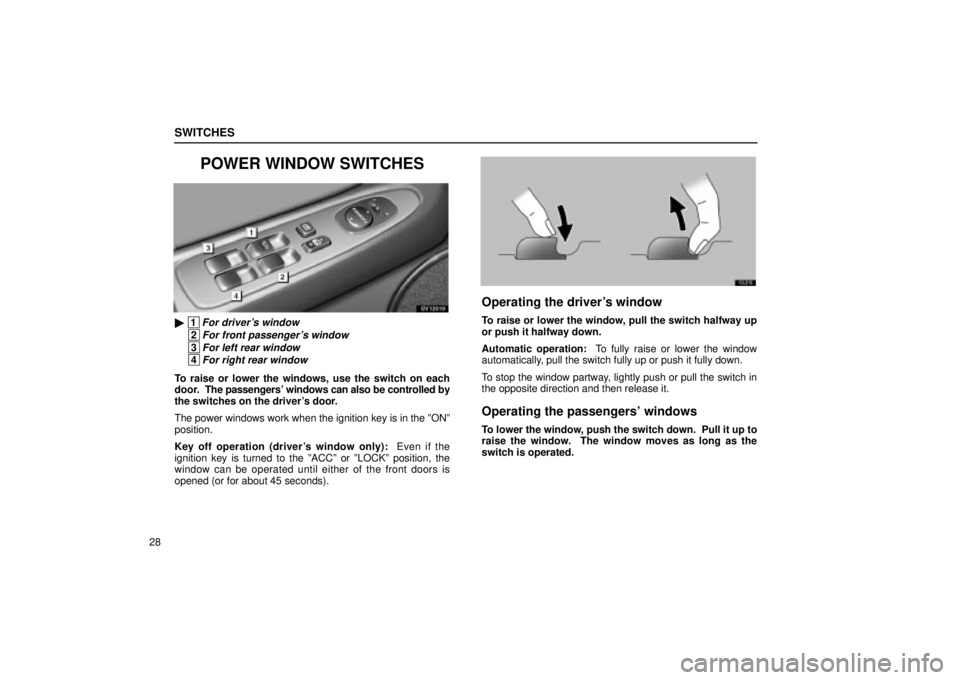
� 1For driver's window
2For front passenger's window
3For left rear window
4For right rear window
To raise or lower the windows, use the switch on each
door. The passengers' windows can also be controlled by
the switches on the driver's door.
The power windows work when the ignition key is in the ºONº
position.
Key off operation (driver's window only): Even if the
ignition key is turned to the ºACCº or ºLOCKº position, the
window can be operated until either of the front doors is
opened (or for about 45 seconds).
12L010
Operating the driver's window
To raise or lower the window, pull the switch halfway up
or push it halfway down.
Automatic operation: To fully raise or lower the window
automatically, pull the switch fully up or push it fully down.
To stop the window partway, lightly push or pull the switch in
the opposite direction and then release it.
Operating the passengers' windows
To lower the window, push the switch down. Pull it up to
raise the window. The window moves as long as the
switch is operated.
Page 43 of 307

SWITCHES
30
EMERGENCY FLASHER SWITCH
SV12020
To turn on the emergency flashers, push the switch.
All the turn signal lights will flash. The emergency flashers will
work with the engine running or off and with or without the
ignition key.
Turn on the emergency flashers to warn other drivers if you
must stop your vehicle where it might be a traffic hazard.
Always pull your vehicle as far off the road as possible.
The turn signal light switch will not work when the emergency
flashers are in operation.
NOTICE
To prevent the battery from being discharged, do notleave the switch on longer than necessary when theengine is not running.
SEAT HEATER SWITCHES
SV12006
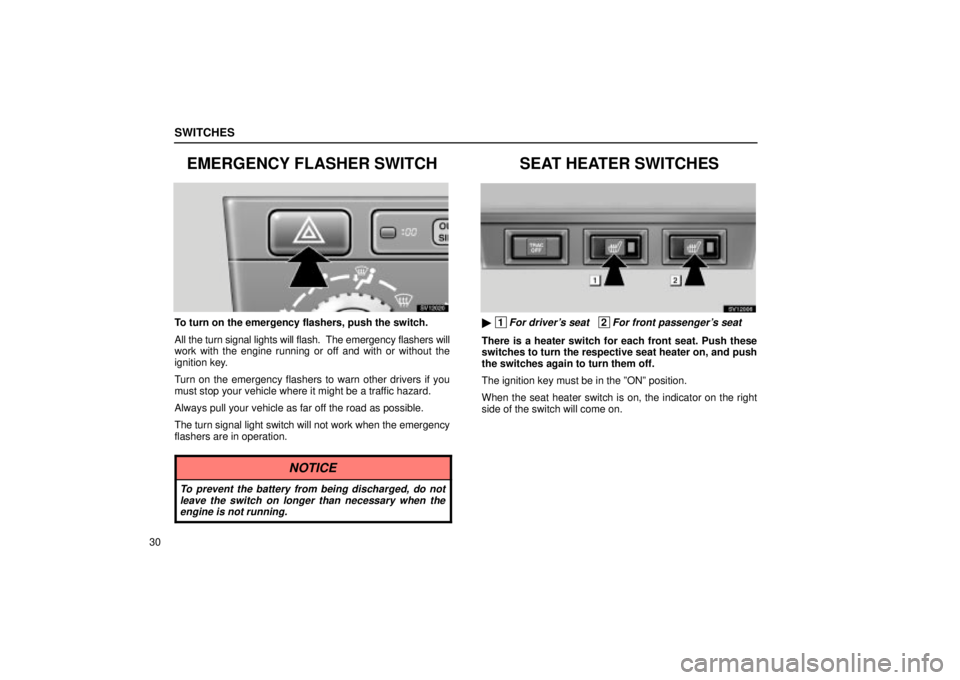
� 1For driver's seat 2For front passenger's seat
There is a heater switch for each front seat. Push these
switches to turn the respective seat heater on, and push
the switches again to turn them off.
The ignition key must be in the ºONº position.
When the seat heater switch is on, the indicator on the right
side of the switch will come on.
Page 46 of 307
SECTION 1 ± 3
33
INSTRUMENTS AND CONTROLS
Gauges, meters and service reminder
indicators
Fuel gauge34
. . . . . . . . . . . . . . . . . . . . . . . . . . . . . . . . . . . . .\
. . . . . . . . . .
Engine coolant temperature gauge 35
. . . . . . . . . . . . . . . . . . . . . . . . . .
Voltmeter 36
. . . . . . . . . . . . . . . . . . . . . . . . . . . . . . . . . . . . \
. . . . . . . . . . . .
Momentary fuel consumption meter 36
. . . . . . . . . . . . . . . . . . . . . . . . .
Tachometer 37
. . . . . . . . . . . . . . . . . . . . . . . . . . . . . . . . . . . . \
. . . . . . . . . .
Odometer and trip meter 38
. . . . . . . . . . . . . . . . . . . . . . . . . . . . . . . . . . .
Service reminder indicators and warning buzzers 38
. . . . . . . . . . . . . .
Instrument panel light control 46
. . . . . . . . . . . . . . . . . . . . . . . . . . . . . . .
Page 47 of 307
GAUGES, METERS AND SERVICE REMINDER INDICATORS
34
FUEL GAUGE
SV13017
�Low fuel level warning light
The gauge is displayed when the ignition switch is on and
indicates the approximate quantity of fuel remaining in the
tank.
It is a good idea to keep the tank over 1/4 full.
If the fuel level approaches ºEº or the low fuel level warning light\
comes on, fill the fuel tank as soon as possible.
On inclines or curves, due to the movement of fuel in the tank,
the fuel gauge needle may fluctuate or the low fuel level
warning light may come on earlier than usual.
If the fuel tank is completely empty, the malfunction indicator
lamp comes on. Fill the fuel tank immediately. The indicator lamp goes off after driving several times. If the
indicator lamp does not go off, contact your Lexus dealer as
soon as possible.
See the inner back cover for fuel capacity and recommended
fuel selection.
Page 49 of 307
GAUGES, METERS AND SERVICE REMINDER INDICATORS
36
VOLTMETER
SV13013
� 1Discharge warning light 2Normal range
The voltmeter tells whether the battery is charged or
discharged. Check it while the engine is running ± the
needle should always indicate as shown above.
If the needle reads below or above the normal range while the
engine is running, it indicates that the charging system needs
immediate repair.
However, it is normal for the needle to drop below the normal
range during engine starting.
MOMENTARY FUEL CONSUMPTIONMETER
SV13018
�Vehicles sold in U.S.A.
SV13020
�Vehicles sold in Canada