Page 1441 of 1672

WIPERS AND WASHERS
84-20 REPAIRS
Reservoir - washer - from 03MY
$% 84.10.03
Remove
1.Remove the front bumper assembly.
+ EXTERIOR FITTINGS, REPAIRS,
Bumper assembly - front.
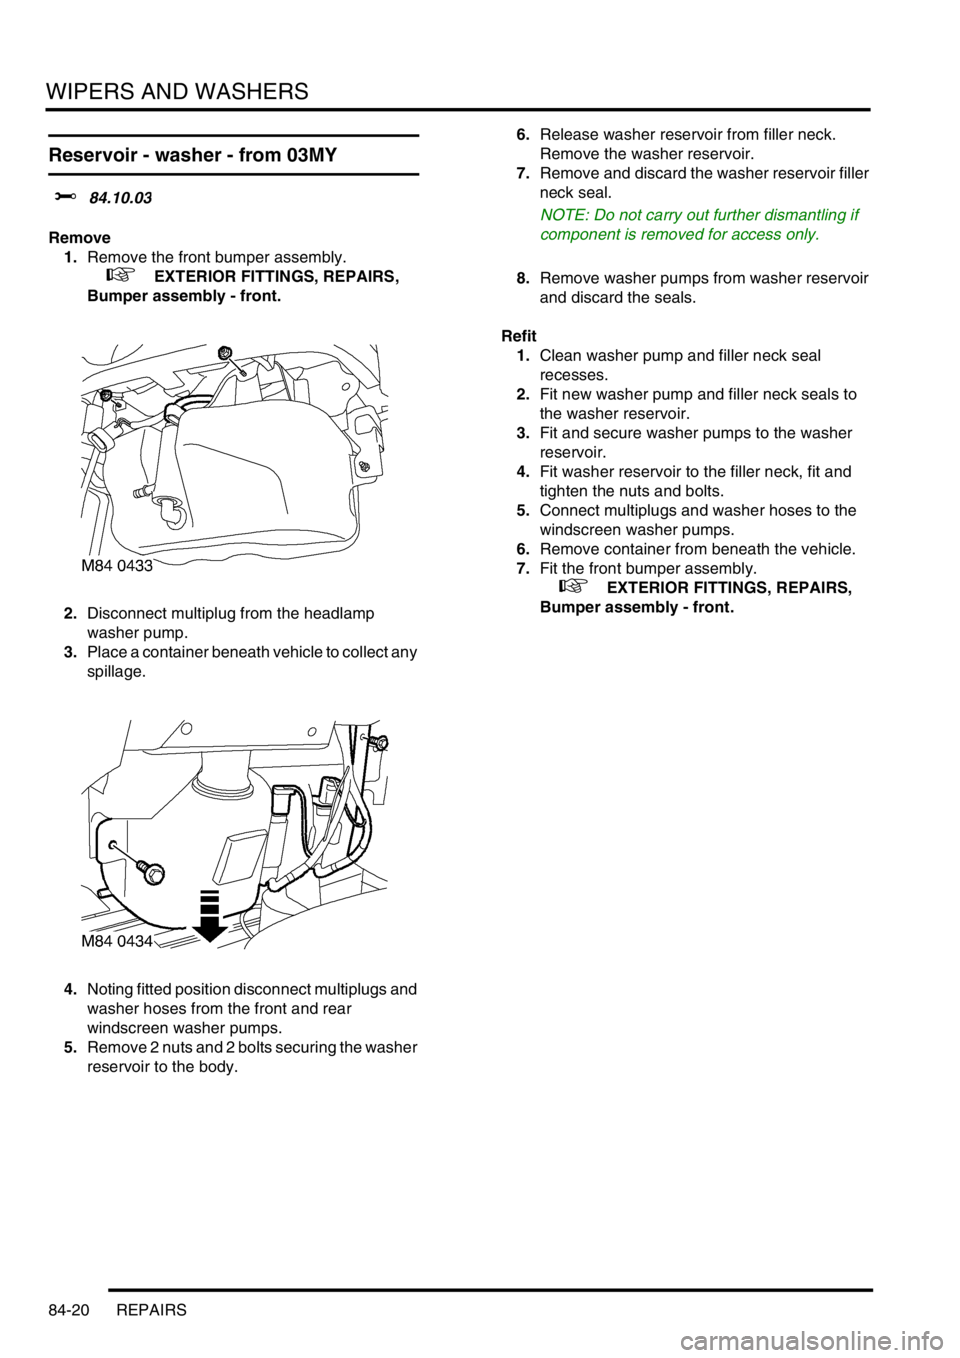
2.Disconnect multiplug from the headlamp
washer pump.
3.Place a container beneath vehicle to collect any
spillage.
4.Noting fitted position disconnect multiplugs and
washer hoses from the front and rear
windscreen washer pumps.
5.Remove 2 nuts and 2 bolts securing the washer
reservoir to the body.6.Release washer reservoir from filler neck.
Remove the washer reservoir.
7.Remove and discard the washer reservoir filler
neck seal.
NOTE: Do not carry out further dismantling if
component is removed for access only.
8.Remove washer pumps from washer reservoir
and discard the seals.
Refit
1.Clean washer pump and filler neck seal
recesses.
2.Fit new washer pump and filler neck seals to
the washer reservoir.
3.Fit and secure washer pumps to the washer
reservoir.
4.Fit washer reservoir to the filler neck, fit and
tighten the nuts and bolts.
5.Connect multiplugs and washer hoses to the
windscreen washer pumps.
6.Remove container from beneath the vehicle.
7.Fit the front bumper assembly.
+ EXTERIOR FITTINGS, REPAIRS,
Bumper assembly - front.
Page 1442 of 1672
WIPERS AND WASHERS
REPAIRS 84-21
Jet - washer - windscreen
$% 84.10.08
Remove
1.Carefully pull the elbow from the washer jet.
2.Place a protective covering around the washer
jet, then release and remove washer jet.
Refit
1.Fit washer jet to its location in the bonnet, and
remove the protective material.
2.Connect the washer tube, ensuring that it is
pushed fully onto the stub pipe.
Pump - washer - screen and headlamp
$% 84.10.21
The following procedure also covers removal of the
rear screen washer pump and the headlamp washer
pump.
Remove
1. Headlamp washer pump: Remove front
bumper.
+ EXTERIOR FITTINGS, REPAIRS,
Bumper assembly - front.
2. Front and rear screen washer pumps:
Remove 7 screws securing LH front wheel arch
liner extension to liner and bumper valance and
remove liner extension.
3.Position container under washer reservoir to
collect fluid spillage.
Page 1443 of 1672
WIPERS AND WASHERS
84-22 REPAIRS
4.Disconnect multiplug from washer pump.
5.Release clip and disconnect washer hose from
washer pump.
6.Remove washer pump from reservoir and
remove and discard pump seal.
Refit
1.Use a new seal and fit pump to reservoir.
2.Connect hose to pump and secure with clip.
3.Connect multiplug to pump.
4. Front and rear screen washer pumps:Fit
wheel arch liner extension, secure to bumper
valance and liner with screws.
5. Headlamp washer pump:Fit front bumper.
+ EXTERIOR FITTINGS, REPAIRS,
Bumper assembly - front.
6.Fill reservoir with washer fluid.
Motor and linkage - wiper - windscreen
$% 84.15.11
Remove
1.Remove plenum air intake.
+ HEATING AND VENTILATION,
REPAIRS, Plenum Air Intake.
2.Remove 4 nuts and one bolt securing motor
mounting plate to body.
3.Remove nut and bolt securing linkage to body.
4.Release motor and linkage from body and
disconnect multiplug from windscreen wiper
motor.
5.Remove motor and linkage.
Page 1445 of 1672
WIPERS AND WASHERS
84-24 REPAIRS
3.Connect front wiper delay multiplug and fit
multiplug to switch bracket.
4.Fit passive coil to column lock.
5.Fit rotary coupler.
+ RESTRAINT SYSTEMS, REPAIRS,
Rotary coupler.
Jet - washer - headlamp
$% 84.20.08
The procedure to remove the headlamp washer jet
on 03MY vehicles is detailed in the front bumper
finisher job.
+ EXTERIOR FITTINGS, REPAIRS, Trim
finisher - bumper - front - from 03MY.
Remove
1.Remove retaining screw cover from jet
housing.
2.Remove screw securing jet to bumper.
3.Release jet and withdraw sufficiently to gain
access to washer tube. Disconnect tube from
jet and remove jet.
Refit
1.Connect jet to washer tube, ensuring it is
pushed fully home.
2.Locate jet in bumper, retain with screw and fit
screw cover.
Page 1456 of 1672

LIGHTING
ADJUSTMENTS 86-2-1
LIGHTING ADJUST ME NTS
Headlamps beam alignment - up to 03MY
$% 86.40.17
Check
1.Ensure vehicle is unladen and tyres are at
correct pressures.
2. Models with SLS: Ensure vehicle is at
standard ride height.
3. Models with headlamp levelling: Ensure
headlamp levelling switch is set to '0'.
4.Align suitable beam setting equipment to
headlamp.
5.Switch headlamps on and measure main beam
settings. Beam must be 1.4% below the
horizontal and parallel to the vehicle centre line.
If necessary, adjust headlamp to get correct
beam settings.
6.Align beam setting equipment to 2nd headlamp
and repeat check.
7.Switch off headlamps and remove beam setting
equipment.
Adjust
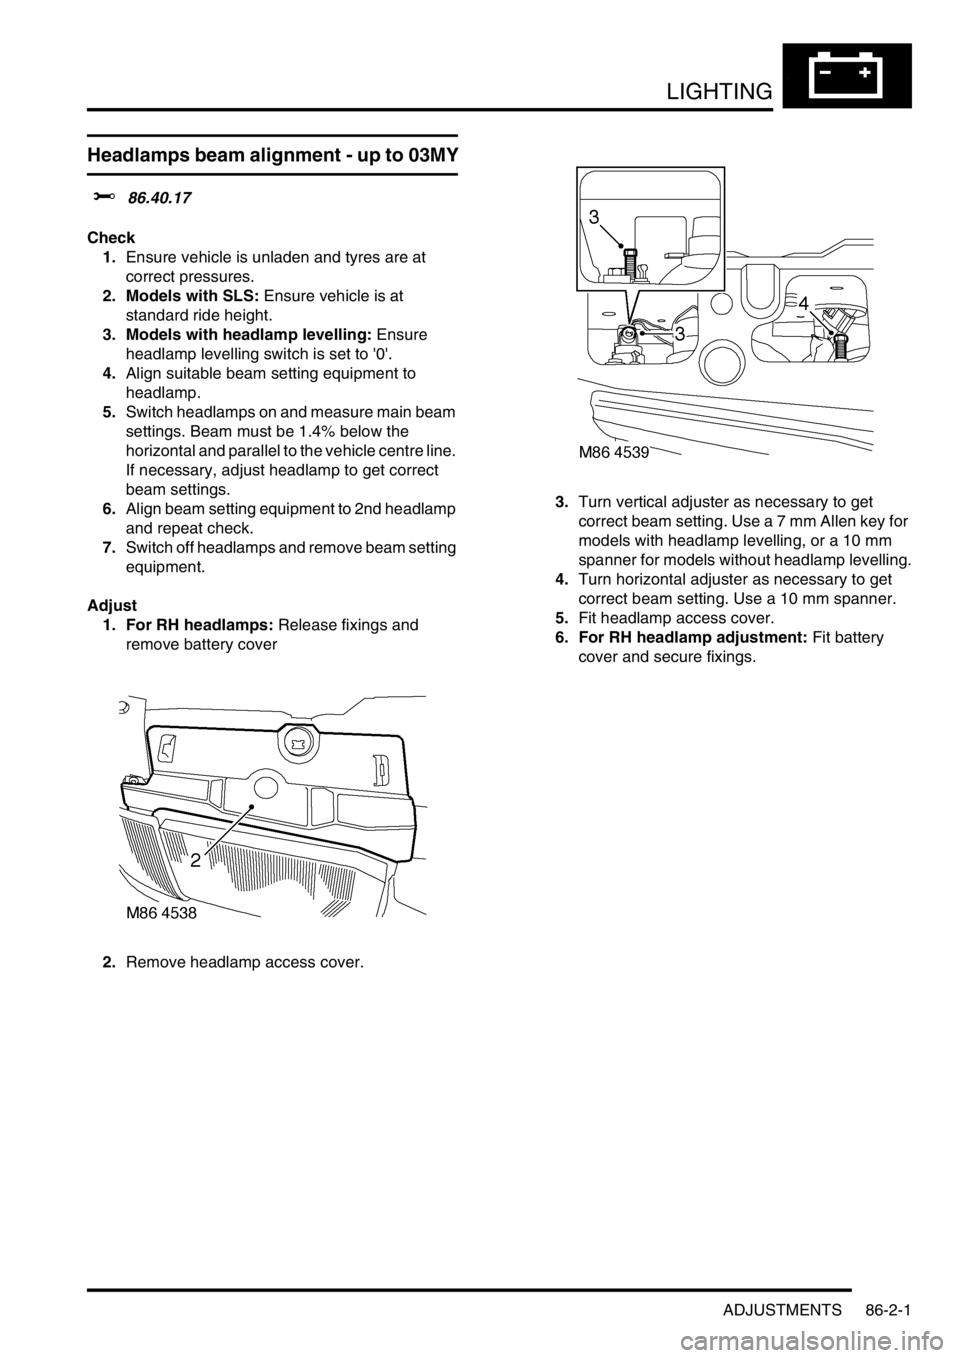
1. For RH headlamps: Release fixings and
remove battery cover
2.Remove headlamp access cover.3.Turn vertical adjuster as necessary to get
correct beam setting. Use a 7 mm Allen key for
models with headlamp levelling, or a 10 mm
spanner for models without headlamp levelling.
4.Turn horizontal adjuster as necessary to get
correct beam setting. Use a 10 mm spanner.
5.Fit headlamp access cover.
6. For RH headlamp adjustment: Fit battery
cover and secure fixings.
Page 1457 of 1672
LIGHTING
86-2-2 ADJUSTMENTS
Headlamps beam alignment - from 03MY
$% 86.40.17
Check
1.Ensure vehicle is unladen and tyres are set at
the correct pressures.
2. Models with SLS: Ensure vehicle is at the
standard ride height.
3. Models without SLS: Set headlamp leveling
switch to zero.
4.Align beam setting equipment to headlamp.
5.Switch on headlamps. Headlamp setting 1.2%
below horizontal and parallel.
6.Align beam setting equipment to second
headlamp and repeat the check.
Adjust
1.Using a flat blade screwdriver rotate the
headlamp adjusters until correct alignment is
achieved
2.Rotate inboard adjuster for verticle alignment.
3.Rotate outboard adjuster for horizontal
alignment.
4.Adjust 2nd headlamp as detailed above.
5.Switch off headlamps and remove beam setting
equipment.
Page 1458 of 1672
LIGHTING
REPAIRS 86-2-3
REPAIRS
Lamp - front repeater
$% 86.40.42
Remove
1. For RH repeater lamp: Release fixings and
remove battery cover.
2.Remove headlamp access cover from body.
3.Remove screw securing repeater lamp to body
and release lamp from 2 locating peg sockets in
wing.
4.Disconnect 2 multiplugs from repeater lamp
and remove lamp. Refit
1.Position new repeater lamp and connect
multiplugs.
2.Fit repeater lamp to body and tighten screw.
3.Fit headlamp access cover.
4. For RH repeater lamp: Fit battery cover and
secure fixings.
Page 1459 of 1672

LIGHTING
86-2-4 REPAIRS
Headlamp - up to 03MY
$% 86.40.49
Remove
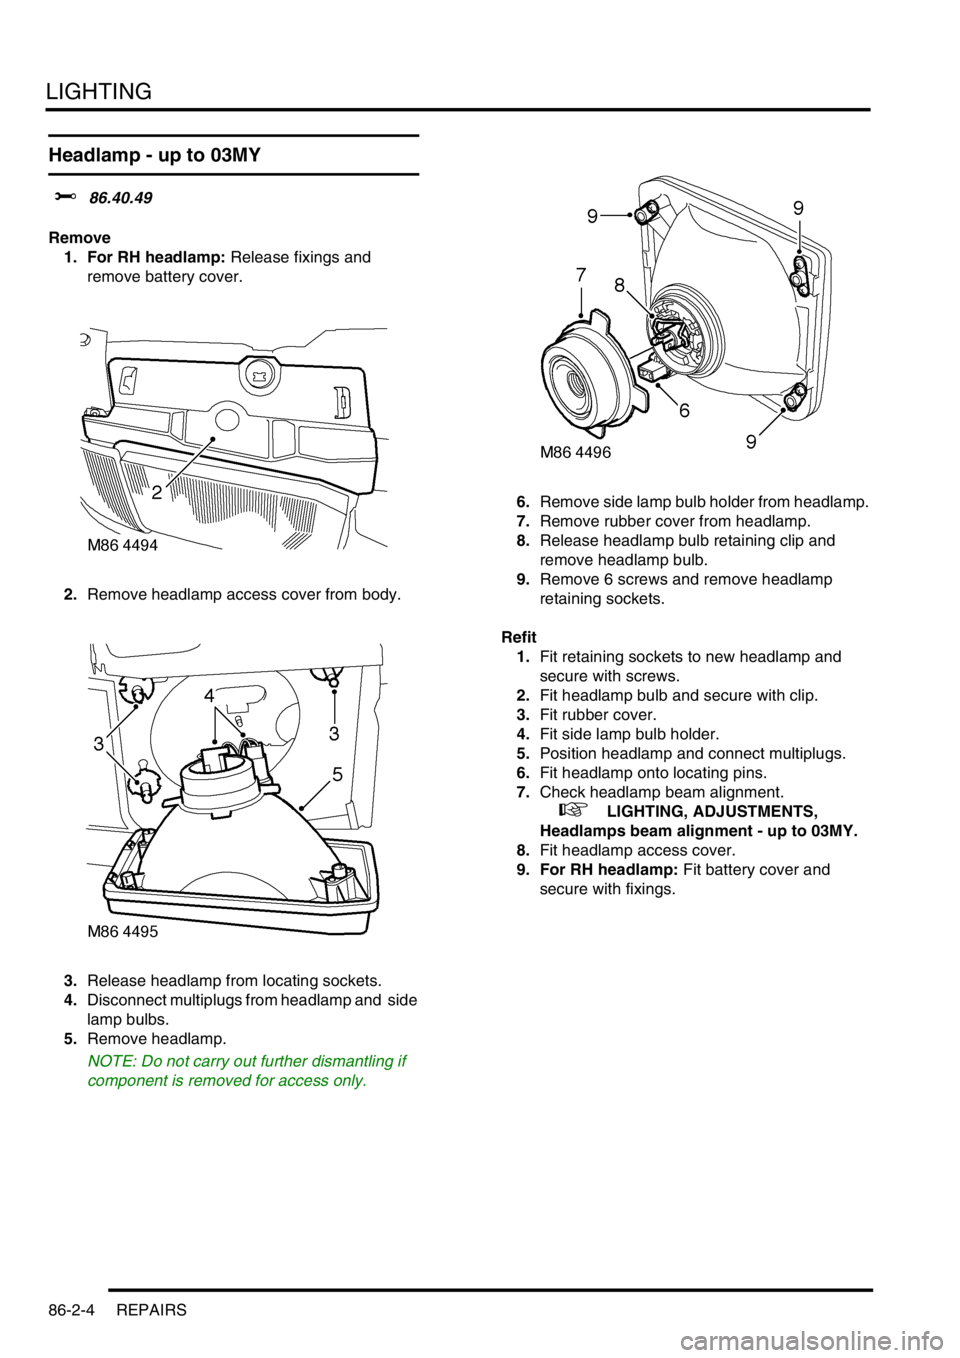
1. For RH headlamp: Release fixings and
remove battery cover.
2.Remove headlamp access cover from body.
3.Release headlamp from locating sockets.
4.Disconnect multiplugs from headlamp and side
lamp bulbs.
5.Remove headlamp.
NOTE: Do not carry out further dismantling if
component is removed for access only.6.Remove side lamp bulb holder from headlamp.
7.Remove rubber cover from headlamp.
8.Release headlamp bulb retaining clip and
remove headlamp bulb.
9.Remove 6 screws and remove headlamp
retaining sockets.
Refit
1.Fit retaining sockets to new headlamp and
secure with screws.
2.Fit headlamp bulb and secure with clip.
3.Fit rubber cover.
4.Fit side lamp bulb holder.
5.Position headlamp and connect multiplugs.
6.Fit headlamp onto locating pins.
7.Check headlamp beam alignment.
+ LIGHTING, ADJUSTMENTS,
Headlamps beam alignment - up to 03MY.
8.Fit headlamp access cover.
9. For RH headlamp: Fit battery cover and
secure with fixings.