2002 LAND ROVER DISCOVERY remove seats
[x] Cancel search: remove seatsPage 1155 of 1672
INTERIOR TRIM COMPONENTS
76-3-2 REPAIRS
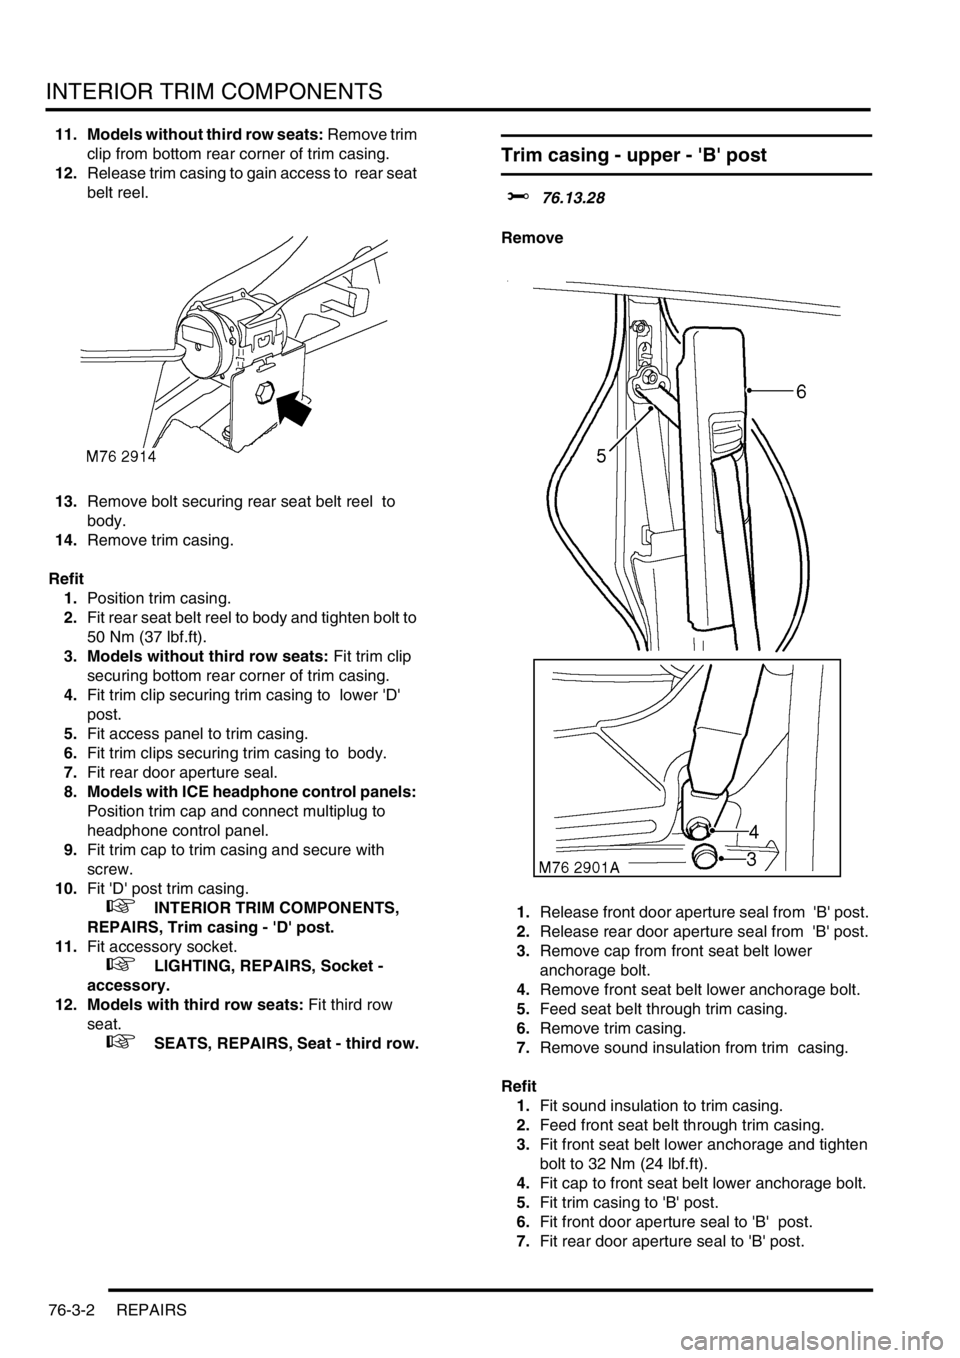
11. Models without third row seats: Remove trim
clip from bottom rear corner of trim casing.
12.Release trim casing to gain access to rear seat
belt reel.
13.Remove bolt securing rear seat belt reel to
body.
14.Remove trim casing.
Refit
1.Position trim casing.
2.Fit rear seat belt reel to body and tighten bolt to
50 Nm (37 lbf.ft).
3. Models without third row seats: Fit trim clip
securing bottom rear corner of trim casing.
4.Fit trim clip securing trim casing to lower 'D'
post.
5.Fit access panel to trim casing.
6.Fit trim clips securing trim casing to body.
7.Fit rear door aperture seal.
8. Models with ICE headphone control panels:
Position trim cap and connect multiplug to
headphone control panel.
9.Fit trim cap to trim casing and secure with
screw.
10.Fit 'D' post trim casing.
+ INTERIOR TRIM COMPONENTS,
REPAIRS, Trim casing - 'D' post.
11.Fit accessory socket.
+ LIGHTING, REPAIRS, Socket -
accessory.
12. Models with third row seats: Fit third row
seat.
+ SEATS, REPAIRS, Seat - third row.
Trim casing - upper - 'B' post
$% 76.13.28
Remove
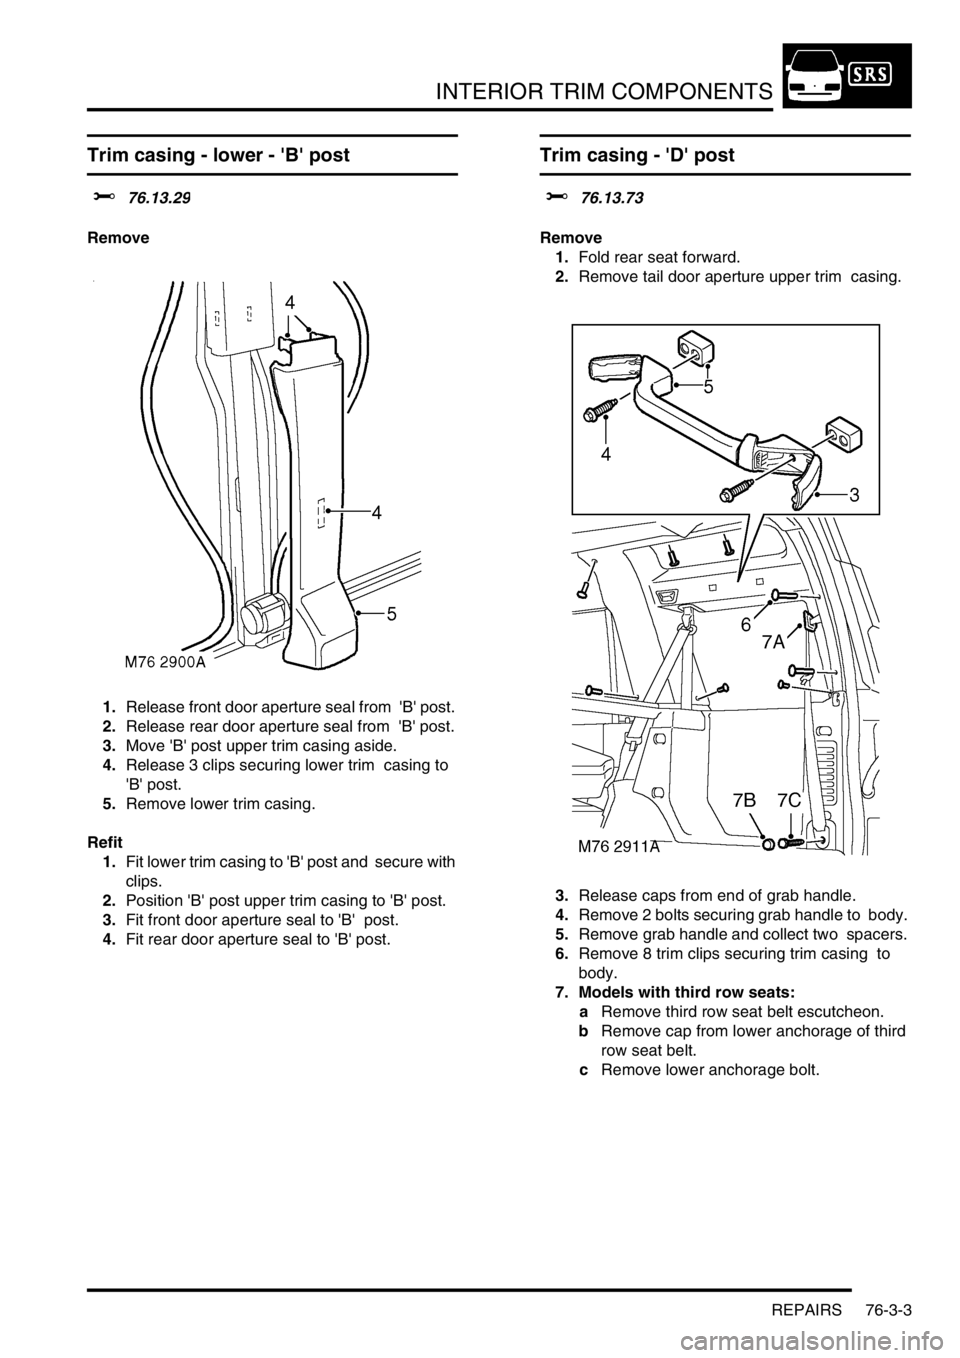
1.Release front door aperture seal from 'B' post.
2.Release rear door aperture seal from 'B' post.
3.Remove cap from front seat belt lower
anchorage bolt.
4.Remove front seat belt lower anchorage bolt.
5.Feed seat belt through trim casing.
6.Remove trim casing.
7.Remove sound insulation from trim casing.
Refit
1.Fit sound insulation to trim casing.
2.Feed front seat belt through trim casing.
3.Fit front seat belt lower anchorage and tighten
bolt to 32 Nm (24 lbf.ft).
4.Fit cap to front seat belt lower anchorage bolt.
5.Fit trim casing to 'B' post.
6.Fit front door aperture seal to 'B' post.
7.Fit rear door aperture seal to 'B' post.
Page 1156 of 1672
INTERIOR TRIM COMPONENTS
REPAIRS 76-3-3
Trim casing - lower - 'B' post
$% 76.13.29
Remove
1.Release front door aperture seal from 'B' post.
2.Release rear door aperture seal from 'B' post.
3.Move 'B' post upper trim casing aside.
4.Release 3 clips securing lower trim casing to
'B' post.
5.Remove lower trim casing.
Refit
1.Fit lower trim casing to 'B' post and secure with
clips.
2.Position 'B' post upper trim casing to 'B' post.
3.Fit front door aperture seal to 'B' post.
4.Fit rear door aperture seal to 'B' post.
Trim casing - 'D' post
$% 76.13.73
Remove
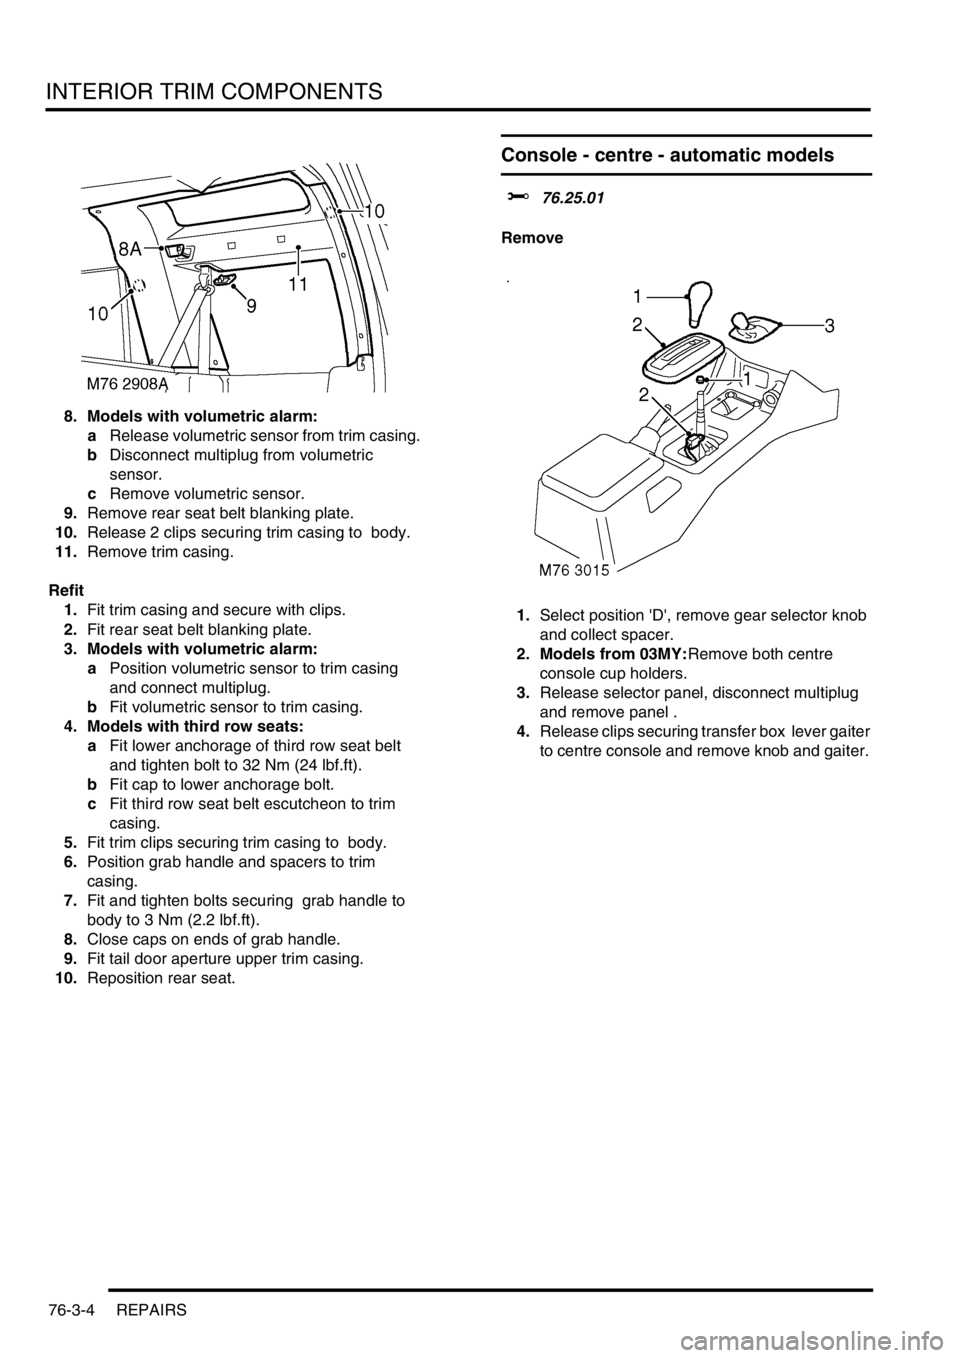
1.Fold rear seat forward.
2.Remove tail door aperture upper trim casing.
3.Release caps from end of grab handle.
4.Remove 2 bolts securing grab handle to body.
5.Remove grab handle and collect two spacers.
6.Remove 8 trim clips securing trim casing to
body.
7. Models with third row seats:
aRemove third row seat belt escutcheon.
bRemove cap from lower anchorage of third
row seat belt.
cRemove lower anchorage bolt.
Page 1157 of 1672
INTERIOR TRIM COMPONENTS
76-3-4 REPAIRS
8. Models with volumetric alarm:
aRelease volumetric sensor from trim casing.
bDisconnect multiplug from volumetric
sensor.
cRemove volumetric sensor.
9.Remove rear seat belt blanking plate.
10.Release 2 clips securing trim casing to body.
11.Remove trim casing.
Refit
1.Fit trim casing and secure with clips.
2.Fit rear seat belt blanking plate.
3. Models with volumetric alarm:
aPosition volumetric sensor to trim casing
and connect multiplug.
bFit volumetric sensor to trim casing.
4. Models with third row seats:
aFit lower anchorage of third row seat belt
and tighten bolt to 32 Nm (24 lbf.ft).
bFit cap to lower anchorage bolt.
cFit third row seat belt escutcheon to trim
casing.
5.Fit trim clips securing trim casing to body.
6.Position grab handle and spacers to trim
casing.
7.Fit and tighten bolts securing grab handle to
body to 3 Nm (2.2 lbf.ft).
8.Close caps on ends of grab handle.
9.Fit tail door aperture upper trim casing.
10.Reposition rear seat.
Console - centre - automatic models
$% 76.25.01
Remove
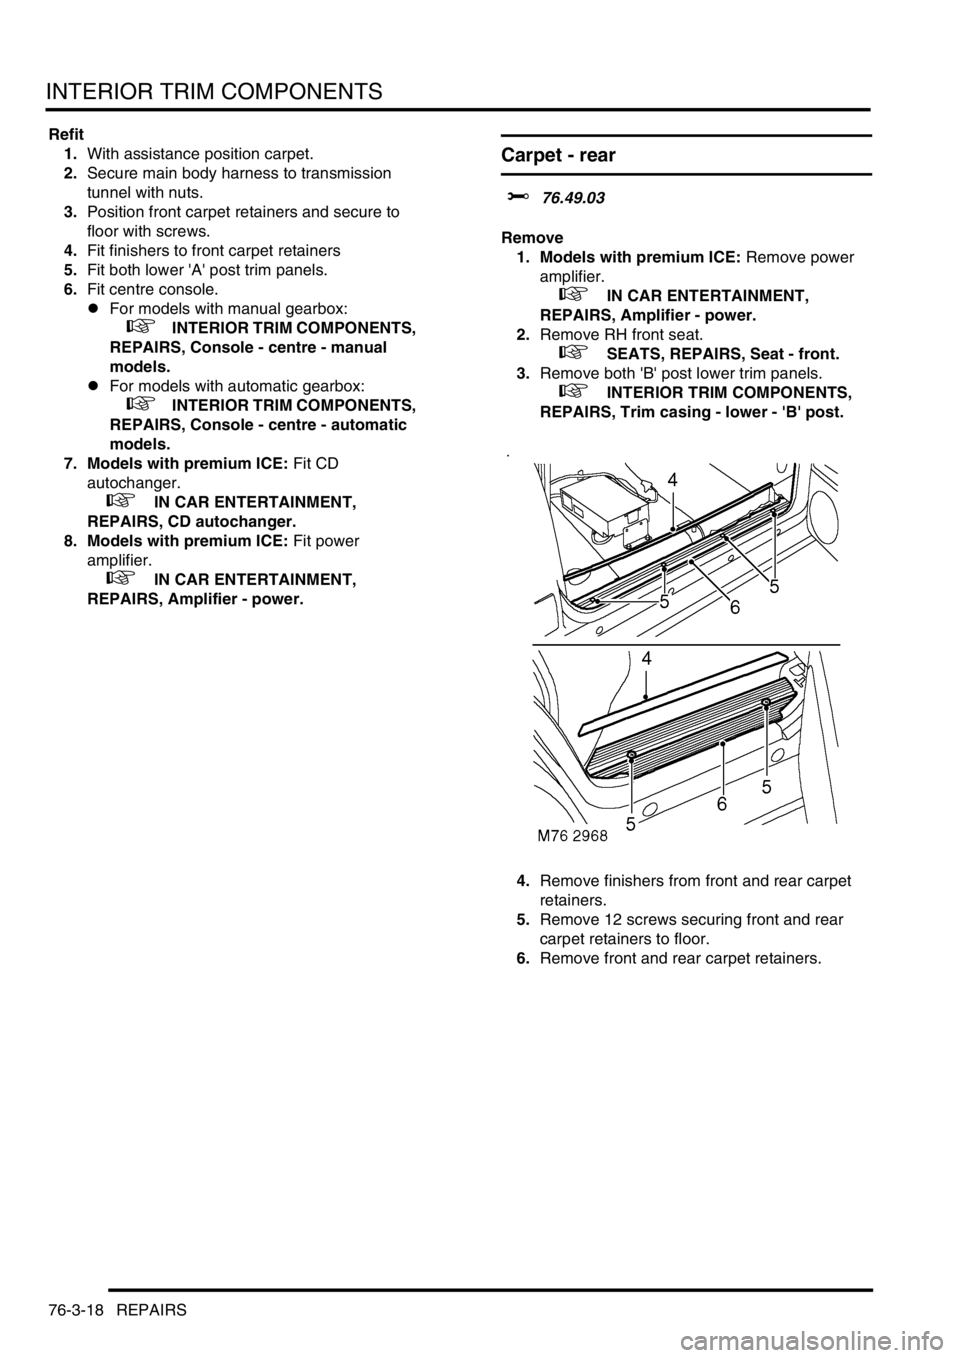
1.Select position 'D', remove gear selector knob
and collect spacer.
2. Models from 03MY:Remove both centre
console cup holders.
3.Release selector panel, disconnect multiplug
and remove panel .
4.Release clips securing transfer box lever gaiter
to centre console and remove knob and gaiter.
Page 1171 of 1672
INTERIOR TRIM COMPONENTS
76-3-18 REPAIRS
Refit
1.With assistance position carpet.
2.Secure main body harness to transmission
tunnel with nuts.
3.Position front carpet retainers and secure to
floor with screws.
4.Fit finishers to front carpet retainers
5.Fit both lower 'A' post trim panels.
6.Fit centre console.
lFor models with manual gearbox:
+ INTERIOR TRIM COMPONENTS,
REPAIRS, Console - centre - manual
models.
lFor models with automatic gearbox:
+ INTERIOR TRIM COMPONENTS,
REPAIRS, Console - centre - automatic
models.
7. Models with premium ICE: Fit CD
autochanger.
+ IN CAR ENTERTAINMENT,
REPAIRS, CD autochanger.
8. Models with premium ICE: Fit power
amplifier.
+ IN CAR ENTERTAINMENT,
REPAIRS, Amplifier - power.
Carpet - rear
$% 76.49.03
Remove
1. Models with premium ICE: Remove power
amplifier.
+ IN CAR ENTERTAINMENT,
REPAIRS, Amplifier - power.
2.Remove RH front seat.
+ SEATS, REPAIRS, Seat - front.
3.Remove both 'B' post lower trim panels.
+ INTERIOR TRIM COMPONENTS,
REPAIRS, Trim casing - lower - 'B' post.
4.Remove finishers from front and rear carpet
retainers.
5.Remove 12 screws securing front and rear
carpet retainers to floor.
6.Remove front and rear carpet retainers.
Page 1172 of 1672
INTERIOR TRIM COMPONENTS
REPAIRS 76-3-19
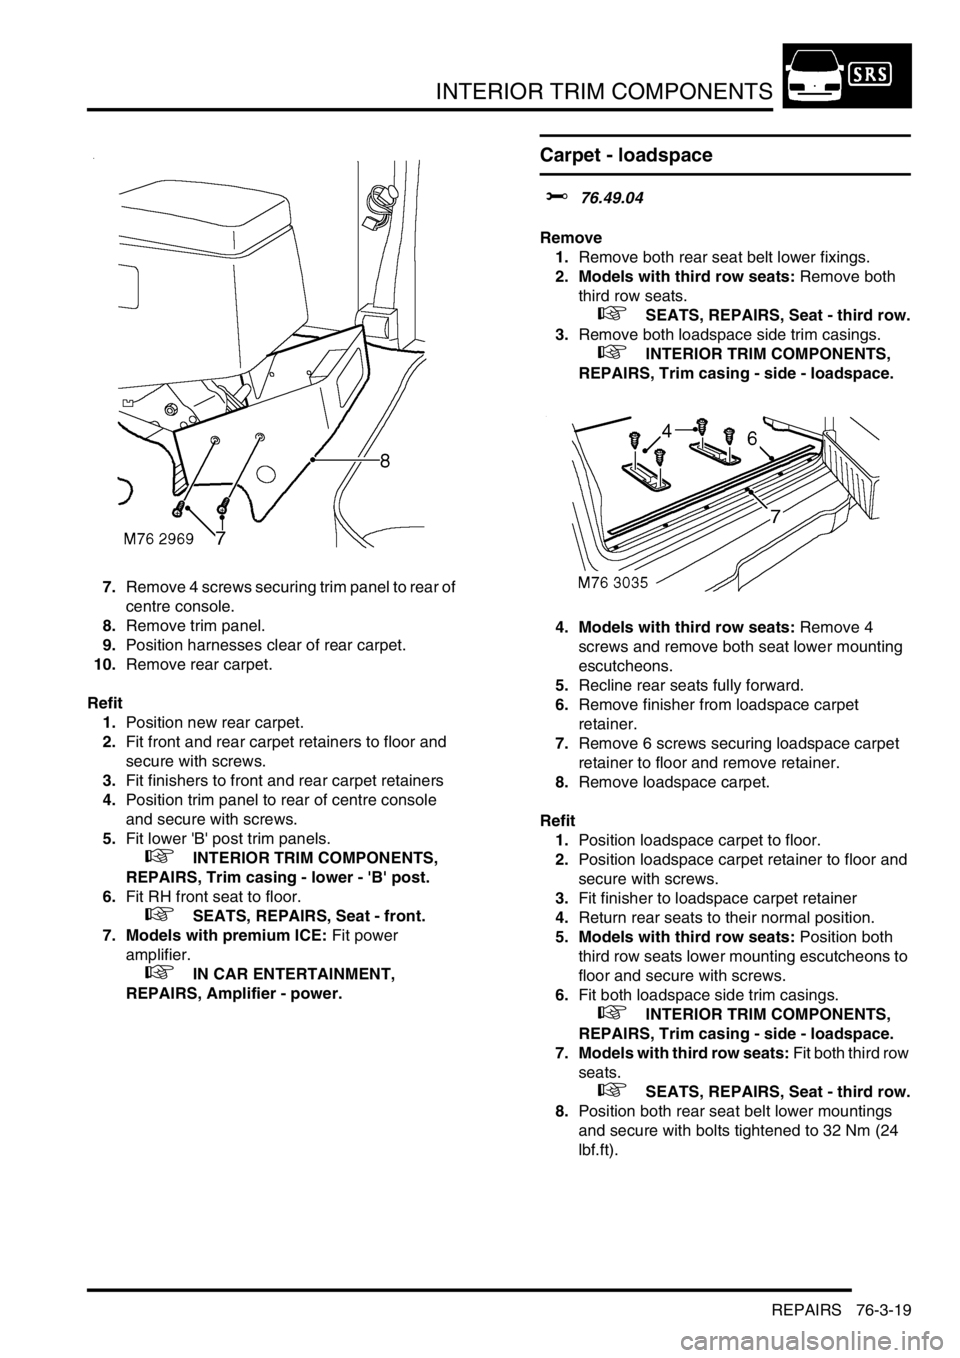
7.Remove 4 screws securing trim panel to rear of
centre console.
8.Remove trim panel.
9.Position harnesses clear of rear carpet.
10.Remove rear carpet.
Refit
1.Position new rear carpet.
2.Fit front and rear carpet retainers to floor and
secure with screws.
3.Fit finishers to front and rear carpet retainers
4.Position trim panel to rear of centre console
and secure with screws.
5.Fit lower 'B' post trim panels.
+ INTERIOR TRIM COMPONENTS,
REPAIRS, Trim casing - lower - 'B' post.
6.Fit RH front seat to floor.
+ SEATS, REPAIRS, Seat - front.
7. Models with premium ICE: Fit power
amplifier.
+ IN CAR ENTERTAINMENT,
REPAIRS, Amplifier - power.
Carpet - loadspace
$% 76.49.04
Remove
1.Remove both rear seat belt lower fixings.
2. Models with third row seats: Remove both
third row seats.
+ SEATS, REPAIRS, Seat - third row.
3.Remove both loadspace side trim casings.
+ INTERIOR TRIM COMPONENTS,
REPAIRS, Trim casing - side - loadspace.
4. Models with third row seats: Remove 4
screws and remove both seat lower mounting
escutcheons.
5.Recline rear seats fully forward.
6.Remove finisher from loadspace carpet
retainer.
7.Remove 6 screws securing loadspace carpet
retainer to floor and remove retainer.
8.Remove loadspace carpet.
Refit
1.Position loadspace carpet to floor.
2.Position loadspace carpet retainer to floor and
secure with screws.
3.Fit finisher to loadspace carpet retainer
4.Return rear seats to their normal position.
5. Models with third row seats: Position both
third row seats lower mounting escutcheons to
floor and secure with screws.
6.Fit both loadspace side trim casings.
+ INTERIOR TRIM COMPONENTS,
REPAIRS, Trim casing - side - loadspace.
7. Models with third row seats: Fit both third row
seats.
+ SEATS, REPAIRS, Seat - third row.
8.Position both rear seat belt lower mountings
and secure with bolts tightened to 32 Nm (24
lbf.ft).
Page 1179 of 1672
SCREENS
76-4-2 REPAIRS
Windscreen
$% 76.81.01
Introduction
The following equipment is required:
lCutting wire and handles.
lKent cutting knife.
lGlazing knife.
lWindscreen repair kit.
lSealant applicator gun.
lSuction cups.
lA felt covered table or stand to support glass.
WARNING: Wear protective gloves when
handling glass, solvents and primers.
WARNING: Wear suitable eye protection when
removing and refitting glass.
WARNING: If glass has splintered, protect eyes
and operate demister blower to remove glass
from heater ducts. Use a vacuum cleaner to
remove glass from fascia, carpet and seats.
Remove
1.Remove air intake plenum.
+ HEATING AND VENTILATION,
REPAIRS, Plenum Air Intake.
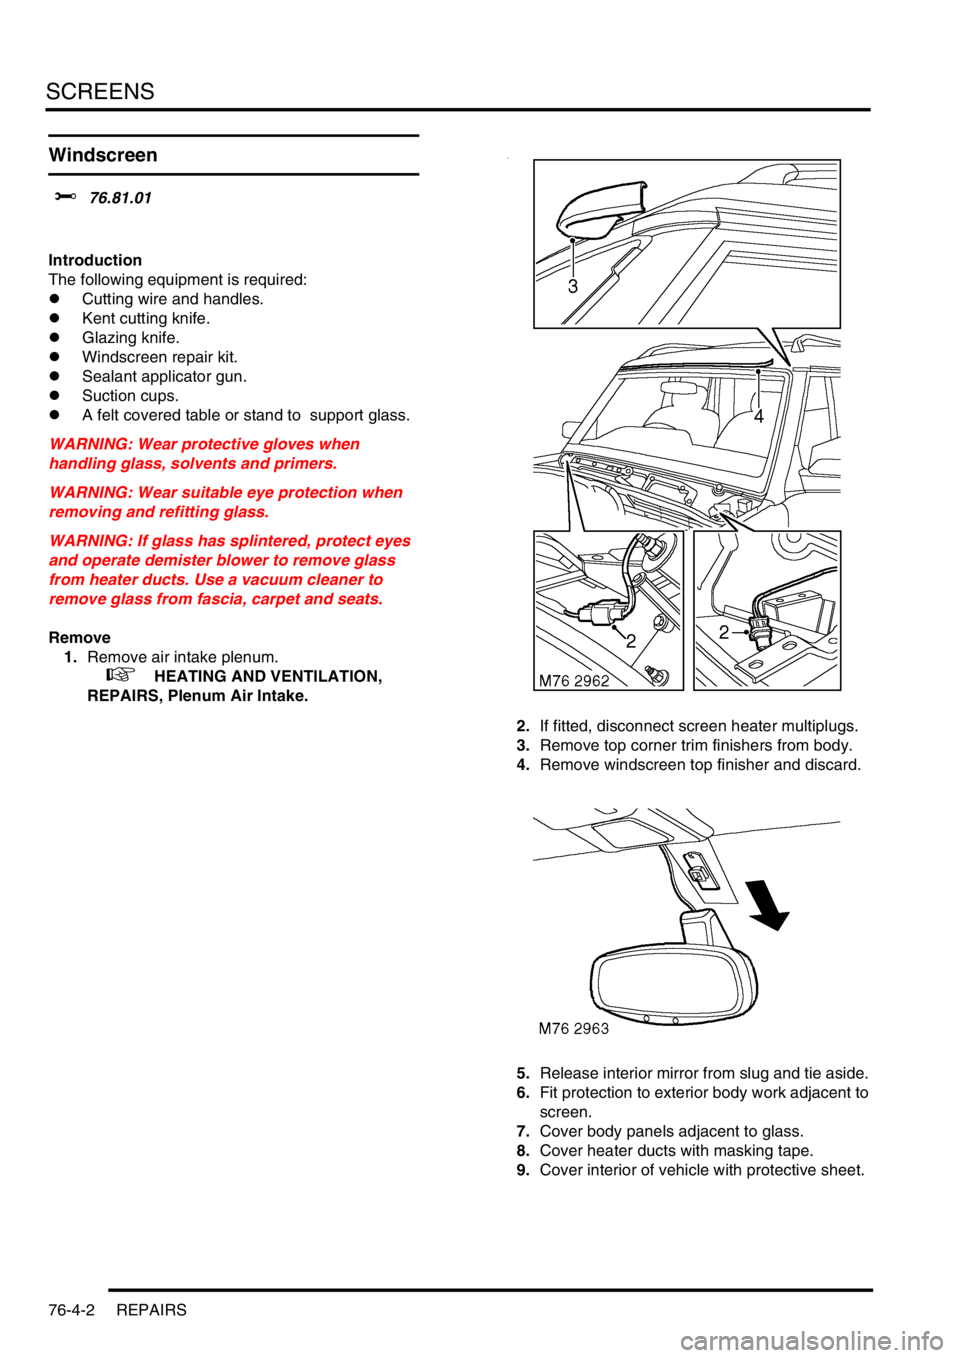
2.If fitted, disconnect screen heater multiplugs.
3.Remove top corner trim finishers from body.
4.Remove windscreen top finisher and discard.
5.Release interior mirror from slug and tie aside.
6.Fit protection to exterior body work adjacent to
screen.
7.Cover body panels adjacent to glass.
8.Cover heater ducts with masking tape.
9.Cover interior of vehicle with protective sheet.
Page 1190 of 1672
SEATS
DESCRIPTION AND OPERATION 76-5-5
Seat switch pack
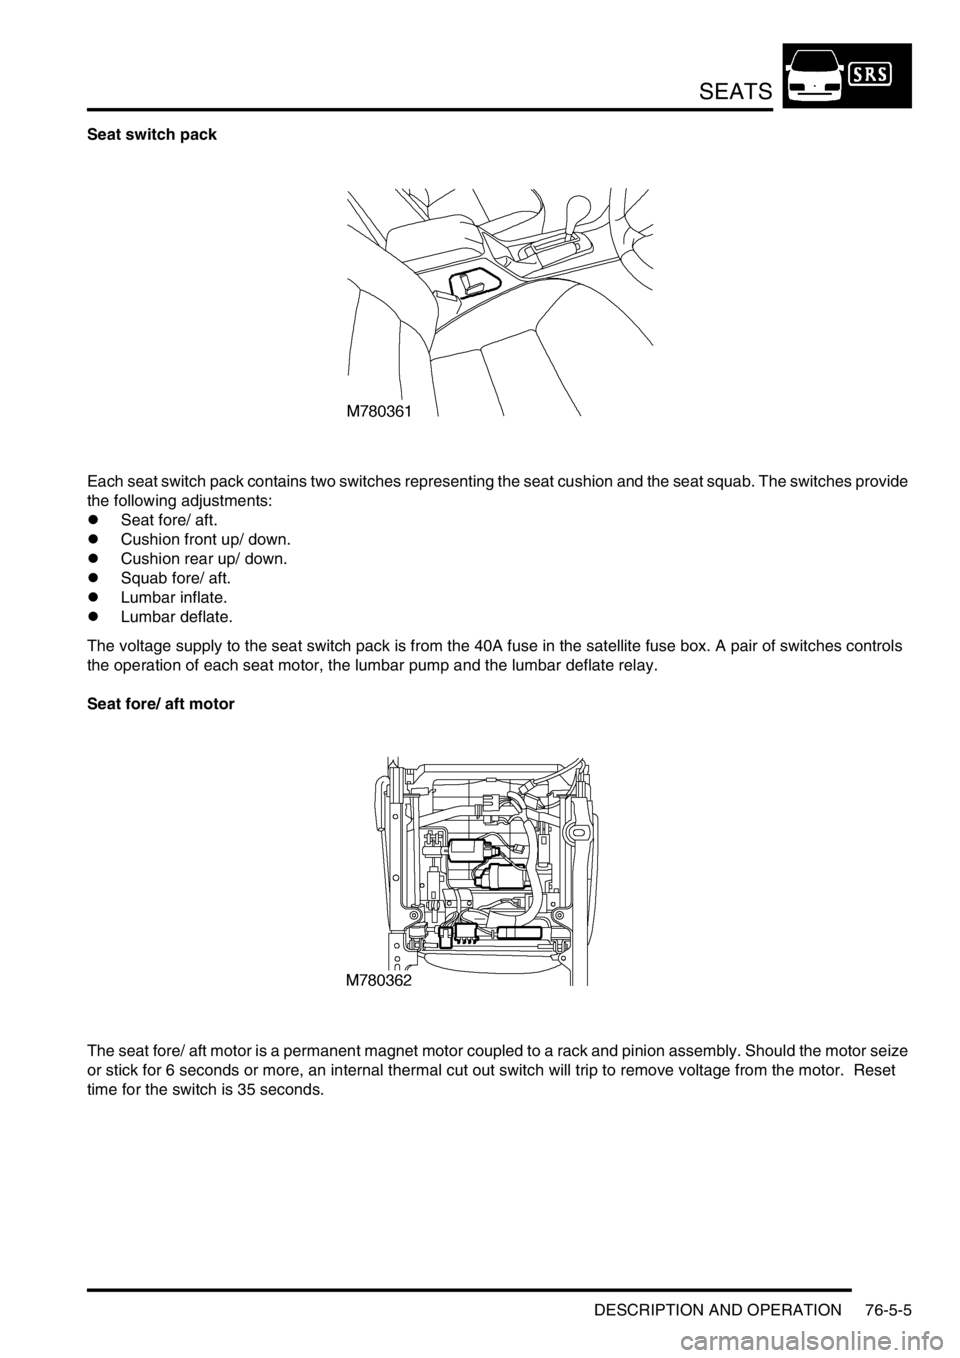
Each seat switch pack contains two switches representing the seat cushion and the seat squab. The switches provide
the following adjustments:
lSeat fore/ aft.
lCushion front up/ down.
lCushion rear up/ down.
lSquab fore/ aft.
lLumbar inflate.
lLumbar deflate.
The voltage supply to the seat switch pack is from the 40A fuse in the satellite fuse box. A pair of switches controls
the operation of each seat motor, the lumbar pump and the lumbar deflate relay.
Seat fore/ aft motor
The seat fore/ aft motor is a permanent magnet motor coupled to a rack and pinion assembly. Should the motor seize
or stick for 6 seconds or more, an internal thermal cut out switch will trip to remove voltage from the motor. Reset
time for the switch is 35 seconds.
Page 1191 of 1672

SEATS
76-5-6 DESCRIPTION AND OPERATION
Two pins within the seat switch pack control the seat fore/ aft motor. Both pins are normally earthed. Operating the
backward switch applies voltage to that pin while the other pin remains earthed. Operating the forward switch reverses
power and earth to the motor allowing the motor to run in the opposite direction.
Seat cushion front up/ down motor
The seat cushion front up/ down motor is a permanent magnet motor coupled to a rack and pinion assembly. Should
the motor seize or stick for 6 seconds or more an internal thermal cut out switch will trip to remove voltage from the
motor. Reset time for the switch is 35 seconds.
Two pins within the seat switch pack control the seat cushion front up/ down motor. Both pins are normally earthed.
Operating the up switch applies voltage to that pin while the other pin remains earthed. Operating the down switch
reverses power and earth to the motor allowing the motor to run in the opposite direction.
Seat cushion rear up/ down motor
The seat cushion rear up/ down motor is a permanent magnet motor coupled to a rack and pinion assembly. Should
the motor seize or stick for 6 seconds or more, an internal thermal cut out switch will trip to remove voltage from the
motor. Reset time for the switch is 35 seconds.
Two pins within the seat switch pack control the seat cushion rear up/ down motor. Both pins are normally earthed.
Operating the up switch applies voltage to that pin while the other pin remains earthed. Operating the down switch
reverses power and earth to the motor allowing the motor to run in the opposite direction.
Seat squab fore/ aft motor
The squab fore/ aft motor is a permanent magnet motor coupled to a rotary rack and pinion assembly. Should the
motor seize or stick for 6 seconds or more, an internal thermal cut out switch will trip to remove voltage from the motor.
Reset time for the switch is 35 seconds.
Two pins within the seat switch pack control the squab fore/ aft motor. Both pins are normally earthed. Operating the
fore switch applies voltage to that pin while the other pin remains earthed. Operating the aft switch reverses power
and earth to the motor allowing the motor to run in the opposite direction.
Lumbar pump
The lumbar pump inflates a bladder in the squab which provides extra support for the seat occupant. With no load on
the seat it takes approximately 10 seconds to completely inflate the bladder. With a load of 25 kg (55 lb) it takes
approximately 15 seconds to inflate the bladder. A pressure cut off switch in the system will operate at 0.12 to 1.93
bar (1.8 to 28 lbf.in
2). If a problem occurs with the lumbar bladder, e.g. a rupture, the whole lumbar system must be
replaced. The components are not serviceable.
Power comes from the seat switch pack through a 3A fuse in the satellite fuse box. The lumbar pump and the lumbar
deflate solenoid share an earth.
Lumbar deflate solenoid
The lumbar deflate solenoid vents the lumbar bladder to atmosphere to allow air to evacuate the bladder. The average
time to evacuate the bladder with a load of 25 kg (55 lb) is 9 seconds.
Power comes from the seat switch pack through a 3A fuse in the satellite fuse box. The lumbar deflate solenoid and
the lumbar pump share an earth.