2002 LAND ROVER DISCOVERY engine oil
[x] Cancel search: engine oilPage 1370 of 1672
HEATING AND VENTILATION
REPAIRS 80-29
Pipe - Heater - Feed
$% 80.25.07
Remove
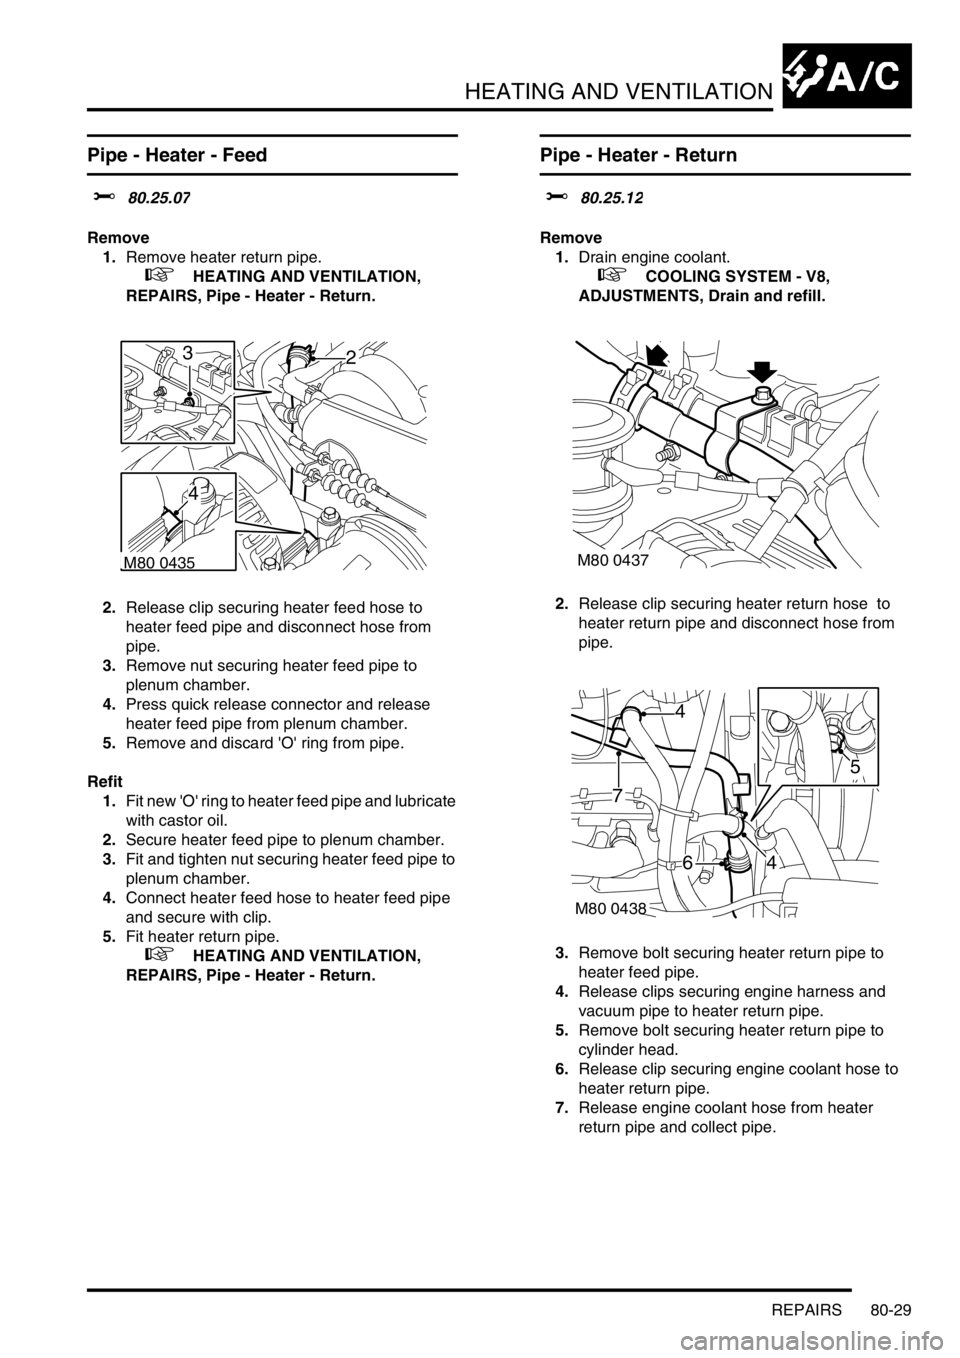
1.Remove heater return pipe.
+ HEATING AND VENTILATION,
REPAIRS, Pipe - Heater - Return.
2.Release clip securing heater feed hose to
heater feed pipe and disconnect hose from
pipe.
3.Remove nut securing heater feed pipe to
plenum chamber.
4.Press quick release connector and release
heater feed pipe from plenum chamber.
5.Remove and discard 'O' ring from pipe.
Refit
1.Fit new 'O' ring to heater feed pipe and lubricate
with castor oil.
2.Secure heater feed pipe to plenum chamber.
3.Fit and tighten nut securing heater feed pipe to
plenum chamber.
4.Connect heater feed hose to heater feed pipe
and secure with clip.
5.Fit heater return pipe.
+ HEATING AND VENTILATION,
REPAIRS, Pipe - Heater - Return.
Pipe - Heater - Return
$% 80.25.12
Remove
1.Drain engine coolant.
+ COOLING SYSTEM - V8,
ADJUSTMENTS, Drain and refill.
2.Release clip securing heater return hose to
heater return pipe and disconnect hose from
pipe.
3.Remove bolt securing heater return pipe to
heater feed pipe.
4.Release clips securing engine harness and
vacuum pipe to heater return pipe.
5.Remove bolt securing heater return pipe to
cylinder head.
6.Release clip securing engine coolant hose to
heater return pipe.
7.Release engine coolant hose from heater
return pipe and collect pipe.
M80 0435
23
4
M80 0437
M80 0438
4
46
7
5
Page 1404 of 1672
AIR CONDITIONING
REPAIRS 82-31
REPAIRS
Compressor - diesel
$% 82.10.20
Remove
1.Remove engine acoustic cover.
2.Depressurise air conditioning system.
+ AIR CONDITIONING, REFRIGERANT
RECOVERY, RECYCLING AND
RECHARGING, Refrigerant recovery,
recycling and recharging.
3.Remove auxiliary drive belt.
+ CHARGING AND STARTING,
REPAIRS, Belt - auxiliary drive.
4.Drain cooling system.
+ COOLING SYSTEM - Td5,
ADJUSTMENTS, Drain and refill.
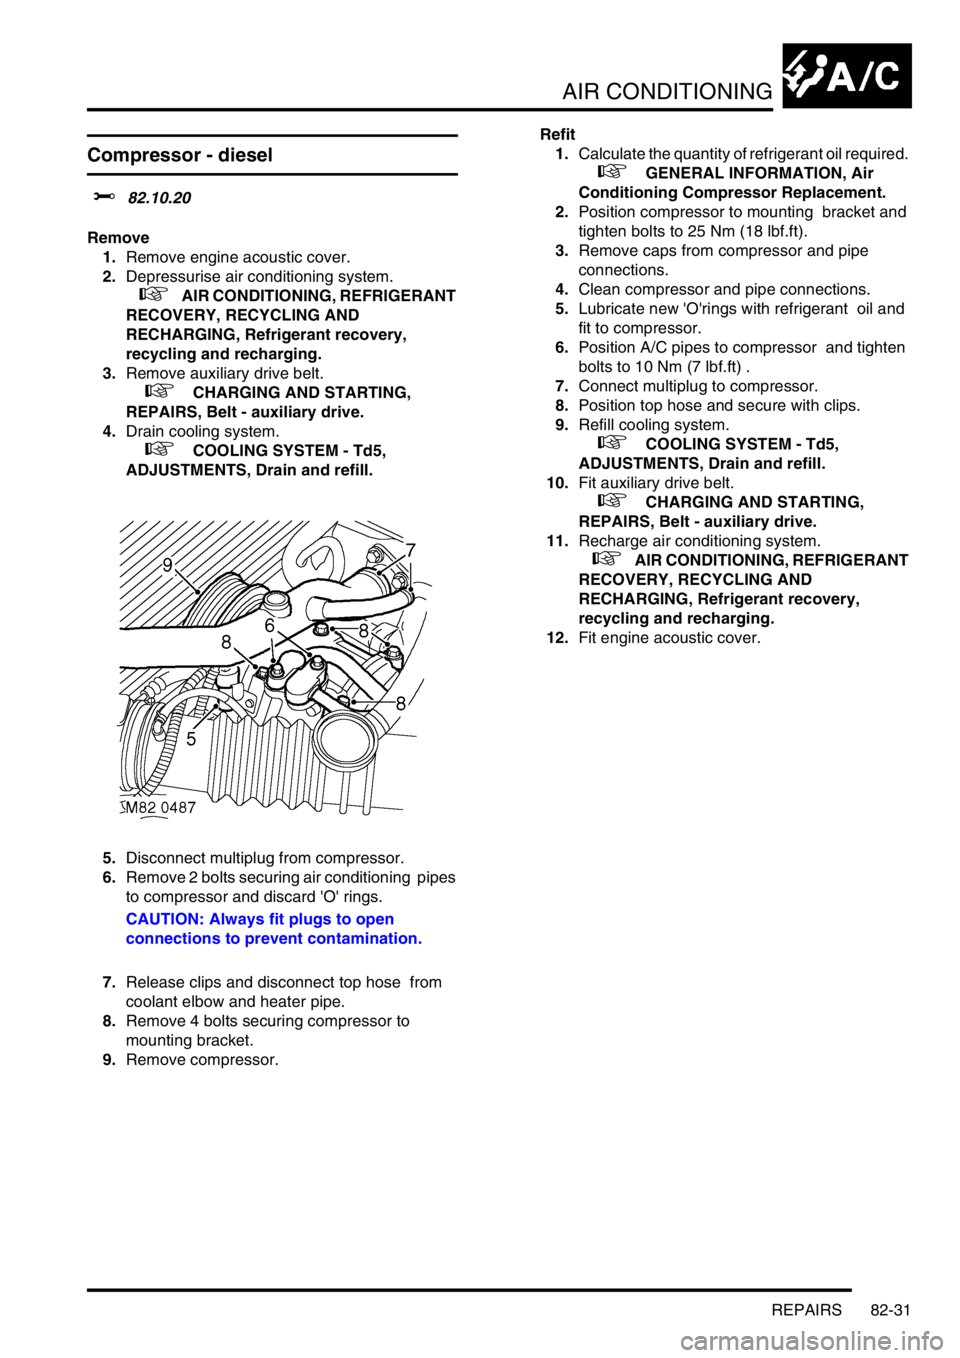
5.Disconnect multiplug from compressor.
6.Remove 2 bolts securing air conditioning pipes
to compressor and discard 'O' rings.
CAUTION: Always fit plugs to open
connections to prevent contamination.
7.Release clips and disconnect top hose from
coolant elbow and heater pipe.
8.Remove 4 bolts securing compressor to
mounting bracket.
9.Remove compressor.Refit
1.Calculate the quantity of refrigerant oil required.
+ GENERAL INFORMATION, Air
Conditioning Compressor Replacement.
2.Position compressor to mounting bracket and
tighten bolts to 25 Nm (18 lbf.ft).
3.Remove caps from compressor and pipe
connections.
4.Clean compressor and pipe connections.
5.Lubricate new 'O'rings with refrigerant oil and
fit to compressor.
6.Position A/C pipes to compressor and tighten
bolts to 10 Nm (7 lbf.ft) .
7.Connect multiplug to compressor.
8.Position top hose and secure with clips.
9.Refill cooling system.
+ COOLING SYSTEM - Td5,
ADJUSTMENTS, Drain and refill.
10.Fit auxiliary drive belt.
+ CHARGING AND STARTING,
REPAIRS, Belt - auxiliary drive.
11.Recharge air conditioning system.
+ AIR CONDITIONING, REFRIGERANT
RECOVERY, RECYCLING AND
RECHARGING, Refrigerant recovery,
recycling and recharging.
12.Fit engine acoustic cover.
Page 1436 of 1672
WIPERS AND WASHERS
DESCRIPTION AND OPERATION 84-15
Headlamp powerwash pump
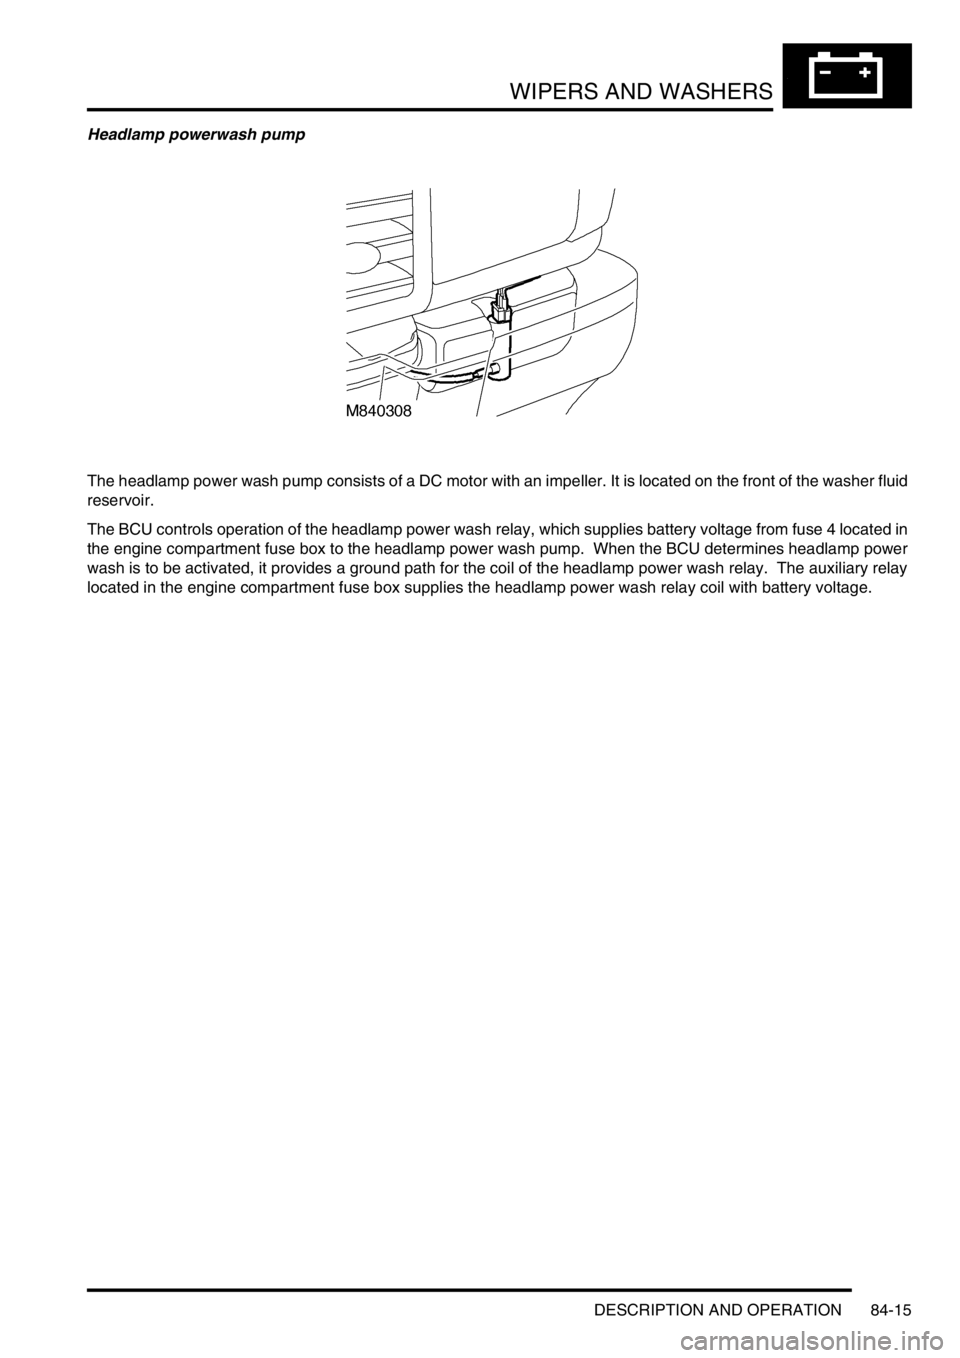
The headlamp power wash pump consists of a DC motor with an impeller. It is located on the front of the washer fluid
reservoir.
The BCU controls operation of the headlamp power wash relay, which supplies battery voltage from fuse 4 located in
the engine compartment fuse box to the headlamp power wash pump. When the BCU determines headlamp power
wash is to be activated, it provides a ground path for the coil of the headlamp power wash relay. The auxiliary relay
located in the engine compartment fuse box supplies the headlamp power wash relay coil with battery voltage.
Page 1451 of 1672
CHARGING AND STARTING
86-1-2 REPAIRS
Refit
1.Clean mating faces of alternator and vacuum
pump.
2.Fit vacuum pump to alternator and tighten
bolts to 8 Nm (6 lbf.ft).
3.Position alternator to engine and connect
multiplug.
4.Connect vacuum hose and oil drain hose to
vacuum pump and secure clips.
5.With assistance align alternator to mounting
bracket and fit but do not tighten bolt.
6.Fit bolt securing support stay to alternator and
tighten to 25 Nm (18 lbf.ft) .
7.Tighten bolt securing alternator to mounting
bracket to 45 Nm (33 lbf.ft).
8.Using new 'O' ring, connect oil supply pipe to
cylinder head and tighten to 10 Nm (7 lbf.ft).
9.Connect lead to alternator and tighten nut to 6
Nm (4.4 lbf.ft).
10.Fit auxiliary drive belt tensioner and tighten bolt
to 50 Nm (37 lbf.ft).
11.Fit auxiliary drive belt.
+ CHARGING AND STARTING,
REPAIRS, Belt - auxiliary drive.
Alternator - V8
$% 86.10.02
Remove
1.Remove auxiliary drive belt.
+ CHARGING AND STARTING,
REPAIRS, Belt - auxiliary drive.
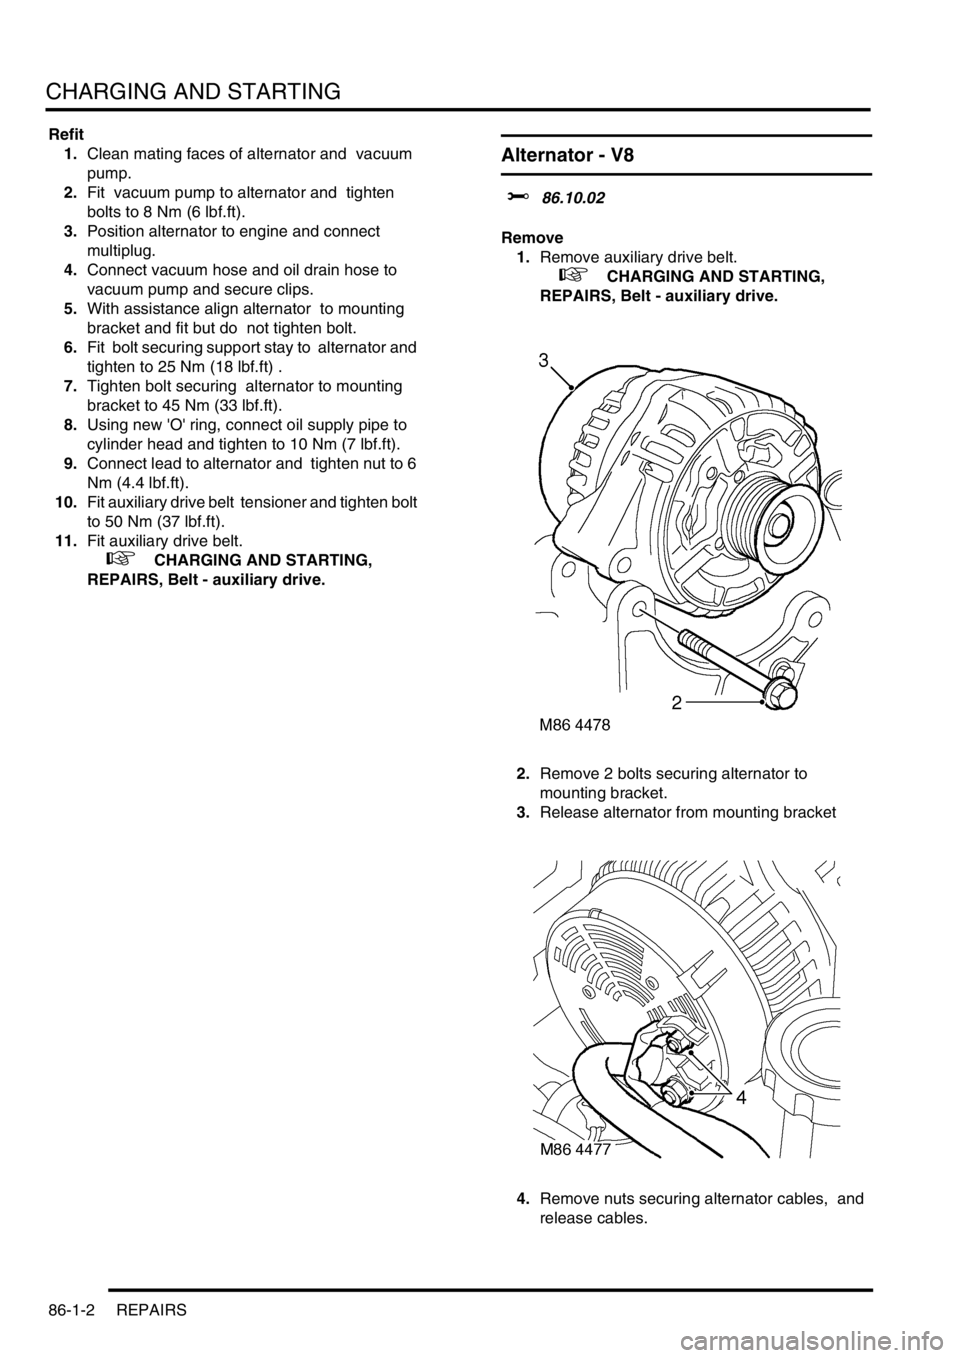
2.Remove 2 bolts securing alternator to
mounting bracket.
3.Release alternator from mounting bracket
4.Remove nuts securing alternator cables, and
release cables.
Page 1471 of 1672

BODY CONTROL UNIT
86-3-2 DESCRIPTION AND OPERATION
Power supply
Battery supply to the BCU and the IDM is provided through a 10 A fuse located in the engine compartment fuse box.
The BCU unit receives an ignition switched power supply (ignition switch position II) input via a 10 A fuse in the
passenger compartment fuse box.
The BCU receives a signal when the ignition switch is turned to the crank position, it then supplies an earth path to
the starter relay coil, to enable the crank operation by supplying power through the starter relay contacts to the starter
motor.
Battery voltage is monitored and BCU operation will function normally between 8 and 18 volts. Between 5.7 and 8
volts the BCU is in the 'under volts' state. The status of the battery is used to determine which outputs may be driven.
If a voltage supply above 18 volts is experienced, outputs will not normally be driven except for those functions which
are required during cranking (robust immobilisation, antenna coil, crank enable relay and feed to gear position switch
contacts W, X, Y, Z). In the over voltage state the vehicle can be driven, but all other functions are disabled and
outputs are switched off (power windows, heated screen, direction indicators etc.).
All functions are disabled on power up until communications between the BCU and IDM have been established. If
communications cannot be established, operation will commence with degraded functionality.
Battery supply to the IDM is provided through the inertia switch and a 10 A fuse in the engine compartment fuse box.
If the inertia switch contacts are closed battery voltage is available at the IDM; if the inertia switch contacts are open
there is no battery supply to the IDM. The supply condition of the IDM is signalled to the BCU via the serial bus. If the
inertia switch is operated (contacts open) the change in state is detected by the BCU which unlocks the doors if the
ignition switch is in position II and the alarm is not set.
The BCU is earthed through a hard-wire connection.
Inputs and outputs
The BCU and IDM process inputs and provide the necessary outputs for control and operation of the vehicle's 'body'
systems.
BCU inputs
The BCU processes signals received from the following components:
lDoor latch switches.
lDriver's door key lock/ unlock switches.
lBonnet activated security system.
lVolumetric sensors.
lCentral Door Locking (CDL) switches.
lRemote transmitter (via receiver unit).
lInertia fuel cut-off switch.
lIgnition switch.
lFuel flap release switch.
The input voltages (V
in) for BCU digital signals are defined as follows:
lLogic 1 when V
in ≥ 6V.
lLogic 0 when V
in ≤ 2V.
BCU input voltages between 2 and 6 volts are indeterminate and cannot be guaranteed.
Analogue input voltages are measured as a ratio with respect to battery voltage.
Page 1472 of 1672
BODY CONTROL UNIT
DESCRIPTION AND OPERATION 86-3-3
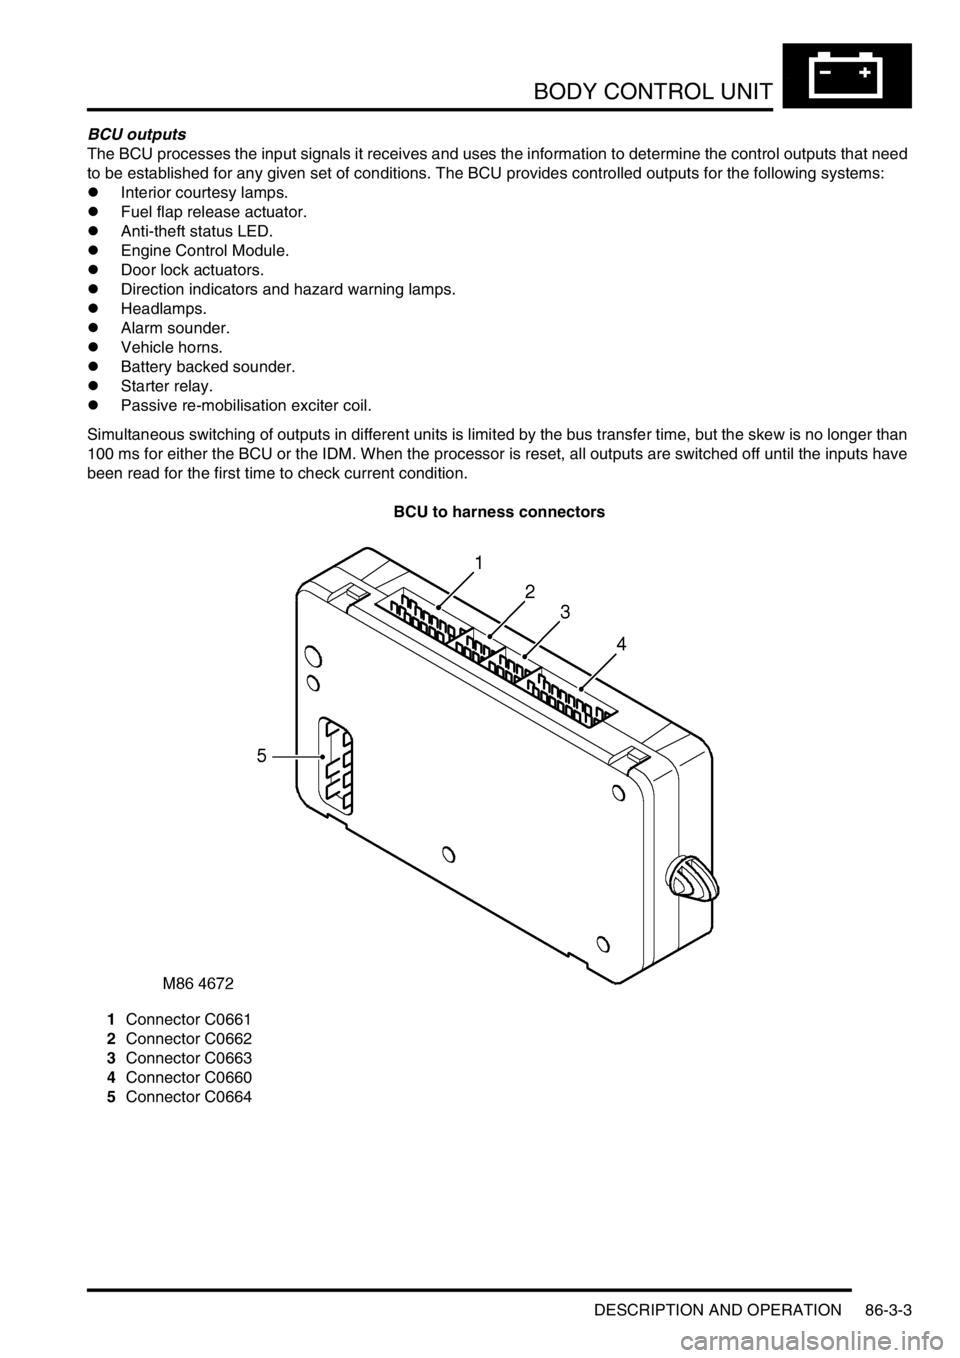
BCU outputs
The BCU processes the input signals it receives and uses the information to determine the control outputs that need
to be established for any given set of conditions. The BCU provides controlled outputs for the following systems:
lInterior courtesy lamps.
lFuel flap release actuator.
lAnti-theft status LED.
lEngine Control Module.
lDoor lock actuators.
lDirection indicators and hazard warning lamps.
lHeadlamps.
lAlarm sounder.
lVehicle horns.
lBattery backed sounder.
lStarter relay.
lPassive re-mobilisation exciter coil.
Simultaneous switching of outputs in different units is limited by the bus transfer time, but the skew is no longer than
100 ms for either the BCU or the IDM. When the processor is reset, all outputs are switched off until the inputs have
been read for the first time to check current condition.
BCU to harness connectors
1Connector C0661
2Connector C0662
3Connector C0663
4Connector C0660
5Connector C0664
Page 1482 of 1672

BODY CONTROL UNIT
DESCRIPTION AND OPERATION 86-3-13
Anti-theft system
The BCU controls the logical switching operations for enabling and activating the anti-theft system. Features include:
lPerimetric protection – monitors the condition of doors and hinged panels.
lVolumetric protection – monitors the vehicle's interior space.
lRemote locking, superlocking and unlocking functions.
lEngine immobilisation and remobilisation.
lAdvanced mislock detection and automatic compensation.
lEKA code functions.
lCustomer configuration options.
lMarket configuration options.
Immobilisation
The immobilisation system comprises the following components:
lRF receiver.
lRF transmitter/ transponder.
lTransponder coil.
lBCU.
lDoor switches, door lock switches and bonnet switch.
lIDM.
lECM.
lStarter solenoid relay.
lStatus LED.
Alarm sounder Alarm Audible warnings are given by the security system sounder only.
Both Audible warnings are given by both the security system sounder
and the vehicle horn.
Vehicle Audible warnings are given by the vehicle horn only.
BBUS Audible warnings are given by the security system sounder,
vehicle horn and BBUS.
Disabled Audible warnings are not given.
Acclimatisation locking Disabled The vehicle cannot be locked if the ignition is on.
Enabled The vehicle can be locked if the ignition is on and the engine is
running.
Alarm tamper Disabled The security system LED does not flash when the security system
has been tampered with.
Enabled The security system LED flashes when the security system has
been tampered with.
Engine immobilised LED off The security system LED does not flash when the engine is
immobilised.
LED flash The security system LED flashes when the engine is immobilised.
Low battery warning Disabled The security system LED does not flash when the remote
transmitter battery is low.
Enabled The security system LED flashes when the remote transmitter
battery is low.
Emergency Key Access
(EKA)Disabled EKA is disabled.
Enabled EKA is enabled and the door locks operate electrically.
No unlock EKA is enabled, but the door locks do not operate electrically. Function Option Details
Page 1488 of 1672

BODY CONTROL UNIT
DESCRIPTION AND OPERATION 86-3-19
Operation
For IDM inputs which are also inputs for BCU functions, the delay before the BCU recognises the change in input
status is less than 250 ms. The BCU uses a debounce algorithm to ignore changes in input having a duration less
than 100 ms with the exception of automatic gearbox W, X, Y, Z inputs, which have a debounce period of 33 ms.
Transit mode
To prevent excessive battery drain during transit to overseas markets, the vehicle is placed in a transit mode.
To exit the transit mode, simultaneously hold down the heated rear window switch and the rear fog lamp switch, turn
the ignition switch from 0 to II and, after a minimum of 2 seconds, release the switches.
Transit mode can be entered using TestBook. When TestBook communicates with the BCU for diagnostics related to
BCU operation, it first checks that the vehicle is not in transit mode.
Anti-theft system
The BCU uses the driver's door key lock and unlock switches to activate and deactivate the security system. The
driver's door lock is also used for entering the EKA.
+ ALARM SYSTEM AND HORN, DESCRIPTION AND OPERATION, Description.
Immobilisation
For immobilisation, the BCU disables the starter motor relay. When the engine is cranking, the ECM looks for a coded
signal from the BCU. If the signal is not received within one second of cranking, the fuel supply to the engine is
stopped and the injectors are disabled. This also prevents unburnt fuel from entering the catalyst.
If the BCU is disconnected, the engine starter motor will remain isolated by the starter motor relay and the ECM will
remain immobilised. The main wiring for the system is contained within the main harness which is relatively
inaccessible, so preventing intruders from disabling the system by cutting the wires for the immobilisation system.
Once the immobiliser has been activated, destruction of the trigger device or the wiring to it will not disarm the system.
The RF transmitter communicates to the BCU via the RF receiver using a 70 bit code. Pressing the unlock button on
the transmitter will re-mobilise the vehicle. The RF transponder is integrated into the metal key assembly, inserting
the key into the ignition switch will induce a signal in the exciter coil to re-mobilise the vehicle.
Anti-theft alarm
The alarm system provides a warning of unauthorised access to the vehicle and includes perimetric and volumetric
monitoring under the control of the BCU.
The perimetric protection system detects opening of all doors, tail door and bonnet and will also detect the operation
of the ignition key switch. The following conditions must be satisfied before the BCU will operate all of the functions
of perimetric protection:
lAll doors and hinged panels are in the closed position.
lIgnition key out of the ignition switch.
lInertia switch is not tripped.
If all conditions are not satisfied the BCU will enter a mislock condition.
The volumetric sensor uses two ultrasonic sensors mounted in the headlining to detect movement within the vehicle.
The alarm will trigger when the sensor signals the BCU for 200 ms or greater. Within a single setting period the alarm
system will allow a maximum of 10 triggers as a result of any combination of sensor inputs. It is possible to lock the
vehicle without enabling the volumetric alarm by using the key. The same conditions needed to satisfy enabling of the
perimetric protection system is also needed to enable volumetric protection.