2002 LAND ROVER DISCOVERY buttons
[x] Cancel search: buttonsPage 1561 of 1672

IN CAR ENTERTAINMENT
86-6-8 DESCRIPTION AND OPERATION
Traffic information function
A traffic/news information button (I) allows traffic or news information to be selected on the FM waveband only, in this
mode the radio will mute when traffic or news messages are received. After the traffic or news message the radio,
cassette tape or CD will resume play, the traffic and news information varies with the country of use and radio band
selected.
Multi function buttons
The music symbol button is used for mode selection for adjustment of bass, treble etc. depending on current mode
selected. Operation of presets 1-6 depends on current mode of operation and allows selection of radio band (Radio
mode on) or CD-autochanger disc (in the CD mode). Search/Seek (Mode dependent) manual or automatic selection
of band or track. MAN (mode dependent) when pressed the button allows manual operation or alternate mode
selections such as manual tuning, compact disk cue/review, tape forward/rewind modes. The mode dependent SCAN
button allows automatic searching of radio bands, tape or compact disk tracks.
Internal memory
An internal memory chip stores the station presets and security code, power is supplied internally to the chip via a
permanent power feed, supplied from the passenger compartment fuse box.
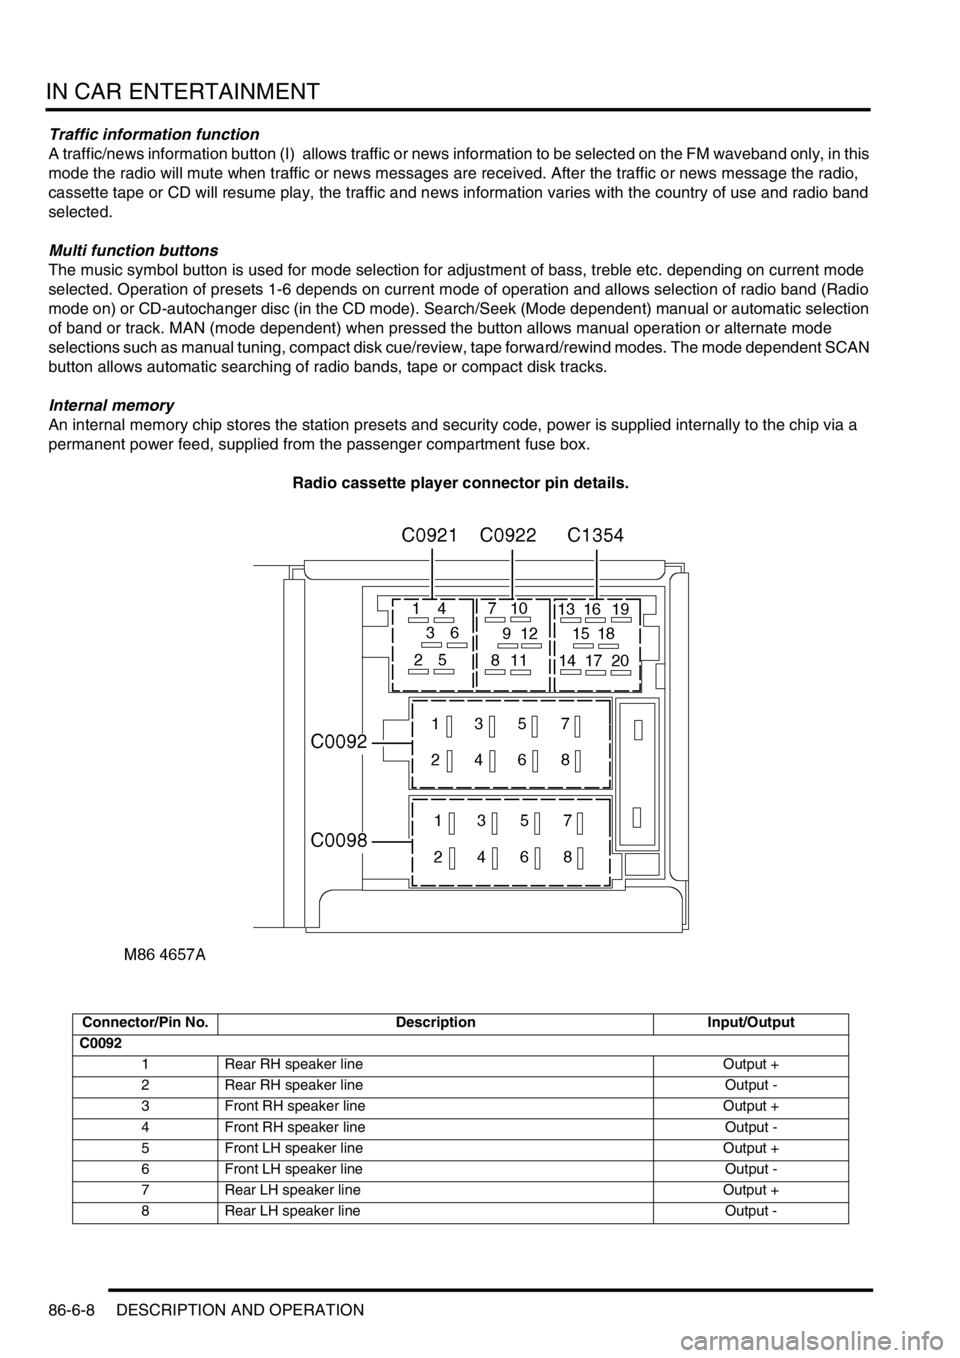
Radio cassette player connector pin details.
Connector/Pin No. Description Input/Output
C0092
1 Rear RH speaker line Output +
2 Rear RH speaker line Output -
3 Front RH speaker line Output +
4 Front RH speaker line Output -
5 Front LH speaker line Output +
6 Front LH speaker line Output -
7 Rear LH speaker line Output +
8 Rear LH speaker line Output -
Page 1563 of 1672

IN CAR ENTERTAINMENT
86-6-10 DESCRIPTION AND OPERATION
Remote radio steering wheel controls (midline and high line systems)
The remote radio control switch is located on the LH side of the steering wheel and is secured with two screws. The
wiring from the remote radio control switch plugs in to a connector that is part of the steering wheel rotary coupler.
Operation of the remote radio control switches allow the driver to control the ICE without releasing the steering wheel.
Volume, mode and selection functions can be carried out using the steering wheel mounted control switches. Control
inputs from the remote radio control switches are sent to the radio cassette player.
Aerial
On base and midline ICE systems an AM/FM aerial is built-in to the side window glass on the RH side of the vehicle.
An amplifier is located on the frame above the rear side widow behind the rear quarter trim, and is secured (and
earthed) with one bolt. Coaxial leads connect the aerial to the aerial amplifier and radio cassette. Power is supplied
from the auxilary relay in the engine compartment fuse box, through a fuse in the passenger compartment fusebox to
the amplifier.
On high line ICE systems two amplified aerials are built-in to the side window glass of the vehicle. The two aerials are
an AM/FM aerial on the RH side, and an FM aerial on the LH side. The amplifier for each aerial are located on the
frame above each rear side widow behind the rear quarter trim, and are each secured (and earthed) with one bolt.
Amplified aerials improve the reception quality, the FM aerial gives improved reception in areas of poor signal
(diversity) conditions in urban areas. A Power feed from the radio cassette player is connected to the amplified aerials,
power is available when the cassette player is operating. The aerials are connected to the radio cassette player by
two coaxial cables, a small plug connects the FM only aerial, a larger plug connects the AM/FM aerial.
Power amplifier (high line system)
The amplifier is located on a bracket under the LH front seat and is secured with three screws and washers. The
amplifier receives inputs from the radio, radio cassette player or (via the radio cassette player) the CD-autochanger.
Power for the amplifier is supplied from the passenger compartment fuse box. The amplifier will power up when an
enable logic signal is sent from the radio cassette, this signal is sent by the radio cassette when it is turned on.
CD-autochanger (high line system)
A CD-autochanger is located under the RH front seat, the unit is secured to brackets in the floor with four screws and
washers. A tray is used to hold each compact disk (CD), the loaded tray is then inserted in a magazine, the magazine
holds six trays and is then inserted into the CD-autochanger. A sliding cover protects the internal components of the
CD-autochanger from dirt entry through the magazine opening. An eject button located on the front of the CD-
autochanger can be used to release the magazine from the CD-autochanger. The sliding cover has to be opened
manually before the magazine eject button is pressed. The operation of the CD-autochanger is controlled by inputs
from the radio cassette, the control inputs can be from the radio cassette buttons, the remote radio controls or the rear
radio headphone amplifiers if they are fitted. The output from the CD-autochanger are connected to the radio cassette
player. The radio cassette player sends the outputs to the power amplifier. Power is supplied to the CD-autochanger
by a feed from the radio cassette player.
Radio headphone amplifiers (high line system)
The rear mounted radio headphone amplifiers are located in the lower rear quarter trim casing and are held in position
by a clip on the side of the headphone amplifier. Mode and function buttons are located on a control panel, the mode
button allows each of the rear seat passengers to independently select from the radio, tape or CD-autochanger. The
driver and the rear seat passengers can each listen to any of the audio devices they select. However the radio
cassette setting has overall priority e.g:
lIf the radio cassette is using a radio wave band (AM or FM), the headphone user will be able to select the cassette
tracks or CD-autochanger. The user will be able to listen to same radio band that is selected on the radio
cassette, but will not be able to change the station selected.
lIf the radio cassette has CD-autochanger selected, the headphone amplifiers will allow listening to the compact
disk but will not allow track changes. The headphone user will be able to select on all of the radio bands or
cassette tracks.
lIf the radio cassette has tape selected, the headphone amplifiers will allow listening to the tape but will not allow
track changes. The headphone user will be able to select all radio bands or CD's on the CD-autochanger.
Page 1564 of 1672

IN CAR ENTERTAINMENT
DESCRIPTION AND OPERATION 86-6-11
If one headphone amplifier unit has control of the tape player, CD or radio, the other headphone amplifier will be able
to listen and be able to change tape tracks or radio bands. Other buttons allow a search seek function of radio band
or compact disk track, reversal of the tape, radio station and volume adjustment depending on the current operating
mode. If one radio headphone amplifier has control of the radio, tape or CD autochanger the other radio headphone
amplifier is able to change the track or radio band selected. A headphone socket with a glow ring is located on the
control panel. When a headphone is turned on , a 'headphone-module active' signal is sent to the radio cassette
player. The design incorporates panel illumination and a glow-ring to locate the socket in low light conditions. To
control the audio output from the radio headphone amplifiers, signals are sent to and received from the radio cassette
player.
Automatic volume control (High line system only)
An automatic base and treble volume control feature compensates for increases in interior road/transmission noise.
A road speed signal is monitored by the power amplifier, the signal is supplied by the SLABS ECU.
+ BRAKES, DESCRIPTION AND OPERATION, Description.The power amplifier boosts the levels of base
and treble as road speed increases. This system ensures that the apparent volume of sound remains constant and is
not affected by increases in the background noise in the vehicle.
Speakers
Some vehicles will not have all the speakers, the type and location of speakers fitted depends on the trim level and
ICE options specified for the vehicle.
A-post speakers LH/RH (if fitted)
The A-post speakers are located in the A-post trim on each side of the windscreen, and are each protected by a metal
grille. The speakers are held from the rear by a bayonet clip that clamps the speaker on to the A-post trim. The A-post
speakers are a high range type and have a power rating of:
lMid line system A-post speakers have a power rating of 15 watts and an impedance of 4
Ω.
lHigh line system A-post speakers have a power rating of 30 watts and an impedance of 4
Ω.
Upper front and rear door speakers LH/RH (high line system only)
The upper door speakers are located in the upper door trim, the speaker is protected by an integral metal grille. The
speaker is held in by a threaded ring that clamps the speaker from the rear onto the door trim. The upper door speaker
is a mid-range type and has a power rating of 30 watts and an impedance of 4
Ω.
Lower front door speakers LH/RH
The lower front door speaker is located in the front end of the lower (pocket) trim and is secured by three self tapping
screws. The speaker is protected by a clip on circular metal grille. The type of lower front door speakers fitted depends
on trim level and market:
lThe base and mid line systems are fitted with full-range door speakers with a power rating of 15 watts and an
impedance of 4
Ω
lThe high line system is fitted with a low-range door speaker with a power rating of 30 watts and an impedance
of 4
Ω.
Lower rear door speaker LH/RH
The lower rear door speaker is located in the lower door trim and is secured by three self tapping screws. The speaker
is protected by a clip on metal grille. The type of lower rear door speaker fitted depends on trim level and market:
lThe base and mid line systems are fitted with full-range door speakers with a power rating of 15 watts and an
impedance of 4
Ω
lThe high line system is fitted with a low-range door speaker with a power rating of 30 watts and an impedance
of 4
Ω.
Low range tail door speakers (high line system only)
The low range tail door speaker are located in a plastic casing in the lower door trim. Each of the two speakers is
secured to the casing with four self tapping screws. The casing is secured to the lower door structure with eight bolts.
The tail door trim surrounds the casing, the front of the casing is covered by a metal grill that is secured with six
screws. The low range tail door speakers have a power rating of 30 watts and has an impedance of 4
Ω.
Page 1618 of 1672

NAVIGATION SYSTEM
DESCRIPTION AND OPERATION 87-3
Navigation Computer
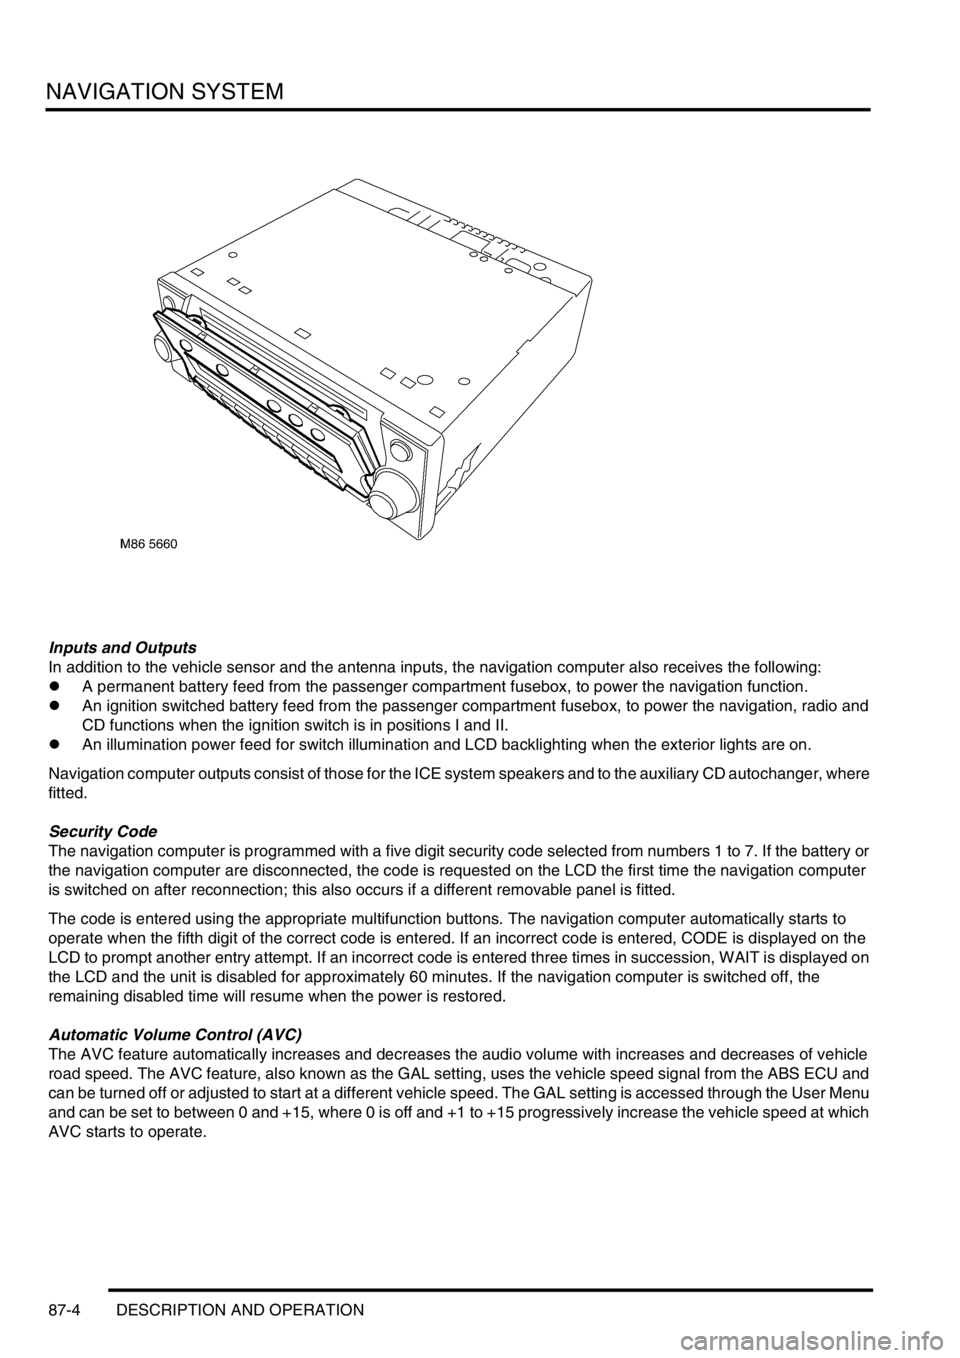
The navigation computer is installed in the DIN radio slot in the fascia. A spring loaded catch on each side of the
navigation computer secures it in position. Slide tools, installed in slots at the bottom front corners of the navigation
computer, are required to unlock the catches during removal.
The navigation computer contains all the hardware and software required for control of the navigation, radio and CD
systems, including the GPS receiver and a solid state piezo gyro for the navigation system. The piezo gyro measures
the motion of the vehicle around its vertical axis.
The controls for the navigation computer are all located on the front panel of the unit. The centre section of the front
panel hinges to allow access to the CD player and, for security purposes, can be removed from the unit. The controls
perform the following functions:
lOn/Off (ON) button, for switching the unit on and off.
lTone button, for activating the tone menu to adjust bass, treble, balance, fade and loudness functions.
lTraffic Programme (TP) button, for activating the traffic information programme menu (Europe only).
lCompact Disc (CD) mode button, for selecting CD operation.
lRadio (Rad) mode button, for selecting radio operation and tuning menus.
lNavigation (Nav) mode button, for entry and exit of the navigation menu and service mode.
lCD eject button, opens the removable panel and ejects the CD.
lRH rotary control, scrolls through menus when turned and enters a selection when pressed. Also mutes audio
navigation instructions when pressed in navigation mode.
lMultifunction buttons, for entering the security code and menu selections.
lLiquid Crystal Display (LCD), green screen that displays navigation, radio and CD information.
lLH rotary control, adjusts volume when turned. When pressed, restores, repeats or interrupts audio navigation
instructions or provides destination details.
1On/Off button
2Tone button
3Traffic programme button (Europe only)
4CD mode button
5Radio mode button
6Navigation mode button7CD eject button
8RH rotary control
9Release tool slot
10Multifunction buttons
11LCD
12LH rotary control
Page 1619 of 1672

NAVIGATION SYSTEM
87-4 DESCRIPTION AND OPERATION
Inputs and Outputs
In addition to the vehicle sensor and the antenna inputs, the navigation computer also receives the following:
lA permanent battery feed from the passenger compartment fusebox, to power the navigation function.
lAn ignition switched battery feed from the passenger compartment fusebox, to power the navigation, radio and
CD functions when the ignition switch is in positions I and II.
lAn illumination power feed for switch illumination and LCD backlighting when the exterior lights are on.
Navigation computer outputs consist of those for the ICE system speakers and to the auxiliary CD autochanger, where
fitted.
Security Code
The navigation computer is programmed with a five digit security code selected from numbers 1 to 7. If the battery or
the navigation computer are disconnected, the code is requested on the LCD the first time the navigation computer
is switched on after reconnection; this also occurs if a different removable panel is fitted.
The code is entered using the appropriate multifunction buttons. The navigation computer automatically starts to
operate when the fifth digit of the correct code is entered. If an incorrect code is entered, CODE is displayed on the
LCD to prompt another entry attempt. If an incorrect code is entered three times in succession, WAIT is displayed on
the LCD and the unit is disabled for approximately 60 minutes. If the navigation computer is switched off, the
remaining disabled time will resume when the power is restored.
Automatic Volume Control (AVC)
The AVC feature automatically increases and decreases the audio volume with increases and decreases of vehicle
road speed. The AVC feature, also known as the GAL setting, uses the vehicle speed signal from the ABS ECU and
can be turned off or adjusted to start at a different vehicle speed. The GAL setting is accessed through the User Menu
and can be set to between 0 and +15, where 0 is off and +1 to +15 progressively increase the vehicle speed at which
AVC starts to operate.
Page 1621 of 1672

NAVIGATION SYSTEM
87-6 DESCRIPTION AND OPERATION
Service Menu
The service menu provides access to details of the navigation computer hardware and software, and can be accessed
when the navigation computer is in radio mode, by simultaneously pressing the NAV button and the 10 multifunction
buttons. The following items can then be scrolled through by pressing the Nxt (next) and Prv (previous) multifunction
buttons, or turning the RH rotary control:
lModel No.
lSerial No.
lChanger Reset
lGAL
lRadio Software
lRadio Bolo
lNavi Rom
lNavi Flash
lRTC Value
When Changer Reset is displayed, the CD autochanger (where fitted) can be reset by pressing the appropriate
multifunction button.
When the End multifunction button is pressed, the navigation computer quits the service menu and returns to radio
mode.
Garage Menu
Garage menu enables the navigation system to be tested and calibrated, and also contains a route navigation
demonstration. The garage menu is entered from the main navigation menu, as follows:
1Press the Nav button to access the system settings.
2Press and hold multifunction button 3, then press multifunction button 5 to display the garage menu.
The garage menu contains the following, which can be accessed using the RH rotary control:
lCALIBRATION RIDE – Used to calibrate the navigation computer, to enable route navigation.
lGPS INFO– Provides functional test of antenna by checking GPS reception. If functioning correctly, displays the
number of satellites being received, the date, time (Greenwich Mean Time) and the type of positional fix currently
possible.
lCALIBRATION– Allows vehicle specific calibration data to be entered, e.g. tyre size. Also allows current
calibration to be deleted prior to re-calibrating.
NOTE: Only known calibration data should be entered. The navigation computer cannot make route
calculations if incorrect data is entered.
lSENSORS– Allows wheel speed, reverse gear and gyro sensor inputs to be checked.
lVERSION– Displays navigation computer hardware and software details.
lSPEECH TEST– Performs a test of the navigation computer audio output.
lMODULE TEST– Performs a test routine on the internal components of the navigation computer.
lDEMO – Allows a route navigation demonstration to be run.
To quit the garage menu, press the Nav button.
Calibration
Calibration is required after initial installation or replacement of the navigation computer. It may also be necessary
after repairs to system wiring and if route navigation becomes inaccurate or fails to operate. If the navigation computer
contains an existing calibration, this must be deleted, using the garage menu, prior to running the new calibration
routine. The sensor inputs should also be checked before running the calibration routine.
Page 1622 of 1672

NAVIGATION SYSTEM
DESCRIPTION AND OPERATION 87-7
Sensor Check
1Call up the SENSORS screen on the LCD:
lIf the navigation CD-ROM has not been installed before, press and hold multifunction button 1 then press
multifunction button 10.
lIf the navigation CD-ROM has been installed before, use the garage menu as detailed above.
2Drive the vehicle forwards a short distance at a speed greater than 2.5 mph (4 km/h) and ensure the road speed
counter on the SENSORS screen starts to increment.
3Select reverse gear and ensure the direction arrows on the SENSORS screen point rearwards.
4Ensure the GPS data on the SENSORS screen is displayed and updated.
NOTE: The GPS data will randomly display a GPS MODULE FAILURE message. This is not a fault condition, and
no action need be taken, provided the GPS data switches between the GPS MODULE FAILURE message and
actual GPS data.
5Exit the SENSORS screen:
lIf the navigation CD-ROM has not been installed before, press and hold multifunction button 1 then press
multifunction button 10.
lIf the navigation CD-ROM has been installed before, press the Nav button.
Calibration Routine
1Park the vehicle outside in an area clear of high buildings, trees etc.
NOTE: The more open the surrounding area is, the faster the system will acquire sufficient GPS satellite signals to
begin calibration. To minimise the calibration time, the vehicle should not be moved again until the calibration
ride.
2Turn the ignition switch to position II. If the navigation computer does not come on, press the navigation
computer ON button.
3If necessary, use the navigation computer multifunction buttons to enter the security code.
4Turn the ignition switch to position 0 and remove the ignition key.
5Press the navigation computer ON button.
6Call up the SENSORS screen on the LCD:
lIf the navigation CD-ROM has not been installed before, press and hold multifunction button 1 then press
multifunction button 10.
lIf the navigation CD-ROM has been installed before, use the garage menu as detailed above.
7Turn the LH rotary control to minimum volume.
8Wait for 30 minutes. If necessary, the vehicle can be left unattended and locked.
NOTE: Land Rover recommend a minimum of 30 minutes be allowed to elapse in order to ensure that only a short
distance need be driven to achieve calibration.
9After the 30 minutes have elapsed, ensure the navigation computer LCD shows a GPS almanac figure of 27 or
higher.
10Start the vehicle engine and allow to idle.
11Install the navigation CD-ROM.
12Wait until the navigation computer LCD prompts for a language to be selected. Turn the RH rotary control to
scroll through the options, highlight the required language and press the RH rotary control to select.
13The navigation computer LCD will prompt for a voice to be selected. Turn the RH rotary control to scroll through
the options, highlight the required voice and press the RH rotary control to select.
14Wait until the navigation computer LCD advises "language has been loaded OK". Press the RH rotary control to
confirm the language and voice selections.
15The navigation computer LCD will default to the CALIBRATION RIDE screen and should show the
CALIBRATION RIDE CAN START message. The GPS data and the road speed counter will also be shown.
16Drive the vehicle over a road route approximating that shown below (it is not necessary to copy the route
exactly). Calibration is complete when the navigation computer LCD switches to show DESTINATION & POI
and the satellite graphic. If all the pre calibration ride conditions were complied with, calibration is typically
achieved within 3 miles (5 km) and usually occurs when the vehicle returns to the start point. However,
calibration may be achieved earlier in the journey and, if it is, there is no need to complete the remainder of the
calibration route.