2002 JEEP LIBERTY Electrical
[x] Cancel search: ElectricalPage 1585 of 1803
LATCH
REMOVAL
(1) Remove the grill. (Refer to 23 - BODY/EXTERI-
OR/GRILLE - REMOVAL)
(2) Remove the latch support bracket bolts and
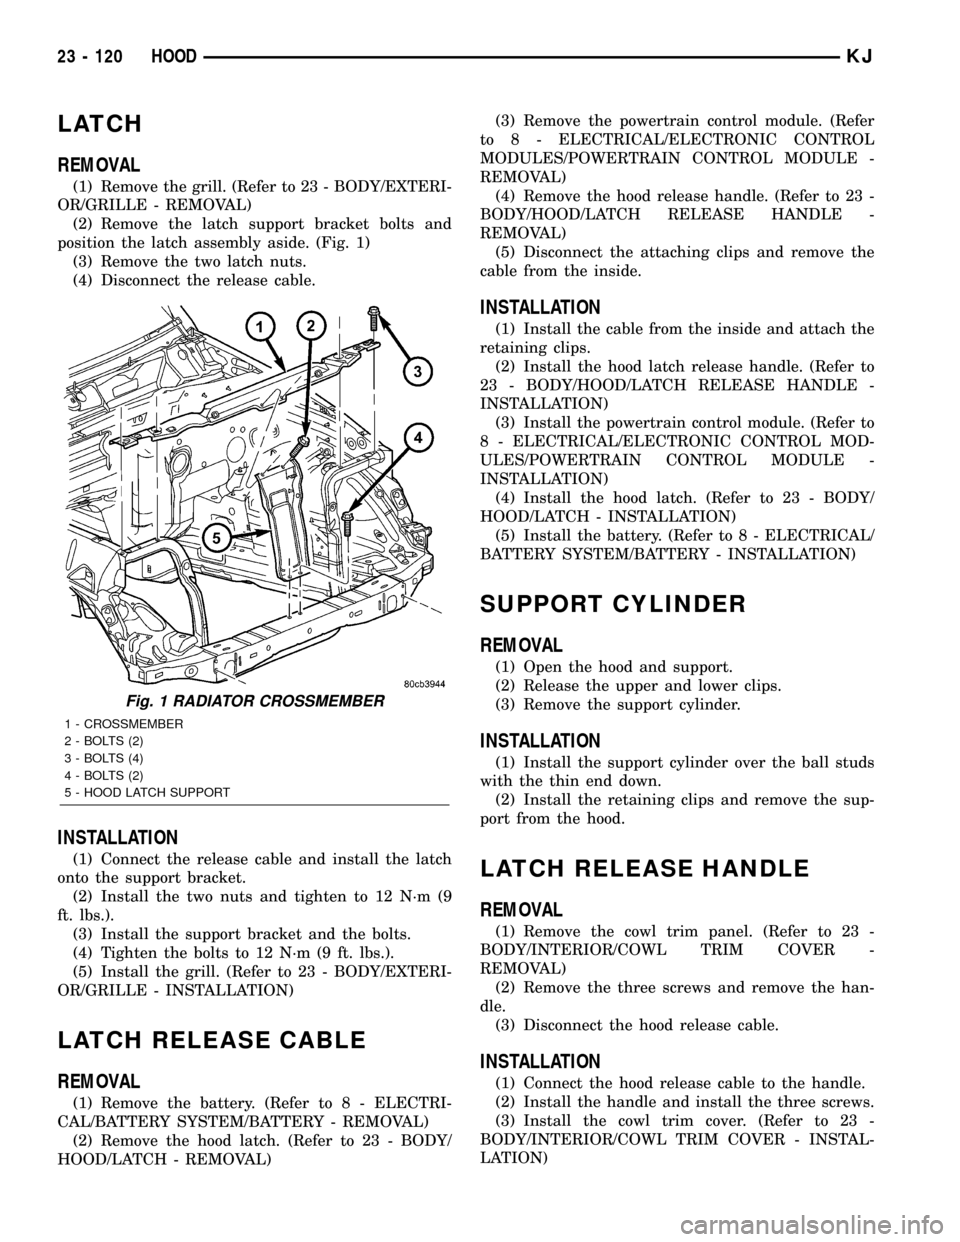
position the latch assembly aside. (Fig. 1)
(3) Remove the two latch nuts.
(4) Disconnect the release cable.
INSTALLATION
(1) Connect the release cable and install the latch
onto the support bracket.
(2) Install the two nuts and tighten to 12 N´m (9
ft. lbs.).
(3) Install the support bracket and the bolts.
(4) Tighten the bolts to 12 N´m (9 ft. lbs.).
(5) Install the grill. (Refer to 23 - BODY/EXTERI-
OR/GRILLE - INSTALLATION)
LATCH RELEASE CABLE
REMOVAL
(1) Remove the battery. (Refer to 8 - ELECTRI-
CAL/BATTERY SYSTEM/BATTERY - REMOVAL)
(2) Remove the hood latch. (Refer to 23 - BODY/
HOOD/LATCH - REMOVAL)(3) Remove the powertrain control module. (Refer
to 8 - ELECTRICAL/ELECTRONIC CONTROL
MODULES/POWERTRAIN CONTROL MODULE -
REMOVAL)
(4) Remove the hood release handle. (Refer to 23 -
BODY/HOOD/LATCH RELEASE HANDLE -
REMOVAL)
(5) Disconnect the attaching clips and remove the
cable from the inside.
INSTALLATION
(1) Install the cable from the inside and attach the
retaining clips.
(2) Install the hood latch release handle. (Refer to
23 - BODY/HOOD/LATCH RELEASE HANDLE -
INSTALLATION)
(3) Install the powertrain control module. (Refer to
8 - ELECTRICAL/ELECTRONIC CONTROL MOD-
ULES/POWERTRAIN CONTROL MODULE -
INSTALLATION)
(4) Install the hood latch. (Refer to 23 - BODY/
HOOD/LATCH - INSTALLATION)
(5) Install the battery. (Refer to 8 - ELECTRICAL/
BATTERY SYSTEM/BATTERY - INSTALLATION)
SUPPORT CYLINDER
REMOVAL
(1) Open the hood and support.
(2) Release the upper and lower clips.
(3) Remove the support cylinder.
INSTALLATION
(1) Install the support cylinder over the ball studs
with the thin end down.
(2) Install the retaining clips and remove the sup-
port from the hood.
LATCH RELEASE HANDLE
REMOVAL
(1) Remove the cowl trim panel. (Refer to 23 -
BODY/INTERIOR/COWL TRIM COVER -
REMOVAL)
(2) Remove the three screws and remove the han-
dle.
(3) Disconnect the hood release cable.
INSTALLATION
(1) Connect the hood release cable to the handle.
(2) Install the handle and install the three screws.
(3) Install the cowl trim cover. (Refer to 23 -
BODY/INTERIOR/COWL TRIM COVER - INSTAL-
LATION)
Fig. 1 RADIATOR CROSSMEMBER
1 - CROSSMEMBER
2 - BOLTS (2)
3 - BOLTS (4)
4 - BOLTS (2)
5 - HOOD LATCH SUPPORT
23 - 120 HOODKJ
Page 1587 of 1803
DOOR
REMOVAL
(1) Disconnect the door wire harness electrical con-
nector at the A-pillar.
(2) Support the door with a suitable lifting device.
(3) Remove the bolts attaching the check strap to
the a-pillar.
NOTE: The epoxy washers should not be removed
from the hinge. If the washers are removed the door
may have to be re-adjusted.
(4) Remove the nuts attaching the door hinges to
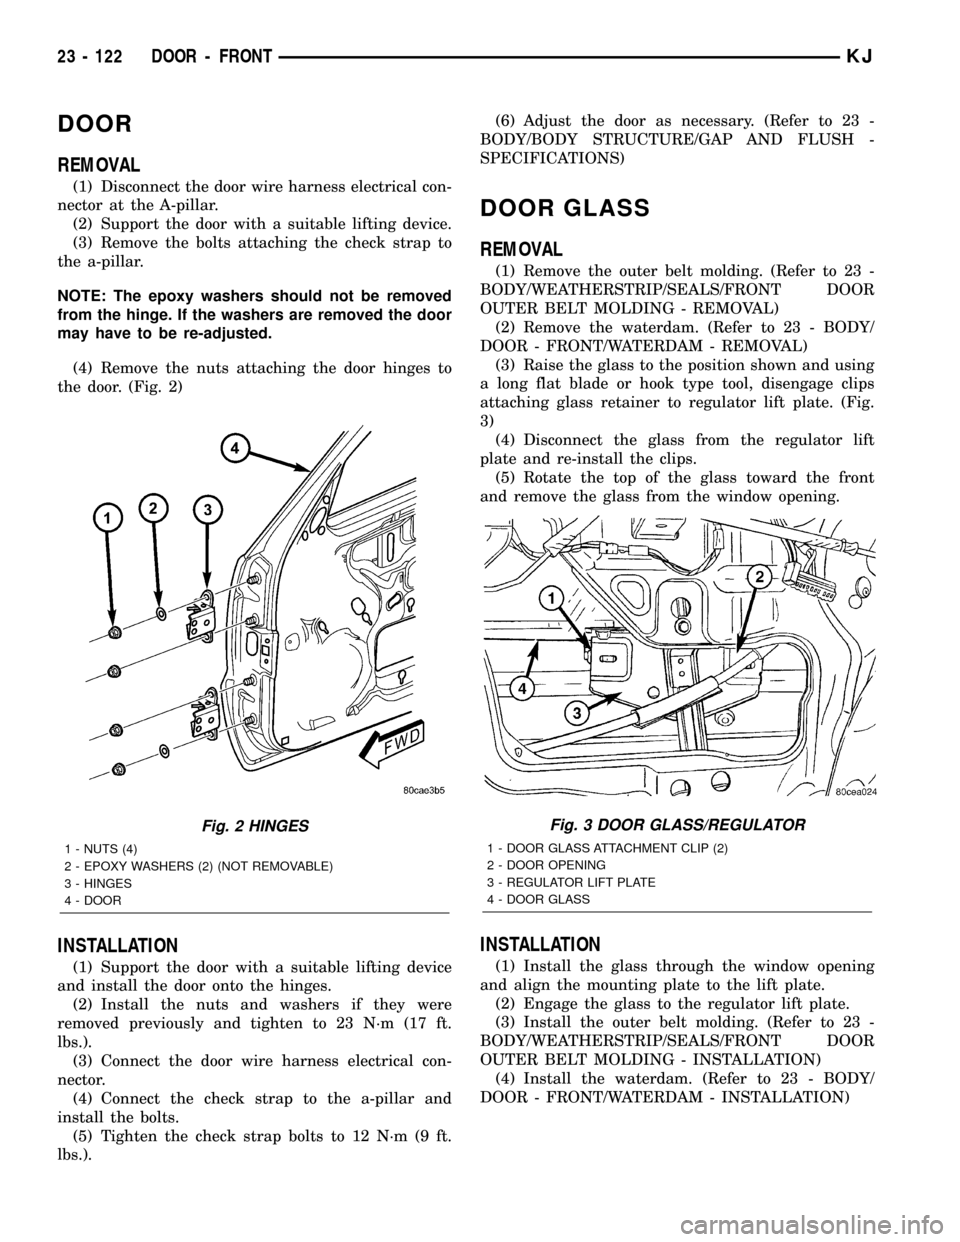
the door. (Fig. 2)
INSTALLATION
(1) Support the door with a suitable lifting device
and install the door onto the hinges.
(2) Install the nuts and washers if they were
removed previously and tighten to 23 N´m (17 ft.
lbs.).
(3) Connect the door wire harness electrical con-
nector.
(4) Connect the check strap to the a-pillar and
install the bolts.
(5) Tighten the check strap bolts to 12 N´m (9 ft.
lbs.).(6) Adjust the door as necessary. (Refer to 23 -
BODY/BODY STRUCTURE/GAP AND FLUSH -
SPECIFICATIONS)
DOOR GLASS
REMOVAL
(1) Remove the outer belt molding. (Refer to 23 -
BODY/WEATHERSTRIP/SEALS/FRONT DOOR
OUTER BELT MOLDING - REMOVAL)
(2) Remove the waterdam. (Refer to 23 - BODY/
DOOR - FRONT/WATERDAM - REMOVAL)
(3) Raise the glass to the position shown and using
a long flat blade or hook type tool, disengage clips
attaching glass retainer to regulator lift plate. (Fig.
3)
(4) Disconnect the glass from the regulator lift
plate and re-install the clips.
(5) Rotate the top of the glass toward the front
and remove the glass from the window opening.
INSTALLATION
(1) Install the glass through the window opening
and align the mounting plate to the lift plate.
(2) Engage the glass to the regulator lift plate.
(3) Install the outer belt molding. (Refer to 23 -
BODY/WEATHERSTRIP/SEALS/FRONT DOOR
OUTER BELT MOLDING - INSTALLATION)
(4) Install the waterdam. (Refer to 23 - BODY/
DOOR - FRONT/WATERDAM - INSTALLATION)
Fig. 2 HINGES
1 - NUTS (4)
2 - EPOXY WASHERS (2) (NOT REMOVABLE)
3 - HINGES
4 - DOOR
Fig. 3 DOOR GLASS/REGULATOR
1 - DOOR GLASS ATTACHMENT CLIP (2)
2 - DOOR OPENING
3 - REGULATOR LIFT PLATE
4 - DOOR GLASS
23 - 122 DOOR - FRONTKJ
Page 1588 of 1803
EXTERIOR HANDLE
REMOVAL
(1) Remove the door glass. (Refer to 23 - BODY/
DOOR - FRONT/DOOR GLASS - REMOVAL)
(2) Disconnect the lock switch electrical connector,
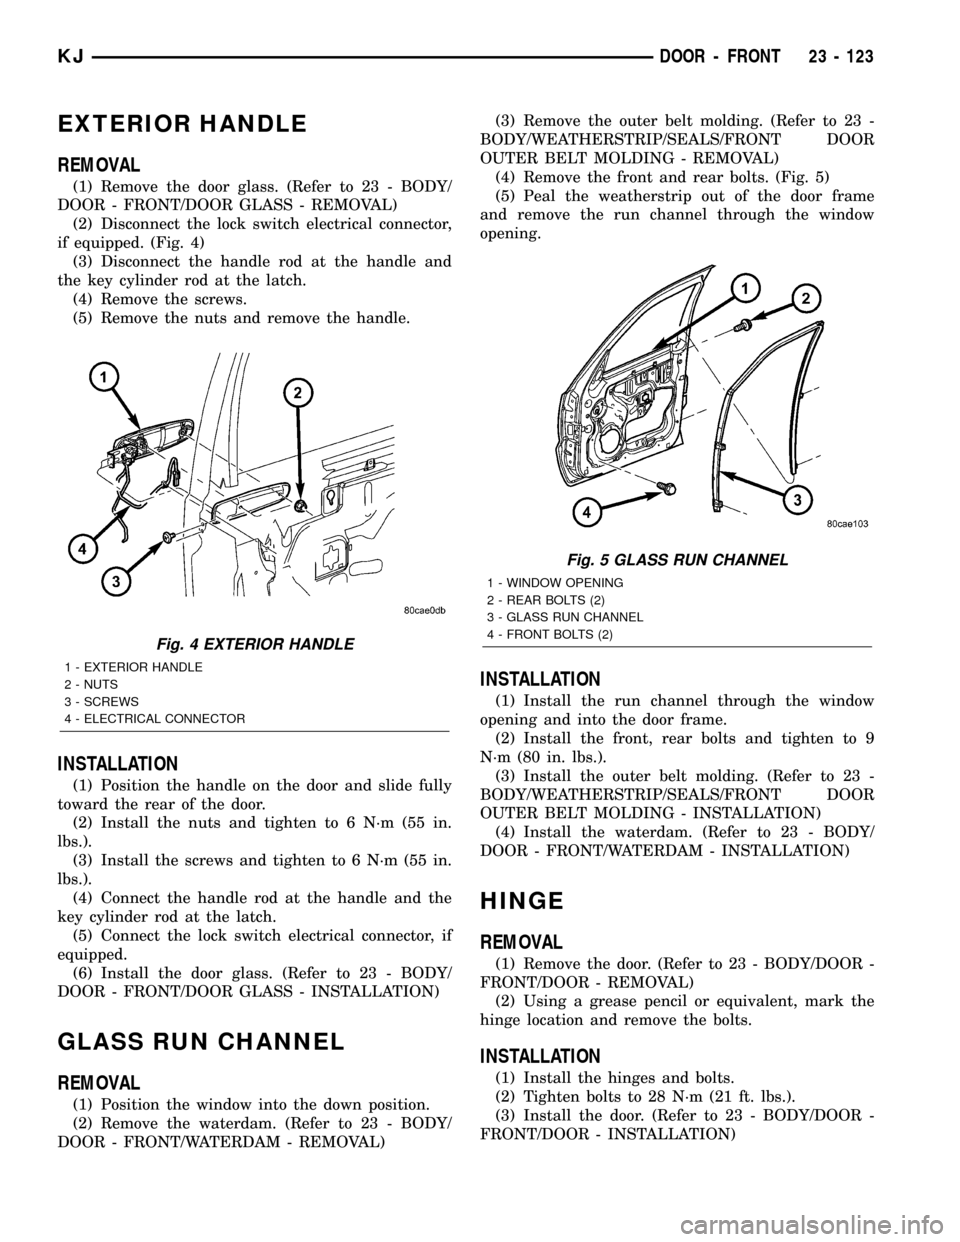
if equipped. (Fig. 4)
(3) Disconnect the handle rod at the handle and
the key cylinder rod at the latch.
(4) Remove the screws.
(5) Remove the nuts and remove the handle.
INSTALLATION
(1) Position the handle on the door and slide fully
toward the rear of the door.
(2) Install the nuts and tighten to 6 N´m (55 in.
lbs.).
(3) Install the screws and tighten to 6 N´m (55 in.
lbs.).
(4) Connect the handle rod at the handle and the
key cylinder rod at the latch.
(5) Connect the lock switch electrical connector, if
equipped.
(6) Install the door glass. (Refer to 23 - BODY/
DOOR - FRONT/DOOR GLASS - INSTALLATION)
GLASS RUN CHANNEL
REMOVAL
(1) Position the window into the down position.
(2) Remove the waterdam. (Refer to 23 - BODY/
DOOR - FRONT/WATERDAM - REMOVAL)(3) Remove the outer belt molding. (Refer to 23 -
BODY/WEATHERSTRIP/SEALS/FRONT DOOR
OUTER BELT MOLDING - REMOVAL)
(4) Remove the front and rear bolts. (Fig. 5)
(5) Peal the weatherstrip out of the door frame
and remove the run channel through the window
opening.
INSTALLATION
(1) Install the run channel through the window
opening and into the door frame.
(2) Install the front, rear bolts and tighten to 9
N´m (80 in. lbs.).
(3) Install the outer belt molding. (Refer to 23 -
BODY/WEATHERSTRIP/SEALS/FRONT DOOR
OUTER BELT MOLDING - INSTALLATION)
(4) Install the waterdam. (Refer to 23 - BODY/
DOOR - FRONT/WATERDAM - INSTALLATION)
HINGE
REMOVAL
(1) Remove the door. (Refer to 23 - BODY/DOOR -
FRONT/DOOR - REMOVAL)
(2) Using a grease pencil or equivalent, mark the
hinge location and remove the bolts.
INSTALLATION
(1) Install the hinges and bolts.
(2) Tighten bolts to 28 N´m (21 ft. lbs.).
(3) Install the door. (Refer to 23 - BODY/DOOR -
FRONT/DOOR - INSTALLATION)
Fig. 4 EXTERIOR HANDLE
1 - EXTERIOR HANDLE
2 - NUTS
3 - SCREWS
4 - ELECTRICAL CONNECTOR
Fig. 5 GLASS RUN CHANNEL
1 - WINDOW OPENING
2 - REAR BOLTS (2)
3 - GLASS RUN CHANNEL
4 - FRONT BOLTS (2)
KJDOOR - FRONT 23 - 123
Page 1589 of 1803
LATCH
REMOVAL
(1) Remove the waterdam. (Refer to 23 - BODY/
DOOR - FRONT/WATERDAM - REMOVAL)
(2) Disconnect the exterior handle rod at the han-
dle.
(3) Disconnect the lock and lock cylinder rods at
the latch.
(4) Remove the screws and remove the latch
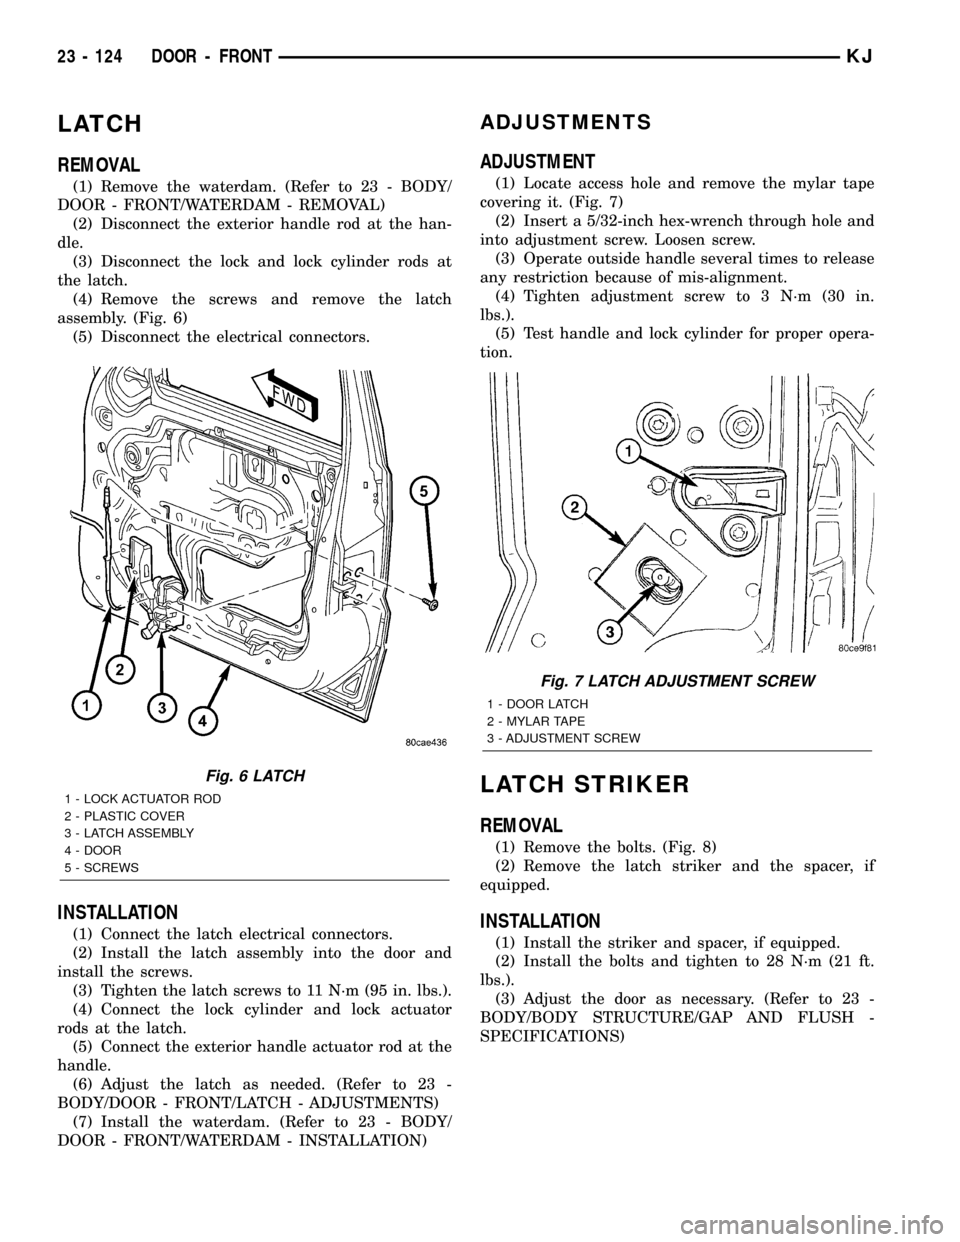
assembly. (Fig. 6)
(5) Disconnect the electrical connectors.
INSTALLATION
(1) Connect the latch electrical connectors.
(2) Install the latch assembly into the door and
install the screws.
(3) Tighten the latch screws to 11 N´m (95 in. lbs.).
(4) Connect the lock cylinder and lock actuator
rods at the latch.
(5) Connect the exterior handle actuator rod at the
handle.
(6) Adjust the latch as needed. (Refer to 23 -
BODY/DOOR - FRONT/LATCH - ADJUSTMENTS)
(7) Install the waterdam. (Refer to 23 - BODY/
DOOR - FRONT/WATERDAM - INSTALLATION)
ADJUSTMENTS
ADJUSTMENT
(1) Locate access hole and remove the mylar tape
covering it. (Fig. 7)
(2) Insert a 5/32-inch hex-wrench through hole and
into adjustment screw. Loosen screw.
(3) Operate outside handle several times to release
any restriction because of mis-alignment.
(4) Tighten adjustment screw to 3 N´m (30 in.
lbs.).
(5) Test handle and lock cylinder for proper opera-
tion.
LATCH STRIKER
REMOVAL
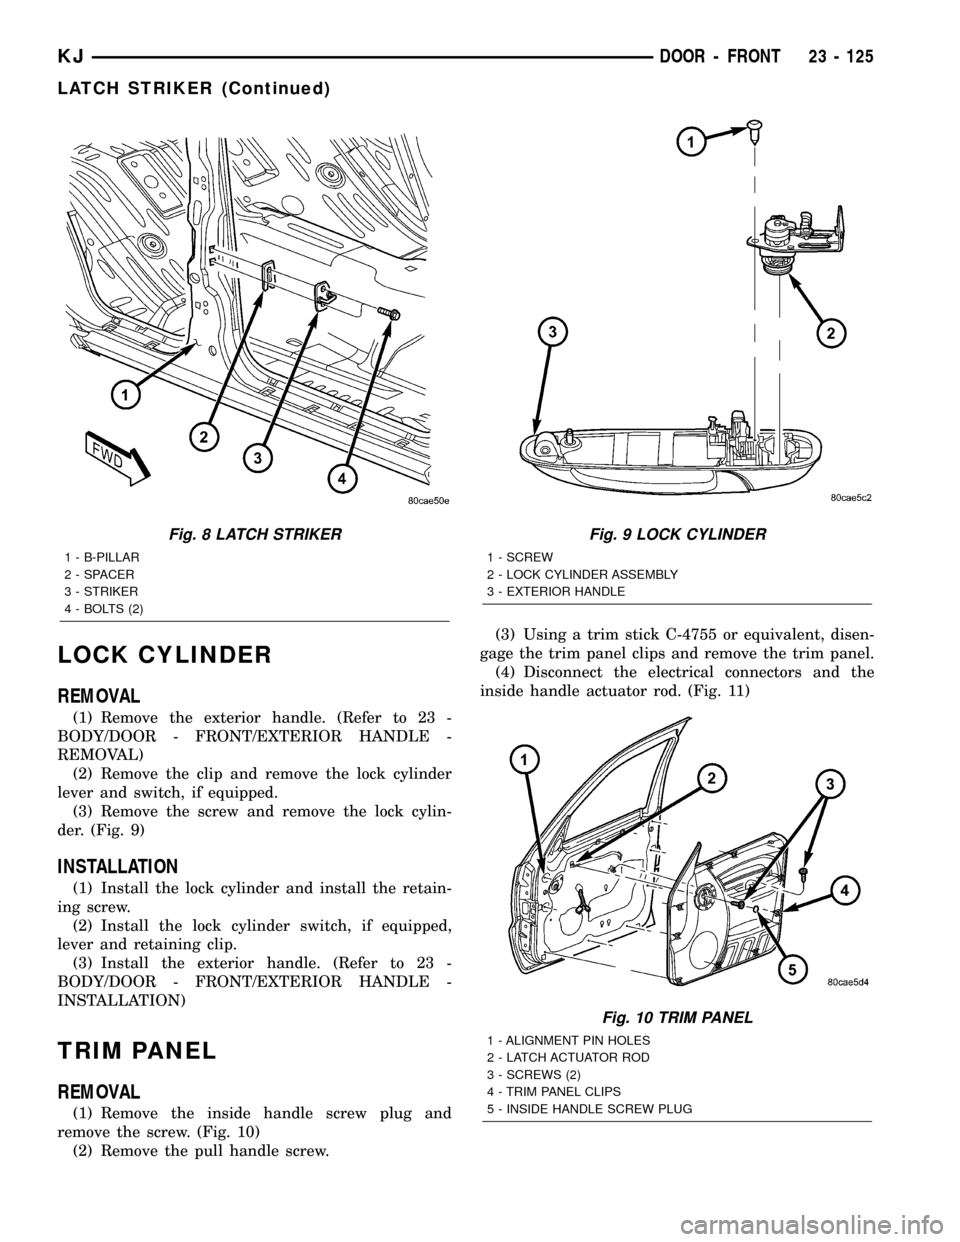
(1) Remove the bolts. (Fig. 8)
(2) Remove the latch striker and the spacer, if
equipped.
INSTALLATION
(1) Install the striker and spacer, if equipped.
(2) Install the bolts and tighten to 28 N´m (21 ft.
lbs.).
(3) Adjust the door as necessary. (Refer to 23 -
BODY/BODY STRUCTURE/GAP AND FLUSH -
SPECIFICATIONS)
Fig. 6 LATCH
1 - LOCK ACTUATOR ROD
2 - PLASTIC COVER
3 - LATCH ASSEMBLY
4 - DOOR
5 - SCREWS
Fig. 7 LATCH ADJUSTMENT SCREW
1 - DOOR LATCH
2 - MYLAR TAPE
3 - ADJUSTMENT SCREW
23 - 124 DOOR - FRONTKJ
Page 1590 of 1803
LOCK CYLINDER
REMOVAL
(1) Remove the exterior handle. (Refer to 23 -
BODY/DOOR - FRONT/EXTERIOR HANDLE -
REMOVAL)
(2) Remove the clip and remove the lock cylinder
lever and switch, if equipped.
(3) Remove the screw and remove the lock cylin-
der. (Fig. 9)
INSTALLATION
(1) Install the lock cylinder and install the retain-
ing screw.
(2) Install the lock cylinder switch, if equipped,
lever and retaining clip.
(3) Install the exterior handle. (Refer to 23 -
BODY/DOOR - FRONT/EXTERIOR HANDLE -
INSTALLATION)
TRIM PANEL
REMOVAL
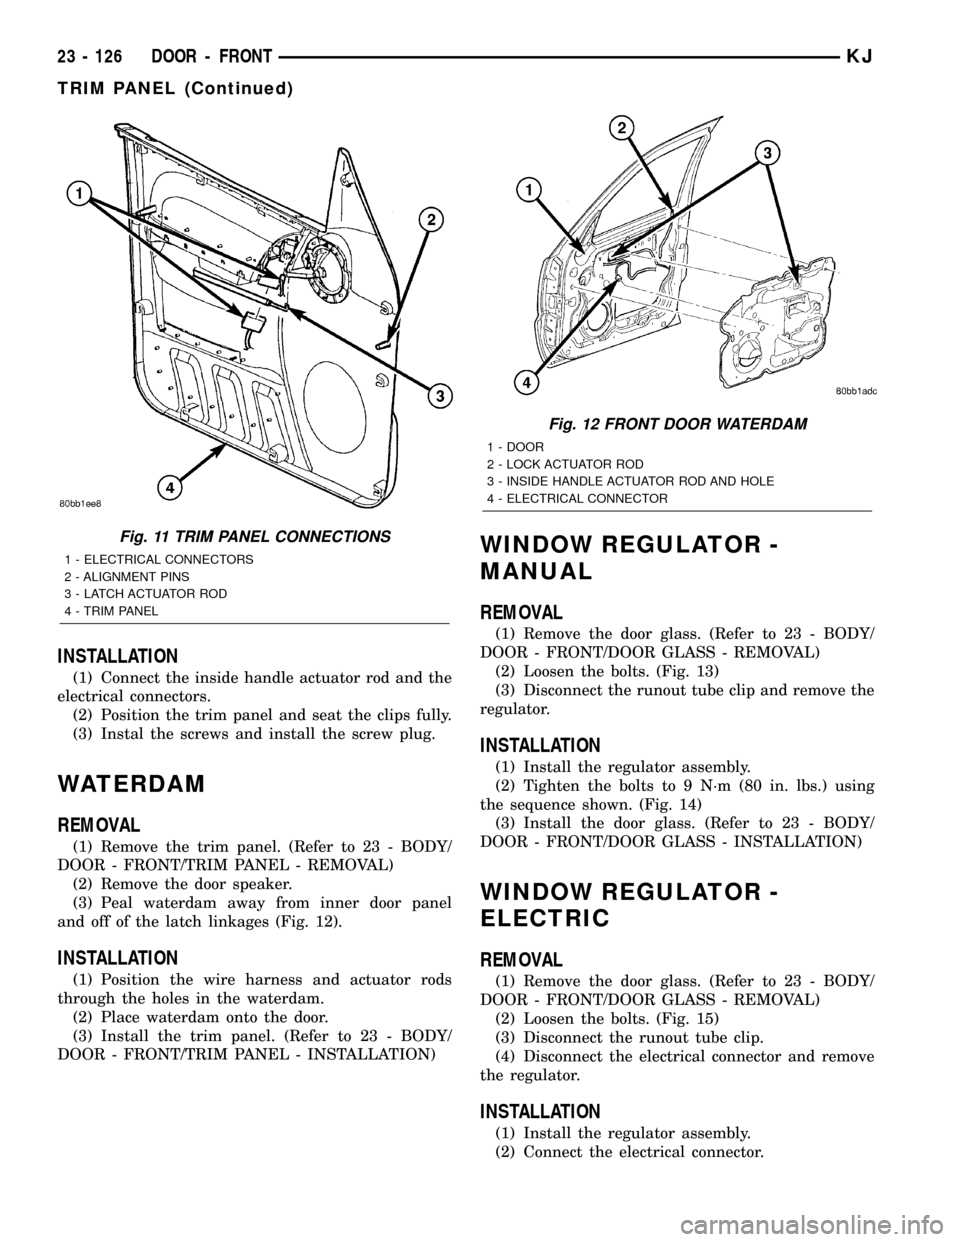
(1) Remove the inside handle screw plug and
remove the screw. (Fig. 10)
(2) Remove the pull handle screw.(3) Using a trim stick C-4755 or equivalent, disen-
gage the trim panel clips and remove the trim panel.
(4) Disconnect the electrical connectors and the
inside handle actuator rod. (Fig. 11)
Fig. 8 LATCH STRIKER
1 - B-PILLAR
2 - SPACER
3 - STRIKER
4 - BOLTS (2)
Fig. 9 LOCK CYLINDER
1 - SCREW
2 - LOCK CYLINDER ASSEMBLY
3 - EXTERIOR HANDLE
Fig. 10 TRIM PANEL
1 - ALIGNMENT PIN HOLES
2 - LATCH ACTUATOR ROD
3 - SCREWS (2)
4 - TRIM PANEL CLIPS
5 - INSIDE HANDLE SCREW PLUG
KJDOOR - FRONT 23 - 125
LATCH STRIKER (Continued)
Page 1591 of 1803
INSTALLATION
(1) Connect the inside handle actuator rod and the
electrical connectors.
(2) Position the trim panel and seat the clips fully.
(3) Instal the screws and install the screw plug.
WATERDAM
REMOVAL
(1) Remove the trim panel. (Refer to 23 - BODY/
DOOR - FRONT/TRIM PANEL - REMOVAL)
(2) Remove the door speaker.
(3) Peal waterdam away from inner door panel
and off of the latch linkages (Fig. 12).
INSTALLATION
(1) Position the wire harness and actuator rods
through the holes in the waterdam.
(2) Place waterdam onto the door.
(3) Install the trim panel. (Refer to 23 - BODY/
DOOR - FRONT/TRIM PANEL - INSTALLATION)
WINDOW REGULATOR -
MANUAL
REMOVAL
(1) Remove the door glass. (Refer to 23 - BODY/
DOOR - FRONT/DOOR GLASS - REMOVAL)
(2) Loosen the bolts. (Fig. 13)
(3) Disconnect the runout tube clip and remove the
regulator.
INSTALLATION
(1) Install the regulator assembly.
(2) Tighten the bolts to 9 N´m (80 in. lbs.) using
the sequence shown. (Fig. 14)
(3) Install the door glass. (Refer to 23 - BODY/
DOOR - FRONT/DOOR GLASS - INSTALLATION)
WINDOW REGULATOR -
ELECTRIC
REMOVAL
(1) Remove the door glass. (Refer to 23 - BODY/
DOOR - FRONT/DOOR GLASS - REMOVAL)
(2) Loosen the bolts. (Fig. 15)
(3) Disconnect the runout tube clip.
(4) Disconnect the electrical connector and remove
the regulator.
INSTALLATION
(1) Install the regulator assembly.
(2) Connect the electrical connector.
Fig. 11 TRIM PANEL CONNECTIONS
1 - ELECTRICAL CONNECTORS
2 - ALIGNMENT PINS
3 - LATCH ACTUATOR ROD
4 - TRIM PANEL
Fig. 12 FRONT DOOR WATERDAM
1 - DOOR
2 - LOCK ACTUATOR ROD
3 - INSIDE HANDLE ACTUATOR ROD AND HOLE
4 - ELECTRICAL CONNECTOR
23 - 126 DOOR - FRONTKJ
TRIM PANEL (Continued)
Page 1594 of 1803
DOOR
REMOVAL
(1) Disconnect the door wire harness electrical con-
nector at the b-pillar.
(2) Disconnect the check strap from the b-pillar.
(Refer to 23 - BODY/DOORS - REAR/CHECK STRAP
- REMOVAL)
(3) Support the door with a suitable lifting device.
NOTE: The epoxy washers should not be removed
from the hinge. If the washers are removed the door
may have to be re-adjusted.
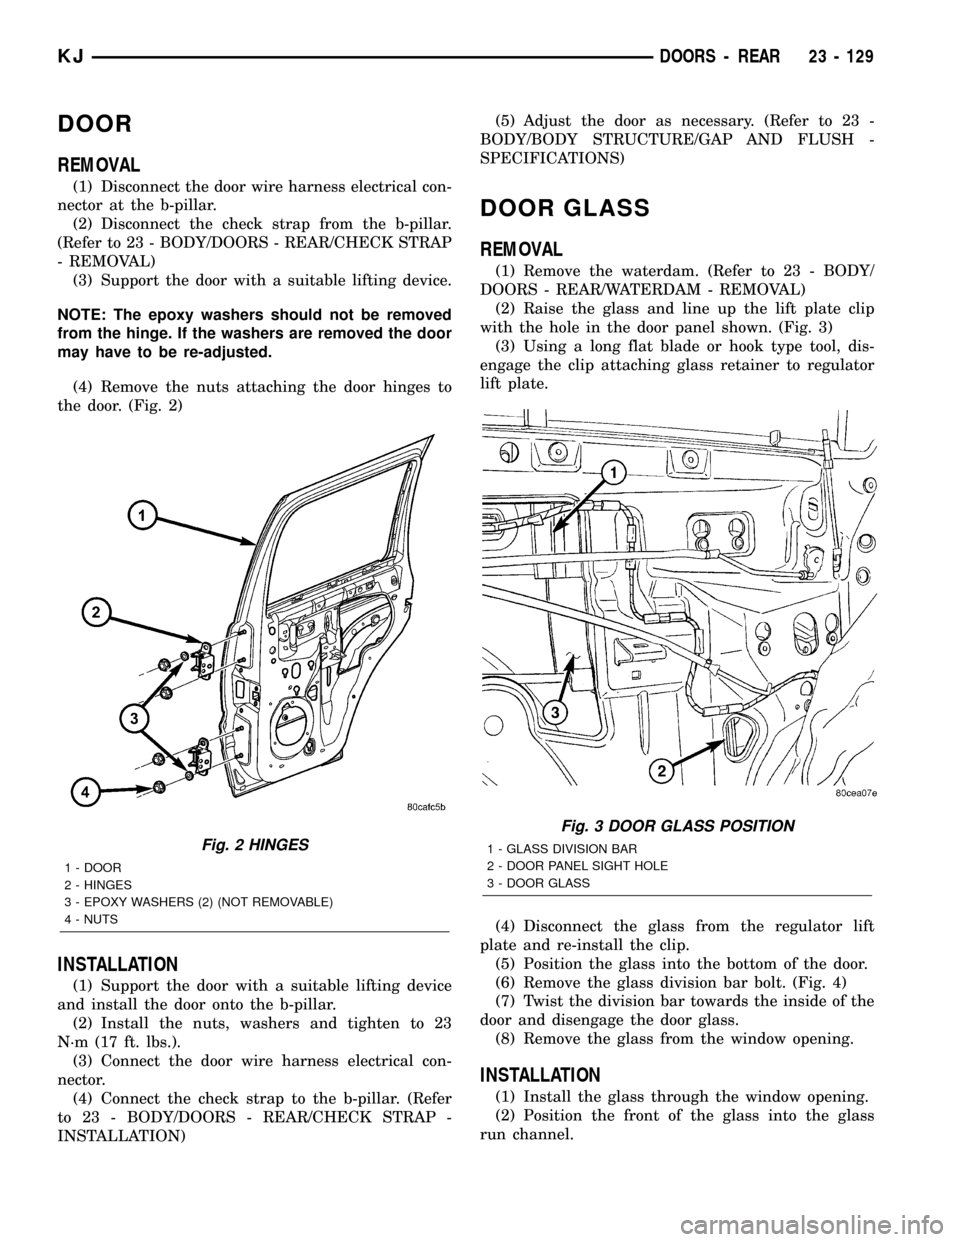
(4) Remove the nuts attaching the door hinges to
the door. (Fig. 2)
INSTALLATION
(1) Support the door with a suitable lifting device
and install the door onto the b-pillar.
(2) Install the nuts, washers and tighten to 23
N´m (17 ft. lbs.).
(3) Connect the door wire harness electrical con-
nector.
(4) Connect the check strap to the b-pillar. (Refer
to 23 - BODY/DOORS - REAR/CHECK STRAP -
INSTALLATION)(5) Adjust the door as necessary. (Refer to 23 -
BODY/BODY STRUCTURE/GAP AND FLUSH -
SPECIFICATIONS)
DOOR GLASS
REMOVAL
(1) Remove the waterdam. (Refer to 23 - BODY/
DOORS - REAR/WATERDAM - REMOVAL)
(2) Raise the glass and line up the lift plate clip
with the hole in the door panel shown. (Fig. 3)
(3) Using a long flat blade or hook type tool, dis-
engage the clip attaching glass retainer to regulator
lift plate.
(4) Disconnect the glass from the regulator lift
plate and re-install the clip.
(5) Position the glass into the bottom of the door.
(6) Remove the glass division bar bolt. (Fig. 4)
(7) Twist the division bar towards the inside of the
door and disengage the door glass.
(8) Remove the glass from the window opening.
INSTALLATION
(1) Install the glass through the window opening.
(2) Position the front of the glass into the glass
run channel.
Fig. 2 HINGES
1 - DOOR
2 - HINGES
3 - EPOXY WASHERS (2) (NOT REMOVABLE)
4 - NUTS
Fig. 3 DOOR GLASS POSITION
1 - GLASS DIVISION BAR
2 - DOOR PANEL SIGHT HOLE
3 - DOOR GLASS
KJDOORS - REAR 23 - 129
Page 1596 of 1803
HINGE
REMOVAL
(1) Remove the door. (Refer to 23 - BODY/DOORS
- REAR/DOOR - REMOVAL)
(2) Remove the upper b-pillar trim. (Refer to 23 -
BODY/INTERIOR/B-PILLAR UPPER TRIM -
REMOVAL)
(3) Remove the two door hinge bolts from the
inside of the b-pillar.
(4) Remove the exterior bolts attaching the door
hinges to the b-pillar.
INSTALLATION
(1) Install the hinges.
(2) Install the exterior bolts and tighten to 28 N´m
(21 ft. lbs.).
(3) Install the two inner hinge bolts and tighten to
28 N´m (21 ft. lbs.).
(4) Adjust the door as necessary. (Refer to 23 -
BODY/BODY STRUCTURE/GAP AND FLUSH -
SPECIFICATIONS)
(5) Install the upper b-pillar trim. (Refer to 23 -
BODY/INTERIOR/B-PILLAR UPPER TRIM -
INSTALLATION)
(6) Install the door. (Refer to 23 - BODY/DOORS -
REAR/DOOR - INSTALLATION)
LATCH
REMOVAL
(1) Remove the door glass. (Refer to 23 - BODY/
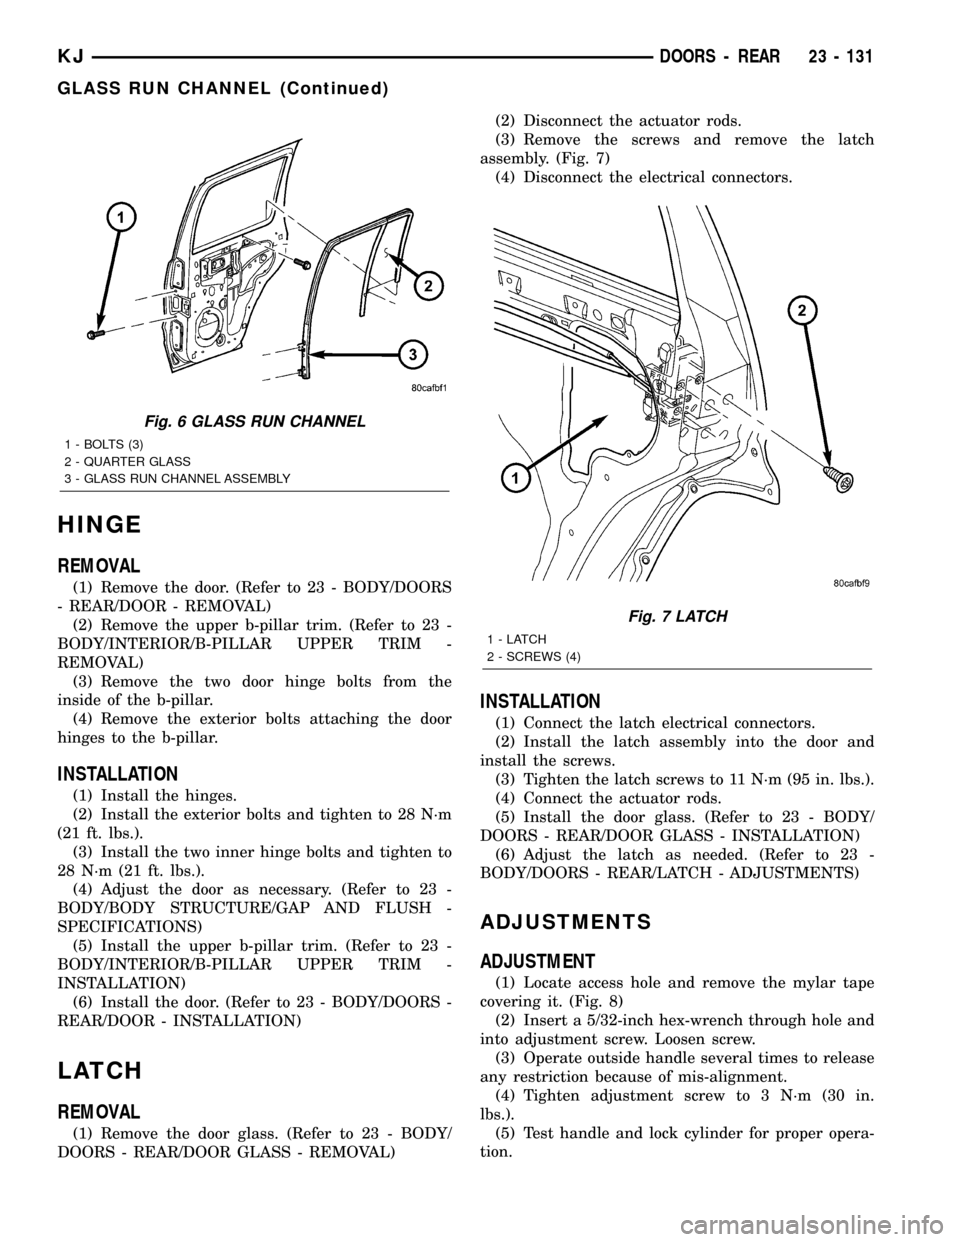
DOORS - REAR/DOOR GLASS - REMOVAL)(2) Disconnect the actuator rods.
(3) Remove the screws and remove the latch
assembly. (Fig. 7)
(4) Disconnect the electrical connectors.
INSTALLATION
(1) Connect the latch electrical connectors.
(2) Install the latch assembly into the door and
install the screws.
(3) Tighten the latch screws to 11 N´m (95 in. lbs.).
(4) Connect the actuator rods.
(5) Install the door glass. (Refer to 23 - BODY/
DOORS - REAR/DOOR GLASS - INSTALLATION)
(6) Adjust the latch as needed. (Refer to 23 -
BODY/DOORS - REAR/LATCH - ADJUSTMENTS)
ADJUSTMENTS
ADJUSTMENT
(1) Locate access hole and remove the mylar tape
covering it. (Fig. 8)
(2) Insert a 5/32-inch hex-wrench through hole and
into adjustment screw. Loosen screw.
(3) Operate outside handle several times to release
any restriction because of mis-alignment.
(4) Tighten adjustment screw to 3 N´m (30 in.
lbs.).
(5) Test handle and lock cylinder for proper opera-
tion.
Fig. 6 GLASS RUN CHANNEL
1 - BOLTS (3)
2 - QUARTER GLASS
3 - GLASS RUN CHANNEL ASSEMBLY
Fig. 7 LATCH
1-LATCH
2 - SCREWS (4)
KJDOORS - REAR 23 - 131
GLASS RUN CHANNEL (Continued)