2002 Hyundai Atos air conditioning
[x] Cancel search: air conditioningPage 96 of 249
VEHICLE MAINTENANCE REQUIREMENTS
VEHICLE MAINTENANCE REQUIREMENTS VEHICLE MAINTENANCE REQUIREMENTS
VEHICLE MAINTENANCE REQUIREMENTS
VEHICLE MAINTENANCE REQUIREMENTS
5-7
F070P01A-AAT
oo
oo
o Driveshafts and boots
Driveshafts and boots Driveshafts and boots
Driveshafts and boots
Driveshafts and boots
Check the drive shafts, boots and clamps for
cracks, deterioration, or damage. Replace any damaged parts and, if necessary, repack thegrease.
F070Q01A-AAToo
oo
o Air conditioning refrigerant
Air conditioning refrigerant Air conditioning refrigerant
Air conditioning refrigerant
Air conditioning refrigerant
Check the air conditioning lines and connec-
tions for leakage and damage. Check air condi-tioning performance according to the relevantshop manual if necessary.
F070R02X-GAToo
oo
o Rear wheel bearing grease
Rear wheel bearing grease Rear wheel bearing grease
Rear wheel bearing grease
Rear wheel bearing grease
Check rear wheel bearing grease whenever the
brake drums are removed to inspect the rearbrake system.
Page 98 of 249
DO-IT-YOURSELF MAINTENANCE
DO-IT-YOURSELF MAINTENANCE DO-IT-YOURSELF MAINTENANCE
DO-IT-YOURSELF MAINTENANCE
DO-IT-YOURSELF MAINTENANCE
6-2 G020A01A-AAT
GENERAL CHECKS
GENERAL CHECKS GENERAL CHECKS
GENERAL CHECKS
GENERAL CHECKS
Engine Compartment
Engine Compartment Engine Compartment
Engine Compartment
Engine Compartment The following should be checked regularly:
o Engine oil level and condition
o Transaxle fluid level and condition
o Brake fluid level
o Clutch fluid level
o Engine coolant level
o Windshield washer fluid level
o Accessory drive belt condition
o Engine coolant hose condition
o Fluid leaks (on or below components)
o Power steering fluid level
o Battery Condition G020C01X-GAT
Vehicle Interior
Vehicle Interior Vehicle Interior
Vehicle Interior
Vehicle Interior
The following should be checked each time
when the vehicle is driven:
o Lights operation
o Windshield wipers operation
o Horn operation
o Defroster, heating system operation (and air conditioning, if installed)
o Steering operation and condition
o Mirror condition and operation
o Turn signal operation
o Accelerator pedal operation
o Brake operation, including parking brake
o Manual transaxle operation, including clutch operation
o Automatic transaxle operation, including "Park" mechanism operation
o Seat control condition and operation
o Seat belt condition and operation
o Sunvisor operation
If you notice anything that does not operate
correctly or appears to be functioning in cor-rectly, inspect it carefully and seek assistancefrom your Hyundai dealer if service is needed. G030A01A-AAT
CHECKING THE ENGINE OIL
CHECKING THE ENGINE OIL CHECKING THE ENGINE OIL
CHECKING THE ENGINE OIL
CHECKING THE ENGINE OIL
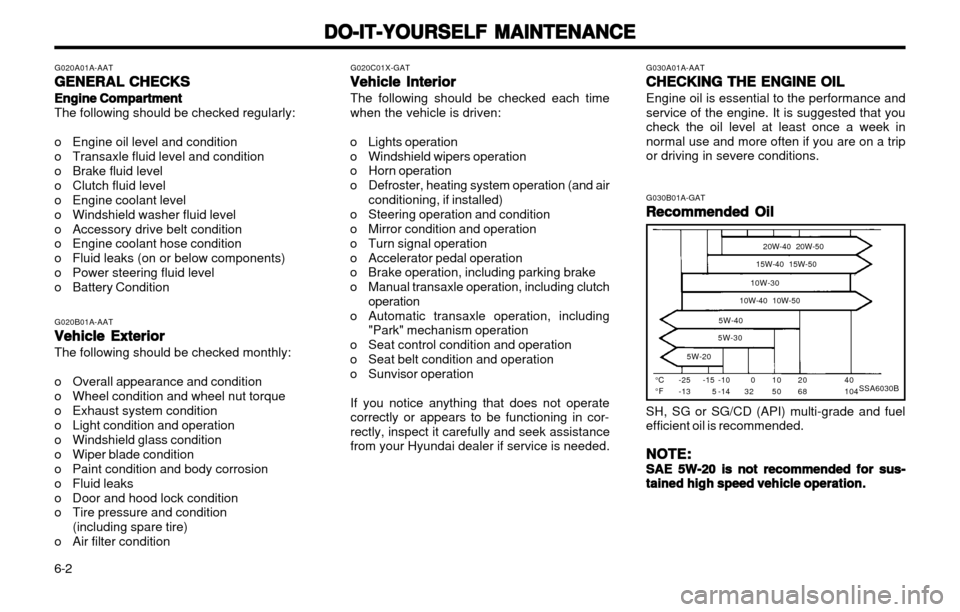
Engine oil is essential to the performance andservice of the engine. It is suggested that youcheck the oil level at least once a week innormal use and more often if you are on a tripor driving in severe conditions. G030B01A-GAT
Recommended Oil
Recommended Oil Recommended Oil
Recommended Oil
Recommended Oil
SSA6030B°C °F -25-13 20W-40 20W-50
15W-40 15W-50
10W-30
10W-40 10W-50
5W-40
5W-30
5W-2040 104
2068
1050
032
-15 5 -10-14
SH, SG or SG/CD (API) multi-grade and fuel efficient oil is recommended.
NOTE:
NOTE: NOTE:
NOTE:
NOTE:
SAE 5W-20 is not recommended for sus-
SAE 5W-20 is not recommended for sus- SAE 5W-20 is not recommended for sus-
SAE 5W-20 is not recommended for sus-
SAE 5W-20 is not recommended for sus-
tained high speed vehicle operation.
tained high speed vehicle operation. tained high speed vehicle operation.
tained high speed vehicle operation.
tained high speed vehicle operation.
G020B01A-AAT
Vehicle Exterior
Vehicle Exterior Vehicle Exterior
Vehicle Exterior
Vehicle Exterior The following should be checked monthly:
o Overall appearance and condition
o Wheel condition and wheel nut torque
o Exhaust system condition
o Light condition and operation
o Windshield glass condition
o Wiper blade condition
o Paint condition and body corrosion
o Fluid leaks
o Door and hood lock condition
o Tire pressure and condition
(including spare tire)
o Air filter condition
Page 108 of 249
DO-IT-YOURSELF MAINTENANCE
DO-IT-YOURSELF MAINTENANCE DO-IT-YOURSELF MAINTENANCE
DO-IT-YOURSELF MAINTENANCE
DO-IT-YOURSELF MAINTENANCE
6-12 G140B01A-AAT
Checking the Air Conditioning Opera-
Checking the Air Conditioning Opera- Checking the Air Conditioning Opera-
Checking the Air Conditioning Opera-
Checking the Air Conditioning Opera-
tion
tion tion
tion
tion
1. Start the engine and let it run at a fast idle for
several minutes with the air conditioning set at the maximum cold setting.
2. If the air coming out of the in-dash vents is not cold, have the air conditioning systeminspected by your Hyundai dealer.
CAUTION:
CAUTION: CAUTION:
CAUTION:
CAUTION:
Running the air conditioning system for ex-
Running the air conditioning system for ex- Running the air conditioning system for ex-
Running the air conditioning system for ex-
Running the air conditioning system for ex-
tended periods of time with a low refrigerant
tended periods of time with a low refrigerant tended periods of time with a low refrigerant
tended periods of time with a low refrigerant
tended periods of time with a low refrigerant
level may damage the compressor.
level may damage the compressor. level may damage the compressor.
level may damage the compressor.
level may damage the compressor.
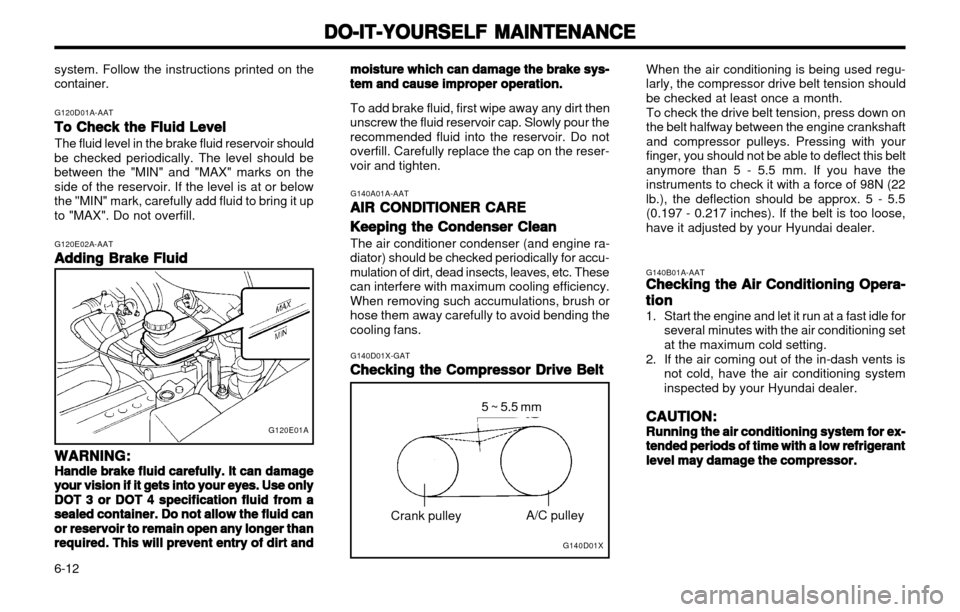
When the air conditioning is being used regu-larly, the compressor drive belt tension shouldbe checked at least once a month. To check the drive belt tension, press down on the belt halfway between the engine crankshaftand compressor pulleys. Pressing with yourfinger, you should not be able to deflect this belt
anymore than 5 - 5.5 mm. If you have theinstruments to check it with a force of 98N (22lb.), the deflection should be approx. 5 - 5.5(0.197 - 0.217 inches). If the belt is too loose,have it adjusted by your Hyundai dealer.
G120D01A-AAT
To Check the Fluid Level
To Check the Fluid Level To Check the Fluid Level
To Check the Fluid Level
To Check the Fluid Level
The fluid level in the brake fluid reservoir should
be checked periodically. The level should bebetween the "MIN" and "MAX" marks on theside of the reservoir. If the level is at or belowthe "MIN" mark, carefully add fluid to bring it upto "MAX". Do not overfill.
G120E02A-AATAdding Brake Fluid
Adding Brake Fluid Adding Brake Fluid
Adding Brake Fluid
Adding Brake Fluid
WARNING:
WARNING: WARNING:
WARNING:
WARNING:
Handle brake fluid carefully. It can damage
Handle brake fluid carefully. It can damage Handle brake fluid carefully. It can damage
Handle brake fluid carefully. It can damage
Handle brake fluid carefully. It can damage your vision if it gets into your eyes. Use only
your vision if it gets into your eyes. Use only your vision if it gets into your eyes. Use only
your vision if it gets into your eyes. Use only
your vision if it gets into your eyes. Use only
DOT 3 or DOT 4 specification fluid from a
DOT 3 or DOT 4 specification fluid from a DOT 3 or DOT 4 specification fluid from a
DOT 3 or DOT 4 specification fluid from a
DOT 3 or DOT 4 specification fluid from a
sealed container. Do not allow the fluid can
sealed container. Do not allow the fluid can sealed container. Do not allow the fluid can
sealed container. Do not allow the fluid can
sealed container. Do not allow the fluid can
or reservoir to remain open any longer than
or reservoir to remain open any longer than or reservoir to remain open any longer than
or reservoir to remain open any longer than
or reservoir to remain open any longer than
required. This will prevent entry of dirt and
required. This will prevent entry of dirt and required. This will prevent entry of dirt and
required. This will prevent entry of dirt and
required. This will prevent entry of dirt and moisture which can damage the brake sys-
moisture which can damage the brake sys- moisture which can damage the brake sys-
moisture which can damage the brake sys-
moisture which can damage the brake sys-
tem and cause improper operation.
tem and cause improper operation. tem and cause improper operation.
tem and cause improper operation.
tem and cause improper operation.
To add brake fluid, first wipe away any dirt then
unscrew the fluid reservoir cap. Slowly pour the recommended fluid into the reservoir. Do notoverfill. Carefully replace the cap on the reser-voir and tighten.
G120E01A
G140A01A-AAT
AIR CONDITIONER CARE
AIR CONDITIONER CARE AIR CONDITIONER CARE
AIR CONDITIONER CARE
AIR CONDITIONER CARE
Keeping the Condenser Clean
Keeping the Condenser Clean Keeping the Condenser Clean
Keeping the Condenser Clean
Keeping the Condenser Clean
The air conditioner condenser (and engine ra-
diator) should be checked periodically for accu- mulation of dirt, dead insects, leaves, etc. Thesecan interfere with maximum cooling efficiency.When removing such accumulations, brush orhose them away carefully to avoid bending thecooling fans.
G140D01X-GATChecking the Compressor Drive Belt
Checking the Compressor Drive Belt Checking the Compressor Drive Belt
Checking the Compressor Drive Belt
Checking the Compressor Drive Belt
A/C pulley
Crank pulley
G140D01X
5 ~ 5.5 mm
system. Follow the instructions printed on the container.
Page 109 of 249
DO-IT-YOURSELF MAINTENANCE
DO-IT-YOURSELF MAINTENANCE DO-IT-YOURSELF MAINTENANCE
DO-IT-YOURSELF MAINTENANCE
DO-IT-YOURSELF MAINTENANCE
6-13
G170A01A-GAT
CHECKING BRAKE PEDAL
CHECKING BRAKE PEDAL CHECKING BRAKE PEDAL
CHECKING BRAKE PEDAL
CHECKING BRAKE PEDAL
FREEPLAY
FREEPLAY FREEPLAY
FREEPLAY
FREEPLAY
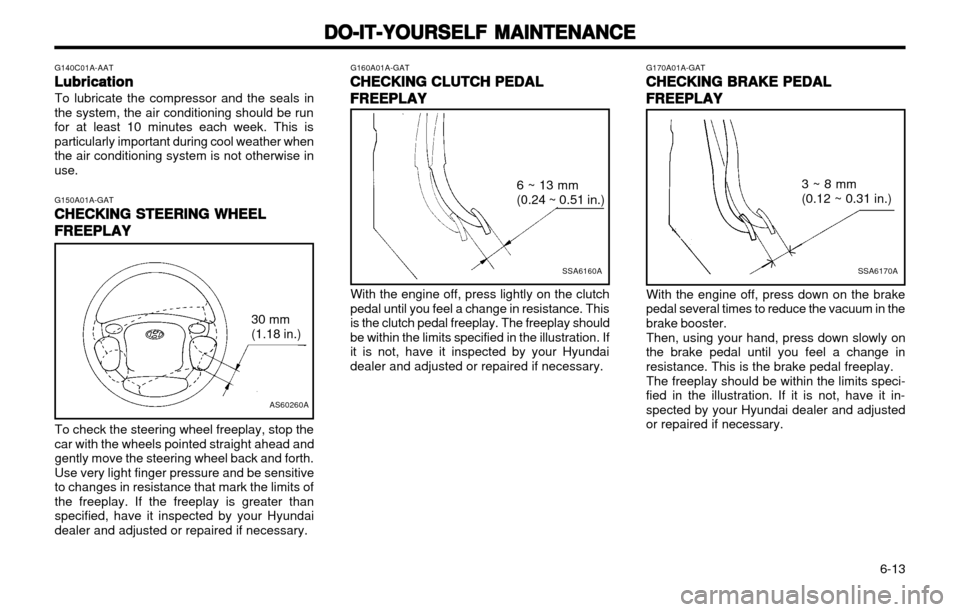
To check the steering wheel freeplay, stop the car with the wheels pointed straight ahead andgently move the steering wheel back and forth.Use very light finger pressure and be sensitiveto changes in resistance that mark the limits ofthe freeplay. If the freeplay is greater thanspecified, have it inspected by your Hyundaidealer and adjusted or repaired if necessary. G160A01A-GAT
CHECKING CLUTCH PEDAL
CHECKING CLUTCH PEDAL CHECKING CLUTCH PEDAL
CHECKING CLUTCH PEDAL
CHECKING CLUTCH PEDAL
FREEPLAY
FREEPLAY FREEPLAY
FREEPLAY
FREEPLAY
SSA6160A
6 ~ 13 mm (0.24 ~ 0.51 in.)
With the engine off, press lightly on the clutch
pedal until you feel a change in resistance. This is the clutch pedal freeplay. The freeplay shouldbe within the limits specified in the illustration. Ifit is not, have it inspected by your Hyundaidealer and adjusted or repaired if necessary.
SSA6170A
3 ~ 8 mm (0.12 ~ 0.31 in.)
With the engine off, press down on the brake
pedal several times to reduce the vacuum in the brake booster.
Then, using your hand, press down slowly on
the brake pedal until you feel a change inresistance. This is the brake pedal freeplay.
The freeplay should be within the limits speci-
fied in the illustration. If it is not, have it in-spected by your Hyundai dealer and adjustedor repaired if necessary.
G140C01A-AAT
Lubrication
Lubrication Lubrication
Lubrication
Lubrication
To lubricate the compressor and the seals in
the system, the air conditioning should be run for at least 10 minutes each week. This isparticularly important during cool weather whenthe air conditioning system is not otherwise inuse.
G150A01A-GATCHECKING STEERING WHEEL
CHECKING STEERING WHEEL CHECKING STEERING WHEEL
CHECKING STEERING WHEEL
CHECKING STEERING WHEEL
FREEPLAY
FREEPLAY FREEPLAY
FREEPLAY
FREEPLAY
AS60260A
30 mm (1.18 in.)
Page 112 of 249
DO-IT-YOURSELF MAINTENANCE
DO-IT-YOURSELF MAINTENANCE DO-IT-YOURSELF MAINTENANCE
DO-IT-YOURSELF MAINTENANCE
DO-IT-YOURSELF MAINTENANCE
6-16
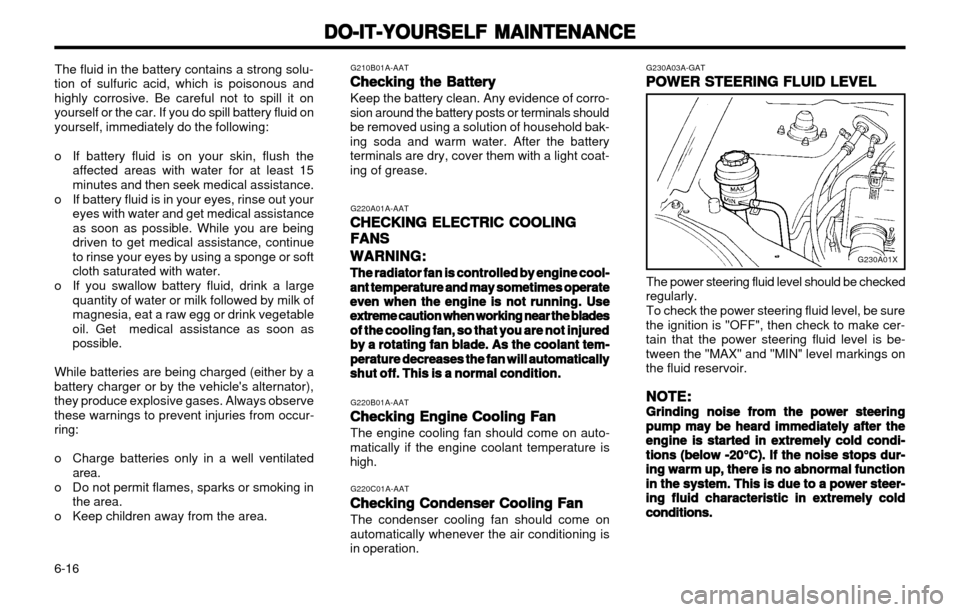
G230A03A-GAT POWER STEERING FLUID LEVEL
POWER STEERING FLUID LEVEL POWER STEERING FLUID LEVEL
POWER STEERING FLUID LEVEL
POWER STEERING FLUID LEVEL
The power steering fluid level should be checked
regularly.
To check the power steering fluid level, be sure
the ignition is "OFF", then check to make cer- tain that the power steering fluid level is be-tween the "MAX" and "MIN" level markings onthe fluid reservoir.
NOTE:
NOTE: NOTE:
NOTE:
NOTE:
Grinding noise from the power steering
Grinding noise from the power steering Grinding noise from the power steering
Grinding noise from the power steering
Grinding noise from the power steering pump may be heard immediately after the
pump may be heard immediately after the pump may be heard immediately after the
pump may be heard immediately after the
pump may be heard immediately after the
engine is started in extremely cold condi-
engine is started in extremely cold condi- engine is started in extremely cold condi-
engine is started in extremely cold condi-
engine is started in extremely cold condi-
tions (below
tions (below tions (below
tions (below
tions (below
-20°C). If the noise stops dur-
-20°C). If the noise stops dur- -20°C). If the noise stops dur-
-20°C). If the noise stops dur-
-20°C). If the noise stops dur-
ing warm up, there is no abnormal function
ing warm up, there is no abnormal function ing warm up, there is no abnormal function
ing warm up, there is no abnormal function
ing warm up, there is no abnormal function
in the system. This is due to a power steer-
in the system. This is due to a power steer- in the system. This is due to a power steer-
in the system. This is due to a power steer-
in the system. This is due to a power steer-
ing fluid characteristic in extremely cold
ing fluid characteristic in extremely cold ing fluid characteristic in extremely cold
ing fluid characteristic in extremely cold
ing fluid characteristic in extremely cold
conditions.
conditions. conditions.
conditions.
conditions.
G230A01X
The fluid in the battery contains a strong solu-
tion of sulfuric acid, which is poisonous and highly corrosive. Be careful not to spill it onyourself or the car. If you do spill battery fluid onyourself, immediately do the following:
o If battery fluid is on your skin, flush the affected areas with water for at least 15 minutes and then seek medical assistance.
o If battery fluid is in your eyes, rinse out your eyes with water and get medical assistanceas soon as possible. While you are beingdriven to get medical assistance, continueto rinse your eyes by using a sponge or softcloth saturated with water.
o If you swallow battery fluid, drink a large quantity of water or milk followed by milk ofmagnesia, eat a raw egg or drink vegetableoil. Get medical assistance as soon aspossible.
While batteries are being charged (either by abattery charger or by the vehicle's alternator),they produce explosive gases. Always observethese warnings to prevent injuries from occur-ring:
o Charge batteries only in a well ventilated area.
o Do not permit flames, sparks or smoking in the area.
o Keep children away from the area. G210B01A-AAT
Checking the Battery
Checking the Battery Checking the Battery
Checking the Battery
Checking the Battery
Keep the battery clean. Any evidence of corro-
sion around the battery posts or terminals should be removed using a solution of household bak-ing soda and warm water. After the batteryterminals are dry, cover them with a light coat-ing of grease.
G220A01A-AATCHECKING ELECTRIC COOLING
CHECKING ELECTRIC COOLING CHECKING ELECTRIC COOLING
CHECKING ELECTRIC COOLING
CHECKING ELECTRIC COOLING
FANS
FANS FANS
FANS
FANS
WARNING:
WARNING: WARNING:
WARNING:
WARNING:
The radiator fan is controlled by engine cool-
The radiator fan is controlled by engine cool- The radiator fan is controlled by engine cool-
The radiator fan is controlled by engine cool-
The radiator fan is controlled by engine cool-
ant temperature and may sometimes operate
ant temperature and may sometimes operate ant temperature and may sometimes operate
ant temperature and may sometimes operate
ant temperature and may sometimes operate
even when the engine is not running. Use
even when the engine is not running. Use even when the engine is not running. Use
even when the engine is not running. Use
even when the engine is not running. Use
extreme caution when working near the blades
extreme caution when working near the blades extreme caution when working near the blades
extreme caution when working near the blades
extreme caution when working near the blades
of the cooling fan, so that you are not injured
of the cooling fan, so that you are not injured of the cooling fan, so that you are not injured
of the cooling fan, so that you are not injured
of the cooling fan, so that you are not injured
by a rotating fan blade. As the coolant tem-
by a rotating fan blade. As the coolant tem- by a rotating fan blade. As the coolant tem-
by a rotating fan blade. As the coolant tem-
by a rotating fan blade. As the coolant tem-
perature decreases the fan will automatically
perature decreases the fan will automatically perature decreases the fan will automatically
perature decreases the fan will automatically
perature decreases the fan will automatically
shut off. This is a normal condition.
shut off. This is a normal condition. shut off. This is a normal condition.
shut off. This is a normal condition.
shut off. This is a normal condition.
G220B01A-AATChecking Engine Cooling Fan
Checking Engine Cooling Fan Checking Engine Cooling Fan
Checking Engine Cooling Fan
Checking Engine Cooling Fan
The engine cooling fan should come on auto-
matically if the engine coolant temperature ishigh.
G220C01A-AATChecking Condenser Cooling Fan
Checking Condenser Cooling Fan Checking Condenser Cooling Fan
Checking Condenser Cooling Fan
Checking Condenser Cooling Fan
The condenser cooling fan should come on
automatically whenever the air conditioning isin operation.
Page 125 of 249
INDEX
INDEX INDEX
INDEX
INDEX
10-1
Catalytic Converter .................................................................... 7-1 ~ 7-2
Child-Protector Rear Door Lock ......................................................... 1-5
Cigarette Lighter ................................................................................
1-26
Clock ................................................................................................ 1-26
Clutch Pedal freeplay ........................................................................ 6-13
Combination Light Daytime running lights ................................................................. 1-23
Headlight flasher .......................................................................... 1-24
Headlight switch ........................................................................... 1-23
High-beam switch ........................................................................ 1-24
Lane change signal ...................................................................... 1-23
Turn signal operation ................................................................... 1-23
Compact Disk Player Operation (H922M) ........................................ 1-49
Cooling Fans ..................................................................................... 6-16
Corrosion Protection Cleaning the interior ....................................................................... 4-3
Protecting your Hyundai from corrosion ........................................ 4-1
Washing and waxing ...................................................................... 4-2
DD
DD
D
Defroster ........................................................................................... 1-38
Door Central door locking system .......................................................... 1-7
Door locks ...................................................................................... 1-4
Locking, unlocking front doors with a key ..................................... 1-4
Drive Belts ............................................................................... 6-12, 6-14 Driving Economical driving ......................................................................... 2-9
Smooth cornering ........................................................................... 2-9
Winter driving ................................................................................. 2-9
ZK000A1-G
10. INDEX
10. INDEX 10. INDEX
10. INDEX
10. INDEX
AA
AA
A
Air bag .................................................................................... 1-13 ~ 1-17
Air Cleaner Filter ................................................................................. 6-9Air Conditioning
Care ............................................................................................. 6-12
Operation ..................................................................................... 1-38
Antenna ............................................................................................. 1-54
Ashtray .............................................................................................. 1-27
Audio Fault Code .............................................................................. 1-51
BB
BB
B
Battery ...................................................................................... 2-10, 6-16
Bi-Level Heating ................................................................................ 1-36
Brake Anti-lock system ............................................................................ 2-8
Checking the brakes .................................................................... 6-11
Fluid .................................................................................. 6-11 ~ 6-12
Pedal clearance ........................................................................... 6-14
Pedal freeplay .............................................................................. 6-13
Practices ............................................................................... 2-7 ~ 2-8
Breaking-In your New Hyundai ........................................................... 1-1
CC
CC
C
Care of Cassette Tapes ................................................................... 1-52
Cassette Tape Player Operation (H900A) ............................. 1-44 ~ 1-46
1010
1010
10
Page 153 of 249
FEATURES OF YOUR HYUNDAI
1-16
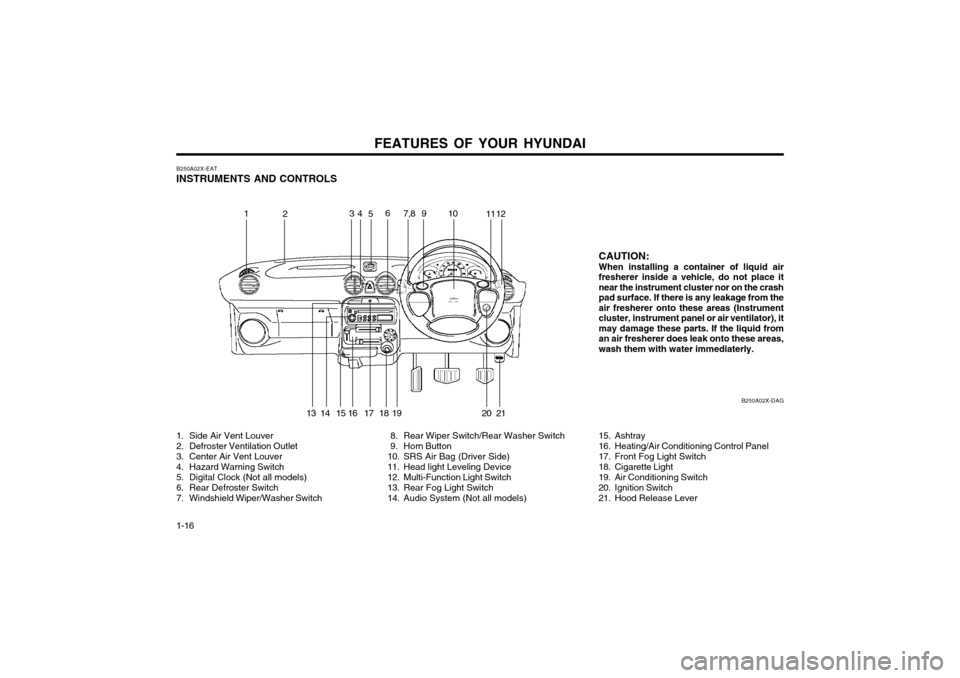
B250A02X-EAT INSTRUMENTS AND CONTROLS
1. Side Air Vent Louver
2. Defroster Ventilation Outlet
3. Center Air Vent Louver
4. Hazard Warning Switch
5. Digital Clock (Not all models)
6. Rear Defroster Switch
7. Windshield Wiper/Washer Switch 8. Rear Wiper Switch/Rear Washer Switch
9. Horn Button
10. SRS Air Bag (Driver Side)
11. Head light Leveling Device
12. Multi-Function Light Switch
13. Rear Fog Light Switch
14. Audio System (Not all models)15. Ashtray
16. Heating/Air Conditioning Control Panel
17. Front Fog Light Switch
18. Cigarette Light
19. Air Conditioning Switch
20. Ignition Switch
21. Hood Release LeverB250A02X-DAG
CAUTION: When installing a container of liquid airfresherer inside a vehicle, do not place it
near the instrument cluster nor on the crash
pad surface. If there is any leakage from theair fresherer onto these areas (Instrument
cluster, instrument panel or air ventilator), it
may damage these parts. If the liquid froman air fresherer does leak onto these areas,
wash them with water immediaterly.
1
2 34
5 9
7,8
6
1011 12
14 15 16 17 19 18 21 20
13
Page 170 of 249
FEATURES OF YOUR HYUNDAI 1-33
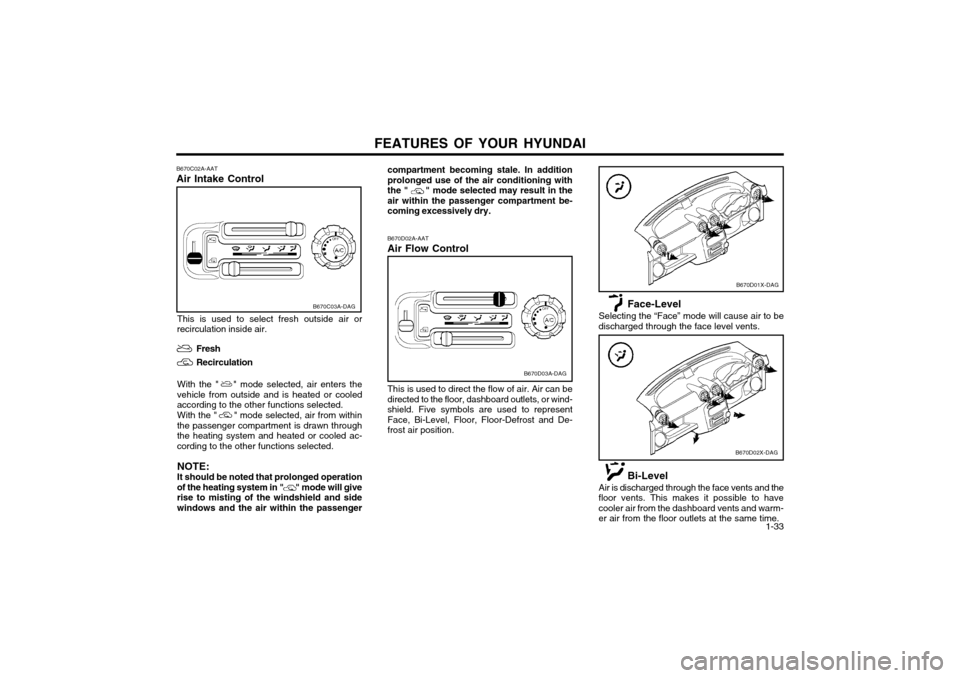
B670C02A-AAT Air Intake Control
B670C03A-DAG
This is used to select fresh outside air or
recirculation inside air.
Fresh Recirculation
With the " " mode selected, air enters the
vehicle from outside and is heated or cooled according to the other functions selected.
With the " " mode selected, air from within
the passenger compartment is drawn throughthe heating system and heated or cooled ac-cording to the other functions selected.
NOTE:It should be noted that prolonged operation
of the heating system in " " mode will giverise to misting of the windshield and sidewindows and the air within the passenger
compartment becoming stale. In addition prolonged use of the air conditioning withthe " " mode selected may result in theair within the passenger compartment be-coming excessively dry.
B670D02A-AAT Air Flow Control
B670D03A-DAG
This is used to direct the flow of air. Air can be directed to the floor, dashboard outlets, or wind-
shield. Five symbols are used to representFace, Bi-Level, Floor, Floor-Defrost and De-frost air position.
B670D01X-DAG
B670D02X-DAG
Face-Level
Selecting the “Face” mode will cause air to be
discharged through the face level vents.
Bi-Level
Air is discharged through the face vents and the
floor vents. This makes it possible to have cooler air from the dashboard vents and warm-
er air from the floor outlets at the same time.