2002 Hyundai Atos power steering
[x] Cancel search: power steeringPage 92 of 249
VEHICLE MAINTENANCE REQUIREMENTS
VEHICLE MAINTENANCE REQUIREMENTS VEHICLE MAINTENANCE REQUIREMENTS
VEHICLE MAINTENANCE REQUIREMENTS
VEHICLE MAINTENANCE REQUIREMENTS
5-3
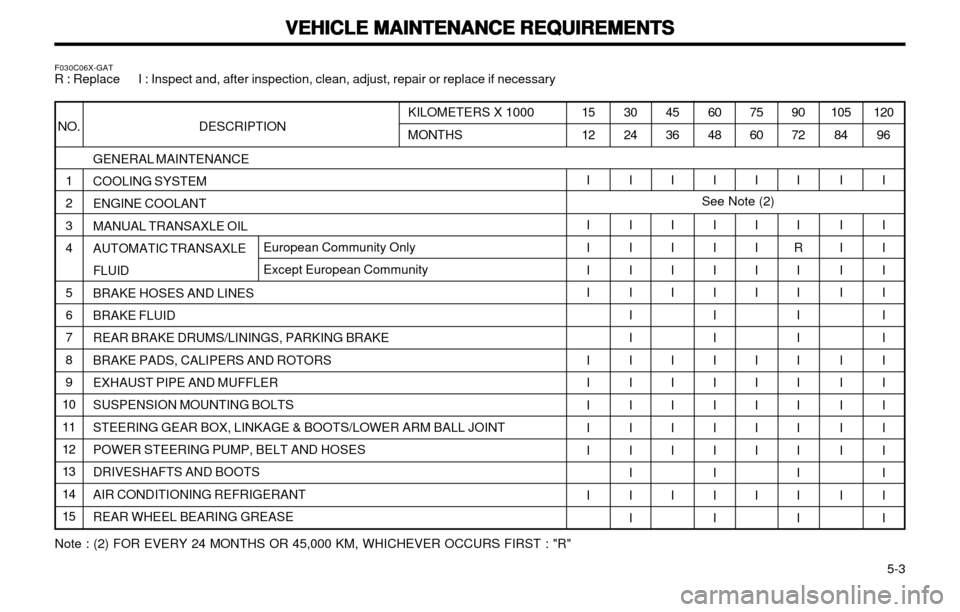
GENERAL MAINTENANCE COOLING SYSTEM ENGINE COOLANTMANUAL TRANSAXLE OIL AUTOMATIC TRANSAXLE FLUIDBRAKE HOSES AND LINES BRAKE FLUID REAR BRAKE DRUMS/LININGS, PARKING BRAKEBRAKE PADS, CALIPERS AND ROTORS EXHAUST PIPE AND MUFFLER SUSPENSION MOUNTING BOLTSSTEERING GEAR BOX, LINKAGE & BOOTS/LOWER ARM BALL JOINT POWER STEERING PUMP, BELT AND HOSES DRIVESHAFTS AND BOOTSAIR CONDITIONING REFRIGERANT REAR WHEEL BEARING GREASE
F030C06X-GAT
R : Replace I : Inspect and, after inspection, clean, adjust, repair or replace if necessary
120
96
I I I I I I I I I I I I I I I
105
84
I I I I I I I I I I I
90 72
I I
R
I I I I I I I I I I I I
75 60
I I I I I I I I I I I
60 48
I I I I I I I I I I I I I I I
45 36
I I I I I I I I I I I
30 24
I I I I I I I I I I I I I I I
15 12
I I I I I I I I I I I
KILOMETERS X 1000 MONTHS
NO. DESCRIPTION
1 2 34 5 6 7 89
101112 13 1415
See Note (2)
Note : (2) FOR EVERY 24 MONTHS OR 45,000 KM, WHICHEVER OCCURS FIRST : "R"
European Community Only Except European Community
Page 95 of 249
VEHICLE MAINTENANCE REQUIREMENTS
VEHICLE MAINTENANCE REQUIREMENTS VEHICLE MAINTENANCE REQUIREMENTS
VEHICLE MAINTENANCE REQUIREMENTS
VEHICLE MAINTENANCE REQUIREMENTS
5- 6 F070B01A-GAT
oo
oo
o Cooling System
Cooling System Cooling System
Cooling System
Cooling System
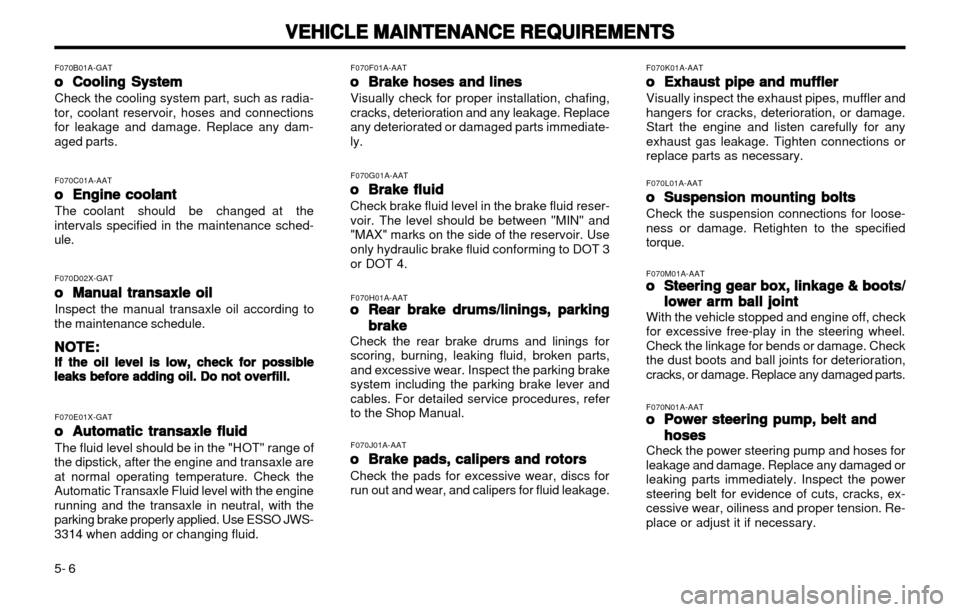
Check the cooling system part, such as radia-
tor, coolant reservoir, hoses and connections for leakage and damage. Replace any dam-aged parts.
F070C01A-AAToo
oo
o
Engine coolant
Engine coolant Engine coolant
Engine coolant
Engine coolant
The coolant should be changed at the
intervals specified in the maintenance sched-ule.
F070D02X-GAToo
oo
o Manual transaxle oil
Manual transaxle oil Manual transaxle oil
Manual transaxle oil
Manual transaxle oil
Inspect the manual transaxle oil according to
the maintenance schedule.
NOTE:
NOTE: NOTE:
NOTE:
NOTE:
If the oil level is low, check for possible
If the oil level is low, check for possible If the oil level is low, check for possible
If the oil level is low, check for possible
If the oil level is low, check for possible leaks before adding oil. Do not overfill.
leaks before adding oil. Do not overfill. leaks before adding oil. Do not overfill.
leaks before adding oil. Do not overfill.
leaks before adding oil. Do not overfill.
F070E01X-GAToo
oo
o
Automatic transaxle fluid
Automatic transaxle fluid Automatic transaxle fluid
Automatic transaxle fluid
Automatic transaxle fluid
The fluid level should be in the "HOT" range of
the dipstick, after the engine and transaxle are at normal operating temperature. Check theAutomatic Transaxle Fluid level with the engine
running and the transaxle in neutral, with theparking brake properly applied. Use ESSO JWS-3314 when adding or changing fluid. F070F01A-AAT
oo
oo
o Brake hoses and lines
Brake hoses and lines Brake hoses and lines
Brake hoses and lines
Brake hoses and lines
Visually check for proper installation, chafing,
cracks, deterioration and any leakage. Replaceany deteriorated or damaged parts immediate-ly. F070G01A-AAT
oo
oo
o Brake fluid
Brake fluid Brake fluid
Brake fluid
Brake fluid
Check brake fluid level in the brake fluid reser- voir. The level should be between "MIN" and"MAX" marks on the side of the reservoir. Use only hydraulic brake fluid conforming to DOT 3 or DOT 4. F070H01A-AAT oo
oo
o
Rear brake drums/linings, parking
Rear brake drums/linings, parking Rear brake drums/linings, parking
Rear brake drums/linings, parking
Rear brake drums/linings, parking
brake
brake brake
brake
brake
Check the rear brake drums and linings for
scoring, burning, leaking fluid, broken parts,and excessive wear. Inspect the parking brake
system including the parking brake lever andcables. For detailed service procedures, referto the Shop Manual. F070J01A-AAT
oo
oo
o
Brake pads, calipers and rotors
Brake pads, calipers and rotors Brake pads, calipers and rotors
Brake pads, calipers and rotors
Brake pads, calipers and rotors
Check the pads for excessive wear, discs for
run out and wear, and calipers for fluid leakage. F070L01A-AAT
oo
oo
o Suspension mounting bolts
Suspension mounting bolts Suspension mounting bolts
Suspension mounting bolts
Suspension mounting bolts
Check the suspension connections for loose-ness or damage. Retighten to the specifiedtorque.
F070K01A-AAT
oo
oo
o Exhaust pipe and muffler
Exhaust pipe and muffler Exhaust pipe and muffler
Exhaust pipe and muffler
Exhaust pipe and muffler
Visually inspect the exhaust pipes, muffler andhangers for cracks, deterioration, or damage.Start the engine and listen carefully for any
exhaust gas leakage. Tighten connections orreplace parts as necessary. F070M01A-AAT oo
oo
o
Steering gear box, linkage & boots/
Steering gear box, linkage & boots/ Steering gear box, linkage & boots/
Steering gear box, linkage & boots/
Steering gear box, linkage & boots/
lower
lower lower
lower
lower arm ball joint
arm ball joint arm ball joint
arm ball joint
arm ball joint
With the vehicle stopped and engine off, check for excessive free-play in the steering wheel.Check the linkage for bends or damage. Check
the dust boots and ball joints for deterioration,
cracks, or damage. Replace any damaged parts. F070N01A-AAT oo
oo
o Power steering pump, belt and
Power steering pump, belt and Power steering pump, belt and
Power steering pump, belt and
Power steering pump, belt and
hoses
hoses hoses
hoses
hoses
Check the power steering pump and hoses for leakage and damage. Replace any damaged orleaking parts immediately. Inspect the powersteering belt for evidence of cuts, cracks, ex-
cessive wear, oiliness and proper tension. Re-place or adjust it if necessary.
Page 97 of 249
DO-IT-YOURSELF MAINTENANCE
DO-IT-YOURSELF MAINTENANCE DO-IT-YOURSELF MAINTENANCE
DO-IT-YOURSELF MAINTENANCE
DO-IT-YOURSELF MAINTENANCE
6-1
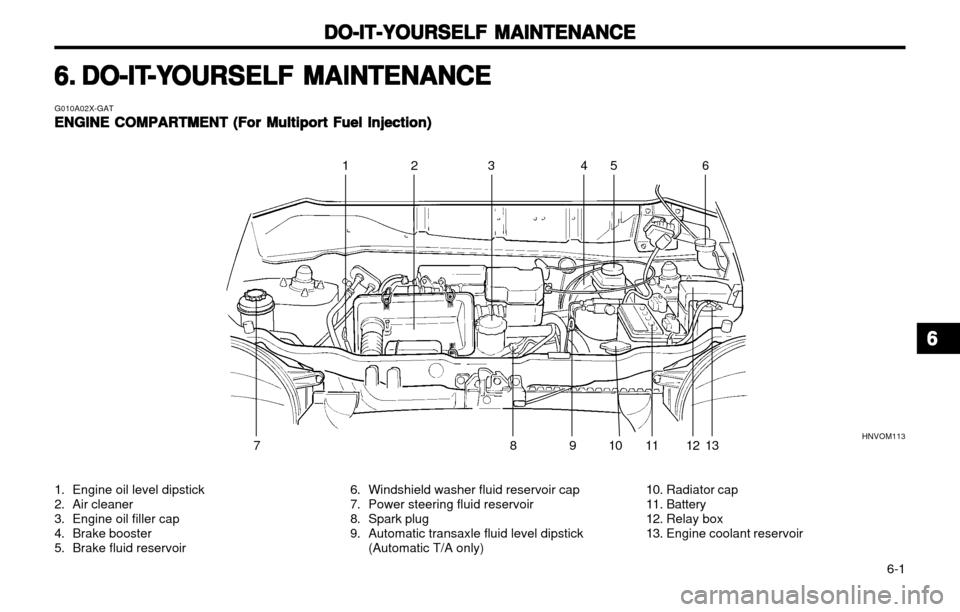
G010A02X-GATENGINE COMPARTMENT (For Multiport Fuel Injection)
ENGINE COMPARTMENT (For Multiport Fuel Injection) ENGINE COMPARTMENT (For Multiport Fuel Injection)
ENGINE COMPARTMENT (For Multiport Fuel Injection)
ENGINE COMPARTMENT (For Multiport Fuel Injection)
1. Engine oil level dipstick
2. Air cleaner
3. Engine oil filler cap
4. Brake booster
5. Brake fluid reservoir 6. Windshield washer fluid reservoir cap
7. Power steering fluid reservoir
8. Spark plug
9. Automatic transaxle fluid level dipstick
(Automatic T/A only) 10. Radiator cap
11. Battery
12. Relay box
13. Engine coolant reservoir
6.6.
6.6.
6.
DO-IT
DO-IT DO-IT
DO-IT
DO-IT
-Y
-Y -Y
-Y
-Y
OURSELF MAINTENANCE
OURSELF MAINTENANCE OURSELF MAINTENANCE
OURSELF MAINTENANCE
OURSELF MAINTENANCE
12 4 5 6
HNVOM113
81 011 13
12
79 3
66
66
6
Page 98 of 249
DO-IT-YOURSELF MAINTENANCE
DO-IT-YOURSELF MAINTENANCE DO-IT-YOURSELF MAINTENANCE
DO-IT-YOURSELF MAINTENANCE
DO-IT-YOURSELF MAINTENANCE
6-2 G020A01A-AAT
GENERAL CHECKS
GENERAL CHECKS GENERAL CHECKS
GENERAL CHECKS
GENERAL CHECKS
Engine Compartment
Engine Compartment Engine Compartment
Engine Compartment
Engine Compartment The following should be checked regularly:
o Engine oil level and condition
o Transaxle fluid level and condition
o Brake fluid level
o Clutch fluid level
o Engine coolant level
o Windshield washer fluid level
o Accessory drive belt condition
o Engine coolant hose condition
o Fluid leaks (on or below components)
o Power steering fluid level
o Battery Condition G020C01X-GAT
Vehicle Interior
Vehicle Interior Vehicle Interior
Vehicle Interior
Vehicle Interior
The following should be checked each time
when the vehicle is driven:
o Lights operation
o Windshield wipers operation
o Horn operation
o Defroster, heating system operation (and air conditioning, if installed)
o Steering operation and condition
o Mirror condition and operation
o Turn signal operation
o Accelerator pedal operation
o Brake operation, including parking brake
o Manual transaxle operation, including clutch operation
o Automatic transaxle operation, including "Park" mechanism operation
o Seat control condition and operation
o Seat belt condition and operation
o Sunvisor operation
If you notice anything that does not operate
correctly or appears to be functioning in cor-rectly, inspect it carefully and seek assistancefrom your Hyundai dealer if service is needed. G030A01A-AAT
CHECKING THE ENGINE OIL
CHECKING THE ENGINE OIL CHECKING THE ENGINE OIL
CHECKING THE ENGINE OIL
CHECKING THE ENGINE OIL
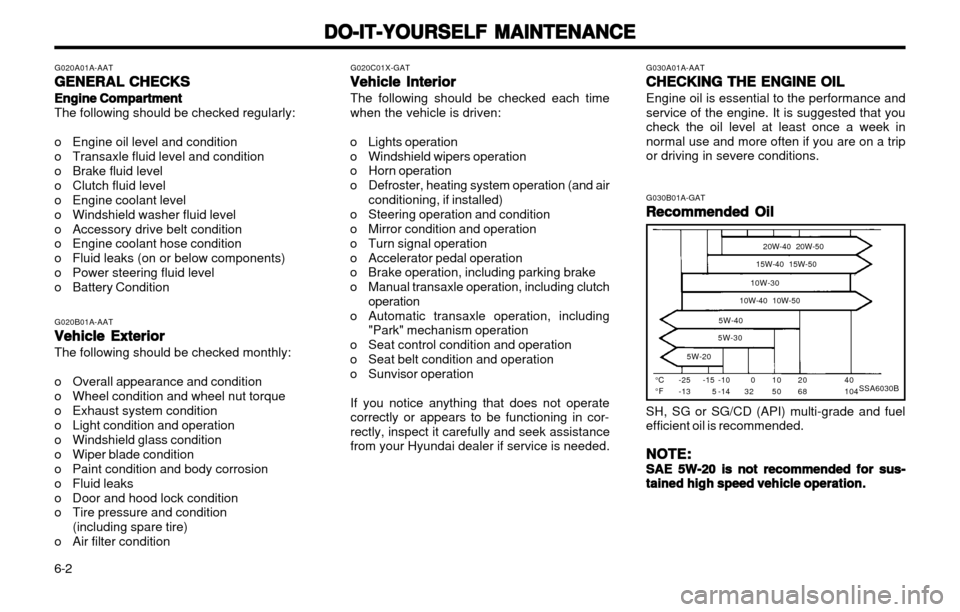
Engine oil is essential to the performance andservice of the engine. It is suggested that youcheck the oil level at least once a week innormal use and more often if you are on a tripor driving in severe conditions. G030B01A-GAT
Recommended Oil
Recommended Oil Recommended Oil
Recommended Oil
Recommended Oil
SSA6030B°C °F -25-13 20W-40 20W-50
15W-40 15W-50
10W-30
10W-40 10W-50
5W-40
5W-30
5W-2040 104
2068
1050
032
-15 5 -10-14
SH, SG or SG/CD (API) multi-grade and fuel efficient oil is recommended.
NOTE:
NOTE: NOTE:
NOTE:
NOTE:
SAE 5W-20 is not recommended for sus-
SAE 5W-20 is not recommended for sus- SAE 5W-20 is not recommended for sus-
SAE 5W-20 is not recommended for sus-
SAE 5W-20 is not recommended for sus-
tained high speed vehicle operation.
tained high speed vehicle operation. tained high speed vehicle operation.
tained high speed vehicle operation.
tained high speed vehicle operation.
G020B01A-AAT
Vehicle Exterior
Vehicle Exterior Vehicle Exterior
Vehicle Exterior
Vehicle Exterior The following should be checked monthly:
o Overall appearance and condition
o Wheel condition and wheel nut torque
o Exhaust system condition
o Light condition and operation
o Windshield glass condition
o Wiper blade condition
o Paint condition and body corrosion
o Fluid leaks
o Door and hood lock condition
o Tire pressure and condition
(including spare tire)
o Air filter condition
Page 112 of 249
DO-IT-YOURSELF MAINTENANCE
DO-IT-YOURSELF MAINTENANCE DO-IT-YOURSELF MAINTENANCE
DO-IT-YOURSELF MAINTENANCE
DO-IT-YOURSELF MAINTENANCE
6-16
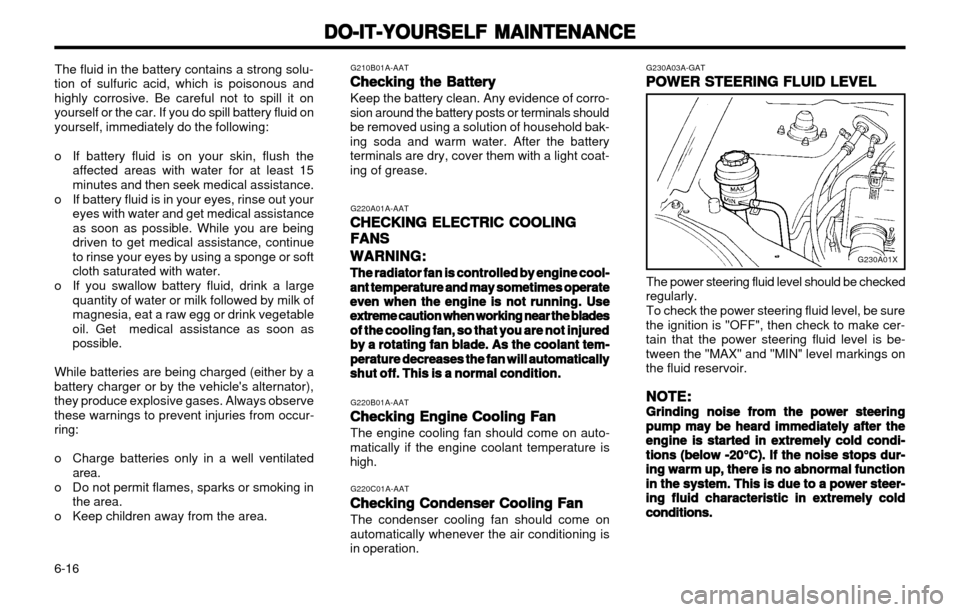
G230A03A-GAT POWER STEERING FLUID LEVEL
POWER STEERING FLUID LEVEL POWER STEERING FLUID LEVEL
POWER STEERING FLUID LEVEL
POWER STEERING FLUID LEVEL
The power steering fluid level should be checked
regularly.
To check the power steering fluid level, be sure
the ignition is "OFF", then check to make cer- tain that the power steering fluid level is be-tween the "MAX" and "MIN" level markings onthe fluid reservoir.
NOTE:
NOTE: NOTE:
NOTE:
NOTE:
Grinding noise from the power steering
Grinding noise from the power steering Grinding noise from the power steering
Grinding noise from the power steering
Grinding noise from the power steering pump may be heard immediately after the
pump may be heard immediately after the pump may be heard immediately after the
pump may be heard immediately after the
pump may be heard immediately after the
engine is started in extremely cold condi-
engine is started in extremely cold condi- engine is started in extremely cold condi-
engine is started in extremely cold condi-
engine is started in extremely cold condi-
tions (below
tions (below tions (below
tions (below
tions (below
-20°C). If the noise stops dur-
-20°C). If the noise stops dur- -20°C). If the noise stops dur-
-20°C). If the noise stops dur-
-20°C). If the noise stops dur-
ing warm up, there is no abnormal function
ing warm up, there is no abnormal function ing warm up, there is no abnormal function
ing warm up, there is no abnormal function
ing warm up, there is no abnormal function
in the system. This is due to a power steer-
in the system. This is due to a power steer- in the system. This is due to a power steer-
in the system. This is due to a power steer-
in the system. This is due to a power steer-
ing fluid characteristic in extremely cold
ing fluid characteristic in extremely cold ing fluid characteristic in extremely cold
ing fluid characteristic in extremely cold
ing fluid characteristic in extremely cold
conditions.
conditions. conditions.
conditions.
conditions.
G230A01X
The fluid in the battery contains a strong solu-
tion of sulfuric acid, which is poisonous and highly corrosive. Be careful not to spill it onyourself or the car. If you do spill battery fluid onyourself, immediately do the following:
o If battery fluid is on your skin, flush the affected areas with water for at least 15 minutes and then seek medical assistance.
o If battery fluid is in your eyes, rinse out your eyes with water and get medical assistanceas soon as possible. While you are beingdriven to get medical assistance, continueto rinse your eyes by using a sponge or softcloth saturated with water.
o If you swallow battery fluid, drink a large quantity of water or milk followed by milk ofmagnesia, eat a raw egg or drink vegetableoil. Get medical assistance as soon aspossible.
While batteries are being charged (either by abattery charger or by the vehicle's alternator),they produce explosive gases. Always observethese warnings to prevent injuries from occur-ring:
o Charge batteries only in a well ventilated area.
o Do not permit flames, sparks or smoking in the area.
o Keep children away from the area. G210B01A-AAT
Checking the Battery
Checking the Battery Checking the Battery
Checking the Battery
Checking the Battery
Keep the battery clean. Any evidence of corro-
sion around the battery posts or terminals should be removed using a solution of household bak-ing soda and warm water. After the batteryterminals are dry, cover them with a light coat-ing of grease.
G220A01A-AATCHECKING ELECTRIC COOLING
CHECKING ELECTRIC COOLING CHECKING ELECTRIC COOLING
CHECKING ELECTRIC COOLING
CHECKING ELECTRIC COOLING
FANS
FANS FANS
FANS
FANS
WARNING:
WARNING: WARNING:
WARNING:
WARNING:
The radiator fan is controlled by engine cool-
The radiator fan is controlled by engine cool- The radiator fan is controlled by engine cool-
The radiator fan is controlled by engine cool-
The radiator fan is controlled by engine cool-
ant temperature and may sometimes operate
ant temperature and may sometimes operate ant temperature and may sometimes operate
ant temperature and may sometimes operate
ant temperature and may sometimes operate
even when the engine is not running. Use
even when the engine is not running. Use even when the engine is not running. Use
even when the engine is not running. Use
even when the engine is not running. Use
extreme caution when working near the blades
extreme caution when working near the blades extreme caution when working near the blades
extreme caution when working near the blades
extreme caution when working near the blades
of the cooling fan, so that you are not injured
of the cooling fan, so that you are not injured of the cooling fan, so that you are not injured
of the cooling fan, so that you are not injured
of the cooling fan, so that you are not injured
by a rotating fan blade. As the coolant tem-
by a rotating fan blade. As the coolant tem- by a rotating fan blade. As the coolant tem-
by a rotating fan blade. As the coolant tem-
by a rotating fan blade. As the coolant tem-
perature decreases the fan will automatically
perature decreases the fan will automatically perature decreases the fan will automatically
perature decreases the fan will automatically
perature decreases the fan will automatically
shut off. This is a normal condition.
shut off. This is a normal condition. shut off. This is a normal condition.
shut off. This is a normal condition.
shut off. This is a normal condition.
G220B01A-AATChecking Engine Cooling Fan
Checking Engine Cooling Fan Checking Engine Cooling Fan
Checking Engine Cooling Fan
Checking Engine Cooling Fan
The engine cooling fan should come on auto-
matically if the engine coolant temperature ishigh.
G220C01A-AATChecking Condenser Cooling Fan
Checking Condenser Cooling Fan Checking Condenser Cooling Fan
Checking Condenser Cooling Fan
Checking Condenser Cooling Fan
The condenser cooling fan should come on
automatically whenever the air conditioning isin operation.
Page 113 of 249

DO-IT-YOURSELF MAINTENANCE
DO-IT-YOURSELF MAINTENANCE DO-IT-YOURSELF MAINTENANCE
DO-IT-YOURSELF MAINTENANCE
DO-IT-YOURSELF MAINTENANCE
6-17
G270A02X-GAT
HEADLIGHT BULB
HEADLIGHT BULB HEADLIGHT BULB
HEADLIGHT BULB
HEADLIGHT BULB
Replacement instructions:
1. Allow the bulb to cool. Wear eye protection.
2. Always grasp the bulb by its base, avoid touching the glass.
3. Disconnect the connector, then remove the dust cover.
4. Push the bulb spring for removing the head- light bulb.
5. Remove the headlight bulb. If the bulb is burned out, replace it with the same watt- age.
6. Installation is the reverse order of the re- moval.
7. Use the protective cap and carton to promptly dispose of the old bulb.
8. Check for proper headlight aim. WARNING:
WARNING: WARNING:
WARNING:
WARNING:
The halogen bulb contains gas under pres-
The halogen bulb contains gas under pres- The halogen bulb contains gas under pres-
The halogen bulb contains gas under pres-
The halogen bulb contains gas under pres- sure and if impacted
sure and if impacted sure and if impacted
sure and if impacted
sure and if impacted
could shatter, and re-
could shatter, and re- could shatter, and re-
could shatter, and re-
could shatter, and re-
sulting in flying fragments. Always wear eye
sulting in flying fragments. Always wear eye sulting in flying fragments. Always wear eye
sulting in flying fragments. Always wear eye
sulting in flying fragments. Always wear eye
protection
protection protection
protection
protection
when servicing the bulb. Protect
when servicing the bulb. Protect when servicing the bulb. Protect
when servicing the bulb. Protect
when servicing the bulb. Protect
the bulb against abrasions or scratches and
the bulb against abrasions or scratches and the bulb against abrasions or scratches and
the bulb against abrasions or scratches and
the bulb against abrasions or scratches and
against liquids when lighted. Turn the bulb
against liquids when lighted. Turn the bulb against liquids when lighted. Turn the bulb
against liquids when lighted. Turn the bulb
against liquids when lighted. Turn the bulb
on only when installed in a headlight. Re-
on only when installed in a headlight. Re- on only when installed in a headlight. Re-
on only when installed in a headlight. Re-
on only when installed in a headlight. Re-
place the headlight if damaged or cracked.
place the headlight if damaged or cracked. place the headlight if damaged or cracked.
place the headlight if damaged or cracked.
place the headlight if damaged or cracked.
Keep the bulb out of the reach
Keep the bulb out of the reach Keep the bulb out of the reach
Keep the bulb out of the reach
Keep the bulb out of the reach
of children
of children of children
of children
of children
and dispose of the used bulb with care.
and dispose of the used bulb with care. and dispose of the used bulb with care.
and dispose of the used bulb with care.
and dispose of the used bulb with care. G290A02X-GAT
HEADLIGHT AIMING ADJUSTMENT
HEADLIGHT AIMING ADJUSTMENT HEADLIGHT AIMING ADJUSTMENT
HEADLIGHT AIMING ADJUSTMENT
HEADLIGHT AIMING ADJUSTMENT Before performing aiming adjustment, make sure of the following.
1. Keep all tires inflated to the correct pres-
sure.
2. Place the vehicle on level ground and press the front bumper & rear bumper down sev- eral times. Place the vehicle at a distance of3,000 mm (118 in.) from the test wall.
3. See that the vehicle is unloaded (except for full levels of coolant, engine oil and fuel, andspare tire, jack, and tools). Have the driveror equivalent weight placed in driver's seat.
Recommended Fluid
Recommended Fluid Recommended Fluid
Recommended Fluid
Recommended Fluid
Use PSF-3 type fluid.
NOTE:
NOTE: NOTE:
NOTE:
NOTE:
Do not start the engine when the power
Do not start the engine when the power Do not start the engine when the power
Do not start the engine when the power
Do not start the engine when the power steering oil reservoir is empty.
steering oil reservoir is empty. steering oil reservoir is empty.
steering oil reservoir is empty.
steering oil reservoir is empty.
G240A01A-AATPOWER STEERING HOSES
POWER STEERING HOSES POWER STEERING HOSES
POWER STEERING HOSES
POWER STEERING HOSES
It is suggested that you check the power steer-
ing hose connections for fluid leakage at those intervals specified in the vehicle maintenanceschedule in Section 5.
The power steering hoses should be replaced if
there is severe surface cracking, pulling, scuff-ing or worn spots. Deterioration of the hosecould cause premature failure.
G260A03A-AATREPLACING HEADLIGHT BULBS
REPLACING HEADLIGHT BULBS REPLACING HEADLIGHT BULBS
REPLACING HEADLIGHT BULBS
REPLACING HEADLIGHT BULBS
Before attempting to replace a headlight bulb,
be sure the switch is turned to the "OFF"position.
The next paragraph shows how to reach head-
light bulbs so they may be changed. Be sure toreplace the burned-out bulb with one of thesame number and wattage rating.
CAUTION:
CAUTION: CAUTION:
CAUTION:
CAUTION:
Keep the lamps out of contact with petro-
Keep the lamps out of contact with petro- Keep the lamps out of contact with petro-
Keep the lamps out of contact with petro-
Keep the lamps out of contact with petro- leum product, such as oil, gasoline, etc.
leum product, such as oil, gasoline, etc. leum product, such as oil, gasoline, etc.
leum product, such as oil, gasoline, etc.
leum product, such as oil, gasoline, etc.
G270A01X
Page 122 of 249
VEHICLE SPECIFICATIONS
VEHICLE SPECIFICATIONS VEHICLE SPECIFICATIONS
VEHICLE SPECIFICATIONS
VEHICLE SPECIFICATIONS
9-1
9.9.
9.9.
9.
VEHICLE SPECIFICA
VEHICLE SPECIFICA VEHICLE SPECIFICA
VEHICLE SPECIFICA
VEHICLE SPECIFICA
TIONS
TIONS TIONS
TIONS
TIONS
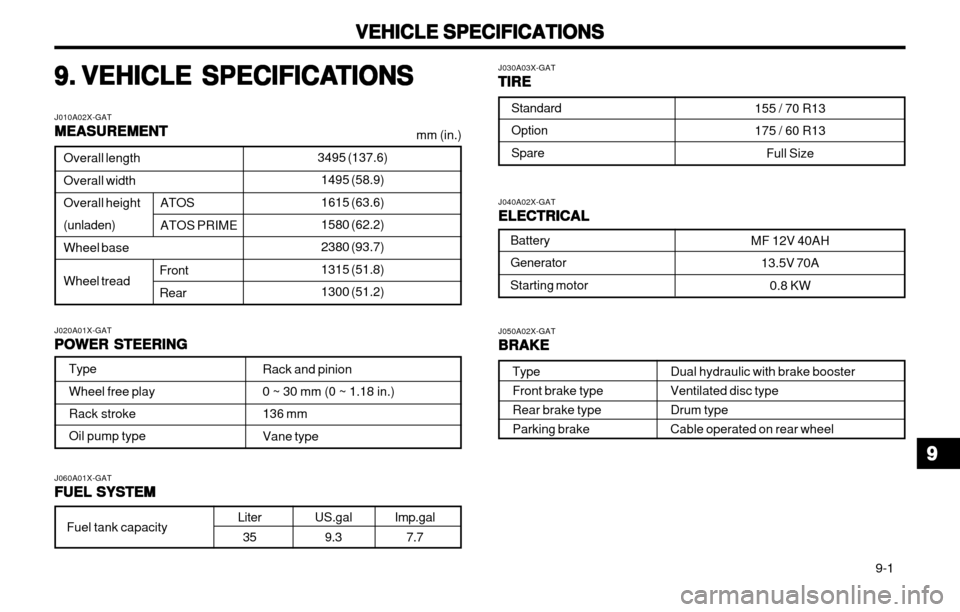
J010A02X-GAT MEASUREMENT
MEASUREMENT MEASUREMENT
MEASUREMENT
MEASUREMENT
mm (in.)
J020A01X-GAT POWER STEERING
POWER STEERING POWER STEERING
POWER STEERING
POWER STEERING
Imp.gal
7.7Liter35 US.gal
9.3
J060A01X-GAT
FUEL SYSTEM
FUEL SYSTEM FUEL SYSTEM
FUEL SYSTEM
FUEL SYSTEM J040A02X-GAT
ELECTRICAL
ELECTRICAL ELECTRICAL
ELECTRICAL
ELECTRICAL J050A02X-GAT
BRAKE
BRAKE BRAKE
BRAKE
BRAKE
Dual hydraulic with brake booster Ventilated disc typeDrum typeCable operated on rear wheel
J030A03X-GAT
TIRE
TIRE TIRE
TIRE
TIRE
3495 (137.6)
1495 (58.9) 1615 (63.6) 1580 (62.2) 2380 (93.7)1315 (51.8) 1300 (51.2)Overall length Overall widthOverall height (unladen) Wheel base Wheel tread
Front Rear
ATOS ATOS PRIME
Type Wheel free play Rack stroke Oil pump type Rack and pinion 0 ~ 30 mm (0 ~ 1.18 in.) 136 mmVane type
Standard Option Spare
155 / 70 R13175 / 60 R13
Full Size
Battery Generator Starting motor MF 12V 40AH
13.5V 70A
0.8 KW
Fuel tank capacity Type Front brake typeRear brake typeParking brake
99
99
9
Page 124 of 249
VEHICLE SPECIFICATIONS
VEHICLE SPECIFICATIONS VEHICLE SPECIFICATIONS
VEHICLE SPECIFICATIONS
VEHICLE SPECIFICATIONS
9-3
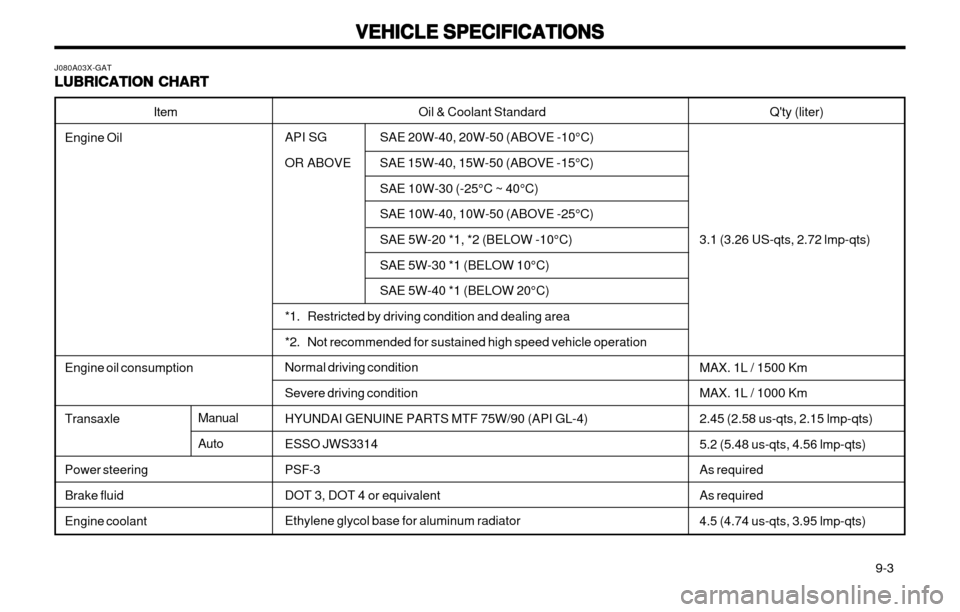
Oil & Coolant Standard
API SG SAE 20W-40, 20W-50 (ABOVE -10°C)
OR ABOVE SAE 15W-40, 15W-50 (ABOVE -15°C) SAE 10W-30 (-25°C ~ 40°C) SAE 10W-40, 10W-50 (ABOVE -25°C) SAE 5W-20 *1, *2 (BELOW -10°C) SAE 5W-30 *1 (BELOW 10°C)SAE 5W-40 *1 (BELOW 20°C)
*1. Restricted by driving condition and dealing area
*2. Not recommended for sustained high speed vehicle operationNormal driving condition Severe driving condition HYUNDAI GENUINE PARTS MTF 75W/90 (API GL-4)ESSO JWS3314 PSF-3 DOT 3, DOT 4 or equivalentEthylene glycol base for aluminum radiator
Item
Engine Oil Engine oil consumption Transaxle Power steering Brake fluid Engine coolant Q'ty (liter)
3.1 (3.26 US-qts, 2.72 lmp-qts) MAX. 1L / 1500 Km MAX. 1L / 1000 Km2.45 (2.58 us-qts, 2.15 lmp-qts) 5.2 (5.48 us-qts, 4.56 lmp-qts) As requiredAs required 4.5 (4.74 us-qts, 3.95 lmp-qts)
J080A03X-GAT LUBRICATION CHART
LUBRICATION CHART LUBRICATION CHART
LUBRICATION CHART
LUBRICATION CHART
Manual Auto