Page 9 of 158

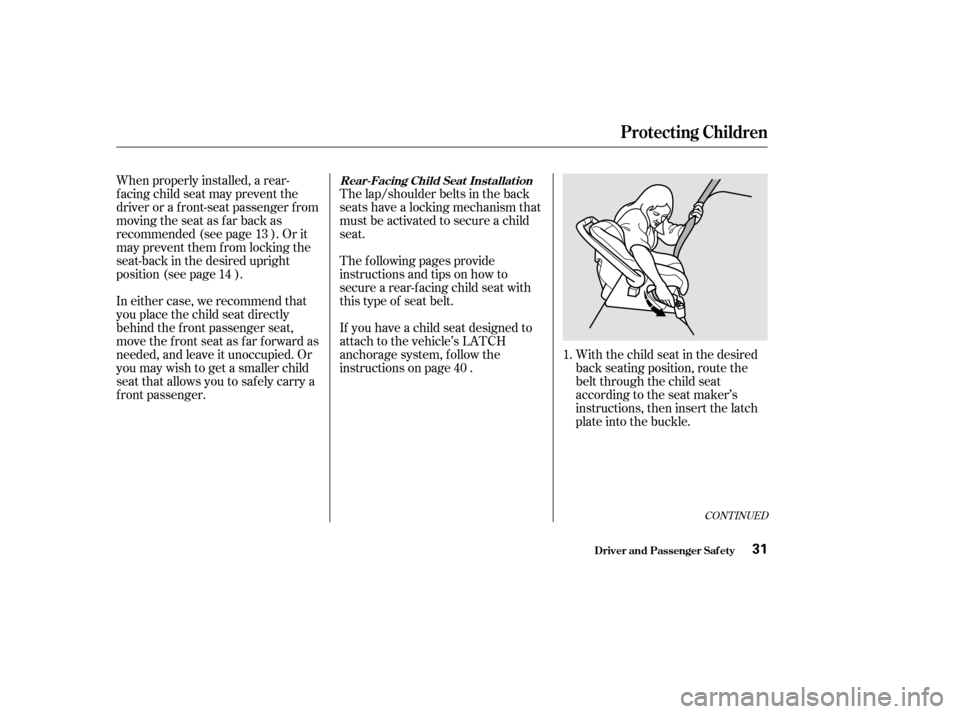
With the child seat in the desired
back seating position, route the
belt through the child seat
according to the seat maker’s
instructions, then insert the latch
plate into the buckle.
When properly installed, a rear-
f acing child seat may prevent the
driver or a f ront-seat passenger f rom
moving the seat as far back as
recommended (see page ). Or it
may prevent them f rom locking the
seat-back in the desired upright
position (see page ).
In either case, we recommend that
you place the child seat directly
behind the f ront passenger seat,
move the front seat as far forward as
needed, and leave it unoccupied. Or
you may wish to get a smaller child
seat that allows you to safely carry a
f ront passenger.
The lap/shoulder belts in the back
seats have a locking mechanism that
must be activated to secure a child
seat.
The f ollowing pages provide
instructions and tips on how to
secure a rear-f acing child seat with
this type of seat belt.
If you have a child seat designed to
attach to the vehicle’s LATCH
anchorage system, follow the
instructions on page .
1.
13
14
40
CONT INUED
Protecting Children
Driver and Passenger Saf ety
Rear-Facing Child Seat Inst allat ion
31
Page 10 of 158

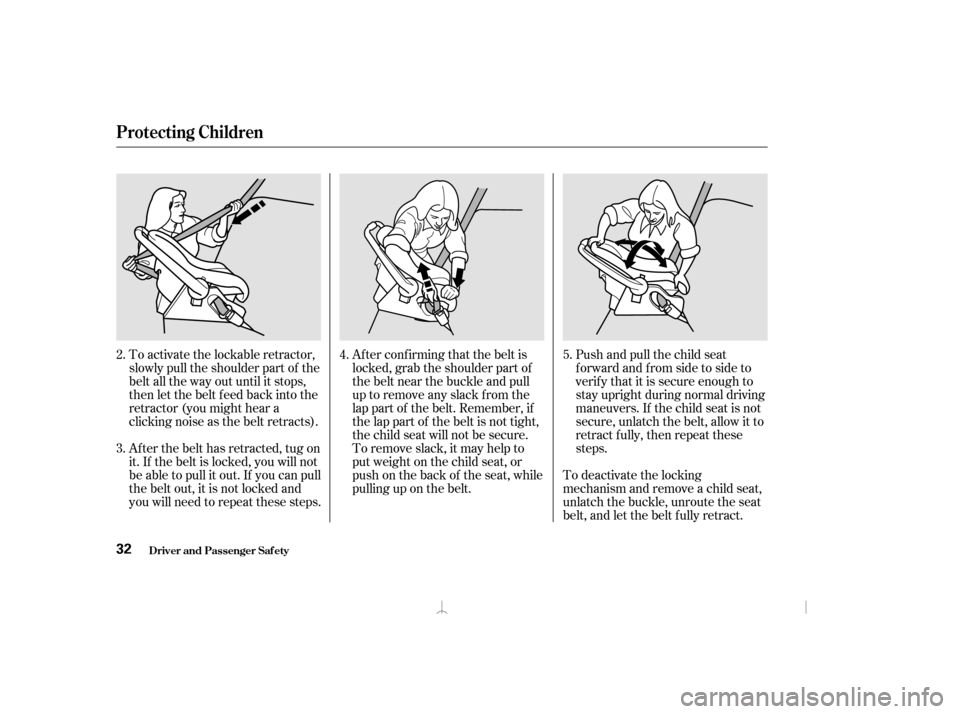
To activate the lockable retractor,
slowly pull the shoulder part of the
belt all the way out until it stops,
then let the belt f eed back into the
retractor (you might hear a
clicking noise as the belt retracts).
Af ter the belt has retracted, tug on
it. If the belt is locked, you will not
be able to pull it out. If you can pull
the belt out, it is not locked and
you will need to repeat these steps.Af ter conf irming that the belt is
locked, grab the shoulder part of
the belt near the buckle and pull
up to remove any slack from the
lap part of the belt. Remember, if
the lap part of the belt is not tight,
the child seat will not be secure.
To remove slack, it may help to
putweightonthechildseat,or
push on the back of the seat, while
pulling up on the belt.
Push and pull the child seat
f orward and f rom side to side to
verif y that it is secure enough to
stay upright during normal driving
maneuvers. If the child seat is not
secure, unlatch the belt, allow it to
retract f ully, then repeat these
steps.
To deactivate the locking
mechanism and remove a child seat,
unlatch the buckle, unroute the seat
belt, and let the belt f ully retract.
2. 3.
4.
5.
Protecting Children
Driver and Passenger Saf ety32
Page 11 of 158

If it is necessary to put a f orward-
f acing child seat in the f ront, move
the vehicle seat as far to the rear as
possible, be sure the child seat is
f irmly secured to the car, and the
child is properly strapped in the seat.The lap/shoulder belts in the back
and f ront passenger seating positions
have a locking mechanism that must
be activated to secure a child seat.
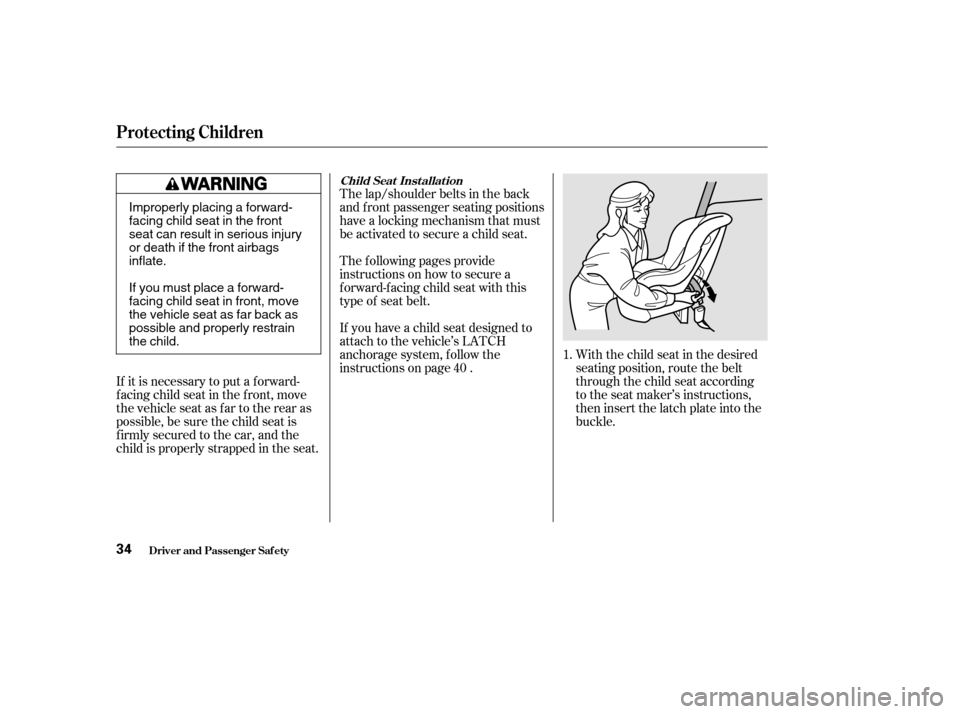
With the child seat in the desired
seating position, route the belt
through the child seat according
to the seat maker’s instructions,
then insert the latch plate into the
buckle.
The f ollowing pages provide
instructions on how to secure a
f orward-f acing child seat with this
type of seat belt.
If you have a child seat designed to
attach to the vehicle’s LATCH
anchorage system, follow the
instructions on page .
1.
40
Child Seat Inst allat ion
Protecting Children
Driver and Passenger Saf ety34
Improperly placing a forward-
facing child seat in the front
seat can result in serious injury
or death if the front airbagsinflate.
Ifyoumustplaceaforward-
facing child seat in front, move
the vehicle seat as far back as
possible and properly restrain
the child.
Page 12 of 158

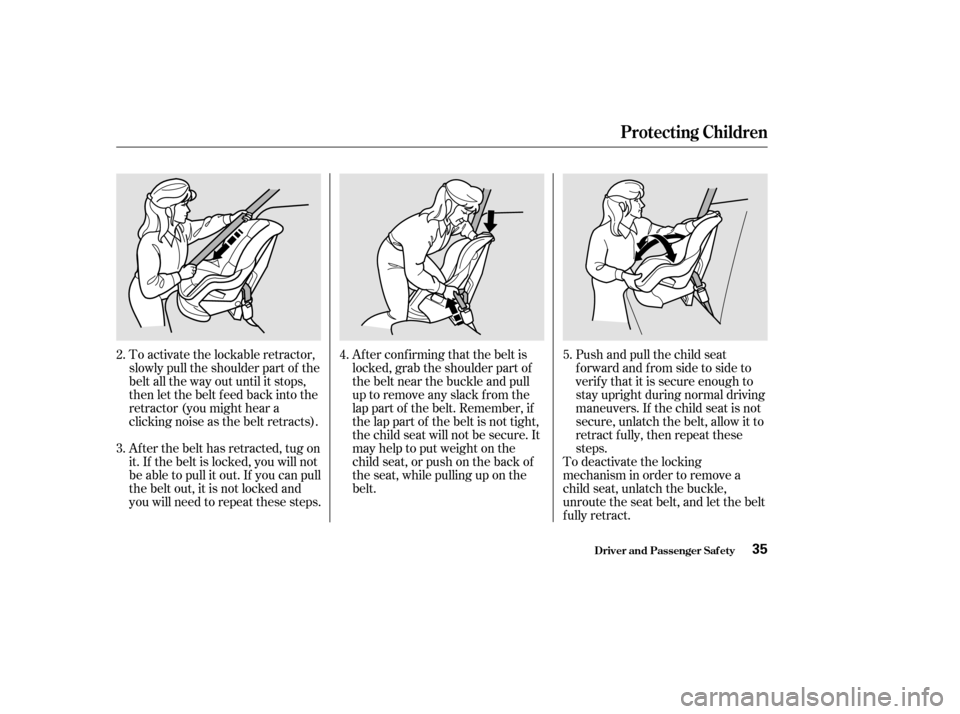
To activate the lockable retractor,
slowly pull the shoulder part of the
belt all the way out until it stops,
then let the belt f eed back into the
retractor (you might hear a
clicking noise as the belt retracts).
Af ter the belt has retracted, tug on
it. If the belt is locked, you will not
be able to pull it out. If you can pull
the belt out, it is not locked and
you will need to repeat these steps.Af ter conf irming that the belt is
locked, grab the shoulder part of
the belt near the buckle and pull
up to remove any slack from the
lap part of the belt. Remember, if
the lap part of the belt is not tight,
the child seat will not be secure. It
mayhelptoputweightonthe
child seat, or push on the back of
the seat, while pulling up on the
belt.
Push and pull the child seat
f orward and f rom side to side to
verif y that it is secure enough to
stay upright during normal driving
maneuvers. If the child seat is not
secure, unlatch the belt, allow it to
retract f ully, then repeat these
steps.
To deactivate the locking
mechanism in order to remove a
child seat, unlatch the buckle,
unroute the seat belt, and let the belt
fully retract.
2. 3.
4.
5.
Protecting Children
Driver and Passenger Saf ety35
Page 19 of 158

If the indicator remains lit after
you have f ully released the
parking brake while the engine is
running, or if it comes on while
driving, it can indicate a problem
in the brake system. For complete
inf ormation, see page .
This indicator comes on when you
turn the ignition switch ON (II). It
is a reminder to check the parking
brake. Driving with the parking
brake not f ully released can
damage the brakes and tires.
This light has two f unctions:
This indicator lights when you turn
the ignition switch ON (II). If it
comes on at any other time, it
indicates a potential problem with
your f ront airbags. This light will
also alert you to a potential problem
with your side airbags or passenger’s
side airbag automatic cutoff system.
For complete inf ormation, see page
.
This indicator lights when you turn
the ignition switch ON (II). If it
comes on at any other time, it
indicates that the passenger’s side
airbag has automatically shut off.
For complete inf ormation, see page . This light normally comes on f or a
f ew seconds when you turn the
ignition switch ON (II), and when
the ignition switch is turned to
START (III). If this light comes on at
any other time, there is a problem in
theABS.If thishappens,takethe
cartoyourdealertohaveitchecked.
With the light on, your car still has
normal braking ability but no anti-
lock. For complete inf ormation, see
page .
47
1. 2.
48
329 221
Only on models equipped with ABS (see
page )
Only on models equipped with side airbags 220
Indicator L ights
Inst rument s and Cont rols
Supplemental Restraint
System Indicator
Parking Brake and Brake System
Indicator
Side A irbag Cut-of f
IndicatorAnti-lock Brake System (ABS)
Indicator
57
U.S. Canada
U.S. Canada
Page 21 of 158

This indicator comes on f or a f ew
seconds when you turn the ignition
switch ON (II). It will then go of f if
you have inserted a properly-coded
ignition key. If it is not a properly-
coded key, the indicator will blink
and the engine will not start (see
page ).
This indicator also blinks several
times when you turn the ignition
switch f rom ON (II) to ACCESSORY
(I) or LOCK (0).
This light comes on when the
washer f luid level is low. Add washer
f luid when you see this light come on
(see page ).
This indicator lights when you turn
the ignition switch to ON (II) with
the headlight switch of f and the
parking brake set. It should go of f if
youturnontheheadlightsorrelease
the parking brake. If it comes on at
any other time, it means there is a
problem with the DRL. There may
also be a problem with the high
beam headlights.
This light comes on with the high
beam headlights. See page for
inf ormation on the headlight
controls.
On Canadian models, this indicator
comes on with reduced brightness
when the Daytime Running Lights
(DRL) are on (see page ). This lights when you set the cruise
control. See page f or inf ormation
on operating the cruise control.
This light comes on as a reminder
that you must ref uel soon.
64
65 185
71
262
Canadian models only
Only on models equipped with Cruise
Control System
Canadian models only
Indicator L ights
Inst rument s and Cont rols
Immobilizer System
Indicator
Washer Level Indicator
‘‘Daytime Running
Lights’’ Indicator
High Beam Indicator
Cruise Control Indicator
Low Fuel Indicator
59
Page 23 of 158

To open the trunk, push the Trunk
Release button f or approximately
one second.
The trunk will not open if the key is
in the ignition switch.Panic mode allows you to remotely
activate your car’s security system to
attract attention. When activated, the
horn will sound, and the exterior
lights will f lash, f or about 30 seconds.
To activate panic mode, press and
hold the PANIC button for about two
seconds.
To cancel Panic mode bef ore 30
seconds, press any button on the
remote transmitter. You can also
turn the ignition switch to ON (II).
The ceiling light (if the ceiling light
switch is in the center position) will
come on when you press the
UNLOCK button. If you do not open
any door, the light stays on f or about
10 seconds, then f ades out. If you
relock the doors with the remote
transmitter before 10 seconds have
elapsed, the light will go of f
immediately.
You cannot lock the doors with the
remote transmitter if any door is not
f ully closed or the key is in the
ignition switch.
If you unlock the doors with the
remote transmitter, but do not open
any of the doors within 20 seconds,
the doors automatically relock and
the security system sets.Panic Mode
Keys and Locks
Inst rument s and Cont rols76
Page 24 of 158
�´
When the remote transmitter’s
battery begins to get weak, it may
take several pushes on the button to
lock or unlock the doors, and the
LED will not light. Replace the
battery as soon as possible.
Battery type: CR2025
Remove the old battery and note the
polarity. Make sure the polarity of
the new battery is the same ( side
f acing up), then insert it in the
transmitter.
To replace the battery, pry the two
parts of the transmitter apart.
CONT INUED
Replacing the Battery
Keys and Locks
Inst rument s and Cont rols77
BBAATTTTEERRYY