Page 99 of 158

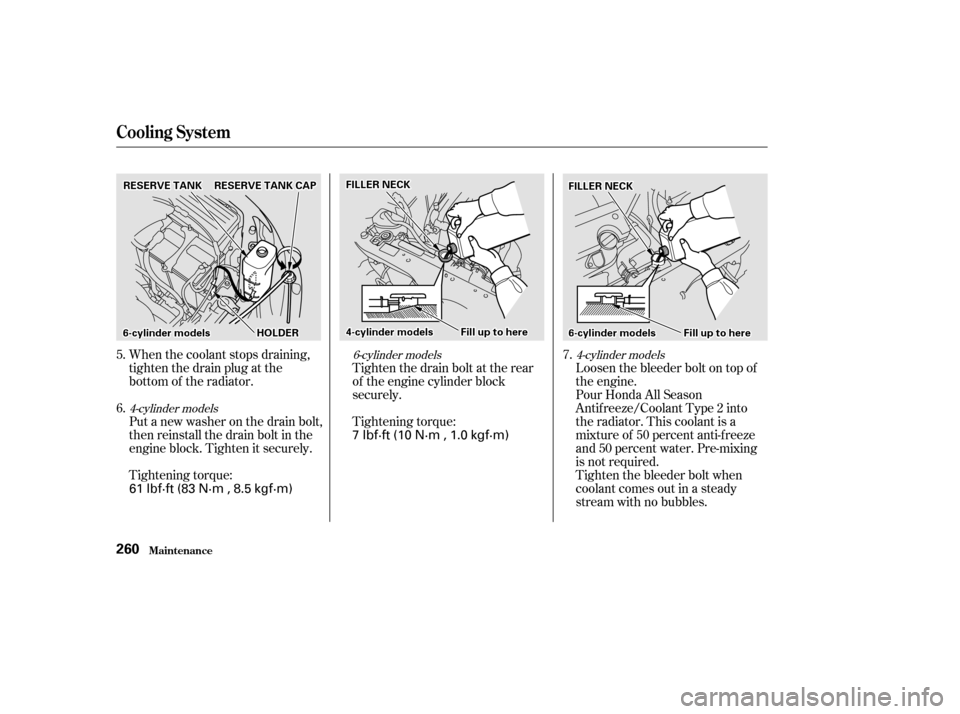
When the coolant stops draining,
tightenthedrainplugatthe
bottom of the radiator.
Put a new washer on the drain bolt,
then reinstall the drain bolt in the
engine block. Tighten it securely.
Tightening torque:Tighten the drain bolt at the rear
of the engine cylinder block
securely.
Tightening torque:
Loosen the bleeder bolt on top of
the engine.
Pour Honda All Season
Antif reeze/Coolant Type 2 into
the radiator. This coolant is a
mixture of 50 percent anti-f reeze
and 50 percent water. Pre-mixing
is not required.
Tighten the bleeder bolt when
coolant comes out in a steady
stream with no bubbles.
7.
6.
5.
4-cylinder models 6-cylinder models 4-cylinder models
Cooling Syst em
Maint enance260
FFIILLLLEERRNNEECCKK
44--ccyylliinnddeerrmmooddeellssFFiilllluuppttoohheerree
FFIILLLLEERRNNEECCKK
66--ccyylliinnddeerrmmooddeellssFFiilllluuppttoohheerree
RREESSEERRVVEETTAANNKKCCAAPPRREESSEERRVVEETTAANNKK
66--ccyylliinnddeerrmmooddeellssHHOOLLDDEERR
61 lbf·ft (83 N·m , 8.5 kgf·m)
7 lbf·ft (10 N·m , 1.0 kgf·m)
Page 105 of 158
The spark plugs in your car should
be replaced according to the time
and distance recommendations in
the maintenance schedule.Loosen the two holding clips by
turning the heads one-quarter turn
counterclockwise with a f lat-tipped
screwdriver. Remove the cover on
the f ront cylinder bank by pulling
it straight up. Disconnect the wire connector
f rom the ignition coil by pushing
on the lock tab and pulling on the
connector. Pull on the plastic
connector, not the wires.
Remove the spark plug with
a f ive-eighths inch (16 mm) spark
plug socket.
Use a wrench to remove the
hexagonsocketheadcapbolt
holding the ignition coil. Remove
the ignition coil by pulling it
straight out.
Clean up any dirt and oil that have
collected around the ignition coils.
1. 2. 3.
4. 5.
Replacement
Spark Plugs (6-cylinder Models)
Maint enance274
HHOOLLDDIINNGGCCLLIIPP
HHEEXXAAGGOONNSSOOCCKKEETTHHEEAADDCCAAPPBBOOLLTT
Page 106 of 158

�´ �µ
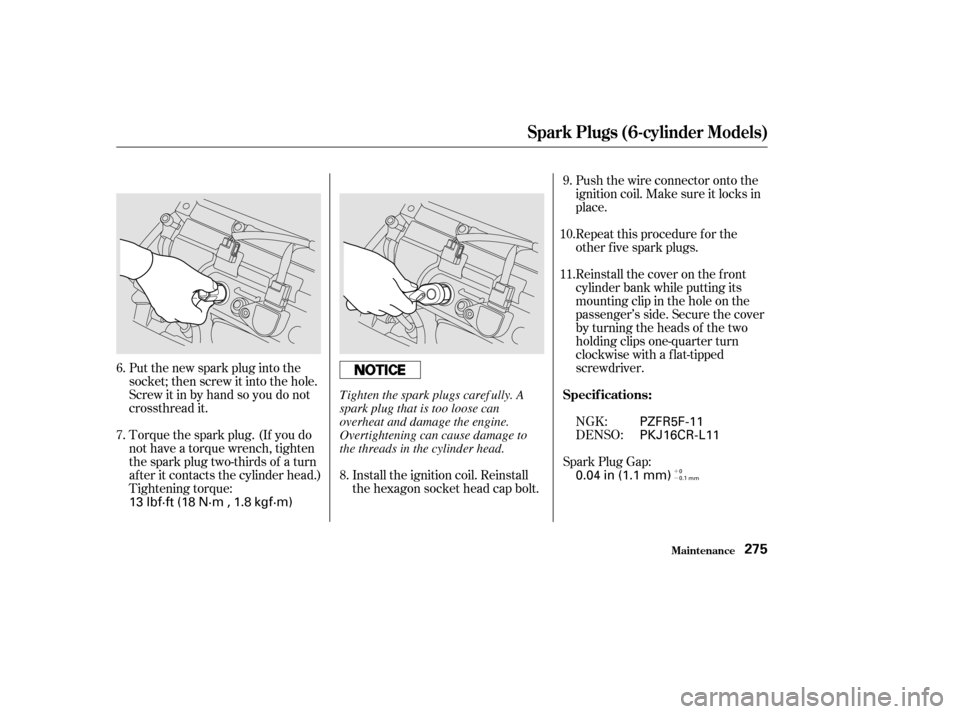
Torque the spark plug. (If you do
not have a torque wrench, tighten
the spark plug two-thirds of a turn
af ter it contacts the cylinder head.)
Tightening torque:
Put the new spark plug into the
socket; then screw it into the hole.
Screw it in by hand so you do not
crossthread it.
Install the ignition coil. Reinstall
the hexagon socket head cap bolt.Push the wire connector onto the
ignition coil. Make sure it locks in
place.
Spark Plug Gap: Reinstall the cover on the front
cylinder bank while putting its
mounting clip in the hole on the
passenger’s side. Secure the cover
by turning the heads of the two
holding clips one-quarter turn
clockwise with a f lat-tipped
screwdriver.
Repeat this procedure f or the
other f ive spark plugs.
NGK:
DENSO:
6. 7.
8.9.
10. 11.
Specif ications:
Spark Plugs (6-cylinder Models)
Maint enance275
13 lbf·ft (18 N·m , 1.8 kgf·m) 0.04 in (1.1 mm)PKJ16CR-L11
PZFR5F-11
0
0.1 mm
Tighten the spark plugs caref ully. A
spark plug that is too loose can
overheat and damage the engine.
Overtightening can cause damage to
the threads in the cylinder head.
Page 109 of 158
Remove the blade f rom its holder
by grasping the tabbed end of the
blade. Pull f irmly until the tabs
come out of the holder.Examine the new wiper blades. If
they have no plastic or metal rein-
f orcement along the back edge,
remove the metal reinf orcement
strips f rom the old wiper blade and
install them in the slots along the
edge of the new blade.Slide the new wiper blade into the
holder until the tabs lock.
Lower the wiper arm down against
the windshield.
Slide the wiper blade assembly
onto the wiper arm. Make sure it
locks in place.
Lower the passenger’s side f irst,
then the driver’s side.
3. 4. 5. 6.
7.
Wiper Blades
Maint enance280
RREEIINNFFOORRCCEEMMEENNTT
BBLLAADDEEBBLLAADDEE
Page 112 of 158

Testthelightstomakesurethe
new bulb is working.
Insert the socket back into the
headlight assembly. Turn it
clockwise to lock it in place.
Install the new bulb in the socket.
Turn it clockwise to lock it in place.
Remove the burned out bulb f rom
thesocketbypushingitinand
turning the bulb counterclockwise
until it unlocks.
Remove the socket from the
headlight assembly by turning it
one-quarter turn counterclockwise.
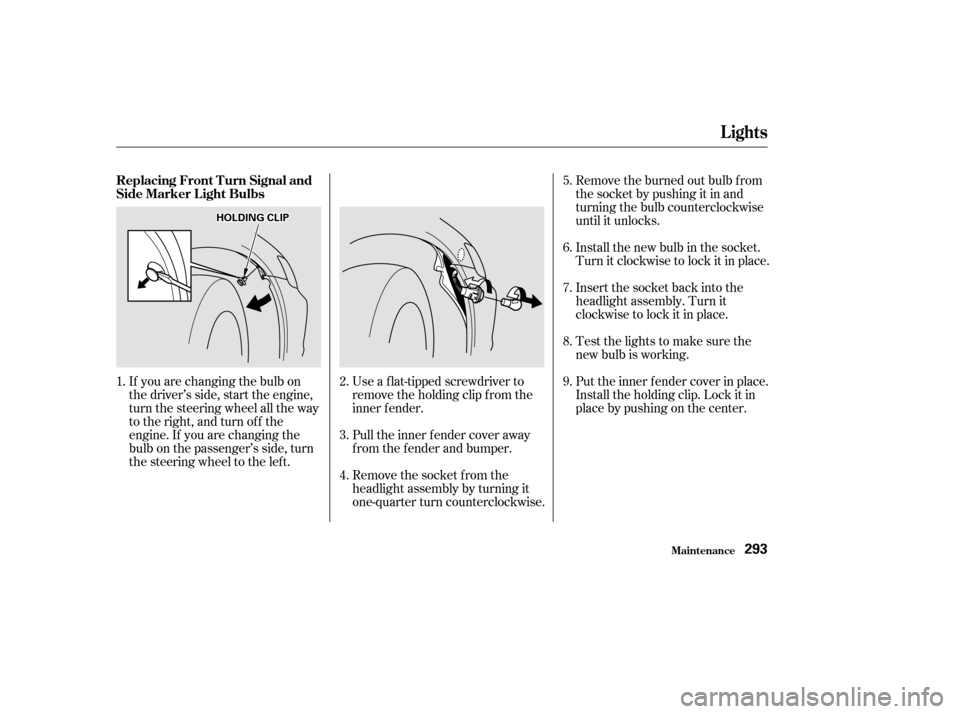
If you are changing the bulb on
the driver’s side, start the engine,
turn the steering wheel all the way
to the right, and turn off the
engine. If you are changing the
bulb on the passenger’s side, turn
the steering wheel to the left.
Use a f lat-tipped screwdriver to
remove the holding clip f rom the
inner f ender.
Pull the inner f ender cover away
f rom the f ender and bumper.
Put the inner f ender cover in place.
Install the holding clip. Lock it in
place by pushing on the center.
1.
3.
2. 4. 5. 6. 7. 8. 9.
Replacing Front Turn Signal and
Side Marker L ight Bulbs
Lights
Maint enance293
HHOOLLDDIINNGGCCLLIIPP
Page 113 of 158
The parking light bulb is under the
headlight bulb.
Turn the bulb holder one-quarter
turn counterclockwise to remove it
from the lens.
Pull the bulb straight out of its
socket.
Push the new bulb straight into
the socket until it bottoms.Put the bulb holder back into its
hole in the lens, and turn it
clockwise until it locks.
Turn on the parking lights to
make sure the new bulb works.
1. 3.
2. 4.
Replacing a Parking L ight Bulb
Lights
Maint enance294
Page 114 of 158
Open the trunk.Put the f astener in the hole on the
side of the trunk lining and push
on the center until it locks (the
center is f lush with the head).
Reinstall the trunk lining. Make
sure it is installed under the edge
of the trunk seal.
Testthelightstomakesurethe
new bulb is working.
Reinstall the socket into the light
assembly by turning it clockwise
until it locks.
Push the new bulb straight into
the socket until it bottoms.
Pull the bulb straight out of its
socket.
Determine which of the two bulbs
is burned out: stop/taillight or turn
signal.
Remove the socket by turning it
one-quarter turn counterclockwise.
Remove the fastener from the side
of the trunk lining by turning it
counterclockwise with a coin. Pull
the lining back.
1.
3.
2. 4. 5. 6. 7. 8.
Replacing Rear Bulbs
(in Fenders)
Lights
Maint enance295
FFAASSTTEENNEERR
Page 115 of 158
Open the trunk.Install the new bulb in the socket.
Reinstall the socket into the light
assembly.
Testthelightstomakesurethe
new bulb is working.
Remove the socket by turning it
one-quarter turn counterclockwise.
Remove the burned out bulb f rom
the socket by pulling it straight out
of its socket.
Determine which of the two bulbs
is burned out: taillight or back-up
light.
1. 2.
3. 4.5. 6. 7.
Replacing Rear Bulbs
(in T runk L id)
Lights
Maint enance296