2002 FORD EXPEDITION tow
[x] Cancel search: towPage 195 of 280
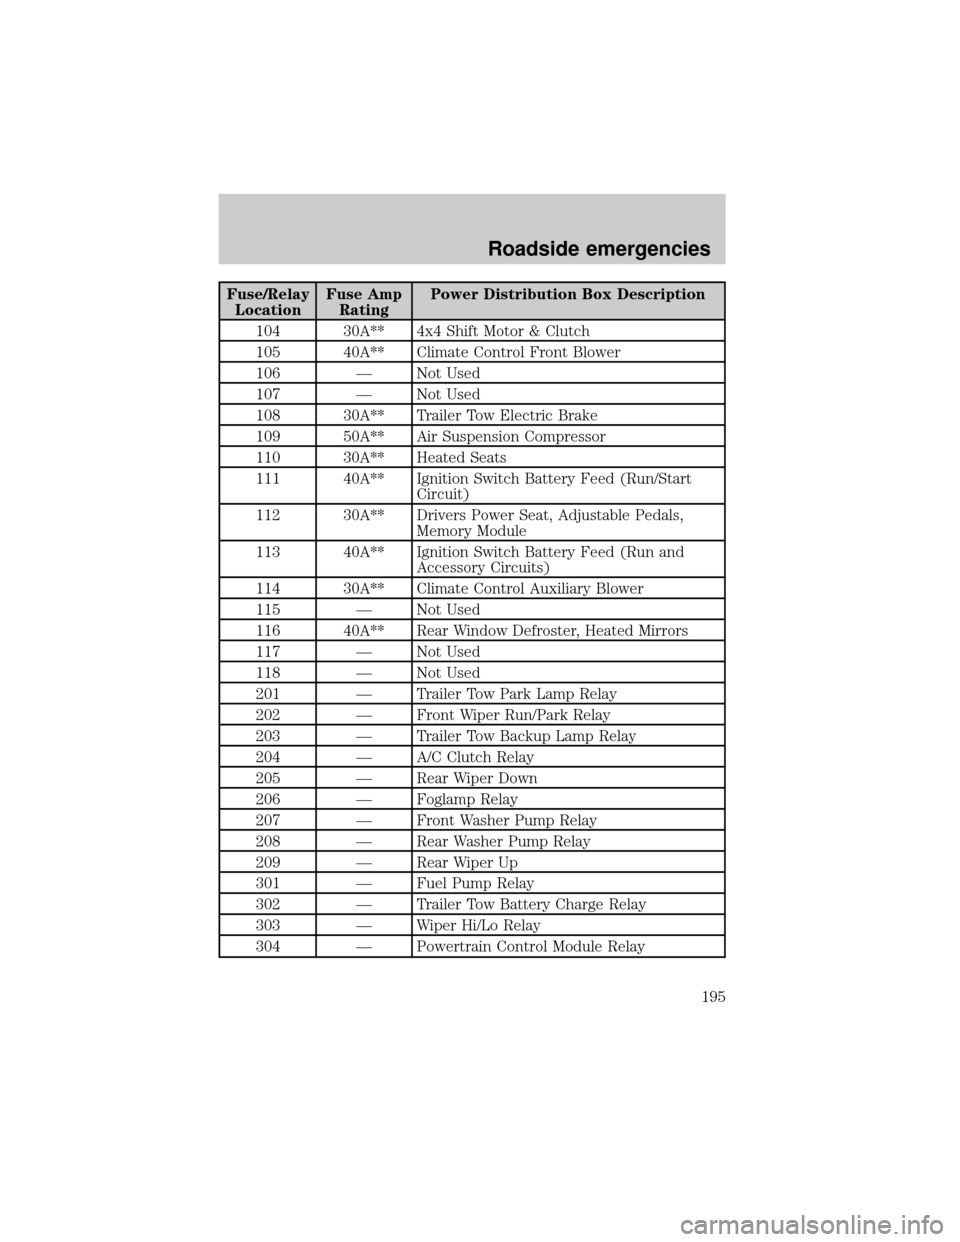
Fuse/Relay
LocationFuse Amp
RatingPower Distribution Box Description
104 30A** 4x4 Shift Motor & Clutch
105 40A** Climate Control Front Blower
106 Ð Not Used
107 Ð Not Used
108 30A** Trailer Tow Electric Brake
109 50A** Air Suspension Compressor
110 30A** Heated Seats
111 40A** Ignition Switch Battery Feed (Run/Start
Circuit)
112 30A** Drivers Power Seat, Adjustable Pedals,
Memory Module
113 40A** Ignition Switch Battery Feed (Run and
Accessory Circuits)
114 30A** Climate Control Auxiliary Blower
115 Ð Not Used
116 40A** Rear Window Defroster, Heated Mirrors
117 Ð Not Used
118 Ð Not Used
201 Ð Trailer Tow Park Lamp Relay
202 Ð Front Wiper Run/Park Relay
203 Ð Trailer Tow Backup Lamp Relay
204 Ð A/C Clutch Relay
205 Ð Rear Wiper Down
206 Ð Foglamp Relay
207 Ð Front Washer Pump Relay
208 Ð Rear Washer Pump Relay
209 Ð Rear Wiper Up
301 Ð Fuel Pump Relay
302 Ð Trailer Tow Battery Charge Relay
303 Ð Wiper Hi/Lo Relay
304 Ð Powertrain Control Module Relay
Roadside emergencies
195
Page 196 of 280
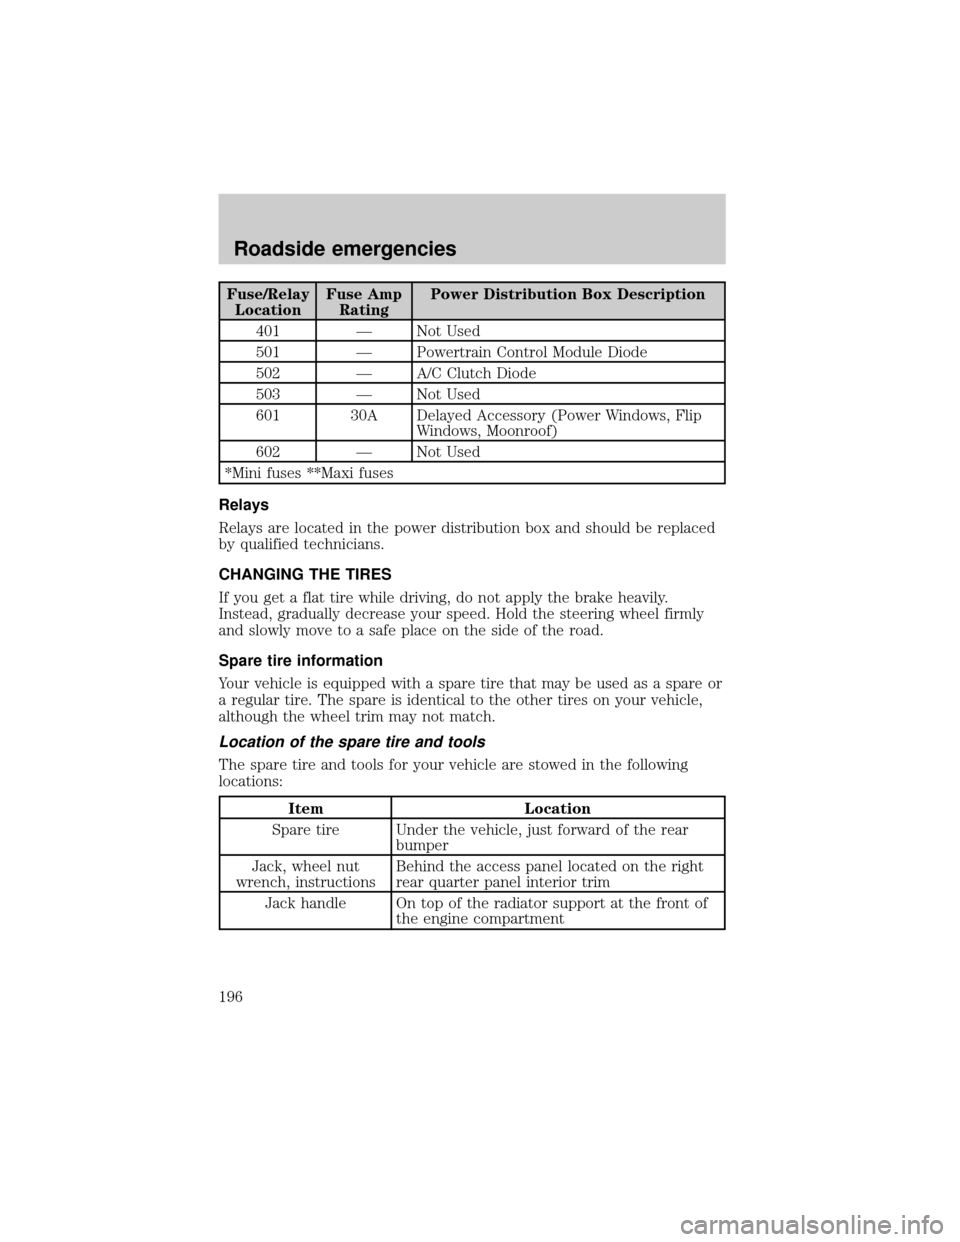
Fuse/Relay
LocationFuse Amp
RatingPower Distribution Box Description
401 Ð Not Used
501 Ð Powertrain Control Module Diode
502 Ð A/C Clutch Diode
503 Ð Not Used
601 30A Delayed Accessory (Power Windows, Flip
Windows, Moonroof)
602 Ð Not Used
*Mini fuses **Maxi fuses
Relays
Relays are located in the power distribution box and should be replaced
by qualified technicians.
CHANGING THE TIRES
If you get a flat tire while driving, do not apply the brake heavily.
Instead, gradually decrease your speed. Hold the steering wheel firmly
and slowly move to a safe place on the side of the road.
Spare tire information
Your vehicle is equipped with a spare tire that may be used as a spare or
a regular tire. The spare is identical to the other tires on your vehicle,
although the wheel trim may not match.
Location of the spare tire and tools
The spare tire and tools for your vehicle are stowed in the following
locations:
Item Location
Spare tire Under the vehicle, just forward of the rear
bumper
Jack, wheel nut
wrench, instructionsBehind the access panel located on the right
rear quarter panel interior trim
Jack handle On top of the radiator support at the front of
the engine compartment
Roadside emergencies
196
Page 197 of 280
Removing the jack handle
1. Open the hood.
2. Unsnap the end of the handle that is retained by the clip on the top of
the windshield washer bottle.
3. Unsnap the shaft of the handle from the two retaining clips attached
to the top of the radiator shroud.
Removing the jack and tools
1. Locate the access panel on the right rear quarter panel interior trim.
Lift the two panel retaining clips and remove the panel.
2. Unsnap the wheel lug nut wrench and instructions from their retaining
bracket.
3. Remove the jack by turning the thumbwheel counterclockwise to
relieve tension against the stowage bracket.
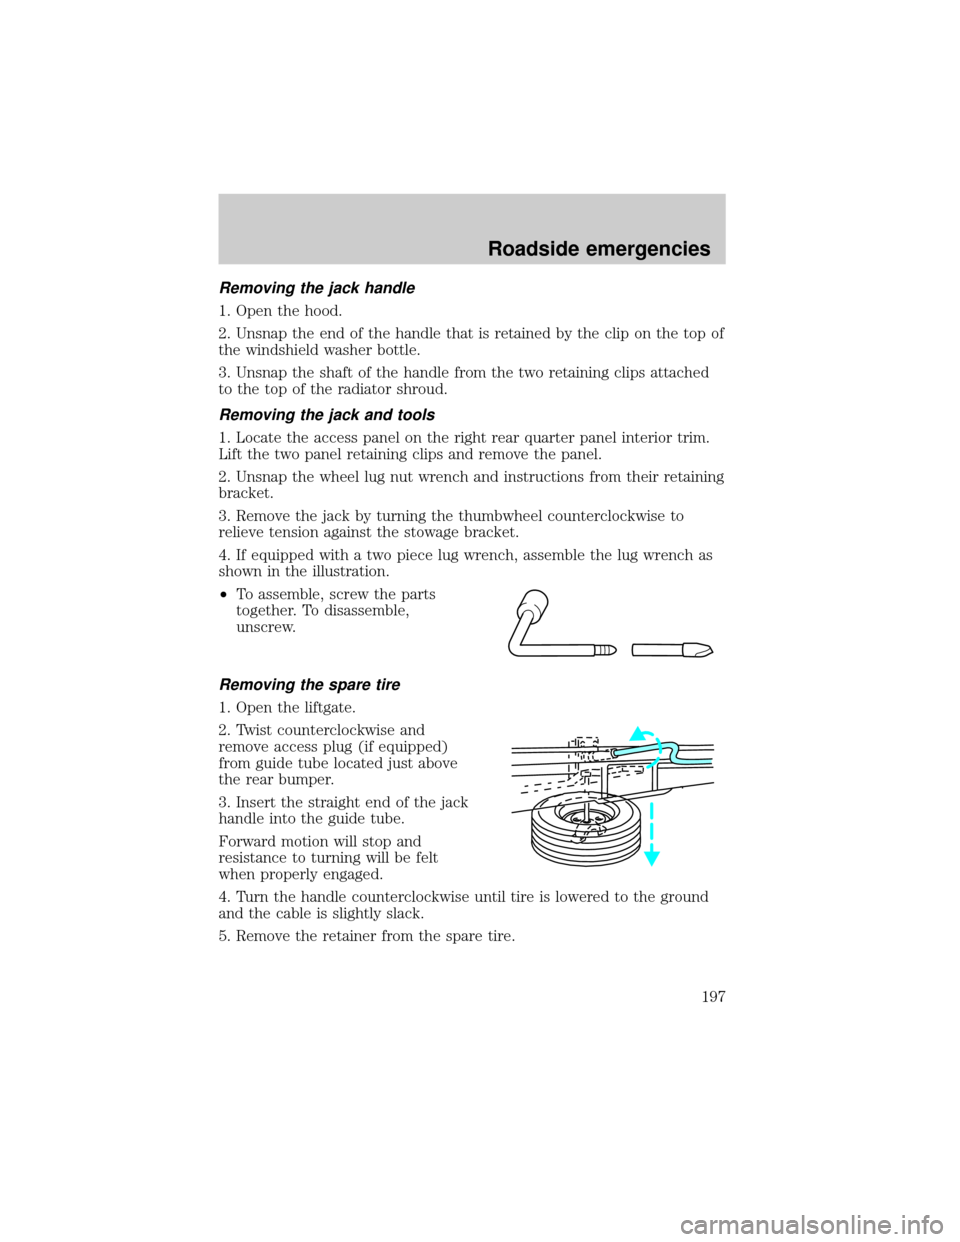
4. If equipped with a two piece lug wrench, assemble the lug wrench as
shown in the illustration.
²To assemble, screw the parts
together. To disassemble,
unscrew.
Removing the spare tire
1. Open the liftgate.
2. Twist counterclockwise and
remove access plug (if equipped)
from guide tube located just above
the rear bumper.
3. Insert the straight end of the jack
handle into the guide tube.
Forward motion will stop and
resistance to turning will be felt
when properly engaged.
4. Turn the handle counterclockwise until tire is lowered to the ground
and the cable is slightly slack.
5. Remove the retainer from the spare tire.
Roadside emergencies
197
Page 198 of 280
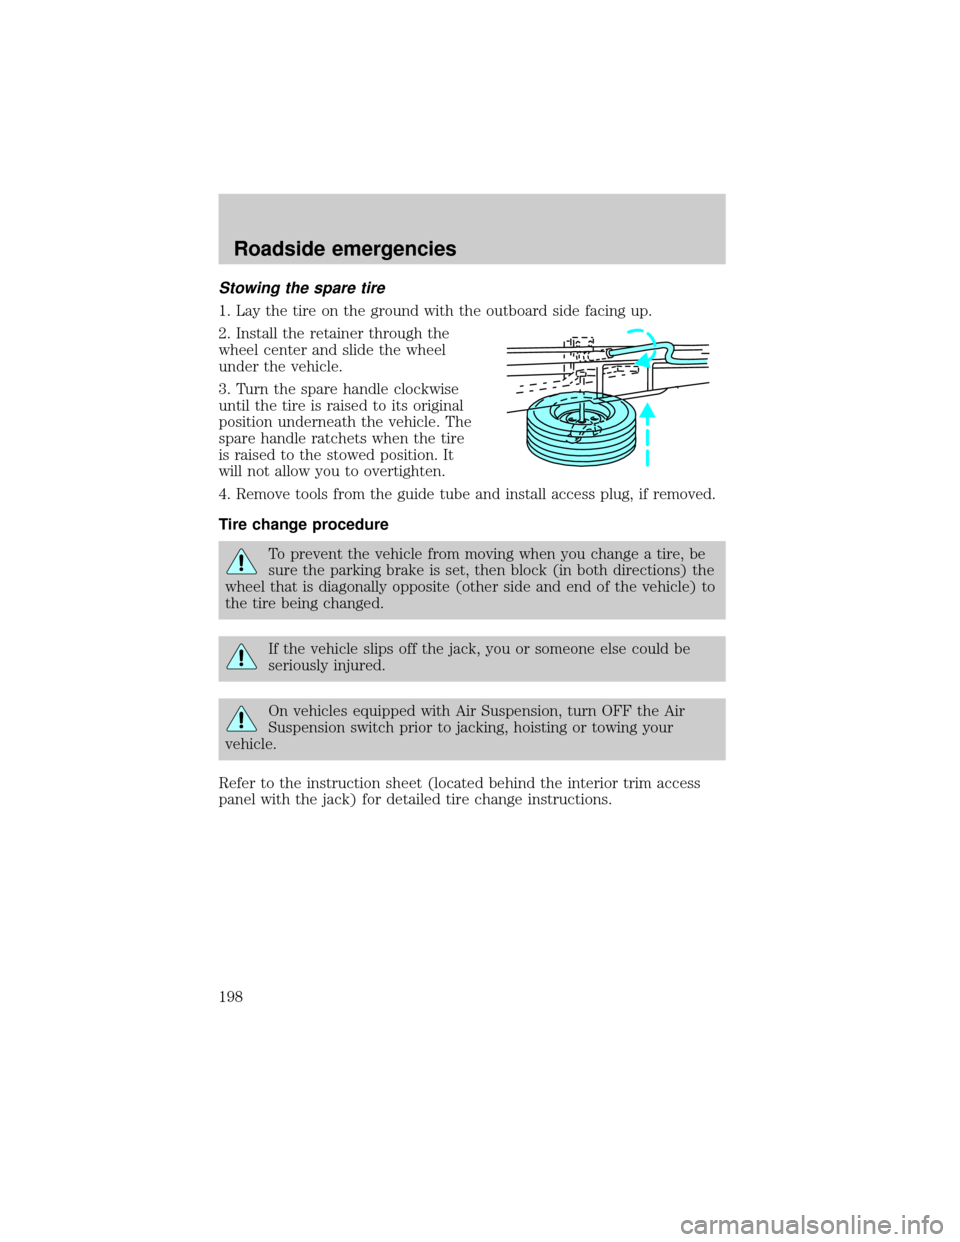
Stowing the spare tire
1. Lay the tire on the ground with the outboard side facing up.
2. Install the retainer through the
wheel center and slide the wheel
under the vehicle.
3. Turn the spare handle clockwise
until the tire is raised to its original
position underneath the vehicle. The
spare handle ratchets when the tire
is raised to the stowed position. It
will not allow you to overtighten.
4. Remove tools from the guide tube and install access plug, if removed.
Tire change procedure
To prevent the vehicle from moving when you change a tire, be
sure the parking brake is set, then block (in both directions) the
wheel that is diagonally opposite (other side and end of the vehicle) to
the tire being changed.
If the vehicle slips off the jack, you or someone else could be
seriously injured.
On vehicles equipped with Air Suspension, turn OFF the Air
Suspension switch prior to jacking, hoisting or towing your
vehicle.
Refer to the instruction sheet (located behind the interior trim access
panel with the jack) for detailed tire change instructions.
Roadside emergencies
198
Page 207 of 280
WRECKER TOWING
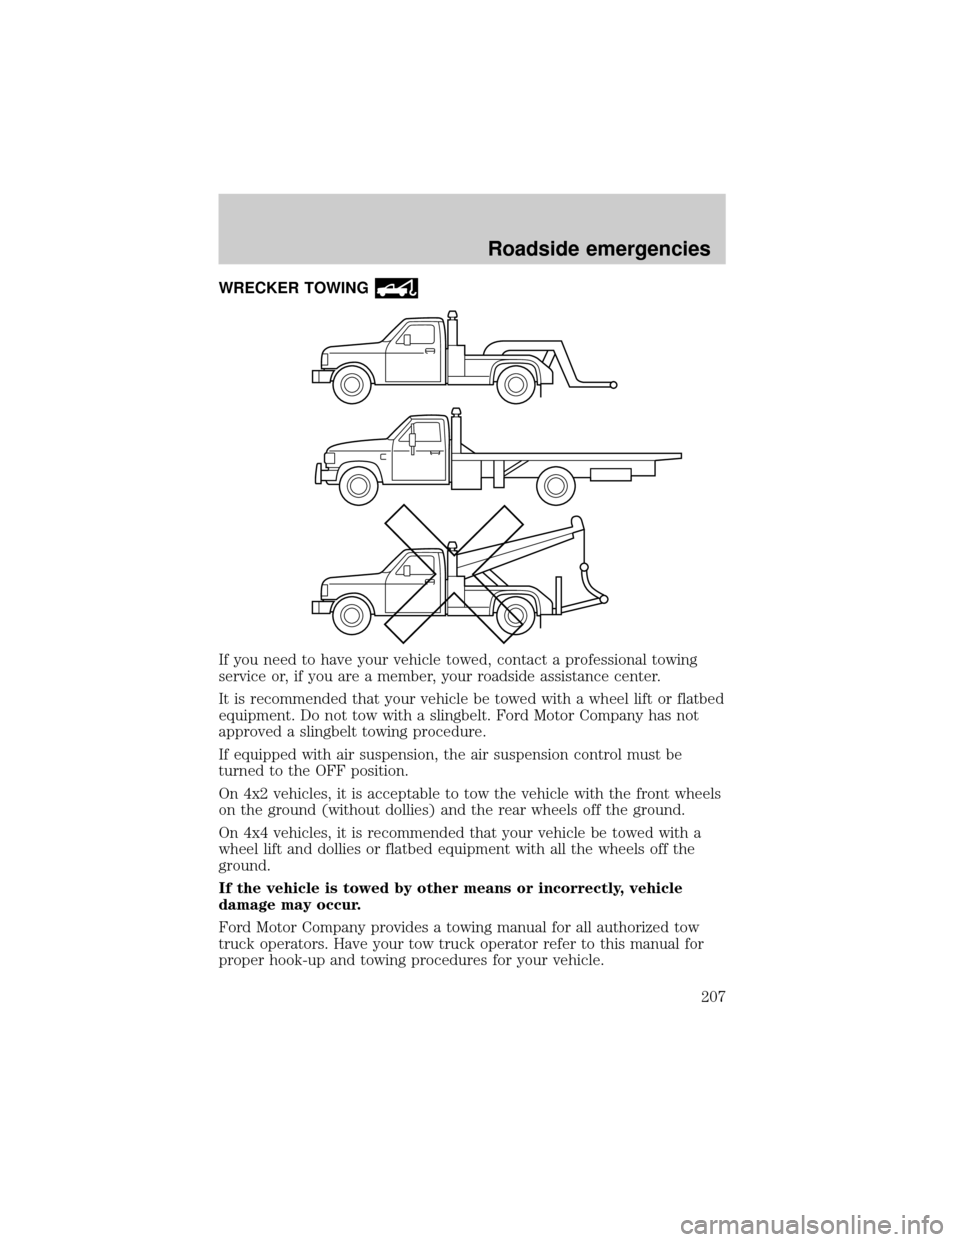
If you need to have your vehicle towed, contact a professional towing
service or, if you are a member, your roadside assistance center.
It is recommended that your vehicle be towed with a wheel lift or flatbed
equipment. Do not tow with a slingbelt. Ford Motor Company has not
approved a slingbelt towing procedure.
If equipped with air suspension, the air suspension control must be
turned to the OFF position.
On 4x2 vehicles, it is acceptable to tow the vehicle with the front wheels
on the ground (without dollies) and the rear wheels off the ground.
On 4x4 vehicles, it is recommended that your vehicle be towed with a
wheel lift and dollies or flatbed equipment with all the wheels off the
ground.
If the vehicle is towed by other means or incorrectly, vehicle
damage may occur.
Ford Motor Company provides a towing manual for all authorized tow
truck operators. Have your tow truck operator refer to this manual for
proper hook-up and towing procedures for your vehicle.
Roadside emergencies
207
Page 210 of 280
In some states (in the U.S.) you must directly notify Ford in writing
before pursuing remedies under your state's warranty laws. Ford is also
allowed a final repair attempt in some states.
In the United States, a warranty dispute must be submitted to the
Dispute Settlement Board before taking action under the Magnuson-Moss
Warranty Act, or to the extent allowed by state law, before pursuing
replacement or repurchase remedies provided by certain state laws. This
dispute handling procedure is not required prior to enforcing state
created rights or other rights which are independent of the
Magnuson-Moss Warranty Act or state replacement or repurchase laws.
FORD EXTENDED SERVICE PLAN
You can get more protection for your new car or light truck by
purchasing Ford Extended Service Plan (Ford ESP) coverage. Ford ESP
is an optional service contract which is backed by Ford Motor Company
or Ford Motor Service Company (in the U.S.) and Ford of Canada (in
Canada). It provides the following:
²Benefits during the warranty period depending on the plan you
purchase (such as: reimbursement for rentals; coverage for certain
maintenance and wear items).
²Protection against covered repair costs after your Bumper-to-Bumper
Warranty expires.
You may purchase Ford ESP from any participating Ford and Lincoln
Mercury and Ford of Canada dealer. There are several plans available in
various time, distance and deductible combinations which can be tailored
to fit your own driving needs. Ford ESP also offers reimbursement
benefits for towing and rental coverage.
When you buy Ford ESP, you receive Peace-of-Mind protection
throughout the United States and Canada, provided by a network of
more than 5,000 participating Ford or Lincoln Mercury and Ford of
Canada dealers.
If you did not take advantage of the Ford Extended Service Plan at the
time of purchasing your vehicle, you may still be eligible. Please contact
your dealer for further information. Since this information is subject to
change, please ask your dealer for complete details about Ford Extended
Service Plan coverage options, or visit the Ford ESP website at
www.ford-esp.com.
Customer assistance
210
Page 218 of 280
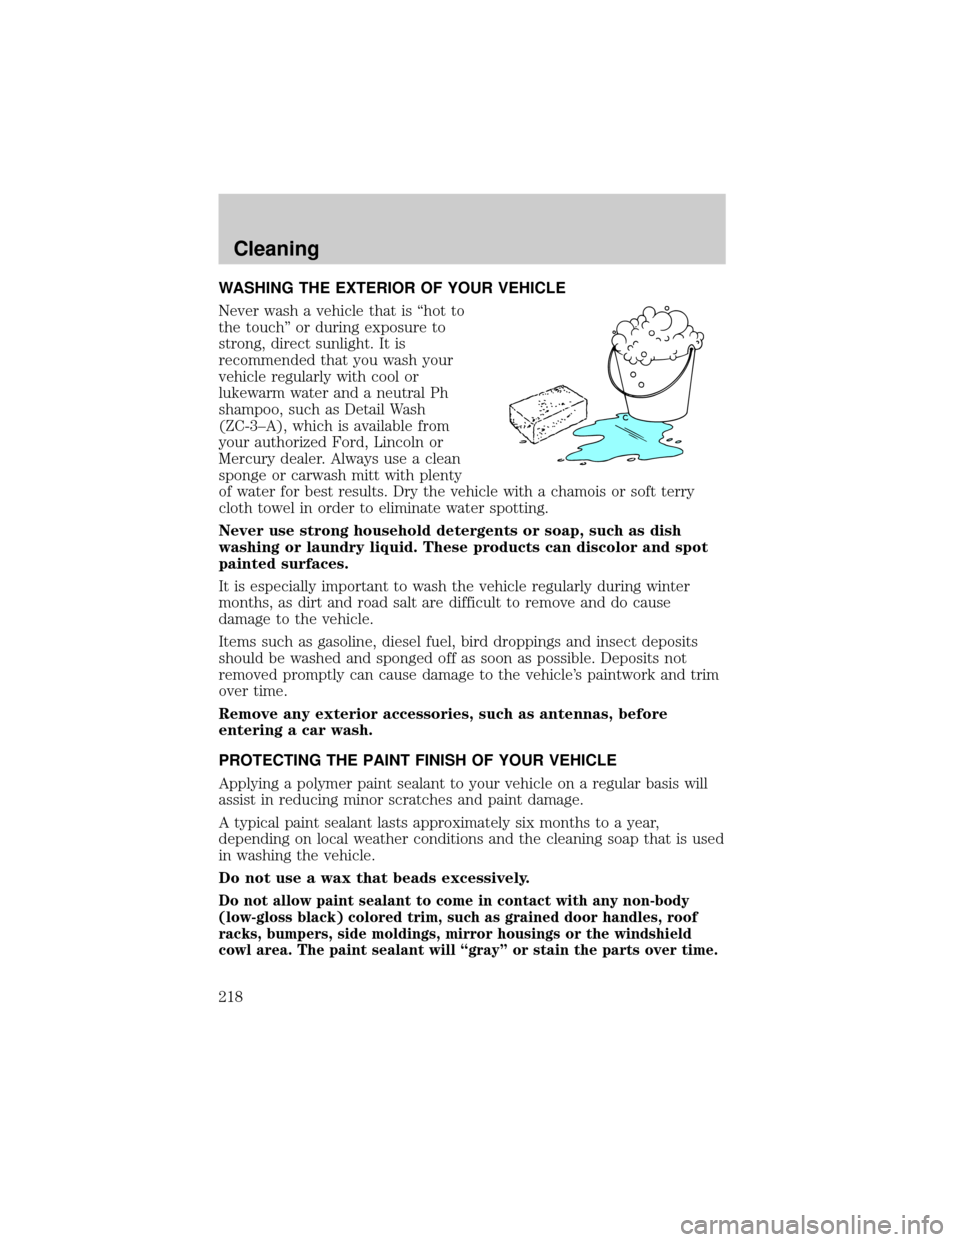
WASHING THE EXTERIOR OF YOUR VEHICLE
Never wash a vehicle that is ªhot to
the touchº or during exposure to
strong, direct sunlight. It is
recommended that you wash your
vehicle regularly with cool or
lukewarm water and a neutral Ph
shampoo, such as Detail Wash
(ZC-3±A), which is available from
your authorized Ford, Lincoln or
Mercury dealer. Always use a clean
sponge or carwash mitt with plenty
of water for best results. Dry the vehicle with a chamois or soft terry
cloth towel in order to eliminate water spotting.
Never use strong household detergents or soap, such as dish
washing or laundry liquid. These products can discolor and spot
painted surfaces.
It is especially important to wash the vehicle regularly during winter
months, as dirt and road salt are difficult to remove and do cause
damage to the vehicle.
Items such as gasoline, diesel fuel, bird droppings and insect deposits
should be washed and sponged off as soon as possible. Deposits not
removed promptly can cause damage to the vehicle's paintwork and trim
over time.
Remove any exterior accessories, such as antennas, before
entering a car wash.
PROTECTING THE PAINT FINISH OF YOUR VEHICLE
Applying a polymer paint sealant to your vehicle on a regular basis will
assist in reducing minor scratches and paint damage.
A typical paint sealant lasts approximately six months to a year,
depending on local weather conditions and the cleaning soap that is used
in washing the vehicle.
Do not use a wax that beads excessively.
Do not allow paint sealant to come in contact with any non-body
(low-gloss black) colored trim, such as grained door handles, roof
racks, bumpers, side moldings, mirror housings or the windshield
cowl area. The paint sealant will ªgrayº or stain the parts over time.
Cleaning
218
Page 221 of 280
WASHING THE EXTERIOR LAMPS
In order to avoid scratching the plastic lamps, do not use dry
paper towels, non-approved chemical solvents or abrasive
cleaners.
Use a soft cloth and a solution of Triple Clean (EOAZ-19526±AA), mixed
properly with water, in order to remove bug residue. If tar or grease
spots are present, clean with Extra Strength Tar and Road Oil Removal
(B7A-19520±AA).
CLEANING THE WINDSHIELD, WIPER BLADES AND REAR
WINDOW
If the wiper does not wipe properly, substances on the windshield, rear
window or the wiper blades may be the cause. These may include hot
wax treatments used by commercial car washes, tree sap, or other
organic contamination.
Do not clean the windshield or rear window glass with abrasives,
as they may cause scratches.
Do not use fuel, kerosene, or paint thinner to clean the
windshield, rear window or the wiper blades as damage may
occur.
Clean the outside of the windshield or rear window with a non-abrasive
cleaner such as Ultra Clear Spray Glass Cleaner (E4AZ-19C507±AA),
available from your authorized Ford, Lincoln or Mercury dealer. If after
cleaning the glass surface, the water sheets from the glass (e.g., does not
bead), then the window is clean.
The windshield, rear window and wiper blades should be cleaned
regularly. Wiper blades can be cleaned with isopropyl (rubbing) alcohol
or windshield washer solution. Be sure to replace wiper blades when
they appear worn or do not function properly.
CLEANING THE INSTRUMENT PANEL
Clean the instrument panel with a damp cloth, then dry with a dry cloth.
Avoid cleaners or polish that increase the gloss of the upper portion of
the instrument panel. The dull finish in this area helps protect the driver
from undesirable windshield reflection.
Cleaning
221